background image

8

LC-13E2U
LC-15E2U/20E2U

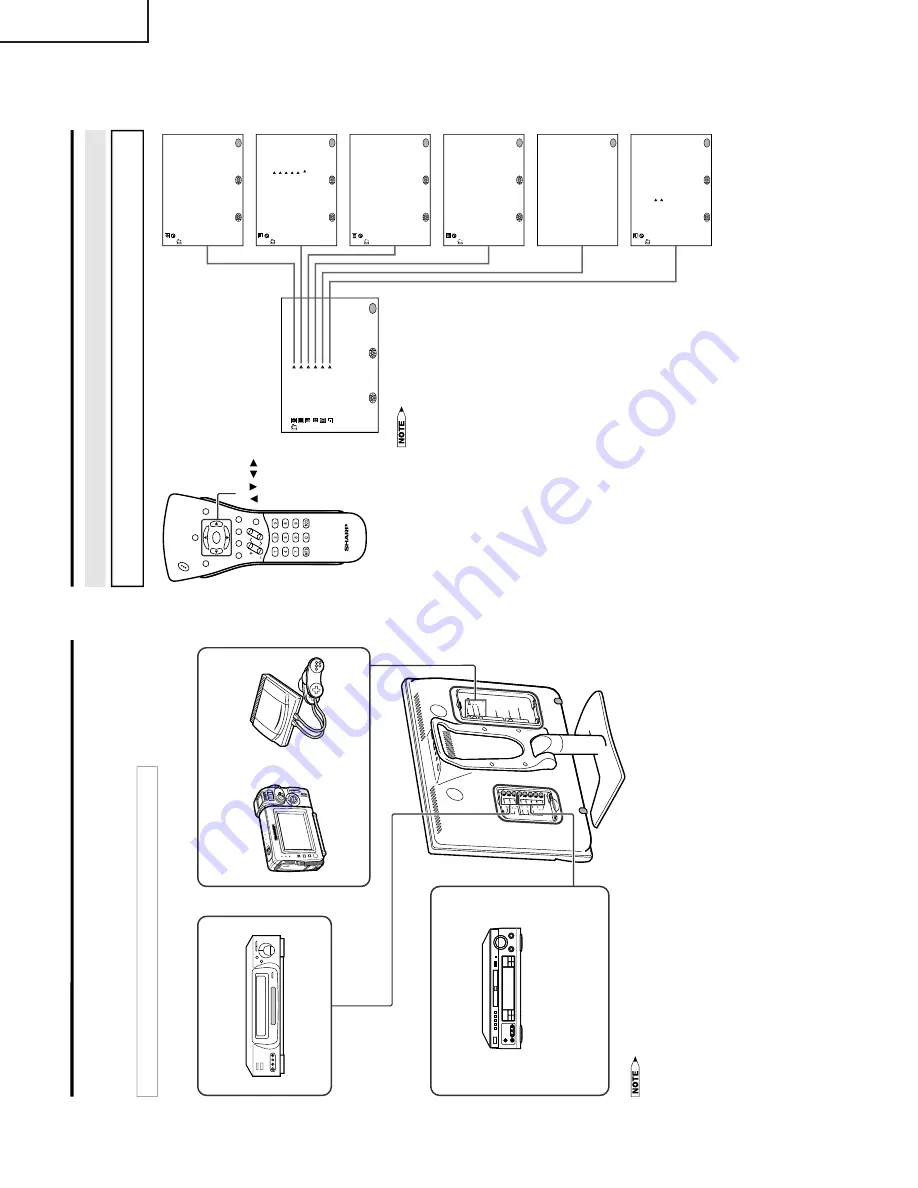
CONNECTING WITH EXTERNAL DEVICES

You can enjoy picture and sound by connecting a VCR or a home video game system to the terminals

located on the rear of the TV set.

When connecting an external device, turn off the power of the main unit first to prevent any possible

damage.

<Example>

Video camera

Home video game system

External devices that can be connected

to COMPONENT terminal

PC connection is not possible.

For the cable, use a commercially available audio/video cable.

Only connect audio/video signals to AV-IN1 and 2 terminals. Connecting other signals may result in a malfunction.

AV-IN1 has 2 video input terminals: VIDEO and S-VIDEO. When you connect external devices to both terminals

(and if you select AV-IN1), you can only view pictures from the S-VIDEO terminal. To view the picture from the

VIDEO terminal, do not connect any external device to the S-VIDEO terminal.

For more information about external device connections, see the manuals of your external devices.

Y

P

B

C

O

M

P

O

N

E

N

T

P

R

L

L

R

A

V

-I

N

 2

/O

U

T

V

ID

E

O

A

U

D

IO

R

A

U

D

IO

A

V

-I

N

 1

L

R

A

U

D

IO

S

-V

ID

E

O

A

N

T

.

V

ID

E

O

P

O

WE

R

IN

P

U

T

D

C

1

3

V

H

E

A

D

P

H

O

N

E

Example of external devices that can be connected

External devices that can be connected

to AV-IN2 terminal

*

If your external device has a component

terminal, COMPONENT connection is

recommended (you can view high-quality

pictures).

<Example>

DVD Player, etc.

<Example>

VCR

Laser disc player

*

If your external device has an S-Video terminal,

S-VIDEO connection is recommended.

External devices that can be connected

to AV-IN1 terminal

M

EN

U

SL

E

EP

 T

IM

ER

V

IDEO

 A

D

JU

S

T

PR

E

S

E

T

C

LO

S

ED

 CA

P

T

IO

N

V

–CH

IP

 BLO

CK

SE

T U

P

SE

L

EC

T

:

EN

T

ER

:

EXIT

:

MENU

SL

E

EP

 T

IM

ER

SE

L

EC

T

:

AD

JU

S

T

:

EXIT

:

MENU

RE

TU

R

N

SL

E

EP

 T

IM

ER

 [

– 

R

EM

AI

N

]

P

IC

TU

R

E

[

   3

0

]

TI

N

T

CO

LO

R

BL

AC

K L

E

V

E

L

SHARP

N

E

S

S

SE

L

EC

T

:

EN

T

ER

:

EXIT

:

MENU

V

IDEO

 A

D

JU

S

T

(T

V

)

RE

TU

R

N

[    

0

]

[    

0

]

[    

0

]

[    

0

]

BR

IG

H

TNE

S

S

[B

R

IG

H

T

]

AU

TO

 P

OW

ER

 O

F

F

PIC

TU

R

E   

F

L

IP

A

V

2 IN/

O

U

T

SE

L

EC

T

:

EXIT

:

MENU

RE

TU

R

N

[O

F

F   ]

[N

OR

M

AL

]

[

IN

    ]

PR

E

S

E

T

AD

JU

S

T

:

CC

/T

EX

T

[O

F

F

]

SE

L

EC

T

:

EXIT

:

MENU

RE

TU

R

N

AD

JU

S

T

:

C

LO

S

ED

 CA

P

T

IO

N

IN

PUT

 S

E

C

R

E

N

O

.

– – – –

EXIT

:

MENU

BLU

E S

CRE

EN

[O

F

F

]

LA

N

G

U

AGE

SE

L

EC

T

:

EXIT

:

MENU

RE

TU

R

N

AD

JU

S

T

:

SE

T U

P

CH

–S

E

T

T

IN

G

CO

LO

R S

Y

S

T

EM

R

ESE

T

[ N358

]

SELECTING MENU ITEMS

This LCD 

TV set allo

ws y

ou to adjust the v

ar

ious settings using the men

u screen.

 Select the desired

men

u item b

y

 f

ollo

wing the steps below and then ref

er to the indicated page f

or details

.

1

Press 

MENU

 to display the MENU

screen.

2

Press 

'

/

"

 to select the desired

menu item.

3

Press 

\

/

|

 to enter.

4

Press 

MENU

 to exit.

The TINT display only appears when

the color system is set to N358 or

N443.

The displayed items differ depending

on the setting conditions.

The selected item changes to yellow.

Items in magenta cannot be se-

lected.

TV mode

This product is factory set to comply

with the color system in the United

States (NTSC-N358). For Brazil

(PAL-M), Argentina (PAL-N) and

Uruguay (PAL-N), set the color

system before using this product.

To return to the previous screen,

select RETURN.

You can adjust some settings with

the special buttons: SLEEP,

BRIGHT, PIC. FLIP and CC 

Ë

 LC-13E2U/LC-15E2U

COLOR SYSTEM

When you set COLOR SYSTEM to

AUTO, the AUTO mode

automatically detects the receiving

signal system and adjusts the

reception system of the TV set.

When the picture or sound is not

stable, set a specific COLOR

SYSTEM (not AUTO). The picture

and sound may be improved.

Selecting Menu Items

CH

VOL

P

O

W

E

R

MENU

DISPLAY

MUTE

SLEEP

PIC. FLIP

BRIGHT

C

C

TV/VIDEO

FLASHBACK

* The screen indications shown above are larger than actual for easy reading.

MENU/

/

/

/

Summary of Contents for LC-13E2U

Page 1: ... EACHSECTION 12 REPLACEMENT PARTS LIST 13 PACKING OF THE SET 19 Page LCD COLOR TELEVISION OUTLINE The above models are based on the LC 13E1U UB UW LC 15E1U UB UW and LC 20E1U UB UW Their desktop stand has been redesigned This Service Manual covers the modifications only For other technical data refer to the Service Manuals for LC 13E1U UB UW and LC 15E1U UB UW S72N2LC 13E1U as well as for LC 20E1U...

Page 2: ...owing safety checks 1 Inspect all lead dress to make certain that leads are not pinched and check that hardware is not lodged between the chassis and other metal parts in the receiver 2 Inspect all protective devices such as non metallic control knobs insulation materials cabinet backs adjustment and compartment covers or shields isolation resistor capacitor networks mechanical insulators etc 3 To...

Page 3: ... vérifications suivantes 1 Inspecter tous les faisceaux de câbles pour s assurer que les fils ne soient pas pincés ou qu un outil ne soit pas placé entre le châssis et les autres pièces métalliques du récepteur 2 Inspecter tous les dispositifs de protection comme les boutons de commande non métalliques les isolants le dos du coffret les couvercles ou blindages de réglage et de compartiment les rés...

Page 4: ... C which is higher than the conventional lead solder by 40 C and as it has poor solder wettabillty you may be apt to keep the soldering bit in contact with the PWB for extended period of time However Since the land may be peeled off or the maximum heat resistance temperature of parts may be excoeded remove the bit from the PWB as soon as you conurm the steady soldering condition Lead free solder c...

Page 5: ...AV IN2 AV IN2 AV OUT Terminals COMPONENT COMPONENT IN AUDIO IN Antenna F Type Headphone Mini jack for stereo ø3 5 mm OSD language English French Spanish Power supply DC 12 V AC 110 240 V 50 60 Hz Weight 9 3 lbs 4 2 kg w o accessories Accessories Remote control Batteries x2 Antenna cable AC adapter AC cord Cable clamps x2 Operation manual LC 13E2U LC 15E2U 13 Advanced Super View BLACK TFT LCD Model...

Page 6: ... TV set can also be rotated 25 degrees horizontally Adjust the angle so that the TV set can be watched most comfortably POWER indicator A green indicator lights when the power is on and a red indicator lights when in the standby mode the indicator will not light when the main power is off The examples used throughout this manual are based on the LC 20E2U model LC 20E2U LC 13E2U LC 15E2U Remote con...

Page 7: ...the supplied accessories No sound will be heard from the main unit speakers when a headphone mini plug is connected into the HEADPHONE jack Rear terminal AV IN 1 L R AUDIO S VIDE O ANT VIDEO POWER INPUT DC13V HEAD PHONE Y P B COMPON ENT P R L L R AV IN 2 OUT VIDEO AUDIO R AUDIO AV IN 1 L R AUDIO S VIDE O ANT VIDEO POWER INPUT DC13V HEAD PHONE On screen display 20 VOLUME Adjust the sound volume usi...

Page 8: ...EX I T MENU SLEEP T IMER SELECT ADJUST EX I T MENU RETURN SLEEP T IMER REMA I N P I CTURE 30 T I NT COLOR BLACK LEVEL SHARPNESS SELECT ENTER EX I T MENU V I DEO ADJUST TV RETURN 0 0 0 0 BR I GHTNESS BR I GHT AUTO POWER OFF P I CTURE F L I P AV2 I N OUT SELECT EX I T MENU RETURN OFF NORMAL I N PRESET ADJUST CC TEXT OFF SELECT EX I T MENU RETURN ADJUST CLOSED CAPT I ON I NPUT SECRET NO EX I T MENU B...

Page 9: ... MAIN POWER VIDEO L AUDIO R Y PB PR AV IN 2 OUT COMPONENT L AUDIO R VIDEO S VIDEO L AUDIO R HEAD PHONE ANT POWER INPUT DC12V AV IN 1 81 16 205 91 8 232 1317 64 337 313 16 97 8 203 315 16 100 2 21 64 59 12 19 32 320 14 13 32 366 14 41 64 372 221 64 59 3 15 16 100 1 19 64 33 7 5 64 180 0 3 16 5 ...

Page 10: ... L AUDIO R Y PB PR AV IN 2 OUT COMPONENT L AUDIO R VIDEO S VIDEO L AUDIO R HEAD PHONE ANT POWER INPUT DC12V AV IN 1 POWER SLEEP 81 16 205 91 8 232 1459 64 379 313 16 97 8 203 315 16 100 2 21 64 59 13 55 64 352 14 23 64 365 15 7 64 384 221 64 59 3 15 16 100 1 3 8 35 2 7 51 64 198 0 3 16 5 ...

Page 11: ...P VIDEO L AUDIO R Y PB PR AV IN 2 OUT COMPONENT L AUDIO R VIDEO S VIDEO L AUDIO R HEAD PHONE ANT POWER INPUT DC13V AV IN 1 949 64 248 119 64 283 1913 32 493 43 64 103 821 32 220 315 16 100 2 43 64 68 17 21 64 440 18 37 64 472 18 47 64 476 243 64 68 3 15 16 100 2 1 64 51 5 9 39 64 244 0 3 16 5 ...

Page 12: ...1 11 N443 AVO START Change from 152 to 156 N443 SCIN1 Change from 1623 to 1601 12 PAL AVO START Change from 152 to 156 PAL SCIN1 Change from 1623 to 1601 13 SECAM AVO START Change from 152 to 156 SECAM SCIN1 Change from 1623 to 1601 14 PAL M AVO START Change from 152 to 156 PAL M SCIN1 Change from 1623 to 1601 15 PAL N AVO START Change from 152 to 156 PAL N SCIN1 Change from 1623 to 1601 16 PAL60 ...

Page 13: ...unding Part AC 1 11 VSP7530PB588B J Speaker L AS 1 12 VSP7530PB598B J Speaker R AS 1 13 XEBSD30P08000 J Screw x6 AA 1 15 PSPAH0623CEZZ J Spacer x1 AB 2 CCABBA058WJ11 J Cabinet B Ass y BA 2 1 Not Available Cabinet B 2 2 GLEGGA009WJSA J Leg x2 AG 2 3 HiNDPA365WJSA J Model Label AG 2 4 LANGTA013WJFW J Reinforcement Angle AL 2 5 PSPAGA043WJZZ J Spacer x2 AC 2 6 XEBSD30P08000 J Screw x1 AA 3 CDAi A031W...

Page 14: ...127WJ01 J Top Cover Ass y AR 4 1 Not Available Top Cover 4 2 GCOVA1943CEKA J Button Cover VOL AD 4 3 GCOVA1943CEKB J Button Cover CH AD 4 4 JBTN 2076CEKA J Operation Button AE 4 5 JBTN A012WJKA J Power Button AE 4 6 LHLDZA027WJKZ J Power Button Holder AE 4 7 MSPRCA014WJFW J Power Button Spring AB 4 8 XEBSD30P08000 J Screw x2 AA 5 Not Available 15 LCD Panel Unit Ass y 5 1 RLCDTA013WJZZ J 15 LCD Pan...

Page 15: ... 3 5 9 5 5 5 4 5 4 5 16 5 7 5 8 5 15 5 6 B L C C F D 5 18 22 22 11 6 16 21 16 18 16 5 5 F 19 I 5 16 5 17 5 17 7 17 13 INVERTER PWB DIGITAL PWB ANALOG PWB 1 7 1 6 1 13 1 14 H 1 2 1 10 1 13 1 14 1 11 1 5 1 5 1 4 1 9 K D G 1 3 1 12 1 4 1 9 1 5 1 4 1 1 18 12 1 I K 4 18 18 4 2 4 1 4 5 4 6 4 7 4 3 4 4 4 8 1 4 1 5 COTROL PWB R C LED PWB 1 15 1 8 3 3 3 4 3 6 3 5 3 2 14 3 3 7 3 14 3 13 3 8 3 12 3 11 3 9 3 ...

Page 16: ...TN 2076CEKA J Power Button AE 4 6 LHLDZA027WJKZ J Power Button Holder AE 4 7 MSPRCA014WJFW J Power Button Spring AB 4 8 XEBSD30P08000 J Screw x2 AA 5 Not Available 20 LCD Panel Unit Ass y 5 1 RLCDTA014WJZZ J 20 LCD Panel Unit DT 5 2 LHLDW1173CEZZ J Wire Holder x1 AD 5 3 PMLT 0402CEZZ J Spacer x1 AC 5 4 PSLDM4685CEFW J Back Shield Panel AX å 5 5 KLMP 0124CEZZ J Lamp Unit A BH å 5 6 KLMP 0125CEZZ J ...

Page 17: ... 20 5 10 5 4 5 5 5 6 5 7 5 8 5 9 5 1 5 19 5 21 5 14 5 15 5 13 5 12 5 17 5 16 5 18 5 19 5 19 5 7 5 19 13 5 11 C Inverter B PWB Inverter A PWB Digital PWB Analog PWB 1 13 1 12 1 9 1 6 1 6 1 6 1 4 1 8 1 7 1 7 K D G 1 13 1 11 1 2 1 3 1 12 1 4 1 8 1 6 1 5 1 1 22 11 1 H L L K 4 22 22 4 2 4 1 4 5 4 6 4 7 4 3 4 4 4 8 1 5 1 6 1 6 1 10 Control PWB R C LED PWB 1 7 1 7 3 7 3 13 3 3 12 3 10 3 8 3 11 3 9 3 1 3 ...

Page 18: ...cessories SPAKPA139WJZZ Wrapping Paper SPAKXA132WJZZ Buffer Material SSAKA0160CEZZ Polyethylene Bag TLABK0001TAZZ No Label LC 20E2U SPAKCA567WJZZ Packing Case SPAKFA267WJZZ Buffer Material Accessories SPAKPA140WJZZ Wrapping Paper SPAKXA252WJZZ Buffer Material SSAKA0160CEZZ Polyethylene Bag TLABK0001TAZZ No Label SERVICE JIGS USE FOR SERVICING LC 13 15E2U QCNW A323WJZZ J Extention Cable 5 pin AD P2...

Page 19: ...D3097CEPA Infrared R C Unit RRMCGA077WJSA Operation Manual TiNS A652WJZZ Cable Clamp LHLDWA002WJSA AAA size Battery 2pcs Wrapping Paper SPAKPA138WJZZ LC 13E2U SPAKPA139WJZZ LC 15E2U Buffer Material SPAKXA128WJZZ LC 13E2U SPAKXA132WJZZ LC 15E2U Buffer Material SPAKXA128WJZZ LC 13E2U SPAKXA132WJZZ LC 15E2U Packing Case SPAKCA569WJZZ LC 13E2U SPAKCA568WJZZ LC 15E2U Buffer Material Accessories SPAKFA2...

Page 20: ... or transmitted in any form or by any means electronic mechanical photocopying recording or otherwise without prior written permission of the publisher SHARP CORPORATION AV Systems Group Quality Reliability Control Center Yaita Tochigi 329 2193 Japan TQ1507 S Mar 2003 Printed in Japan MI KG Design and Production Information Design Japan Production Japan ...

Reviews: