background image

6

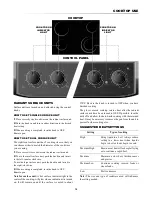
RADIANT SURFACE UNITS

  1  

Use proper pan size — this appliance has different size 

surface units. Select utensils having flat bottoms large 

enough to cover the surface unit heating element. The use 

of undersized utensils will expose a portion of surface 

unit heating element to direct contact and may result in 

ignition of clothing. Proper relationship of utensils to 

heating element will also improve efficiency.

  2

   Never  leave  surface  units  unattended  at  high  heat 

settings. Boilovers cause smoking and greasy spillovers 

that may catch on fire.

  3

   Only certain types of glass, glass/ceramic, ceramic, 

earthware  or  other  glazed  utensils  are  suitable  for 

cooktop service without breaking due to the sudden 

change in temperature.

  4

   To  reduce  the  risk  of  burns,  ignition  of  flammable 

materials and spillage due to unintentional contact with 

utensils, the handle of a utensil should be positioned so 

that it is turned inward and does not extend over adjacent 

surface units.

  5

   Do not cook on broken cooktop. If cooktop should 

break, cleaning solutions and spillovers may penetrate 

the broken cooktop and create a risk of electric shock. 

Contact a qualified technician immediately.

  6  

Clean cooktop with caution. If a wet sponge or cloth is 

used to wipe spills on a hot surface unit, be careful to 

avoid steam burn. Some cleaners can produce noxious 

fumes if applied to a hot surface. Please see cleaning 

the glass cooktop section.

  7  

Clean ventilating hoods frequently. Grease should not 

be allowed to accumulate on hood or filter.

  8

   When flaming foods under the hood, turn the fan on.

  9

   Deep fat fryers - use extreme caution when moving the 

grease kettle or disposing of hot grease.

10

   Always  turn  the  surface  units  off  before  removing 

cookware.

11

   Keep an eye on foods being fried at high or medium 

high heat settings.

12

   Food for frying should be as dry as possible. Frost on 

frozen foods or moisture on fresh foods can cause hot 

fat to bubble up and over the sides of the pan.

13

   Use little fat for effective shallow or deep fat frying. 

Filling the pan too full of fat can cause spillovers when 

food is added.

    If a combination of oils or fats will be used in frying, 

stir together before heating or as fats melt slowly.

14

   Always heat fat slowly and watch as it heats.

15

   Use a deep fat thermometer whenever possible to prevent 

heating fat beyond the smoking point.

IMPORTANT SAFETY INSTRUCTIONS

16

   Avoid scratching the glass cooktop. The cooktop can be 

scratched with items such as sharp instruments, rings 

or other jewelry and rivets on clothing.

17

   Large scratches or impacts to glass doors or cooktop 

can lead to broken or shattered glass.

18

   Never use the glass cooktop surface as cutting board.

19

   Do not place or store items that can melt or catch fire 

on the glass cooktop, even when it is not being used.

20

   Be careful when placing spoons or other stirring utensils 

on glass cooktop surface when it is in use. They may 

become hot and could cause burns.

MICROWAVE DRAWER

When using the Microwave Drawer, basic safety precautions 

should be followed, including the following: 

WARNING

  To reduce the risk of burns, electric shock, 

fire, injury to persons or exposure to excessive microwave 

energy:

  1

  Read all instructions before using the appliance.

  2

  Read  and  follow  the  specific  “PRECAUTIONS  TO 

AVOID  POSSIBLE  EXPOSURE  TO  EXCESSIVE 

MICROWAVE ENERGY” on page 3.

  3 

This  appliance  must  be  properly  grounded.  See 

Installation Instructions for grounding instructions.

  4  

Install or locate this appliance only in accordance with 

the provided Installation Manual.

  5  

Some products such as whole eggs and sealed containers 

- for example, closed glass jars—are able to explode and 

should not be heated in the Microwave Drawer.

  6  

Use this appliance only for its intended use as described 

in this manual. Do not use corrosive chemicals or vapors 

in this appliance. This Microwave Drawer is specifically 

designed to heat, cook or dry food. It is not designed for 

industrial or laboratory use.

  7  

As with any appliance, close supervision is necessary 

when used by children.

  8  

Do not operate this appliance if it has a damaged cord 

or plug, if it is not working properly or if it has been 

damaged or dropped.

  9  

This appliance should be serviced only by qualified 

service personnel. Contact nearest Sharp Authorized 

Servicer for examination, repair or adjustment.

10  

Do not cover or block any openings on the appliance.

11  

Do not store or use this appliance outdoors. Do not use 

this product near water—for example, in a wet basement, 

near a swimming pool or similar locations. 

12  

Do not immerse cord or plug in water. Keep cord away 

from heated surfaces.

13  

Do not climb or sit on the Microwave Drawer. The range 

could tip and cause injuries to persons.

Summary of Contents for KB-3000JS Operation

Page 1: ...NTENTS 2 CUSTOMER ASSISTANCE 3 PRECAUTIONS TO AVOID POSSIBLE EXPOSURE TO EXCESSIVE MICROWAVE ENERGY 3 CONSUMER LIMITED WARRANTY 4 IMPORTANT SAFETY INSTRUCTIONS 5 7 PARTS 8 10 BEFORE OPERATING 11 COOKTOP USE 12 13 MICROWAVE DRAWER COOKING 14 20 OVEN COOKING 21 24 OTHER FEATURES 24 26 CLEANING AND CARE 26 28 BEFORE YOU CALL FOR SERVICE 29 30 ...

Page 2: ...6 SENSOR POPCORN SENSOR REHEAT 17 SENSOR COOKING 17 DEFROST 18 MANUAL DEFROST 19 REHEAT 19 MICRO WARM 19 TIMER 19 MULTIPLE SEQUENCE COOKING 20 HELP 20 MINUTE PLUS 20 MORE OR LESS TIME ADJUSTMENT 20 AUTO START 20 AUDIBLE SIGNAL ELIMINATION 20 END OF COOKING REMINDER 20 CONTROL LOCK 25 OVEN COOKING 21 24 INFORMATION YOU NEED TO KNOW 21 BEFORE USING OVEN 21 HOW TO SET OVEN TEMPERATURE 22 HOW TO PROOF...

Page 3: ...omplete mailing address including zip code your daytime telephone number including area code and description of the problem TO ACCESS INTERNET www sharpusa com 3 PRECAUTIONS TO AVOID POSSIBLE EXPOSURE TO EXCESSIVE MICROWAVE ENERGY a Do not attempt to operate this oven with the door open since open door operation can result in harmful exposure to microwave energy It is important not to defeat or ta...

Page 4: ... Sharp and shall be the sole and exclusive remedy available to the purchaser Correction of defects in the manner and for the period of time described herein shall constitute complete fulfillment of all liabilities and responsibilities of Sharp to the purchaser with respect to the Product and shall constitute full satisfaction of all claims whether based on contract negligence strict liability or ot...

Page 5: ... items stored over the range Flammable material could be ignited if brought in contact with hot surface units or heating elements and may cause severe burns 6 Do not repair or replace any part of appliance unless specifically recommended in this manual All other servicing should be referred to a qualified technician 7 Do not store flammable materials in an oven Microwave Drawer or near surface units ...

Page 6: ...15 Use a deep fat thermometer whenever possible to prevent heating fat beyond the smoking point IMPORTANT SAFETY INSTRUCTIONS 16 Avoid scratching the glass cooktop The cooktop can be scratched with items such as sharp instruments rings or other jewelry and rivets on clothing 17 Large scratches or impacts to glass doors or cooktop can lead to broken or shattered glass 18 Never use the glass cooktop...

Page 7: ...through heating it c Do not use straight sided containers with narrow necks Use a wide mouthed container d After heating allow the container to stand in the Microwave Drawer at least for 20 seconds before removing the container e Use extreme care when inserting a spoon or other utensil into the container OVEN 1 Use care when opening door let hot air or steam escape before removing or replacing foo...

Page 8: ...stable backsplash 10 Glass ceramic cooktop 11 Control knobs 12 Drawer light ELECTRIC RANGE WITH MICROWAVE DRAWER 13 Microwave Drawer Menu Label 14 Microwave Drawer 15 Rack supports 16 Oven door 17 Top heating element 18 Oven door lock 19 Oven light 20 Bottom heating element 21 Broiler pan grid 22 Broiler pan 23 Standard rack 24 EZ Pull rack 4 2 7 3 6 1 8 10 11 12 13 15 16 14 9 6 5 ...

Page 9: ... particular kitchen situation The height can be adjusted from the low position 6 inches high to the highest position 12 inches high in one inch increments See Installation Instructions for directions packed separately The height of the backsplash should be adjusted before the unit is moved into place 19 20 24 23 21 22 7 ...

Page 10: ...OT SURFACE INDICATOR LIGHTS Numbers next to the keysheet illustration indicate pages on which there are feature descriptions and usage information When you wish to use both the Microwave Drawer and the Oven complete one setting and touch START before programming the other setting 24 11 22 24 20 24 25 18 17 19 17 19 17 16 20 11 19 11 20 13 13 13 13 CONTROL KNOBS CONTROL KNOBS ...

Page 11: ...with the drawer open except for START Minute Plus The Oven can be started with the door open except for self cleaning TIMERS Your Insight Range features two separate independent Kitchen Timers The timer on the Oven side left of the control panel is labeled Timer 3 Min Plus The maximum length of this timer is 9 hours 99 minutes You set this timer in hours and minutes For example one hour 30 minutes...

Page 12: ...items melt or soften plastics or increase pressure in closed containers causing them to burst Donʼt store heavy items above the cooktop as they can cause damage if they drop on to the cooktop Never cook directly on the cooktop Always use cookware ABOUT COOKING UTENSILS For best results and energy conservation choose cooking utensils as below Bottom of pan Pans should have flat bottoms that make goo...

Page 13: ...oktop will glow when a radiant unit is turned on It will remain on until the surface is cooled to about 150 F Be sure the knob is turned to OFF when you have finished cooking The glass ceramic cooktop retains heat after the radiant surface units have been turned to OFF If possible turn the units off and allow foods to finish cooking with the retained heat It may be necessary to remove the pan from t...

Page 14: ...ve Drawer at power levels below 100 you may hear the magnetron cycling on and off It is normal for the exterior of the Microwave Drawer to be warm to the touch when cooking or reheating Condensation is a normal part of microwave cooking Room humidity and the moisture in food will influence the amount of moisture that condenses in the Microwave Drawer Generally covered foods will not cause as much c...

Page 15: ...n a thick or dense area away from fat or bone NEVER leave the thermometer in the food during cooking unless it is approved for microwave use ALWAYS use potholders to prevent burns when handling utensils that are in contact with hot food Enough heat from the food can transfer through utensils to cause skin burns Avoid steam burns by directing steam away from the face and hands Slowly lift the farth...

Page 16: ...ETTINGS 1 After the range is plugged in wait 2 minutes before using any sensor setting 2 Be sure the exterior of the cooking container and the interior of the Microwave Drawer are dry Wipe off any moisture with a dry cloth or paper towel 3 The sensor works with foods at normal storage temperature For example popcorn would be at room temperature 4 Any sensor selection can be programmed with More or...

Page 17: ...asserole Add no water if vegetables have just been washed Cover with lid for tender vegetables Use plastic wrap for tender crisp vegetables After cooking stir if possible Let stand covered for 2 to 5 minutes 2 Fresh vegetables hard Carrots sliced Corn on the cob Green beans Winter squash diced halves 25 1 5 lb 2 4 25 1 5 lb 25 1 5 lb 1 2 Place in casserole Add 1 4 tablespoons water Cover with lid ...

Page 18: ...nu Label Select desired food by touching the number pad Ex Touch 2 for steaks chops STEAKS CHOPS ENTER WEIGHT 3 Enter weight by touching number pads 1 0 4 Touch START Minute Plus pad The oven will stop so that the food can be checked 5 After the first stage open the Microwave Drawer Turn steak over and shield any warm portions Close the Microwave Drawer Touch START Minute Plus pad 6 After the secon...

Page 19: ...T PROCEDURE 1 Fresh rolls muffins 1 8 pcs Use this pad to warm rolls muffins biscuits bagels etc Large items should be considered as 2 or 3 regular size Arrange on plate cover with paper towel For refrigerated rolls or muffins it may be necessary to double the entered amount to ensure the proper serving temperature For example enter quantity of 2 for 1 refrigerated muffin 2 Frozen rolls muffins 1 8 pcs...

Page 20: ...uences switching from one power level setting to another automatically Sometimes cooking directions tell you to start on one power level and then change to a different power level Your Microwave Drawer can do this automatically 1 First enter cooking time Then touch Power Level pad once for 100 cooking or repeat touching Power Level pad for a lower power level 2 Enter second cooking time Repeat tou...

Page 21: ...or 3 Baking frozen pies angel food cake yeast bread or casseroles 1 Roasting poultry 1 Roasting meats 1 Baking on 2 racks at the same time 1 and 3 Note Follow package instructions and recipe times The cooking times and temperatures needed to bake a product may vary slightly from your previously owned appliance AIR CIRCULATION IN THE OVEN Baking results will be better if baking pans are centered in...

Page 22: ...3 Touch Timed Cook pad SET TIME 4 Touch the number pads to enter cooking time in hours and minutes For example 1 hour 45 minutes 1 45 5 Touch START pad START Cooking time begins counting down When the oven preheats to the programmed temperature a signal will sound When cooking time is completed a signal will sound and END will appear in the display Oven will turn off Note The oven will cook for th...

Page 23: ...s Well Done High 3 3 5 4 6 Ham slice fully cooked 3 4 Well Done High 3 10 12 No turnover Frankfurters High 3 5 7 No turnover LAMB Chops rib loin or center 3 4 3 4 oz each Medium Well Done High High 3 3 5 7 7 9 6 8 8 10 CHICKEN Broiler Fryer halved quarter 1 3 lb Well Done High 2 12 14 17 19 TO BROIL 1 Touch Broil pad HIGH PUSH START 2 Touch START pad HIGH Touch Broil pad once for High HIGH Twice f...

Page 24: ...Note The health of some birds is extremely sensitive to the fumes given off during the self cleaning cycle of any range Move birds to another well ventilated room During the self cleaning cycle the outside of the oven can become very hot to touch Do not leave small children unattended near the appliance If heavy spillovers are not wiped up before the self cleaning cycle they may flame and cause mor...

Page 25: ...ON AUTO START for Microwave Drawer see page 20 ADJUSTING OVEN TEMPERATURE Your new oven may cook differently than your previous oven For the first few weeks use suggested package times and temperatures Should you determine that an adjustment is desirable try a few recipes or prepared foods to determine the number of degrees for the actual oven adjustment TO RAISE OR LOWER OVEN TEMPERATURE 1 Touch S...

Page 26: ... CLEANING Only use cleaning products that have been specifically designed for glass ceramic cooktops Read and follow all instructions and warnings on the cleaning cream label A sample cleaner cream is supplied with your range Before using the cooktop clean the cooktop with the cleaner cream To avoid possible damage to the cooking surface do not apply cleaning cream to the glass surface when it is h...

Page 27: ... of the microwave drawer area is made from mica so it requires special care Keep the waveguide cover clean to assure good microwave performance Carefully wipe with a soft damp cloth any food spatters from the surface of the cover immediately after they occur Built up splashes may overheat and cause smoke or possibly catch fire Do not remove the waveguide cover ODOR REMOVAL Occasionally a cooking od...

Page 28: ...nd polish dry with a soft cloth The broiler pan and grid can be washed in the dishwasher Note Do not leave in oven during self cleaning cycle OVEN LIGHT REPLACEMENT CAUTION Be sure the oven is unplugged and all parts are COOL before replacing the oven lightbulb Do not turn the oven light on during the self cleaning cycle The high temperature will reduce lamp life The interior oven light will turn ...

Page 29: ...e smooth flat bottomed cookware 6 Areas of discoloration on the cooktop Food spillovers not cleaned before next use Use the recommended cleaning procedure See page 26 7 Metalmarks on cooktop Sliding or scraping of metal pans on top Do not slide metal pans When cool clean with cooktop cleaning cream to remove the marks 8 Brown streaks or specks on cooktop glass surface Boilovers are cooked onto surf...

Page 30: ...as closed during broiling Check if the controls have been properly set See page 22 23 See page 23 See page 21 Leave the door open to broil stop position 17 Self cleaning cycle does not work The oven temperature is too high to set a self cleaning cycle Oven controls improperly set Allow the oven to cool and reset the controls Check if the controls have been properly set See page 24 18 Oven door doe...

Page 31: ...ABEL SELECT FOOD NUMBER 2 See Menu Label Select desired food by touching the number pad Ex Touch 2 for frozen rolls or muffins FROZEN ROLLS ENTER QTY 3 Touch the number pad to select quantity Ex Touch 2 for 2 rolls or muffins 2 4 Touch START Minute Plus pad DEFROST OPERATION Use this feature to defrost the foods shown on the Menu Label 1 Touch Defrost pad SEE LABEL SELECT FOOD NUMBER 2 See Menu Labe...

Page 32: ...the programmed temperature a signal will sound BROIL 1 Touch Broil pad HIGH PUSH START 2 Touch START pad Touch Broil pad once for High Twice for Medium Three times for Low HIGH MED LOW SELF CLEAN 1 Touch Self Clean pad once for Normal 4 hours or twice for Light 2 1 2 hours NORM 2 Touch START pad When self cleaning time is completed a signal will sound and END will appear in the display TIMER 1 Tou...

Reviews: