background image

E-

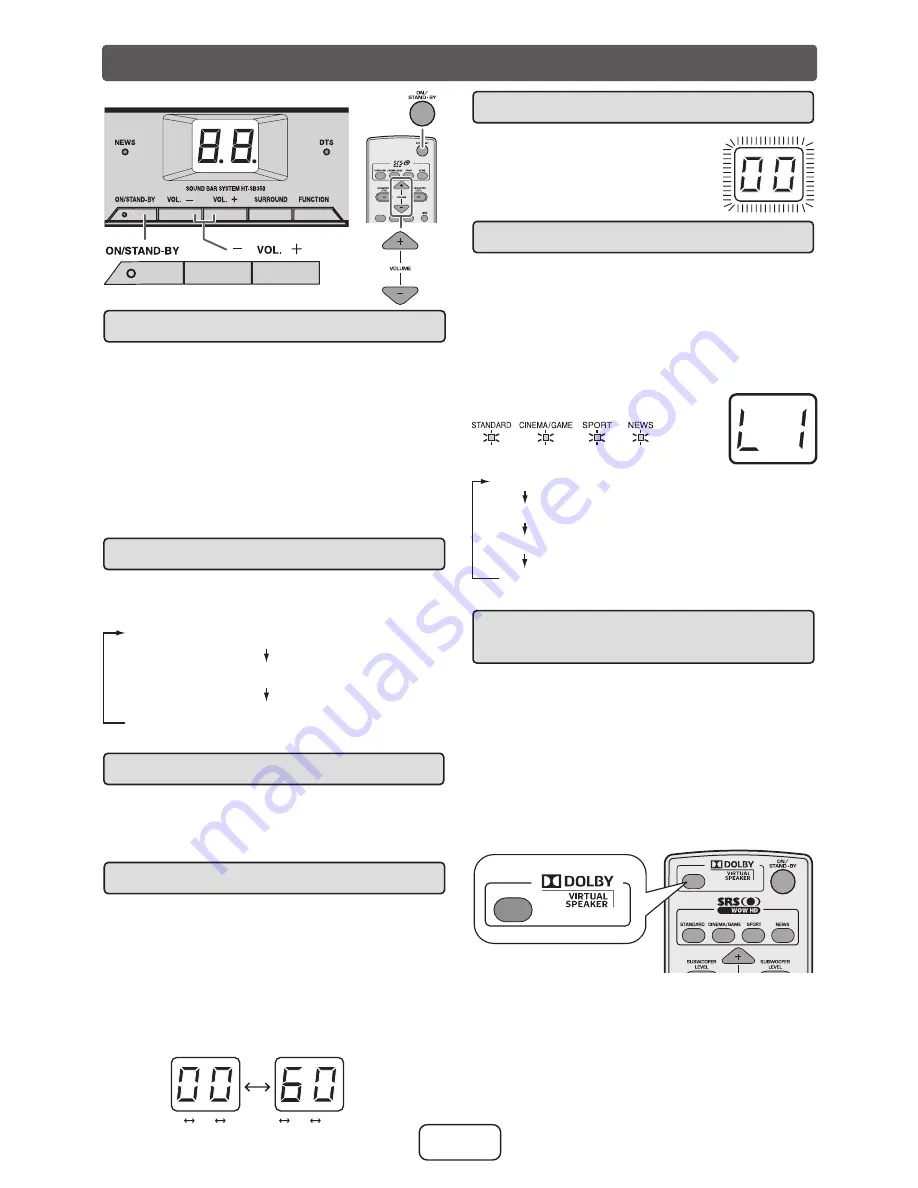
General control

To turn the power on

Press the ON/STAND-BY button.

The sound mode indicator and display light up. 

Note:

If the power does not turn on, check whether 

the power cord is plugged in properly.

To set the unit to stand-by mode:

Press the ON/STAND-BY button again.

Display brightness control

Press the DIMMER button to adjust the brightness 

of the display and sound mode indicator.

Sound mode indicator and display bright

Sound mode indicator and display dim

Sound mode indicator and display off. Pressing any 

button will light up the display for 3 seconds only.

Volume auto fade-in

If you turn off and on the unit with the volume set 

to 40 or higher, the volume starts at 20 and fades 

in to the last set level.

Volume control

Unit operation:

Press volume up (VOL. + ) to increase the volume 

and press volume down (VOL. – ) to decrease 

the volume.

Remote control operation:

Press the  button to increase the volume 

and the VOLUME – button to decrease the volume.

00   01   02 .....    59   60

Muting

The volume is muted temporarily 

when pressing the MUTE button 

on the remote control. Press again 

to restore the volume.

Preset sound mode

Main unit operation:

To change to a different mode, press the SUR-

ROUND button repeatedly until the desired sound 

mode lights up.

Remote control operation:

Press a desired sound mode on the remote control.

STANDARD

SPORT

CINEMA/GAME

NEWS

WOW HD is on for nominal effect
WOW HD on for cinema/game sound effect
WOW HD on for sport broadcasting
WOW HD on for news

WOW HD is on for nominal effect.
WOW HD on for cinema/game sound effect

WOW HD on for news

WOW HD on for sport broadcasting

STANDARD

CINEMA/GAME

NEWS

SPORT

Dolby Virtual Speaker 

(DVS) sound mode

The Dolby Virtual Speaker (DVS) creates virtual 

surrounds comparable to the 5.1ch sound produced 

by the 2.1ch speaker. When setting DVS to “ON” 

for 2 channel stereo signals, Dolby Pro Logic II 

brings out virtual sound effects through the signals 

converted into 5.1ch.

Press the DVS button.

The Dolby Virtual Speaker indicator lights up.

Notes:

Monaural  signals  do  not  generate  surround  ef-

fects.

DVS sound effect may not be obtained depend-

ing  on  signal  types  (the  Dolby  Virtual  Speaker 

indicator blinks). In this case, set the DVS mode 

to “OFF”.

Summary of Contents for HT-SB350

Page 1: ...included Remote control x 1 RRMCGA251AWSA AC DC adaptor x 1 RADPAA061AWZZ AC power cord x 1 QACCDA005AWZZ RCA cable 2pins 2pins x 1 QCNWGA041AWPZ Wall mount angle x 2 LANGKA167AWFW Foot cushion x 4 PCUSSA118AWZZ Pattern paper x 1 TCAUHA022AWZZ Spike Nut x 4 CLEGMA005AW02 Length 25 mm Nut is a trademark of SRS Labs Inc WOW HD technology is incorporated under license from SRS Labs Inc e 10 TINSZA814...

Page 2: ...ence will not occur in a particular installation If this equipment does cause harmful interference to radio or television reception which can be determined by turning the equipment off and on the user is encouraged to try to correct the interference by one or more of the following measures Reorient or relocate the receiving antenna Increase the separation between the equipment and receiver Connect...

Page 3: ...supply cord or plug is damaged liquid has been spilled or objects have fallen into the apparatus the apparatus has been exposed to rain or mois ture does not operate normally or has been dropped Additional Safety Information 15 Power Sources This product should be oper atedonlyfromthetypeofpowersourceindicated on the marking label If you are not sure of the type of power supply to your home consul...

Page 4: ...hat the equipment is positioned in a well ventilated area and ensure that there is at least 4 10 cm of free space along the sides and top of the equipment Use the unit on a firm level surface free from vibration Keep the unit away from direct sunlight strong magnetic fields excessive dust humidity and electronic electrical equipment home computers facsimiles etc which generate electrical noise Do ...

Page 5: ...ty or otherwise In no event shall Sharp be liable or in any way responsible for any damages or defects in the Product which were caused by repairs or attempted repairs performed by anyone other than an authorized servicer Nor shall Sharp be liable or in any way responsible for any incidental or consequential economic or property damage Some states do not allow the exclusion of incidental or conseq...

Page 6: ...cket 10 Coaxial Digital Audio Input Socket 9 Optical Digital Audio Input Socket 9 Subwoofer Pre Output Socket 8 1 2 3 4 5 6 Reference page Rear Panel Remote Control Remote Control Transmitter 10 Dolby Virtual Speaker Button 11 Cinema Game Button Standard Button Volume Up Button 11 Subwoofer Level Down Button 12 Volume Down Button 11 Bass Treble Button 12 TV Operation Buttons 6 On Stand by Button 1...

Page 7: ...ion 1 Tighten all spikes as shown Notes Option 1 or option 2 indicates spike positions based on LCD TV stand When attaching the spikes place the unit on a cushion or soft cloth to avoid damage Caution When using these spikes on glossy or slippery table such as on glass top stick foot cushions at the bottom of the spikes to avoid slippage Note Option 1 or option 2 foot cushion positions based on LC...

Page 8: ... until it is flush with the wall surface 3 1 1 4 32 mm 3 8 8 9 mm Wall surface Wall surface Screw the wall mount angle to the wall as shown in the illustration Total screw is 8 pieces Wall mount angle Wall mount angle screws x 4 screws x 4 Make a hole on the wall following the screw point marks on the pattern paper by using a drill Wall surface 1 1 4 32 mm 3 8 8 9 mm Wall mount angle Wall surface ...

Page 9: ...vailable Audio signal To audio input socket Sound bar To SUBWOOFER PRE OUT socket Commercially available subwoofer amplifier built in Falling prevention Safety wires not supplied are use ful to prevent the unit from falling off the table Loop the safety wires not supplied into each hole as shown and tie the safety wires to the LCD TV stand Sound bar connections to TVs Caution Turn off all other eq...

Page 10: ...ocket Audio signal Audio signal Digital connection Connect to the TV using an optical digital audio cable or a coaxial digital audio cable Analog connection IftheTV monitorhasanaudiooutput connectittothe LINE IN 1 or LINE IN 2 jacks on the rear of the unit To select LINE IN 1 or LINE IN 2 function On the unit Press FUNCTION button repeat edly until L1 or L2 is displayed On remote control Press LIN...

Page 11: ...mbol Positive side up Precautions for battery use Remove the battery if the unit will not be used for a long period of time This will prevent potential damage due to battery leakage Caution Do not use rechargeable battery nickel cadmium battery etc Danger of explosion if battery is incorrectly re placed Replace only with the same or equivalent type Batteries battery pack or batteries installed sha...

Page 12: ...uted temporarily when pressing the MUTE button on the remote control Press again to restore the volume Preset sound mode Main unit operation To change to a different mode press the SUR ROUND button repeatedly until the desired sound mode lights up Remote control operation Press a desired sound mode on the remote control STANDARD SPORT CINEMA GAME NEWS WOW HD is on for nominal effect WOW HD on for ...

Page 13: ...und signals are detected DVS can only be turned on using remote control If you turn ON DVS WOW HD will automatically turn OFF The DVS can be turned OFF by pressing any of the preset sound mode buttons This product incorporates decoders supporting the Dolby Digital system and DTS system DTS Digital Theater Systems One of the digital audio systems for theatrical use As the sound quality is em phasiz...

Page 14: ...e properly Is the battery polarity correct Is the battery dead Is the distance or angle incorrect Are there any obstructions in front of the unit Is there a strong light shining on the remote sensor Is the remote control for another equipment used simultaneously Remote control General control continued Function LINE IN 1 LINE IN 2 DIGITAL 1 DIGITAL 2 Symptom Possible cause No sound is heard Is the...

Page 15: ... on the transmitter on the remote control Condensation can cause the unit to malfunction If this happens leave the power on until normal operation is possible about 1 hour Wipe off any condensation on the transmitter with a soft cloth before operating the unit When you fail to perform operations properly the following messages are displayed on the unit Troubleshooting chart continued Symptom Possi...

Page 16: ... channel Subwoofer 2 1 4 57 mm Woofer x 4 Impedance 3 ohms 12 ohms x 4 parallel con nection General Input terminals Analog input LINE 1 RCA type x 1pair L R 500 mV 47 kohms Analog input LINE 2 Stereo mini jack Ø 3 5 mm 100 mV 47 kohms Coaxial digital input DIGITAL 1 RCA type x 1 Optical digital input DIG ITAL 2 Square type x 1 Audio output terminals Subwoofer Pre Out 10 kohms Dimensions Width 33 1...

Reviews: