Sharp FO-2150CM Setup Manual Download Page 20

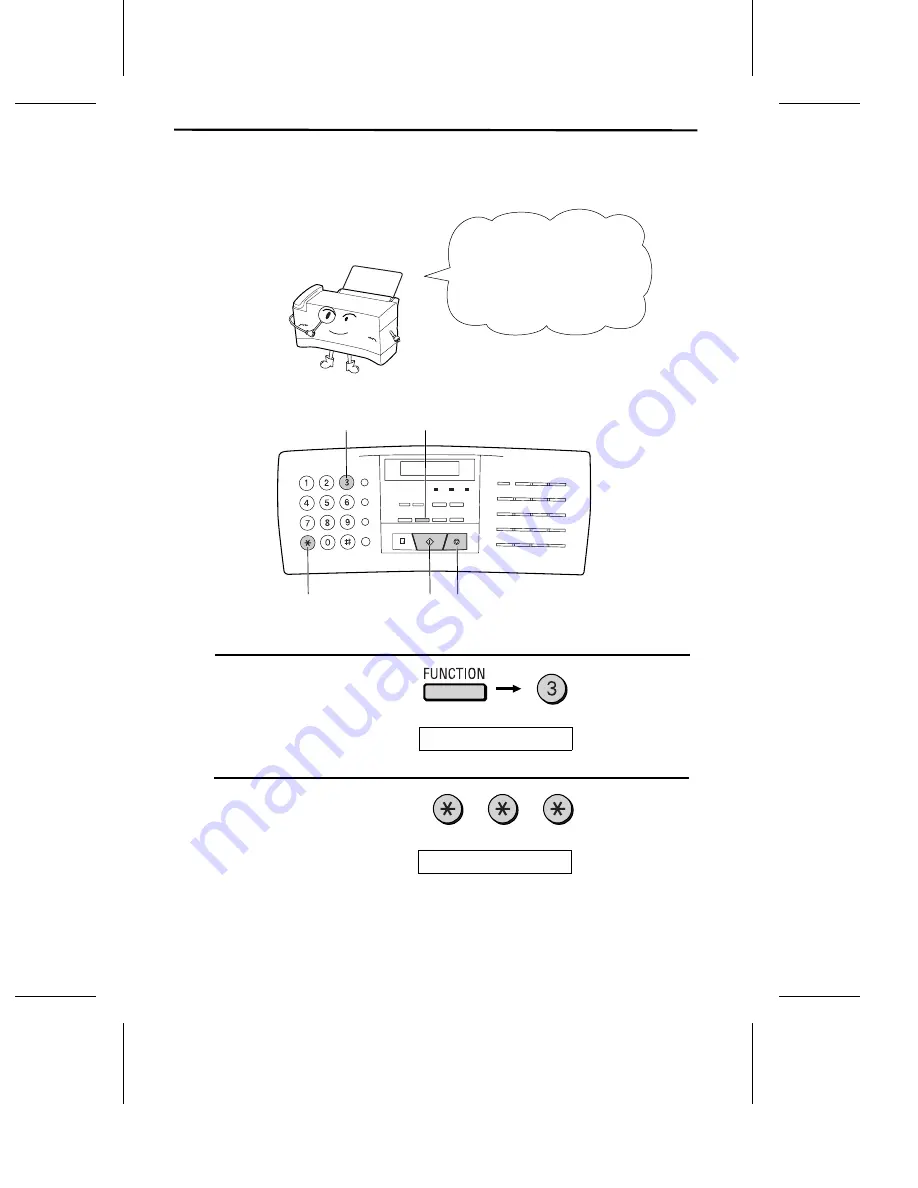
7.   Setting the Date and Time

The date and time appear
in the display and reports,
and are printed at the top
of every page you transmit.

3 key

FUNCTION  key

STOP key

START key

* key

1

Press these keys:

The display will show:

ENTRY MODE

2

Press the 

*

 key two times.

The display will show:

DATE & TIME SET

Note: The Sharp Color MFP  is Year 2000 compliant.

19

Summary of Contents for FO-2150CM

Page 1: ...SETUP GUIDE SHARP COLOR MFP MODEL FO 2150CM ...

Page 2: ...t your dealer or retailer Handset Handset lead Telephone line cord Rapid key labels Setup Guide Paper cover Paper tray Color and black print cartridges one each Quick Reference Guide Sharp Color MFP CD ROM Document tray Adapter for Australia Adapter for New Zealand Business products dealer installation report 1 ...

Page 3: ...nto the back of the machine as shown Pull out the original document support and the output tray Note When receiving faxes copying or printing do not let a large number of pages accumulate in the output tray This may obstruct the outlet and cause paper jams 2 ...

Page 4: ...he handset rest The ends of the handset lead are identical so they will go into either socket Make sure the handset cord goes into the unmarked socket on the side of the machine Use the handset to make ordinary phone calls or to transmit and receive documents manually 3 ...

Page 5: ...e Sharp Color MFP Snap the clips on each side of the port onto the cable connector to secure it 3 Connect the other end of the cable to the parallel port on the back of your computer Note The parallel port mode of your computer must be set to Nibble mode or an equivalent mode such as Compatible PS 2 Standard Normal or Tra ditional mode Note that ECP EPP Byte and Bidirectional modes may not allow c...

Page 6: ...off by simply plugging or unplugging the power lead Note If your area experiences a high incidence of lightning or power surges we recommend that you install surge protectors for the power and telephone lines Surge protectors can be purchased at most telephone specialty stores Moving your fax and reconnecting Should it be necessary to move your fax to a new location first disconnect the telephone ...

Page 7: ...e socket on the wall For Australia For New Zealand Be sure to insert the telephone line cord into the TEL LINE socket Do not insert it into the TEL SET socket Note The Sharp MFP is set for tone dialling If you are on a pulse dial line you must set the Sharp MFP for pulse dialling Press the following keys on the operation panel Press until display shows DIAL MODE TONE PULSE or PSEUDO RING DUR Conne...

Page 8: ... see Answering Machine Connection in Chapter 7 of your online Operation Guide 1 Remove the seal covering the TEL SET socket 2 Connect the extension phone line to the TEL SET socket Important In New Zealand not all standard telephones and answering machines will respond to incoming ringing when connected to the extension socket of the equipment Connections 7 ...

Page 9: ...artridge installed for normal use and change to a color cartridge only when you need to print a color job Note If you receive a fax when a color print cartridge is installed the fax will be held in memory and printed out when a black cartridge is installed CARTRIDGE key 1 Press the CARTRIDGE key The cartridge carrier will move to the centre of the print compartment 8 ...

Page 10: ...by pulling the knob on the cartridge toward you until you hear a click If the cartridge is still useable insert it into the cartridge holder on the back of the machine Push back on the cartridge until it snaps into place To prevent the used print cartridge from drying out be sure to store it in the cartridge holder 3 Remove the new print cartridge from its packaging Installing a Print Cartridge 9 ...

Page 11: ...h the copper colored area 5 Insert the print cartridge into the cartridge carrier Push back on the cartridge until it snaps into place Note If the print cartridge moves loosely in the carrier it is not locked into place Repeat this step 6 Close the front cover Installing a Print Cartridge 10 ...

Page 12: ...cartridge The cartridge will return to its home position If you pressed 3 or 4 for a new cartridge the Sharp MFP will print a test page for printhead alignment 8 If you installed a new print cartridge look at the test page and locate the line that comes closest to forming a perfectly straight line In this example line 13 comes closest to forming a straight line NEW BLACK CART NEW COLOR CART or Ins...

Page 13: ... on the test page If the number is less than 10 enter a 0 before the number Example Line 13 The display will show CLEAN NOZZLES 11 Press the STOP key to return to the time and date display Note If you have installed a color cartridge the display will show the following alternating messages COLOR CARTRIDGE USE BLACK FOR RX Installing a Print Cartridge 12 ...

Page 14: ... number of sheets is 200 for paper from 60 to 80 g m2 150 for paper from 80 to 90 g m2 such as coated paper 1 Remove the paper cover if it is on the paper tray 2 Fan the paper and then tap the edge against a flat surface to even the stack 3 Pull the paper release plate toward you 13 ...

Page 15: ... it out and combine it into a single stack with the new paper before adding the new paper 5 Replace the paper cover on the paper tray 6 Push the paper release plate back down Important Be sure to replace the paper cover before you push the paper release plate down Loading Printing Paper 14 ...

Page 16: ... time display or LETTER LEGAL PLAIN COATED Note This setting is only for received faxes To set the paper size for printing from your computer see your online Operation Guide 8 The Sharp Color MFP has been set at the factory to print on plain paper If you have loaded coated paper you must change the media type setting to COATED Press these keys The display will show MEDIA TYPE Press 1 to select PLA...

Page 17: ...FP you must enter your name and fax telephone number You must also set the date and time Once you enter this information it will automatically appear at the top of each fax page you send 3 key FUNCTION key STOP key START key key 1 Press these keys The display will show ENTRY MODE 16 ...

Page 18: ...s press the key To insert a press the key If you make a mistake press the HOLD SEARCH key to move the cursor back to the mistake and then enter the correct number The new number will replace the old number 5 Press START to enter the fax number in memory Example The display will show ENTER YOUR NAME Cursor A dark square mark in the display that indicates where a number or letter will be entered Ent...

Page 19: ...he cursor to the left Press this key to change case Press this key to move the cursor to the right A 2 2 2 2 2 2 2 2 2 3 3 3 3 3 3 3 3 3 4 4 4 4 4 4 4 4 4 5 5 5 5 5 5 5 5 5 6 6 6 6 6 6 6 6 6 7 7 7 7 7 7 7 7 7 8 8 8 8 8 8 8 8 8 9 9 9 9 9 9 9 9 9 9 9 1 1 9 9 9 B C D E F G H I J K L M N O P Q R T U V W X Y Z SPACE 7 7 7 7 7 S Press either key repeatedly to select one of the following symbols _p 7 Pre...

Page 20: ...nd reports and are printed at the top of every page you transmit 3 key FUNCTION key STOP key START key key 1 Press these keys The display will show ENTRY MODE 2 Press the key two times The display will show DATE TIME SET Note The Sharp Color MFP is Year 2000 compliant 19 ...

Page 21: ...ove the cursor back to the mistake and then enter the correct number Example the 5th 5 Enter a two digit number for the month 01 for January 02 for February 12 for December etc Example January 6 Enter the year four digits Example 1998 7 Enter a two digit number for the hour 00 to 23 and a two digit number for the minute 00 to 59 Example 9 25 Setting the Date and Time 20 ...

Page 22: ...8 Press the START key to start the clock The display will show STORE JUNK FAX 9 Press the STOP key to return to the date and time display Setting the Date and Time 21 ...

Page 23: ... MB of available hard disk space Installing the software 1 Make sure that the Sharp Color MFP is connected to your computer with a parallel cable as explained in Section 3 Connections 2 Make sure the Sharp Color MFP is on the power cord is plugged into an outlet 3 Start up your computer and run Microsoft Windows 95 or Win dows 3 1 Close any other applications that may be running 4 Windows 95 The S...

Page 24: ...ifunction Interface software Click the Sharp Color MFP Printer Driver button to begin installing the printer driver and follow the instructions on the screen 5 The Install New Cartridge dialog box appears If you have already in stalled a print cartridge simply click Old Black Cartridge Installed or Old Color Cartridge Installed Note Do not click Cancel If you have yet to install a print cartridge ...

Page 25: ...rp Color MFP and the Color Multifunction Interface can be found in the Online Guide on the CD To open the guide follow these steps 1 Insert the Multifunction Interface CD in your CD ROM drive 2 Windows 95 Click Start point to Programs and select Color Multifunction Inter face Click Online Guide Windows 3 1 In the Sharp Color MFP group on your Windows desktop double click the Online Guide icon When...

Page 26: ...ether it is a voice call including manually dialled fax transmissions or an automatically dialled fax If it is a voice call the fax will make a special ringing sound to alert you to answer If it is an automatically dialled fax transmission reception will begin automatically ANS mode Select this mode when an answering machine is connected as explained in Chapter 7 of your Online Guide and you want ...

Page 27: ... computer FAX Sharp MFP PC or If you select reception to your computer and the reception mode is set to TEL you must answer all calls by picking up the Sharp MFP s handset If you hear a fax tone through the handset when you answer the computer will automatically begin reception If you have selected reception to your computer and the reception mode is set to FAX or TEL FAX all calls will be answere...

Page 28: ...machine produces odors smoke or unusual noises The power cord is frayed or damaged The machine has been dropped or the housing damaged Do not allow anything to rest on the power cord and do not install the machine where people may walk on the power cord Never insert objects of any kind into slots or openings on the machine This could create a risk of fire or electric shock If an object falls into ...

Page 29: ...n a cordless type during an electrical storm There may be a remote risk of electric shock from lightning Do not use a telephone to report a gas leak in the vicinity of the leak The power outlet must be installed near the equipment and must be easily accessible Important Safety Information 28 ...

Page 30: ...ion software use of consumables other than those approved by Sharp or any alterations made to the product which are not authorised by Sharp Please retain your sales documentation as this should be produced to validate a warranty claim This warranty is in addition to and in no way limits varies or excludes any express and implied rights and remedies under any relevant legislation in the country of ...

Page 31: ...Y LTD A C N 003 039 405 1 Huntingwood Drive Huntingwood Blacktown N S W 2148 SHARP CORPORATION OF NEW ZEALAND LIMITED Cnr Mahunga Drive Hastie Ave Mangere Bridge Auckland New Zealand SHARP CORPORATION PRINTED IN MALAYSIA TINSE3908AXZZ ...

Reviews: