background image

Summary of Contents for F-2700M

Page 1: ...LATION 2 INITIAL SETTINGS 3 PRINTING SETUP 4 BASIC OPERATIONS 5 ANSWERING MACHINE HOOK UP 6 SPECIAL FUNCTIONS 7 OPTIONAL SETTINGS 8 PRINTING OUT REPORTS AND LISTS 9 MAINTENANCE 10 TROUBLESHOOTING SPECIFICATIONS QUICK REFERENCE GUIDE INDEX ...

Page 2: ...t does cause interference to radio or television reception which can be determined by turning the equipment off and on the user is encouraged to try to correct the interference by one or more of the following measures Reorient or relocate the receiving antenna Increase the separation between the equipment and the receiver Connect the equipment into an outlet on a circuit different from that to whi...

Page 3: ... U S A and other countries TrueType is a trademark of Apple Computer Inc IBM PC AT and 0S 2 are trademarks of International Business Machines Corporation Hewlett Packard HP LaserJet and PCL are trademarks of Hewlett Packard Company All other trademarks and copyrights are the property of their respective owners Importantsafety information Never install telephone wiring during a lightning storm Neve...

Page 4: ...Y S lNGS 3 5 CHANGING PRINTER PORT SEnlNGS 3 7 PRINTING FROM MS DOS APPLICATIONS 3 8 4 BASICOPERATIONS SENDING DOCUMENTS Q 1 RECEIVING DOCUMENTS Q 1I MAKING COPIES E Œœ ë õ 4 14 MAKING TELEPHONE CALLS 4 16 5 ANSWERINGMACHINECONNECTION USING THE CONNECTION 5 1 OPTIONAL A M CONNECTION SE lNGS 5 5 6 SPECIALFUNCTIONS MEMORY TRANSMISSION RESERVATION BROADCASTING CONFIDENTIAL TRANSMISSION POLLING RELAY ...

Page 5: ...nt of ozone during operation The amount is not large enough to be harmful however the fax should only be installed in a well ventilated room The fax must be installed on a level surface Keep the fax away from air conditioners heaters direct sunlight and dust Provide easy access to the front back and sides of the fax In particular keep the area in front of the fax clear or the original document may...

Page 6: ...s for the first time go to Step 5 3 If you are replacing the cartridges grasp the finger hold on the imaging cartridge handle marked PUSH and pull the handle out Rehold the handle and pull the imaging cartridge out of the compartment Caution The fusing unit the black unit with ribs extending across the bottom of the compartment becomes very hot during printing Be careful not to touch it If you are...

Page 7: ... section of the drum cartridge and insert it into the compartment Make sure it fits into place on top of the ottom of the if you have removed a used drum cartridge place it in the empty drum catiridge bag seal the bag and dispose of it in a way that conforms to any local regulations that may exist in your area 7 Grasp the protruding end of the protective paper and pull the paper out of the cartrid...

Page 8: ...cing upwards and inseti the cartridge into the printing compartment 11 Place your thumb on the centre of the handle where it is marked PUSH and push the handle slightly up and in so that the cartridge fits into place If you have removed a used imaging cartridge place it in the empty imaging cartridge bag seal the bag and dispose of it in a way that conforms to any local regulations that may exist ...

Page 9: ...RIDGE FO 26DR DRUM CARTRIDGE The imaging cartridge is capable of printing approximately 2000 pages if A4 size paper is used and 470 of each page is covered wit toner When the cartridge nears empty about 250 pages can still be printed the indicator on the operation panel will begin to blink When the cartridge is empty the indicator will light steadily and TONER EMPTY will appear in the display Repl...

Page 10: ...nd Plug the power lead into a 50 Hz grounded 3 prong Press the power switch to power 230 240 V AC outlet turn on the Caution When disconnecting the F 2700M unplug the telephone line cord before unplugging the power lead Insert the small modular plug which terminates the F080TP adaptor line cord into the socket on the side of the fax marked TEL LINE Plug the F080TP adaptor into the telephone socket...

Page 11: ...es WARNING NOTICE For all units installed in New Zealand only the T setting for tone dialling is permitted The P setting for pulse dialling does not operate properly and must not be used Moving your fax and reconnecting Should it be necessary to move your fax to a new location first disconnect the telephone line cord before disconnecting the power lead When reconnecting it is necessary to connect ...

Page 12: ...holes at the rear of the fax Place the paper cover on the paper tray so that the notches on each side of the cover fit onto the catches on each side of the tray Attach the original document support and the received document support to the top of the fax as shown 1 8 INSTALLATION ...

Page 13: ...eiving faxes from an extension phone see Receiving Documents in Chapter 4 Insert one end of the answering machine or extension phone line either into the socket on the back side of the F080TP adaptor or into the socket marked TEL SET on the fax first remove the seal from the socket or Important If you are connecting an answering machine make sure the line plug is insertedinto the answering machine...

Page 14: ...the cable 1 Make sure that the power switches of both the computer and the fax are turned off 2 Plug the cable into the parallel a interface port on the rear side of fax B q your 3 Fasten the bail clips at each end of the parallel interface port over the ends of the cable connector to hold the connector in place r ql Ky k A 4 Plug the other end of the cable into the parallel interFace port on your...

Page 15: ...that you use paper that has already been printed on one side as print quality problems or paper jams may result Some photocopier machines use toner that fuses at a lower temperature than that used in your printer If you run these through the printer the toner which is already on the paper may fuse onto the roller in the fusing unit Some pre printed sheets also use inks or coatings that maybe atiec...

Page 16: ... pinch the lever against the guide 6 Push the lever on the right side of the paper tray down to set the paper 7 Replace the paper tray cover Note When adding paper to the paper tray you must first take outanyremaining paper combine it into one stack with the new paper and then put the stack in the tray If you do not remove the remaining paper and simply place new paper on top of it double feeding ...

Page 17: ...000 copy of a document Display SEARCH DIAL kev This displays various Press this key to sgarch messages during uNcTiON ey for an automatic dialling operation and Press this key to number programming select various I special functions 000000 Number keys Use these keys to dial numbers and enter numbers and letters during number name storing procedures HOLD key Press this key to put the other party on...

Page 18: ...e SPEAKER key Step Press these keys Comments 1 FUNCTION m ENTRYMODE will appear in the display 2 W OWN NUMBER SET will appear in the display START 3 0 Enter your fax number max of 20 digits by 4 m Pressin9the numeric keYs To inse a sPace betweendigits press the key To insert a Example press the key START 5 0 55m55 GH1 GH GH a Enter your name by pressing the appropriate ABC ABC am numeric keys as s...

Page 19: ...first then the letters in the order 4 shown above the key I Delete letter highlighted by the cursor if the cursor is to the right of i6 rEY 3 i ti i ast 7 CQ 9 j urs r e 1 1 Symb ols Press either key repeatedly until the desired symbol appears see the symbol list below Press this key to move the cursor to the left Cursor right Press this key to move the cursor to the right Comments To enter two le...

Page 20: ...The following is an example of entering the name ABC Co l The cursor in the display is indicated below by a rectangle I Step Press these keys Display I 1 1 A 21 SPEAKER o A ABC ABC ABC 3 mB AB ABC co ABC co ABC CO 1 2 4 INITIAL SETTINGS ...

Page 21: ... are as follows Step Press these keys Comments FUNCTION 1 ENTRY MODE will appear in the display 2 I DATE TIME SET will appear in the display Example Enter the day of the month 2 digits 01 to 31 I a 5 Enter the month 2 digits 01 for January 02 Example January for February 12 for December etc I 6 a Example 1996 Enter the last two digits of the year 7 Enter the day of the week by entering the Example...

Page 22: ...s Automatic Fax Phone Changeover a special function for receiving both faxes and voice calls also operates in this mode ANS mode Select this mode when an answering machine is connected to the fax and you want the answering machine to answer all calls This allows you to receive both voice messages and faxes while you are out Setting the reception mode Press the RECEPTION MODE key until the light un...

Page 23: ...fax transmission your fax machine will automatically answer the call after 2 rings and receive the fax To reset Option Setting 17 see Chapter 7 Important The Distinctive Ringing function can only be used if you subscribe to a distinctive ringing service from your telephone company Do not set Option Setting 17 to YES if you are on a normal line as the fax machine will not operate properly If you tu...

Page 24: ... is longer than 20 digits use Chain Dialling Chain Dialling allows you to combine two or more automatic dialling numbers or use an automatic diailing number followed by additional digits entered manually with the numeric keys to dial a single number In addition to being convenient for storing long numbers it allows you to store an area code or access code as an automatic dialling number For exampl...

Page 25: ...Press these keys Comments 1 FUNC ON 1 2 ENTRY MODE will appear in the display I FAX EL MODE will appear in the display 3 o SelectSET I I L To store a Rapid Key number press a Rapid 4 Key I To store a Speed Dial number press two 1 Example numeric keys 01 to 30 5 cm a m Enter the fax number max of 20 digits including Example pauses using the numeric keys T ART If you are storing a Speed Dial number ...

Page 26: ...Step 4 to store another number or STOP 14 Q Step 4 or press STOPto exit If the number is a Rapid Key number you can write the name on the label above the appropriate Rapid Key 1 Clearingnumbers Step Press these keys Comments FUNCTION 1 m ENTRY MODE will appear in the display 2 FAX EL MODE will appear in the display 3 a SelectCLEAR approp ate Rapid Key To clear a Rapid Key number press the 4 To cle...

Page 27: ...mmed Broadcasting operation First clear the programmed operation as described in Entering and Using Programs in Chapter 6 then clear the key If you need to check which program the key is used in print out the Program and Group List as described in Chapter 8 I Step Press these keys Comments 1 1 1 FUNCTION m PROGRAM GROUP will appear in the display GROUP ENTRY MODE will appear in the display 3 a or ...

Page 28: ...STORING NUMBERS FOR AUTOMATIC DIALLING Notes I t 2 12 INITIAL SE lNGS ...

Page 29: ...ows 3 1 or Windows for Workgroups 3 1x 386DX 16 Mhz minimum for Windows 95 Physical RAM 4 MB Virtual memory 6 MB minimum Free hard disk space 5 MB for full installation of Windows Printing System Display VGA or Super VGA minimum requirement Comments The Windows driver provided with the Windows Printing System does not work with pure MS DOS Windows NT Win OS 2 orotheroperating systems You can howev...

Page 30: ... be given the choice of installing all parts of the system Express installation or only the parts that you specify Custom installation The Express installation will install all of the above files and will require approximately 5 MB of free hard disk space If you have limited hard disk space or do not want to install some of the parts select Custom Instaliation and then deselect the parts you do no...

Page 31: ...ounds Available box and then click the Add button To remove a message from the Sounds to Install box click the message in the Sounds to Install box and then click the Remove buttion 7 Remove all floppy disks from the disk drives and then click the Restart Windows button 8 After Windows has restarted the Print a Test Page window will appear Click the OK button to print out a test page This window w...

Page 32: ...he pages which have not been printed The online Help file which comes with Windows Printing System provides detailed information about printing and how to use Windows Printing System You can refer to this information by clicking the Help button in any of the Windows Printing System dialog boxes You can also select contents or Search for Help on from the Help menu in the Printer Status window For h...

Page 33: ...con in the Main program group and then double click the 386 Enhanced icon In the 386 Enhanced dialog box click the Virtual Memory button In the Virtual Memory dialog box click the Change button Enter the desired virtual memory size we recommend at least 6 MB in the New Size box and select Permanent in the Type box Selecting Permanent in the Type box will give the best performance however the maxim...

Page 34: ... then type in the desired amount of vifiual memory we recommend at least 6 MB in the Minimum box 7 Choose the OK button and then click the Yes button the Close button and the Yes button in the dialog boxes which subsequently appear Windows will restart and your new settings will go into effect 3 6 PRINTING SETUP ...

Page 35: ... go to Step 5 4 Select File from the Ports box and then click the OK button You will return to the Printers window 5 Select the F 2700M from the Installed Printers box and then click the Connect button 6 Select the port you want to use from the Ports box and then click the OK button 7 Click the Windows95 1 2 3 4 5 6 Click the Set As Default Printer button and then click the Close button Start butt...

Page 36: ...u can print from an MS DOS application You can install it without having to install the entire Windows Printing System again See installing Windows Printing System in this chapter Before printing select HP LaserJet Series II from the list of available printers in your MS DOS application Changingprint settings PCL Emulation has its own Front Panel window which you can use to change a variety of pri...

Page 37: ...graphics outside this area ca notbe transmitted Scanningwidth 210 mm Scanning length The length of the sheet minus 4 mm from both the top and bottom edges Other restrictions Documents written in yellow greenish yellow or light blue ink cannot be transmitted as the scanner does not recognise these colours Ink glue and correcting fluid on documents must be dry before they are transmitted All clips s...

Page 38: ... guides to the width of your document 2 Place the document face down and push it gently into the document feeder The top edge of the document should enter the fa xfirst The feeder will draw the leading edge of the document into the fax SEND COPY READY will appear in the display 3 You can now either make resolution and or contrast settings as described in the foiiowing section or diai the other par...

Page 39: ...In order to transmit with FINE or SUPER FINE resolution the receiving fax machine must also have that resolution If it doesn t the next best available setting will be used The default resolution the resolution the fax uses if you do not make a resolution setting can be changed to FINE by changing Option Setting 1 See Chapter 7 Optional Settings Contrast The contrast is normally set to AUTO which m...

Page 40: ...with only a single transmission press the panel keys as shown below In this case you can also select a message which will appear at the top of the cover sheet If you want the fax to automatically send a cover sheet with every transmission set Option Setting 11 to YES as described in Chapter 7 Optional Settings no message can be selected in this case I Step Press these keys Comments I FUNCTION 1 Q ...

Page 41: ...er of pages Your fax will adjust the number to include the cover sheet automatically If you need to cancel a batch number entry remove the document from the feeder or press the STOP key If the number of pages actually transmitted does not coincide with the batch number entered the alarm will sound and PAGE COUNT ERROR will appear in the display PAGE E will also appear in the NOTE column of the Tra...

Page 42: ...eir Start key to begin fax reception you can talk with them before sending the fax SPEAKER Pick up the handset or press the q SPEAKER key Listen for the dial tone 2 ABc DEF Dial the number of the receiving machine by pressing the numeric B L keys 3 Wait for the connection Depending on the setting of the receiving machine you will either hear a facsimile reception tone or the other person will answ...

Page 43: ...n Check the display f the number of the receiving machine shown is correct press the START key h If it is not correct press the STOP key to backspace and clear one digit at a time and then re enter the correct digit s Rapid Key Dialling If the number you want to dial has been stored as a Rapid Key number see Storing Numbers for Automatic Dialling in Chapter 2 you can dial it by pressing the approp...

Page 44: ...c Dialling in Chapter 2 can be combined with another automatic dialling number or digits entered manually with the numeric keys to dial one phone number up to 50 digits long The following are some examples of how this can be done Press appropriate Rapid Keys in the proper order For example press Rapid Key 01 then Rapid Key 02 Enter Speed Dial numbers in the proper order For example press the SPEED...

Page 45: ...the name begins with a special character or Example B number press 1 If you don t remember the first letter go to Step 3 you will scroll through the list from the beginning If a name wasn t stored for the number press O This will cause numbers not names to appear when you scroll To access voice numbers stored in Rapid Keys which have no name press O twice note that Speed Dial numbers will also app...

Page 46: ...ing including Direct Keypad Dialling and the line is busy your fax will automatically redial the number Up to 2 redialling attempts will be made at intervals of 5 minutes To stop automatic redia ling press the STOP key Using the REDIAL key You can press the REDIAL key to redial the last number dialled To send a document proceed from Step 3 of Normal Dialling Note that the speaker will be automatic...

Page 47: ...ution When the reception mode is set to MANUAL press the RECEPTION MODE key until the MANUAL light comes on you must answer all calls including fax transmissions using the fax s handset or an extension phone connected to the same line Receivingdocuments on your fax machine When your fax rings pick up the handset If you hear a fax tone wait until RECEIVING appears in the display and then replace th...

Page 48: ...fa document is loaded in its feeder Comments If you have set Option Setting 10 to OFF f and hear a fax tone when you answer the extension phone you must press 5 and if you are on a tone dial phone or walk over to the fax pick up the handset and press the START keyif you are on a pulse dial only phone The code used to activate fax reception from a tone dial extension phone 5 and can be changed if d...

Page 49: ... receiving documents change the setting of Option Setting 2 to a lesser number of rings How the function operates When a call comes in your fax will answer it after the number of rings set with Option Setting 2 After answering the fax monitors the line for about 5 seconds to see if a fax tone is being sent If your fax detects a fax tone this means that the call is an automatically dialled fax it w...

Page 50: ...if the resolution or contrast needs adjustment 1 Load the document s face down ru If desired adjust contrast with the the resolution and or RESOLUTION key 2 Press the COPY key and then the COPY START START key P 0 k Q o Follow these steps when you want to make Up to 99 copies per original can be made multiple copies of one or more originals If you are making multiple copies of more than one origin...

Page 51: ...r of copies is from Example 1 to 9 enter O first 5 START Q Press the START key Note lfyou place a large number of originals in the feeder the memory may become full before all of them can be scanned MEMORY FULL will appear in the display If this happens press the START key to copy the originals which have been scanned and then repeat the multiple copy procedure for the remaining originals includin...

Page 52: ...ust or press the SPEAKER key 2 Dial the number using one of the a GHI a o P RS 7 following methods e e Normal Dialling Enter the full telephone number with the numeric keys Rapid Key Dialling Press the appropriate Rapid Key The voice number will be dialled Speed Dialling Press the SPEED key and enter the 2 digit Speed Dial number with the numeric keys 3 Speak with the other party when they answer ...

Page 53: ...Redial The last number called can be redialled by pressing the REDIAL key it is not necessary to pick up the handset or press the SPEAKER key When the other party answers pick up the handset Hold You can put the other party on hold during a conversation by pressing the HOLD key When this is done they cannot hear you You can put the handset back in the cradle without breaking the connection When yo...

Page 54: ...MAKING TELEPHONE CALLS 4 18 BASIC OPERATIONS ...

Page 55: ...o as follows Hello You ve reached the ABC company No one is available to take your call right now Please leave a message after the beep or press your facsimile Start key to send a fax Thank you for calling Comments it is advisable to keep the length of the message under 10 seconds If it is too long you may have difficulty receiving faxes sent by automatic dialling Your callers can even leave a voi...

Page 56: ...ring machine mode operates While you are out all of your incoming calls will be answered by your answering machine and its outgoing message will play During this time your fax will quietly monitor the line If your fax detects a fax transmission it will take over the line and begin reception If the connection is not good or there is noise on the line the answering machine and or fax machine may not...

Page 57: ...ains a pause or the caller pauses while leaving a message and the pause is longer than the specified duration the fax will interrupt It is best to shorten or eliminate such pauses but if necessary you can also try lengthening the Quiet Detect Time setting This procedure is described in Optional A M Connection Settings at the end of this chapter Are callers who want to send a fax manually having tr...

Page 58: ...machine does not send a calling tone Instead the person faxing normally waits until they hear a reception tone and then presses their Start key In the case of an answering machine connection they will hear your outgoing message instead of a reception tone and then press their Start key However this does not signal a fax transmission to your fax Instead it must use a function called Quiet Detect Ti...

Page 59: ...ns that the answering machine may disconnect the line before fax reception can begin In this case try a Quiet Detect Time setting of about 3 seconds If the fax machine is interrupting callers before they can leave a message try a longer Quiet Detect Time setting If your outgoing message includes a period of silence make sure that the setting is longer than that period of silence or re record your ...

Page 60: ...o take your call right now After the beep please leave a message or if YOUwant to send a fax and are calling on a touch tone line press five once Stafl key asterisk twice and then your facsimile When this function is turned on your fax will answer the call after 4 rings if the answering machine for some reason fails to answer before that time This ensures that you will receive fax messages even if...

Page 61: ... NO With this function the original document is scanned immediately stored in memory and then transmitted once the connection to the receiving machine is made This is convenient when transmitting to places where the line is often busy as it saves you from waiting to collect the original document and frees the feeder for other operations Only one memory transmission can be set at a time The amount ...

Page 62: ... entire transmission This is a back up function which is automatically activated if your fax runs out of paper the imaging cartridge needs replacement or the paper jams When you have received a document in memory FAX RX IN MEMORY will appear in the display alternating with CHECK PAPER REPLACE TONER or PAPER JAM When you add paper replace the imaging cartridge or clear the jam the stored documents ...

Page 63: ...solution and or contrast if desired 2 Enter the number of the receiving machine using one of the following cDCCn methods 3 Note Press a Rapid Key Press the SPEED key and enter a Speed Dial number Enter a full number with the numeric keys Press the START key if you entered a START Speed Dial number or a full number Q u The number will be dialled once the I current operation is completed and transmi...

Page 64: ...ess the BROADCAST key 3 Dial the receiving units using one or more of the following methods Press one or more Rapid Keys Enter one or more Speed Dial numbers by pressing the numeric keys Example Press one or more Group Keys 4 START n Press the START key o1 Set the resolution and or contrast if k desired 5 Press the START key Transmission START wifi begin A Transaction Report is automatically print...

Page 65: ...all been programmed into one Group Key you can perform the broadcasting operation using the following simplified procedure 1 Load the document s I Make any desired transmission settings resolution contrast etc n 191G1 Example Press the appropriate Group Key Transmission will begin SPECIAL FUNCTIONS 6 5 ...

Page 66: ...t s Make any desired transmission settings resolution contrast etc 2 START Press the FUNCTION key 6 and the o NCTIO START key CONF TX MODE will appear in the display 3 If the receiving machine has multiple mailboxes enter the appropriate Example 2 digit mailbox number with the numeric keys if not skip this step 4 START o Press the START key uI h 5 Dial the receiving unit using one of the following...

Page 67: ...ling If it has already been programmed for Rapid Key Dialling you must clear it first as described in Storing Numbers for Automatic Dialling in Chapter 2 Step 1 2 3 4 5 Press these keys STOP Comments ENTRY MODE will appear in the display POLLING FUNCTION will appear in the display Press 1 to turn the polling function on or 2 to turn it off Exit SPEED Example Dial the fax machine you want to poll u...

Page 68: ...ible whilst your fax is on polling standby Polling Security allows you to prevent unauthorized polling of your fax When this function is turned on polling will only take place when the fax number of the polling fax machine has been entered in your fax s list of permitted fax numbers called passcode numbers The number of the polling fax must also be correctly programmed into itself Turning Pol ing ...

Page 69: ...ay I 2 B a PASSCODE MODE will appear in the display 3 r Press 1 to set a number or 2 to clear a number 1 I Storing Enter a 2 digit number from 01 to 10 I This number identifies the fax number you will 41 enter in the next step Clearing Enter the 2 digit number which identifies the fax number you want to clear and Example go to Step 6 I 5 a a 3 a a a Enter the fax number max 20 digits 1 Example I I...

Page 70: ... to specify the relay machine a full number cannot be entered Fax numbers of the end receiving machines can be entered as Rapid Key numbers Speed Dial numbers and or Group Key numbers if they have been stored as such in the relay machine not in your fax machine Check with the operator of the relay machine for these numbers The total number of end receiving machines which can be entered varies with...

Page 71: ...Rapid Key numbers START r Example 9 10 11 12 13 14 Enter the relay machine s Speed Dial numbers of the end receiving machines by pressing numeric keys Skip this step if you don t want to enter Speed Dial numbers Enter numbers of Group Keys for end machines by pressing numeric keys Skip this step if you Example don t want to enter Group Key numbers START 9 Enter a full fax number skip this step if ...

Page 72: ...ke a relay request your fax number must be entered into the Relay Passcode List of the relay fax machine by the operator of that fax Your number must also be correctly entered in your fax as described in Entering Your Name and Fax Number in Chapter 2 Load the document Set the resolution and or contrast if desired Press the FUNCTION key the 5 key and the key 3 START Press the START key 6 12 SPECIAL...

Page 73: ...document mix ups or forgetting to load the document If a transmission from the feeder is set a highlighted T will appear at the right of the display Code numbers are used to specify days of the week Refer to the table below when making time settings which include a specified day I 1 Day SUN MON TUE WED THU FRI SAT Code o 4 1 2 3 45 6 J Note Only regular transmissions and polling operations can be ...

Page 74: ...the numeric keys I START I 9 I o I 1 RESOLUTION If this is a transmission operation adjust the 10 resolution and or contrast if desired Otherwise c I skip this step I START 11 o I I Transmissionoperation If you want to send the document from memory load it now and 1 press MEMORY Otherwise press STARTand START load the document any time before the set o MEMORY 12 transmission time If a non memory t...

Page 75: ...ill assigned to it If you don t remember the number it Lists r Step need to know the number appears in the display when you set the operation print out the Timer List See Chapter 8 Printing Out Reports and Press these keys Comments TIMER MODE will appear in the display Exampie Enter the 1 digit timer number assigned to the operation I START SPECIAL FUNCTIONS 6 15 ...

Page 76: ... a selected time To clear a mistake press the STOP key To program an operation first perform the following basic procedure After you have completed it refer to the procedure for the specific operation you want to program Code numbers are used to set days of the week Refer to the table below when making time settings which include a specified day I Day SUN MON TUE WED TI IU FRI SAT Code o i 1 2 3 4...

Page 77: ...ress the key or key until the desired operation appears in the display The operations will appear in the following order Transmission Polling confidential transmission Broadcasting Relay Request START 3 Continue with the specific procedure for your operation see the following pages Continued from Initial procedure I I 1 Example Enter the fax number of the other machine using one of the following m...

Page 78: ...chine does not have Example mailboxes START I 14 I I I Enter the fax number of the other machine using mm one of the following methods 15 Press a Rapid Key Enter a Speed Dial number with Example the numeric keys START 16 u RESOLUTION 17 Adjust the resolution and contrast if desired othetwise skip this step START 18 i o I i If you want the documentto be sent from START 19 MEMORY o memory press MEMO...

Page 79: ...ss one or more Group Keys I START I 3 14 j o RESOLUTION 15 Adjust the resolution and contrast if desired otherwise skip this step 16 3 STOP 17 0 G Exit 13 14 15 16 procedure RESOLUTION Adjust the resolution and contrast if desired otherwise skip this step START 3 If you want the document to be sent from START MEMORY 3 memory press MEMORY o r If you want the document to be sent from the feeder pres...

Page 80: ...a Rapid Key Enter a Speed Dial number the numeric keys with Exit To clear a Program key follow these steps Step Press these keys Comments 1 FUNCTION a PROGRAM GROUP will appear in the display 2 m PROG ENTRY MODE will appear in the displa a I Select CLEAR 3 I I 171P1 4 I Example Press the Program Key you want to clear START 1 0 1 I 6 I 5 I I STOP I 6 Exit 6 20 SPECIAL FUNCTIONS ...

Page 81: ...can be set at any one time including both timer operations set by pressing a Program Key and operations set as described in Timer Operations in this chapter If a Program Key has been pressed for a timer operation and you need to cancel the operation before it is performed follow these steps 1 17 Pl I I Press the Program Key Example 2 START Press the START key SPECIAL FUNCTIONS 6 21 ...

Page 82: ...s shown you do not want to receive faxes Anti Junk Fax on and off Step Press these keys STOP o s L faxes from parties which junk faxes below and then enter the as shown on the following fax numbers page Comments ANTI JUNK FAX will appear in the display ANTI JUNK SELECT will appear in the display Press 1 to turn Anti Junk Fax on or 2 to turn it off Exit 6 22 SPECIAL FUNCTIONS ...

Page 83: ...l appear in the display 2 0 JUNK FAX MODE will appear in the display I 3 or Press 1 to store a fax number in the Anti Junk Fax List or 2 to clear a fax number from the list Storing Enter a number from 01 to 1O This number identifies the fax number you will store 4 in the next step Clearing Enter the number which identifies the Example fax number you want to clear and go to Step 6 i m a a a 5 Examp...

Page 84: ...ANTI JUNK FAX Notes 6 24 SPECIAL FUNCTIONS ...

Page 85: ...1 FINE RESOLUTION PRIORITY This sets the default resolution the resolution used if a setting is not made with the RESOLUTION key for transmitting documents Press 1 YES to set it to FINE or 2 NO to set it to STANDARD Factory setting 2 Setting2 NUMBER OF RINGS AUTO RECEPTION This sets the number of rings your fax allows before answering an incoming call in AUTO receive mode Enter a number from O to ...

Page 86: ...de Press 2 NO to turn the function off Factory setting 2 Setting7 PSEUDO RINGING DURATION This sets the duration of pseudo ringing when Automatic FatiPhone Changeover is turned on Enter a number from 1 to 2 as follows 1 15 SEC 15 seconds 2 30 SEC 30 seconds Factory setting 1 Setting8 TEUFAX REMOTE NUMBER TRANSFER CODE This sets the 1 digit number for activating fax reception from an extension phon...

Page 87: ...ng paper 2 REDUCE 100 No reduction 3 REDUCE 94 Ye Reduction of A4 size originals to the printing paper size Factory setting 1 Setting 14 COPY CUT OFF Press 1 CONTINUE to have documents longer than the printing paper be continued on a second page when copied Press 2 CUT OFF to have the part outside that length not printed Factory setting 2 Setting 15 FOOTER PRINT Press 1 YES to have the transmittin...

Page 88: ...e telephone line be corrected before print out at the receiving end This is only effective when the other machine has ECM as well Press 2 NO to turn the function off Factory setting 1 Setting19 RINGING VOLUME This sets the volume of the ringer Press l for low 2 for middle or 3 for high Factory setting 2 7 4 OPTIONAL SEITINGS ...

Page 89: ... be automatically printed out whenever information on 30 operations has accumulated A report can still be printed out manually at any time All information is erased after a repofi is printed out If automatic print out is disabled and print out has not been performed manually for 30 operations the information on the oldest operation will be overwritten each time a new operation is performed Explana...

Page 90: ...cognise the handshake si9na rem E 1 the receiverside E 2 Linedisconnected duringtransmission 1 E 3 Linedisconnected after modemspeed fall 1 back E 4 Linedisconnected duringmulti page transmission I E 6 Cannot recognize the handshake signal for next page at receiver side E 7 Noresponse from receiver side or disconnect signal is received at transmitter side Error was not corrected after the E 8 pred...

Page 91: ...been stored for automatic dialling the numbers in the relay group your name and fax number as entered in your fax and a sample of the header printed at the top of every page you transmit This list shows the fax numbers which have permission to poll you This list shows the current status of the optional settings PRINTING OUT REPORTS AND LISTS 8 3 ...

Page 92: ...ted to allow you to check the result Your fax is set at the factory to print out the report only when an error occurs but you can change the setting to have it printed out after every operation only after certain types of operations or not at all This is done by changing Option Setting 5 as described in Chapter 7 The Transaction Repoti shows Activity Report in this chapter f the same information a...

Page 93: ...w White backplate Wipe the reading glass white backplate and rollers with a soft cloth Make sure that all dirt and stains such as those of correcting fluid are removed as these will cause vertical lines on transmitted images and copies Readingglass Wipe the external parts and sutiace of the machine with a dry cloth Caution Do not use benzene or thinner These solvents may damage or discolour the ma...

Page 94: ... Be careful not to touch it 2 Place the drum gently on a clean uncluttered and level surface Do not touch the green drum in the drum cartridge and do not expose the drum to direct light Doing so will damage the surface of the drum 3 Take a sheet of ciean paper and roll it m tightly into a tube Gently tap the suflace of the drum with the tube to pick up any particles of toner which may be sticking ...

Page 95: ...rly connected to both the TEL LINE socket and the wall socket Make sure that the fax is set to the correct dialling mode for your telephone line See OptionSetting 16 in Chapter 7 Nothing is printed at the receiving Make sure that the document for transmission is placed face end down in the feeder Make sure that the printing paper is properly loaded in the receiving machine The power is on but no t...

Page 96: ...it The imaging cartridge may need replacement Received images are distorted Noise on the telephone line may cause distortion Have the other party try sending the document again I Make a copy of another document on your fax If the copy is also distorted your fax may have a problem If the problem persists call for service The photoconductor drum may be damaged Try a new drum cartridge No confidentia...

Page 97: ...d FUNCTION MODE The FUNCTIONkey has been pressed LINE ERROR Transmission or reception was not successful Press STOP to clear the message and then try again MEMORY FULL The memory is full See Memory in Chapter 6 I MEMORY PRINTING The fax is preparing or printing out a document from memory I Confidential transmission was cancelled because the receiving NO CONF FUNC machine does not have a confidenti...

Page 98: ...tion in Chapter 6 REPLACE TONER The imaging cartridge needs replacement or has not been installed The connection was not made when automatic dialling was RECALL MODE attempted The fax will make up to 2 redialling attempts at intervals of 5 minutes Continuoustone 3 seconds indicates the end of transmission reception or copying Intermittent tone 5 seconds 1 second on Indicates incomplete transmissio...

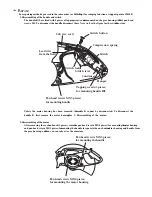
Page 99: ...of printing paper pull the lever marked PULL on the paper tray toward you take out the stack of paper put it back in and push the lever back down If you are unable to clear the paper jam in this way continue with the following steps n L Remove any documents from the received document outlet Open the operation panel and remove the received document guide the imaging 1 I cartridge and the drum cartr...

Page 100: ... of the paper has entered the fusing unit turn the wheel on the top right side of the fusing unit in the direction of the arrow until the leading edge of the paper is released from the unit Wheel Caution Do not pull the paper out of the fusing unit with your hands This may cause toner smudges on succeeding pages Important Do not turn the wheel in the direction opposite that of the arrow Also note ...

Page 101: ...eplace the drum cartridge imaging cartridge and received document guide Close the operation panel For detailed instructions see Step 6 and Steps 10 to 14 in installing the Printer Cartridges in Chapter 1 l TROUBLESHOOTING 10 7 ...

Page 102: ...CLEARING PAPER JAMS Notes 10 8 TROUBLESHOOTING ...

Page 103: ...igit display Auto Manual Answering machine 9600 bps vith automatic fallback to 7200 4800 or 2400 bps Approx 13 seconds Sharp special mode 202 mm average 100 sheets 60 90 g m2 A4 Automatic feeding Width 148 to 216 mm Length 128 to 356 mm Manual feeding Width 148 to 216 mm Length 128 to 1000 mm 210 mm max 52 157 g z one sheet at a time 52 80 g m several sheets 20 sheets max 32 levels Automatic Dark ...

Page 104: ...eric keys I m I I START Redialling Load RESOLUTION I 8d Ø8d à8d document D Q j n tone L 2 Making voicecalls Normal Dialling Lift handset or Dial press Lift handset if you numenc keys 1 press SPEAKER pressed SPEAKER I I Rapid Key Dialling press SPEAKER Press Rapid Lift handset ifyou Key pressed SPEAKER 1 I Lift handset SPEED Speed Dialling 1 or c press SPEAKER Enter Speed Dial number Lift handset i...

Page 105: ... Direct Keypad Dialling 4 7 Display messages IO 3 10 4 Distinctive ringing 2 7 Document feeder 4 2 Document guides 4 2 Document restrictions 4 1 Document rollers 9 1 Document sizes 4 1 Document readable length and width 4 1 Drum Cartridge 1 5 E Electrical outlet 1 6 Error Correction Mode 7 4 Extension telephone connecting 1 9 Extension telephone using 4 12 F Fine Resolution Priority 7 1 Function G...

Page 106: ...peaker volume Speed Dial key Speed Dialling Start key Stop key 8 3 1 10 1 11 2 1 10 5 1 8 1 10 1 11 numbers 8 3 2 9 3 8 6 7 6 9 6 7 1 6 3 4 3 7 8 4 6 16 6 21 4 7 2 1 9 1 4 10 1 7 2 6 2 6 2 6 4 11 2 6 4 11 2 1 2 6 2 1 4 10 4 17 4 10 4 17 6 10 6 12 2 1 entering 2 1 2 1 Storing numbers for automatic dialling 4 12 7 2 m 4 3 2 1 4 3 1 7 9 1 4 9 4 17 4 9 2 2 2 1 4 6m 4 16 1 7 4 8 4 16 4 8 2 1 2 1 2 8 Te...

Page 107: ...er a make one coPy of the n Software soieiy for backup or archivai purpose or b transfer the Font Software to a singie hard disk provicea you keep the originai soleiy for backup or archival ourpose 3 COPYRIGHT The SO WARE is owned by Microsofi Corporation or Sharp Corporation and is protected by Unl ed States copyright laws and internationai treaty rovisions and other applicable nationai iaws Ther...

Page 108: ...e remainder of the original warranty period or thirty 30 days whichever is longer NO OTHER WARRANTIES To the maximum extent permitted by applicable law Sharp and its suppliers disclaim all other warranties either express or implied including but not limited to implied warranties of merchantability and fitness for a particular purpose with regard to the SOFTWAREandthe accompanying writtenmaterials ...

Page 109: ... Notes ...

Page 110: ...a 1 Notes ...

Page 111: ...A PTY LTD A C N 003039405 1 Huntingwood Drive Huntingwood Blacktown N S W 2148 SHARP CORPORATIONOF NEWZEALAND LIMITED Cnr Mahunga Drive Hastie Ave Mangere Bridge Auckland New Zealand SHARP CORPORATION PRINTEDINJAPAN 6FI 5Y TINSE3604SCZZ ...

Reviews: