Sharp DV-NC100 Operation Manual Download Page 17

EN

VCR OPERATION

To correct timer programmes

If you want to correct an automatic timer after you finished
setting programme,

Repeat 

steps to in 

the 

“Timer 

Recording” section.

Select the setting you want to change using

s

or

B

.

Enter the correct numbers using

K

or

L

, then press 

B

.

Press 

MENU

to exit.

Press 

TIMER ON/OFF

to return to timer stand-by mode.

To cancel or check the start/end time

Repeat 

steps to in 

the 

“Timer 

Recording”.

Select a programme number you want to check using

K

or

L

. The details of selected programme appears on the

TV screen. You may cancel the entire programme by
pressing

s

.

Press the 

MENU

button to exit.

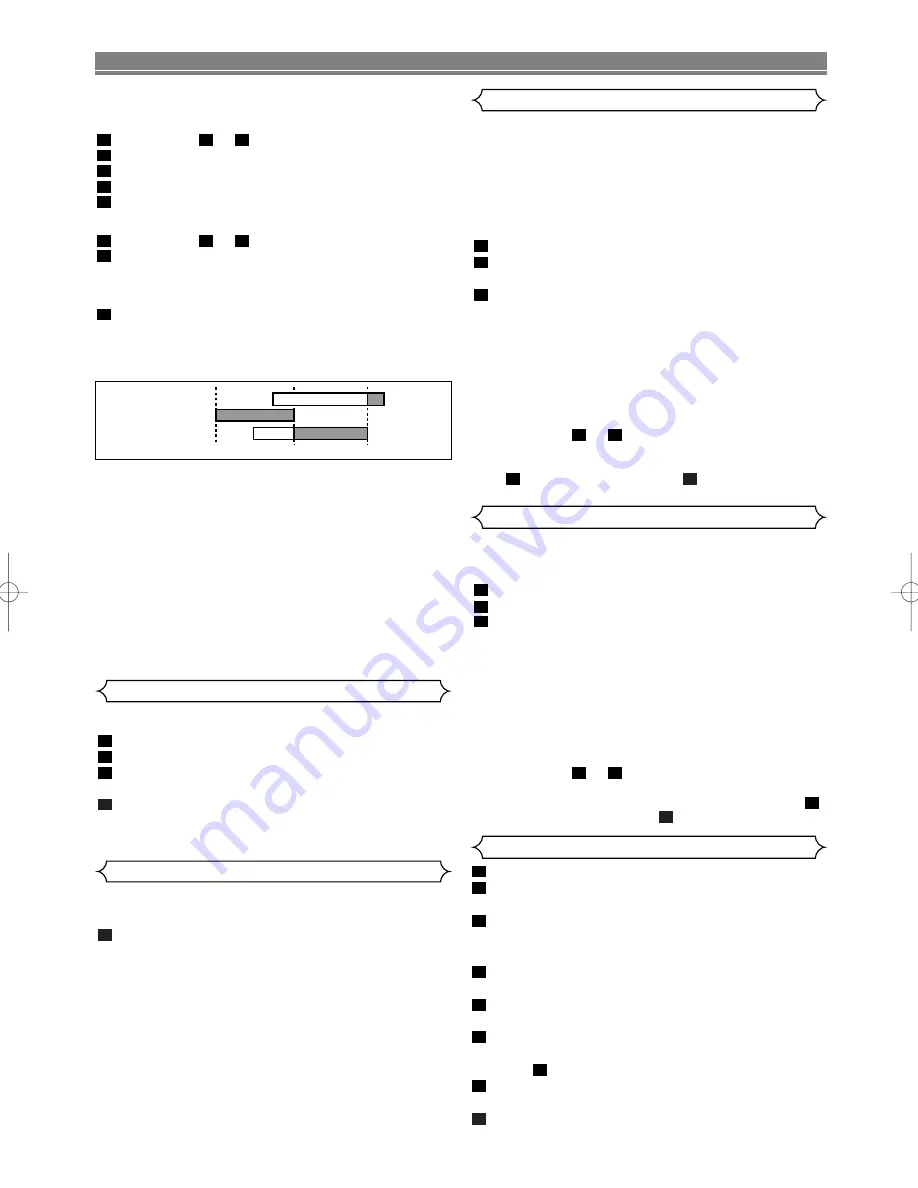
To avoid overlap of TIMER programmes ...

A timer programme will not work while another programme is
under execution.

Hints for Timer Recording

• If there is a power failure or the VCR/DVD is unplugged for

more than 1 hour, clock and all timer settings will be lost.

• If a tape runs out before a timer recording is finished, the

unit ejects the tape and switches into DVD mode automati-
cally. Press 

TIMER ON/OFF

to active VCR function.

• Once the unit goes into Timer-standby mode, no VCR func-

tions are available until 

TIMER ON/OFF 

is pressed. (

OUT

PUT

on the front panel and 

VCR

on the remote control will

not function.)

• Press 

TIMER ON/OFF

to activate VCR functions after your

timer recording is finished.

• DVD functions are available during Timer-standby mode and

Timer recording. You don’t have to stop your timer recording.

9:00

10:00

11:00

Programme 1

Programme 2

Programme 3

3

2

2

1

1

5

4

3

2

3

1

1

– 17 –

If there are any remaining programmes including Daily,
Everyday and Weekly, AUTO RETURN will not operate.

Press 

VCR

, then 

MENU

.

Press

K

or

L

repeatedly to point to SET UP, then press

B

.

Press

K

or

L

to point to AUTO RETURN,  then press 

B

.

[ON] will appear next to AUTO RETURN.
Press 

MENU

.

Watch the Recorded TIMER PROGRAMME

Press 

OPERATE

to turn on the VCR/DVD, then press 

PLAY

.

4

3

2

1

Auto Return

This function enables you to search and confirm the contents
of the recorded programme(s) using the index mark.
• The tape must be fully rewound.

Press 

VCR

, then 

QUICK-FIND

.

To skip to the beginning of next programme

Press 

QUICK-FIND

.

To view at normal speed

Press 

PLAY

. The Quick-Find is cancelled.

NOTES:

• This function will not operate in the Recording mode.
• When you want to cancel the Quick-Find while in

progress, press 

STOP

.

• When the end of a tape is reached during the Quick-

Find, the tape will automatically rewind to the begin-
ning. After rewinding finishes, the VCR/DVD will eject
the tape.

1

Quick-Find

• The index mark will be made automatically when

REC/OTR

is pressed. It will also be marked at the starting

point of Timer recording and OTR.

• The index mark is not recorded if 

STILL/PAUSE

is

pressed and released during recording.

• The time gap between index marks on the tape should be

greater than 1 minute for SP recording and 2 minutes for
LP recording.

Press 

SEARCH MODE

.

Press

K

or 

L

repeatedly until the number of pro-

grammes that you want to skip appears.
Press

s

or

B

.

The VCR/DVD begins rewinding or fast forwarding to the
beginning of desired programme.
• When the preset programme is reached, the VCR/DVD

will start playback automatically.

NOTES:

• Index Search can be set up to 20.
• This function will not operate in the Recording mode.
• Operations must be followed up within 30 seconds,

from steps 

to 

. Otherwise the Index Search

mode will be cancelled.

• To exit the Index Search mode, press 

MENU

in step

. Or press 

STOP

after step 

.

3

2

3

2

3

2

1

Index Search

If a tape includes both programmes recorded in the PAL sys-
tem and ones recorded in the NTSC system, this function
may not be operated correctly.

Press 

VCR

, then 

SEARCH MODE

twice.

Press

K

or 

L

repeatedly until the desired time appears.

Press 

s

or

B

.

The VCR/DVD begins rewinding or fast forwarding to the
specified point.

When 0:00 is reached, the VCR/DVD will start playback auto-
matically.

NOTES:

• Time Search can be set up to 9 hours 59 minutes

(9:59).

• This function will not operate in the Recording mode.
• Operations must be followed up within 30 seconds,

from steps 

to 

. Otherwise the Time Search mode

will be cancelled.

• To exit the Time Search mode, press 

MENU

in step 

.

Or press 

STOP

after step 

.

3

2

3

2

3

2

1

Time Search

Recording from DVD to VCR

To activate DVD function, press 

DVD

.

Insert a non-copyright-protection DVD, then press 

PAUSE

at the point where you want to start recording.
Press 

VCR

, then insert a tape with its erase-prevention

tab in place. Make sure the VCR function is in Stop mode
after you find your recording point.

Press 

TAPE SPEED/SYSTEM

to choose your recording

speed. “SP” or “LP” appears on the front panel display.
Press 

0

0

4

, with the 

numerical buttons

, then “disc”

briefly appears on the front panel display.
Press 

REC/OTR.

• The recording of the DVD’s paused image selected at     

step starts.

Press 

DVD

, then press 

PLAY

.

• The recording of the DVD’s moving image starts.

To stop recording, press 

VCR

, then 

STOP

.

8

7

2

6

5

4

3

2

1

H9744RD(EN).qx4  04.7.2  19:29  Page 17

Summary of Contents for DV-NC100

Page 1: ...read this Operation Manual carefully before using your VCR DVD COMBINATION 5 PULL OPEN DV NC100 OPERATE OPEN CLOSE PLAY STOP DVD VCR CH TIMER REC PLAY REW FF STOP EJECT TRACKING OUTPUT The region number for this VCR DVD is 5 MODEL DV NC100 RU PAL ...

Page 2: ...t cannot be used elsewhere CAUTION USE OF CONTROLS OR ADJUSTMENTS OR PERFORMANCE OF PROCEDURES OTHER THAN THOSE SPECIFIED HEREIN MAY RESULT IN HAZARDOUS RADIATION EXPOSURE AS THE LASER BEAM USED IN THIS VCR DVD IS HARMFUL TO THE EYES DO NOT ATTEMPT TO DISASSEMBLE THE CABINET REFER SERVIC ING TO QUALIFIED PERSONNEL ONLY WARNING TO REDUCE THE RISK OF FIRE OR ELECTRIC SHOCK DO NOT EXPOSE THIS EQUIPME...

Page 3: ... heat sources Keep the VCR DVD away from strong magnetic objects Do not place any object containing water or other liquids on the VCR DVD In the event that liquid should enter the cabi net unplug the VCR DVD immediately and contact the retailer or service centre approved by SHARP immediately Do not remove the VCR DVD cabinet Touching parts inside the cabinet could result in electric shock and or d...

Page 4: ...Choices for audio language and sound mode Parental lock Automatic detection of discs This VCR DVD automatically detects if a loaded disc is DVD audio CD video CD MP3 and JPEG on disc or Kodak Picture CD Playing an MP3 disc Displaying a JPEG picture Kodak Picture CDs can be played Still images stored in JPEG format on CD RW R can also be played Direct Search DTS Digital Theater System You can enjoy...

Page 5: ...rent Tape Speeds 18 TV Colour System 18 PLAYING A DISC 19 Basic Playback 19 General Features 19 Pause 19 Disc Menus 19 Title Menu 20 Step by Step Playback 20 Rapid Play 20 Resume 20 Playing the disc recorded in VR mode Video Recording format 20 Fast Forward Reverse Search 21 Slow Forward Reverse 21 Zoom 21 Track Search 21 Title Chapter Search 21 Time Search 21 Repeat 22 A B REPEAT 22 Programme CD ...

Page 6: ...ode can be played back Some DVD RW R DVD RW R or CD RW R discs made on personal computers or on DVD recorders may not be played back prop erly due to the factors such as scratches dirt or special properties of the disc Discs made on personal computers may not playback properly due to compatibility or settings in the recording software We recommend always to use the standard settings and correctly ...

Page 7: ...eo cable to connect this jack to the S Video jack on your A V compatible TV or wide screen TV for a higher quality picture 25 EURO AV1 TV OUT terminal Use the scart cable to connect this terminal to the 21 pin scart terminal on your A V compatible TV or wide screen TV for a best quality picture If your TV has RCA type audio and video input jacks you may connect to this terminal through the SCART o...

Page 8: ...e title menu 8 ARROW Buttons KLs B up down left right Press to select an item in the menu and to move the cursor 9 RETURN Button Returns to the previous operation DVD 10 Numerical Buttons 11 CLEAR C RESET Button Press to clear the markers or the incorrect input DVD Press to reset the counter VCR 12 PLAY Button Press to begin playback 13 REV Button Fast reverse playback to a desired point 14 REC OT...

Page 9: ...aying back in slow mode DVD or Video CD Lights up when the inserted disc comes to a pause Displays the elapsed time of the title or track The number of a new title chapter or track is displayed when a chapter or track is switched No disc inserted or cannot read Tray open Tray closed Loading the Disc Lights up when the playback control is activated Lights up when the inserted tape is being played b...

Page 10: ... TV You will still need the SCART cable or Round coaxial cable for VCR features S VIDEO connection is available only in DVD mode Connecting to a TV Equipped with RCA type Input Jack If your TV has RCA type audio and video input jacks you may connect to EURO AV1 TV OUT terminal through the SCART output adaptor supplied When using this connec tion do not connect a decoder to the EURO AV2 DECODER ter...

Page 11: ... numbers may be lost C C Digital Connection to Audio Equipment or MD Recorder without a Dolby Digital Decoder Audio CD Audio CDs can be transferred digitally to other equipment such as an MD recorder play the disc as you would normally with the audio mode set to L R and use the connection shown above Audio CDs recorded in the DTS format cannot be trans ferred digitally or via analogue DVD DVDs rec...

Page 12: ...tting will be necessary if your VCR DVD is connected to the TV via the round coaxial cable Press VCR Insert a pre recorded tape into the Cassette compart ment Playback will start automatically If playback does not start press PLAY Select and adjust your TV to channel 36 If the playback picture appears on the TV screen con tinue with step If channel 36 is set for broadcasting or interference lines ...

Page 13: ...the TV channel to the video channel on the TV Press VCR then MENU Press K or L to select INITIAL then press B Press K or L to select CH TUNING then press B Press K or L to select AUTO then press B The tuner scans and memorises all the active channels in your area After scanning the tuner stops on the lowest memorised channel To select a desired channel You can select a desired channel by using CH ...

Page 14: ... 2 1 To Skip a Preset Channel You can replace two channels Press VCR then MENU Press K or L to select INITIAL then press B Press K or L to select CH TUNING then press B Press K or L repeatedly to select MOVE then press B Press the K or L repeatedly to select the position number you want to change the channel then press B You cannot select a position number where appears next to the number This is ...

Page 15: ...AY to start playback Press STILL PAUSE at the desired point on the tape Press REC OTR The VCR DVD will be the Recording Pause mode Press CH o o p p to select the channel to be recorded Press REC OTR or STILL PAUSE The recording will begin Press STOP when recording is completed 6 5 4 3 2 1 4 1 2 1 5 4 3 2 1 During reception of bilingual broadcasts Reception of stereo broadcasts STEREO LEFT RIGHT No...

Page 16: ...ogramme number flashes Press K or L repeatedly until the desired programme number appears Then press B For once only recording Press K or L repeatedly until the relevant month appears For daily recording To record a TV programme at the same time on the same channel from Monday through Friday While the month digit is flashing press K or L repeatedly to select MO FR For everyday recording To record ...

Page 17: ...a tape is reached during the Quick Find the tape will automatically rewind to the begin ning After rewinding finishes the VCR DVD will eject the tape 1 Quick Find The index mark will be made automatically when REC OTR is pressed It will also be marked at the starting point of Timer recording and OTR The index mark is not recorded if STILL PAUSE is pressed and released during recording The time gap...

Page 18: ...SPLAY Each time you press DISPLAY TV screen will change as illustrated When you select the channel using the remote control the numerical buttons select the desired channel position number SP 0 12 34 SP 17 40 P02 CLOCK and CHANNEL NUMBER mode COUNTER mode Press once Press once Press once OFF mode Status Display NOTE If the display shows an abnormal reading or no read ing press RESET button on the ...

Page 19: ...nals playback may start from the second title or it may skip these titles During the playback of two layered disc pictures may stop for a moment This happens when the 1st layer switches to the 2nd layer This is not a malfunction A DVD RW disc recorded in the VR mode may freeze momentarily during playback depending on how the playlist was made and edited deleted titles repeated recording 5 4 3 2 1 ...

Page 20: ...ed to alter the order or content to be played If a PLAYLIST has been created you can choose the ORIGINAL or PLAYLIST option Press MENU in stop mode The current setting screen will appear Pressing MENU during playback is not valid Press s or B to select ORIGINAL or PLAYLIST PLAYLIST will not be displayed when it has not been made Resume playback will not be possible if you change the setting Press ...

Page 21: ... zoomed JPEG pictures 4 3 2 1 JPEG VCD DVD RW DVD Zoom During playback press DIRECT SKIP repeatedly until the Chapter Search or the Title Search screen appears Enter the desired chapter title number using the numeri cal buttons NOTE Depending on the disc being played this function can also be performed by directly entering the desired chapter number using numerical buttons Refer to the manual acco...

Page 22: ...ped The PROGRAM screen will appear Press or to select a track then press ENTER Press CLEAR C RESET to erase the most recently entered pro gramme Press PLAY to play the programmed tracks NOTES While the programme is being played back the STOP works as follows Press STOP once and then PLAY again playback will restart from the point where STOP was pressed Programme continued Press STOP twice and then...

Page 23: ...reen Press Arrow K L s B select a desired track to be played then press PLAY or ENTER If a Kodak Picture CD file is selected an image will be played back from the selected track and go to the next one in turn Press STOP to stop playback NOTES on JPEG and Kodak Picture CD playback A track is displayed for 5 seconds and then the next track is displayed Every press on B will turn the image clockwise ...

Page 24: ...ode The VCR DVD allows you to select a language during DVD disc if multi language available playback Press AUDIO during playback Press AUDIO repeatedly to select your desired language NOTES The sound mode cannot be changed during playback of discs not recorded in double sound Audio language selection cannot be made during Rapid Play Refer to page 20 Pressing AUDIO may not work on some DVDs with mu...

Page 25: ...A indicates All disc repeat Press DISPLAY again to exit 3 2 1 JPEG MP3 3 2 1 VCD CD 4 3 2 1 DVD RW DVD Changing the On Screen Display 9 49 0 00 00 0 00 00 IIII ORG T Some DVDs contain scenes which have been shot simulta neously from various angles You can change the camera angle when the icon appears on the screen If the ANGLE ICON setting is OFF in the Display setting the icon will not appear Ref...

Page 26: ...o switch 1 2 3 OFF 1 2 3 Makes the dark parts brighter OFF Shows the original picture as recorded Press GAMMA or RETURN to exit NOTES The setting will be saved even if the VCR DVD is turned off This function cannot be used during Rapid Play Refer to page 20 3 2 1 VCD DVD RW DVD 1 Digital Gamma Setting VR mode VR mode Use markers to memorise your favourite places on a disc Press MARKER during playb...

Page 27: ...K SETUP PLAYER MENU ENGLISH TV ASPECT 4 3 LETTER BOX DOLBY DIGITAL BITSTREAM DTS OFF MPEG DPCM DVD SETUP ALL All parental lock is cancelled Level 8 DVD software of any grade adult general children can be played back Levels 7 to 2 Only DVD software intended for general use and children can be played back Level 1 Only DVD software intended for children can be played back with those intended for adul...

Page 28: ...t picture with both sides trimmed PAN SCAN is only available on DVDs recorded with this option if not LETTER BOX mode will be used Select 16 9 WIDE if a wide screen TV is connected to the VCR DVD The default setting is 4 3 LETTER BOX You can also adjust the setting from QUICK setup menu STILL MODE Press K or L for item selection AUTO FIELD or FRAME then press ENTER This adjusts the resolution of p...

Page 29: ...Malagasy 5953 Malay 5965 Malayalam 5958 Maltese 5966 Maori 5955 Marathi 5964 Moldavian 5961 Mongolian 5960 Nauru 6047 Nepali 6051 Norwegian NOR 6061 O R Occitan 6149 Oriya 6164 Oromo Afan 6159 Panjabi 6247 Pashto Pushto 6265 Persian 5247 Polish 6258 Portuguese POR 6266 Quechua 6367 Rhaeto Romance 6459 Romanian RUM 6461 Russian RUS 6467 S Samoan 6559 Sangho 6553 Sanskrit 6547 Scots Gaelic 5350 Serb...

Page 30: ...s as indicated Buttons do not work or VCR DVD stops To completely reset the VCR DVD unplug the AC responding cord from the AC outlet for 5 10 seconds VCR DVD does not respond to some Operations may not be permitted by the disc operating commands during playback Refer to the instructions of the disc VCR DVD cannot not read CDs DVDs Use a commonly available cleaning CD DVD to clean the lens before s...

Page 31: ...on See Playback section Playback a tape recorded with SECAM broadcasts in Middle East areas are possible on this unit When a recorded tape with a SECAM VHS appliance or a SECAM recorded tape is replayed with this appliance black and white pictures are produced This appliance cannot be used in France a SECAM system appliance must be used instead Cleaning the Cabinet Use a soft cloth slightly moiste...

Page 32: ...1VMN20137 H9744RD 9HS1VMN20137 SHARP CORPORATION ...

Reviews: