background image

EN-17

ENGLISH

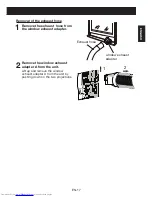
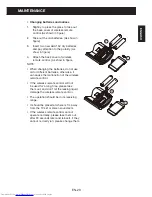
Removal of the exhaust hose

1

  Remove the exhaust  hose from 

the window exhaust adapter.

2

  Remove the window exhaust 

adapter A from the unit.


Lift up and remove the window 

exhaust adapter A from the unit by 

pushing down on the two projections.

1

2

Exhaust hose

window exhaust     
adapter

Summary of Contents for CV10CTXB

Page 1: ...10CTXB CV10CTXW CV10CTXS ENGLISH ESPA Ñ OL PORTABLE TYPE ROOM AIR CONDITIONER INSTALLATION AND OPERATION MANUAL ACONDICIONADOR DE AIRE PARA HABITACIÓN TIPO PORTÁTIL MANUAL DE INSTALACIÓN Y FUNCIONAMIENTO ...

Page 2: ......

Page 3: ...CORPORATION Sharp Plaza Mahwah New Jersey 07495 1163 TEL 1 800 BE SHARP ENGLISH CONTENTS FOR CUSTOMER ASSISTANCE EN 2 CONSUMER LIMITED WARRANTY EN 3 PRECAUTIONS EN 4 LOCATION EN 7 INCLUDED EN 7 PART NAMES EN 8 INSTALL WINDOW PANEL EN 12 INSTALLATION AND REMOVAL OF EXHAUST HOSE EN 16 USE FOR AIR CONDITIONER COOL MODE EN 18 DRY DEHUMIDIFICATION MODE EN 18 FAN MODE EN 18 TO CHANGE AIR FLOW DIRECTION ...

Page 4: ...orized Parts Distributor ACCESSORIES ADDITIONAL CUSTOMER INFORMATION TO WRITE For service problems warranty information missing items and other assistance Sharp Electronics Corporation Customer Assistance Center 1300 Naperville Drive Romeoville IL 60446 1091 TO ACCESS THE INTERNET www sharpusa com Please provide the following information when you write or call model number serial number date of pu...

Page 5: ...nted by Sharp and shall be the sole and exclusive remedy available to the purchaser Correction of defects in the manner and for the period of time described herein shall constitute complete fulfillment of all liabilities and responsibilities of Sharp to the purchaser with respect to the Product and shall constitute full satisfaction of all claims whether based on contract negligence strict liabili...

Page 6: ... confirm the power plug func tions normally This power plug must only be plugged into an appropriate wall socket Do not use in conjunction with any extension cords Push the power plug securely into the socket and make sure it is not loose Do not pull deform or modify the power supply cord or immerse it in water Pulling or misuse of the power supply cord can result in damage to the unit and cause e...

Page 7: ...om Do not block the exhaust air outlet with obstacles Cooling performance may be reduced or stop completely WARNING ABOUT GROUNDING Improper use of the grounding plug can result in the risk of electric shock This appliance must be grounded In the event of an electrical short circuit ground ing reduces the risk of an electric shock by providing a less resistant conduit for the electric current This...

Page 8: ...eat during dehumidification mode and the room temperature will rise Warm air will be blown out from the Exhaust air outlet but this is normal and does not indicate a problem with the unit This unit blows the warm air generated by the unit outside the room via the ex haust hose while in cool mode Accordingly the same amount of air as that is blown out will enter the room from outside through any op...

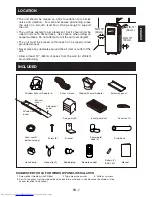
Page 9: ...round the air inlet or outlet of the unit Allow at least 12 30cm of space from the wall for efficient air conditioning LOCATION INCLUDED SUGGESTED TOOLS FOR WINDOW PANEL INSTALLATION 1 Screw driver medium size Phillips 2 Tape measure or ruler 3 Knife or scissors 4 Saw In the event that the window panel needs to be cut down in size because the window is too narrow for direct installation Window Exh...

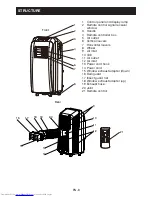
Page 10: ...iver window 3 Handle 4 Remote controller box 5 Air outlet 6 Vertical louvers 7 Horizontal louvers 8 Wheel 9 Air inlet 10 Grill 11 Air outlet 12 Air inlet 13 Power cord hook 14 Power cord 15 Window exhaust adapter down 16 Rain guard 17 Insect guard net 18 Window exhaust adapter up 19 Exhaust hose 20 Joint 21 Remote control STRUCTURE ...

Page 11: ...EN 9 ENGLISH hook screw INSTALL POWER CORD HOOK Attach the hooks to the back of air conditioner with the screws When storing or moving the unit wind the power cord around the hooks ...

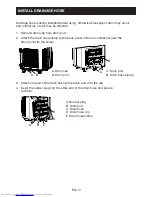
Page 12: ...in port 2 Attach the drain hose clamp to the back panel of the air conditioner near the drain port with the screw A Drain cap B Drain port A Drain port B Drain hose clamp A Rubber plug B Drain port C Drain hose D Drain hose clip E Drain hose clamp 3 Attach one end of the drain hose to the drain port with the clip 4 Insert the rubber plug into the other end of the drain hose and secure with clip ...

Page 13: ...k When water tank is filled Buzzer will sound 8 times LED window show error code H8 In this case plug out drain hose from fixing clamp unsecure the clip pull out the rubber plug from the drain hose then drain out water in tank Then reinstall the drainage hose The unit will resume running after compressor stops for 3 minutes A B ...

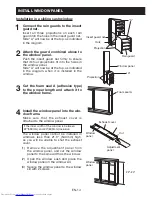
Page 14: ...les in the window panel Side A will now be at the top as indicated in the diagram 3 Cut the foam seal A to the proper length and attach it to the window sill 4 Attach the window panel to the window sill If the inner width of the window is between 22 559mm and 24 609mm inclusive The window panel cannot be installed in windows less than 22 559mm wide as you will be unable to shut the exhaust cover 1...

Page 15: ...nel on the window sill 3 Slide the adjustment and extension panels to fit the window frame width 4 Secure the window panel to the win dow sill with 4 screws 5 Cut the foam seal adhesive type A and B to the proper length and attach it to the window panel Attach foam seal A to the window panel and extension panel and attach foam seal B to the adjustment panel 6 Close the window sash securely against...

Page 16: ...o the proper length and attach it to the window frame 4 Install the window panel into the win dow frame Make sure that the exhaust cover is attached to the window panel If the inner width of the window is between 22 559mm and 24 609mm inclusive The window panel cannot be installed in windows less than 21 3 540mm high as you will be unable to shut the exhaust cover 1 Remove the adjustment panel fro...

Page 17: ...e window sill 3 Slide the adjustment and extension panels to fit the window frame width 4 Secure the window panel to the win dow sill with 4 screws 5 Cut the foam seal adhesive type A and B to the proper length and at tach it to the window panel Attach foam seal A to the window panel and extension panel and attach foam seal B to the adjustment panel 6 Close the window sash securely against the Win...

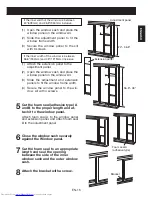
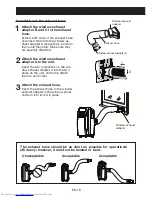
Page 18: ...hed 2 Attach the window exhaust adapter A to the unit Insert the two projections on the win dow exhaust adapter A into the two holes on the unit and firmly attach them to each other 3 Attach the exhaust hose Insert the exhaust hose to the window exhaust adapter in the window panel and turn it to lock it in place The exhaust hose should be as short as possible for operational efficiency however it ...

Page 19: ...emove the exhaust hose from the window exhaust adapter 2 Remove the window exhaust adapter A from the unit Lift up and remove the window exhaust adapter A from the unit by pushing down on the two projections 1 2 Exhaust hose window exhaust adapter ...

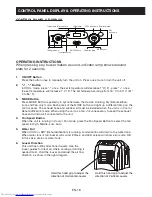
Page 20: ...de When using the unit as a fan it is unnecessary to keep the exhaust hose and window kit connected to the unit 4 Fan Speed Button When the unit is running in Cool or Fan mode press the Fan Speed Button to select the fan speed in High Middle Low Auto 5 Water Full When COOL or DRY Dehumidification is running condensation will drain to the water tank When water tank is full buzzer will sound 8 times...

Page 21: ... Do not expose the signal receiver window to direct sunlight This may adversely affect its operation If necessary close the curtains to block out the sunlight Use of a fluorescent lamp in the same room may interfere with transmission of the signal The unit may be affected by signals emitted from other remote controllers for televisions VCRs or other equipment used in the same room Do not leave the...

Page 22: ...ancelled After Sleep function set up the signal of Sleep will display Under Fan and Auto modes this function is not available By pressing this key you may select AUTO FAN 1 FAN 2 FAN 3 or FAN 4 and may also cycle between them FAN 4 only in cool mode After being powered on AUTO is defaulted Only LOW fan can be set under DRY mode pressing this key can not adjust the fan speed but can send message No...

Page 23: ...d press key to decrease the value The time will increase or decrease by 0 5 hours with each press of this key If pressing or key continuously the time value will change rapidly The remote controller can increase the set time by 0 5 hours every 0 25 seconds After being powered on the fault is no timer setting and there is no display of T ON or H Press ON OFF key to switch on the unit and cancel the...

Page 24: ...g temperature will not be displayed on the LCD the unit will be in accordance with the room temp automatically to select the suitable running method About LOCK Under switch on or switch off state you may hold and key simultaneously to lock and unlock the keypad When locked the display will show the LOCK icon in which case the lock icon will flash three times upon operation of any key After the key...

Page 25: ...n changing the batteries do not use old or different batteries otherwise it can cause the malfunction of the wireless remote control If the wireless remote control will not be used for a long time please take them out and don t let the leaking liquid damage the wireless remote control The operation should be in its receiving range It should be placed at where is 1m away from the TV set or stereo s...

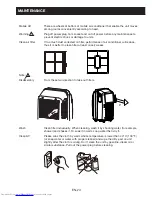
Page 26: ...will reduce thus it is better to clean filter at least once 2 weeks Note Disassembly From these two direction to take out filters Wash Clean filter individually When cleaning wash it by shooting water for example shower and shakes it Or soak it in warm soap water then dry it Clean AC Please soak the cloth by warm whose temperature is lower than 40º C 104 ºF or soap water or water with proper clean...

Page 27: ...rmal phenomenon Unit is running in defrosting operation it will resume running in original operation after defrosting Although it was set the DRY mode there is no cool wind The evaporator frosts 1 Unit is running in defrosting operation it will resume running in original oration after defrosting The LED displays Low voltage over current protection Cut off power supply after 10 minutes turn on the ...

Page 28: ...o are exhausted badly drunk or taken lot of soporific Don t climb on the unit or place something on it for drop may occur and leading malfunction Don t let wind blows to human directly for long time for it is not good for health The unit should leave TV for at least l m to prevent disturbance of electromagnetic wave Don t block air inlet or outlet vent for it would lead malfunction Don t insert fi...

Page 29: ...appliance for disposal at least free of charge to the user d As old products contain valuable resources they can be sold to scrap metal dealers Wild disposal of waste in forests and landscapes endangers your health when hazardous substances leak into the ground water and find their way into the food chain DISPOSAL Do not dispose this product as unsorted municipal waste Collection of such waste sep...

Page 30: ...EN 28 ...

Page 31: ...ey 07495 1163 TEL 1 800 BE SHARP ESPAÑOL ÍNDICE PARA LA ASISTENCIA DEL CLIENTE ES 2 GARANTÍA LIMITADA DEL CONSUMIDOR ES 3 PRECAUCIONES ES 4 UBICACIÓN ES 7 PIEZAS INCLUIDAS ES 7 NOMBRE DE LAS PIEZAS ES 8 INSTALACIÓN DEL PANEL DE VENTANA ES 12 INSTALACIÓN Y DESMONTAJE DE LA MANGUERA DE ESCAPE ES 16 USO PARA EL ACONDICIONADOR DE AIRE MODO ENFRIAR ES 18 MODO DESHUMIDIFICACIÓN ES 18 MODO VENTILADOR ES ...

Page 32: ...entro de servicio autorizado Sharp más cercano PIEZAS para su distribuidor autorizado de piezas ACCESORIOS INFORMACIÓN ADICIONAL PARA LOS CLIENTES CORRESPONDENCIA Sobre problemas de servicio información de garantía ítems perdidos y otras ayudas Sharp Electronics Corporation Customer Assistance Center 1300 Naperville Drive Romeoville IL 60446 1091 ACCESO A INTERNET www sharpusa com Proporciónenos l...

Page 33: ...s legales de Sharp hacia el comprador con respecto al Producto y deberán constituir la total satisfacción de todos los reclamos ya sean basados en un contrato negligencia marco legal u otros En ninguna circunstancia Sharp será responsable por cualquier daño o defectos en el Producto causados por reparaciones o intentos de reparaciones hechos por cualquier persona excepto los centros de sercicio au...

Page 34: ...toma de co rriente para confirmar que la clavija de toma de corriente funciona normalmente Esta clavija de toma de corriente se debe de enchufar sólo en un enchufe de pared apropiado No utilizar en conjunción con cables de extensión Introduzca la clavija de toma de corriente firmemente en el enchufe y asegúrese de que no quede suelto No tire del cable de suministro de energía ni lo deforme o modif...

Page 35: ...rse reducida o incluso detenerse por completo ADVERTENCIA ACERCA DE LA CO NEXIÓN A TIERRA El uso inadecuado de la clavija de co nexión a tierra puede provacar el riesgo de descargas eléctricas Este aparato debe de ser conectado a tie rra En caso de que ocurra un cortocircui to la conexión a tierra reduce el riesgo de una descarga eléctrica al proporcionar un conducto menos resistente para la corri...

Page 36: ... de salida de aire de escape pero esto es normal y no indica que haya algún problema con la unidad Esta unidad sopla el aire caliente generado por la unidad fuera del cuarto por la vía del tubo de escape al estar en el modo enfriar Por consiguiente la misma cantidad de aire inyectada hacia el exterior entrará en la habita ción desde el exterior a través de cualquier apertura en la habitación Cuand...

Page 37: ... 12 30 cm de espacio con respecto a la pared para que el acondicionador de aire funcione de manera eficiente UBICACIÓN ELEMENTOS INCLUIDOS HERRAMIENTAS SUGERIDAS PARA LA INSTALACIÓN DEL PANEL DE VENTANA 1 Destornillador Phillips mediano 2 Cinta métrica o regla 3 Cuchilla o tijeras 4 Sierra en el caso de que el panel de ventana requiera ser cortado a medida porque la ventana es demasiado estrecha p...

Page 38: ...Salida de aire 6 Rejillas verticales 7 Rejillas horizontales 8 Rueda 9 Toma de aire 10 Parrilla 11 Salida de aire 12 Toma de aire 13 Gancho para el cable de suministro de energía 14 Cable de suministro de energía 15 Adaptador del escape de ventana de abajo 16 Protector contra la lluvia 17 Red de protección contra insectos 18 Adaptador del escape de ventana ascendente 19 Manguera de escape 20 Junta...

Page 39: ...ÓN DEL GANCHO PARA EL CABLE DE SUMINISTRO DE ENERGÍA Instale los ganchos en la parte trasera del acondicionador de aire con los tornillos Cuando guarde o traslade la unidad enrolle el cable de suministro de energía alrededor de los ganchos ...

Page 40: ...de drenaje en el panel trasero del acondicionador de aire cerca de la lumbrera de drenaje con el tornillo A Lumbrera de drenaje B Tapa de drenaje A Lumbrera de drenaje B Abrazadera de la manguera de drenaje A Tapón de caucho B Lumbrera de drenaje C Manguera de drenaje D Broche de la manguera de drenaje E Abrazadera de la manguera de drenaje 3 Instale un extremo de la manguera de drenaje en la lumb...

Page 41: ...gua esté lleno el indicador sonoro zumbará 8 veces y la ventana de la pantalla LED mostrará el código de error H8 En este caso desenchufe la manguera de drenaje de la abrazadera de fijación de sprenda el broche retire el tapón de caucho de la manguera de drenaje y después vacíe el agua del depósito Luego vuelva a instalar la manguera de drenaje La unidad reanudará el funcionamiento después de que ...

Page 42: ...agrama cuando este se instala en la ventana 3 Corte el sello de espuma A tipo del adhesivo a la longitud adecuada y péguelo en el marco de la ventana 4 Instale el panel de ventana dentro del marco de la ventana Altura interior de la ventana 22 559 mm 24 609 mm No es posible instalar el panel de ventana en ventanas con menos de 22 559 mm de alto debido a que no podrá cerrar la cu bierta del escape ...

Page 43: ... panel de ventana sobre el marco 3 Deslice los paneles de extensión y de ajuste para fijar la altura del marco de la ventana 3 Fije con 4 tornillos el panel de ventana al marco 5 Corte el sello de espuma B a la longi tud adecuada e instálelo al panel de la ventana 6 Cierre la hoja de la ventana en forma segura contra el panel de ventana 7 Corte el sello de espuma a la longitud adecuada y selle la ...

Page 44: ...stala en la ventana 3 Corte el sello de espuma A tipo adhesivo a la longitud adecuada y péguelo en el marco de la ventana 4 Instale el panel de ventana dentro del marco de la ventana Altura interior de la ventana 22 559 mm 24 609 mm Instale el panel de ventana en el marco de la ventana Si la altura interna de la ventana es inferior a 28 718 mm 1 Retire el panel de ajuste del panel de ventana y cor...

Page 45: ...entana y coloque el panel de ventana sobre el marco de la ventana 3 Deslice el panel de ajuste para adaptarlo a la altura del marco de la ventana 4 Asegure el panel de ventana al marco de la ventana con 4 tornillos y 4 escuadras deslizantes para ventana 5 Corte los sellos de espuma tipo del adhesivo A y B a la longitud adecuada y adjunte al panel de la ventana 6 Cierre la guillotina de la ventana ...

Page 46: ...te las dos proyecciones del adaptador A del escape de ventana en los dos orificios de la unidad e instálelas firmemente 3 Instale la manguera de escape Inserte el adaptador B del escape de ventana en el adaptador C del escape de ventana en el panel de ventana y gírelo para bloquearlo en su lugar La manguera de escape debe ser lo más corta posible para que el funcionamiento sea eficiente no debe es...

Page 47: ...ptador de la manguera de escape de la adapatador de ventana 2 Retire el adaptador A del escape de ventana de la unidad Levante y retire el adaptador A del escape de ventana de la unidad presionando sobre las dos proyecciones 1 2 Manguera de escape Adapatador de ventana ...

Page 48: ... unidad 4 Botón Fan Speed Cuando la unidad está funcionando en los modos Cool Enfriar o Fan Ventilador presione el botón Fan Speed Velocidad del ventilador para seleccionar la velocidad del ventilador en High Alta Middle Media Low Baja o Auto Automática 5 Depósito de agua lleno Cuando la unidad esté funcionando en los modos COOL ENFRIAR o DRY DEHUMIDIFICATION SECO DESHUMIDIFICACIÓN la condensación...

Page 49: ... receptora de señal a la luz solar directa Esto puede afectar adversamente el funcionamiento Si es necesario cierre las cortinas para bloquear la luz solar El uso de una lámpara fluorescente en la misma habitación puede interferir con la transmisión de la señal La unidad puede ser afectada por señales emitidas por otros controles remotos de televisores videograbadoras u otros equipos que se usan e...

Page 50: ...uto Automático la temperatura no se mostrará en el modo Heat Calor el valor inicial es 28 ºC 82 ºF En otros modos el valor inicial es 25 ºC 77 ºF Presione este botón se puede seleccionar Sleep On Suspensión encendida y Sleep Off Suspensión apagada Cuando se enciende la unidad Sleep Off Suspensión apagada está ajustado de manera predeterminada Una vez que se apaga la unidad la función Sleep Suspend...

Page 51: ...agado se puede ajustar el tiempo para el encendido automático Rango de ajuste 0 5 a 24 horas Los caracteres T ON y H parpadearán durante 5 segundos Dentro de los 5 segundos se puede presionar una vez esta tecla para completar el ajuste y enviar el mensaje Si el ajuste es válido se mostrará el tiempo establecido durante 2 segundos antes de mostrar el mensaje de la temperatura Mientras los caractere...

Page 52: ...MIENTO AUTOMÁTICO el ajuste de temperatura no aparece en la pantalla LCD la unidad se basará en la temperatura ambiente para seleccionar el método de funcionamiento adecuado de manera automática Acerca de LOCK Tanto en estado encendido como apagado puede mantener presionadas las teclas y simultáneamente para bloquear y desbloquear el teclado Cuando esté bloqueado la pantalla mostrará el icono LOCK...

Page 53: ...ías viejas o distintas de las especificadas esto puede causar el mal funcionamiento del control remoto inalámbrico Si el control remoto inalámbrico estará en desuso durante un tiempo prolongado retire las baterías para que el líquido que fuga no dañe el control remoto inalámbrico Para llevar a cabo cualquier operación el control remoto inalámbrico debe estar dentro del rango de recepción El contro...

Page 54: ...nto del acondicionador de aire se reducirá por eso se recomienda limpiar el filtro al menos cada 2 semanas Nota Desmontaje Retire los filtros de estas dos ubicaciones Lavado Limpie los filtros individualmente Durante la limpieza lávelos bajo un chorro de agua por ejemplo un duchador y sacúdalos también puede sumergirlos en agua tibia con jabón y secarlos Moje un paño en agua caliente a menos de 40...

Page 55: ...nto y reanudará la operación original después de eliminar la escarcha Aunque está ajustado en el modo DRY DESHUMIDIFICACIÓN no hay viento fresco El evaporador forma escarcha 1 La unidad está funcionando en operación de descongelamiento y reanudará la operación original después de eliminar la escarcha La pantalla LED muestra el mensaje Protección contra baja tensión y sobrecorriente Corte el sumini...

Page 56: ...adas o que han tomado altas dosis de somníferos No suba encima de la unidad ni coloque elementos sobre ella el acondicionador de aire podría caerse y presentar desperfectos No permita que el viento sople directamente sobre las personas durante un tiempo prolongado ya que no es bueno para la salud La unidad debe estar alejada al menos 1 m de los aparatos de televisión para evitar alteraciones por o...

Page 57: ...o para el usuario d Como los productos usados contienen recursos valiosos se pueden vender a comerciantes de desechos metálicos La eliminación descontrolada de desechos en arboledas y parques representa un riesgo para la salud cuando las sustancias peligrosas se filtran a las aguas subterráneas y llegan a la cadena alimenticia ELIMINACIÓN No elimine este producto como desecho municipal sin clasifi...

Page 58: ...ES 28 ...

Page 59: ......

Page 60: ...SHARP ELECTRONICS CORPORATION Sharp Plaza Mahwah New Jersey 07495 1163 U S A SHARP CORPORATION 66129911093 ...

Reviews: