background image

3

TV

Connexions d’antennes

1. Un système de 75 ohms se caractérise

généralement par un câble rond doté  d’un
connecteur de type F susceptible d’être branché
sur une borne sans l’aide d’outils particuliers (non
fourni).

2. Un système de 300 ohms est un câble double plat

qui peut être connecté à une borne 75 ohms par
l’intermédiaire d’un adaptateur 300/75 ohms (non
fourni).

Antennes

• La réception d’images couleur est plus délicate que celle d’images noir et blanc. II est par conséquent

fortement conseillé d’utiliser une antenne extérieure de bonne qualité.

On trouvera ci-dessous une brève explication des types de connexions réalisées avec les différents
systèmes d’antenne:

Connecteur de type F

Câble coaxial 75 ohms (rond)

Câble double 300 ohms (plat)

L

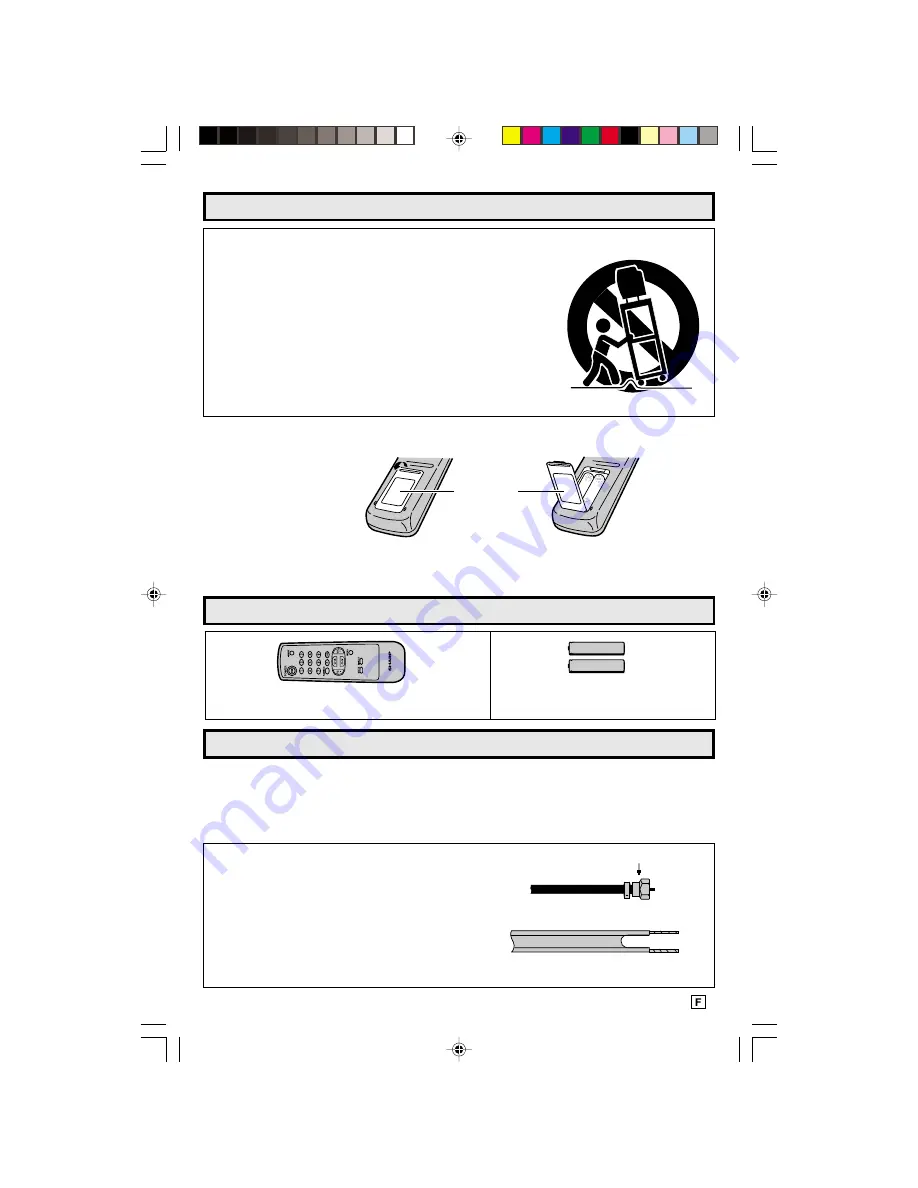
Avant de mettre le téléviseur en marche, préparer la télécommande
Introduire les piles avant d’utiliser la télécommande.

Introduire les piles

• Avec l’ongle du pouce, soulever la fente dans le sens indiqué par la flèche afin de retirer le couvercle

arrière. Insérer deux piles “AA”. Respecter scrupuleusement les polarités des bornes 

e

/

d

 de la pile

et les indications 

e

/

d

 situées à l’intérieur du compartiment.

Avant d’utiliser votre téléviseur (suite)

Accessoires fournis

Télécommande à infrarouge/numéro de pièce :

RRMCG1324CESA

Piles sèches

de format AA

Couvercle

du

compartiment

à piles

Soulever

ATTENTION :

NE PAS PLACER CET APPAREIL SUR UNE TABLE, UN CHARIOT, UN
TRÉPIED OU UN SUPPORT QUI N’EST PAS STABLE. L’APPAREIL
POURRAIT TOMBER ET CAUSER DES BLESSURES GRAVES ET
SUBIR DES DOMMAGES IMPORTANTS. UTILISER SEULEMENT SUR
UNE TABLE, UN CHARIOT, UN TRÉPIED OU UN SUPPORT
RECOMMANDÉS PAR LE FABRICANT OU VENDU AVEC L’APPAREIL.
SUIVRE LES INSTRUCTIONS DU FABRICANT POUR INSTALLER
L’APPAREIL ET UTILISER LES DISPOSITIFS DE MONTAGE
RECOMMANDÉS PAR LE FABRICANT.
L’ENSEMBLE APPAREIL/SUPPORT DOIT ÊTRE DÉPLACÉ AVEC SOIN.
DES ARRÊTS BRUSQUES, UNE FORCE EXCESSIVE ET DES
SURFACES INÉGALES PEUVENT FAIRE BASCULER L’ENSEMBLE.

03-05 CR19M10 [F].p65e

17/5/01, 6:21 pm

3

Summary of Contents for CR19M10

Page 1: ...ore Operating Your Television 2 3 Supplied Accessories 3 Antenna Connections 3 4 Quick Reference Control Operation 5 EZ SETUP during First Use 6 Demo Mode 7 Accessing the MAIN MENU screen without Remote Control 7 Language 8 Sleep Timer 8 PAGE Video Adjust 9 Closed Caption 10 Energy Save 11 Set Up 12 15 EZ Setup 12 Channel Setting 13 15 Blue Screen 15 Using the Video and Audio Input Jacks 16 Before...

Page 2: ... the outlet try reversing the plug Should it fail to fit contact an electrician Do not defeat the safety feature of the polarized plug CAUTION TO PREVENT ELECTRIC SHOCK MATCH WIDE BLADE OF PLUG TO WIDE SLOT FULLY INSERT Note If the set will not be used for a long period such as during a vacation unplug the set from the wall outlet to economize power If the TV set is plugged in a slight current sti...

Page 3: ...to a 75 ohm terminal through a 300 75 ohm ADAPTOR not supplied Antennas The antenna requirements for good color television reception are more important than those for black white television reception For this reason a good quality outdoor antenna is strongly recommended The following is a brief explanation of the type of connections that are provided with the various antenna systems F type connect...

Page 4: ... viewing of the scrambled channels Set your TV on channel 3 or 4 Typically one of these channels is used If this is unknown consult your cable TV company For more specific instructions on installing cable TV consult your cable TV company One possible method of utilizing the converter descrambler provided by your cable TV company is explained below Please note RF switch equipped with position A B n...

Page 5: ...ote Control Functions Quick Reference Control Operation L Location of Controls Front Panel Quick Reference Control Operation CHANNEL UP DOWN MENU 8 Selects next higher channel 9 Selects next lower channel Press both at the same time to access the MAIN MENU screen VOLUME UP DOWN Increases sound Decreases sound POWER Press On Press again Off REMOTE KEYPAD Accesses any channel from keypad FLASHBACK R...

Page 6: ... UP 8 or DOWN 9 to select ENGLISH SPANISH ESPAÑOL or FRENCH FRANÇAIS Then press VOL or to SET LANGUAGE 3 Press VOL or to access EZ SETUP mode 4 Press VOL The tuner will automatically search for the broadcast and cable TV channels The CH No will automatically increase when it appears If you want to stop the EZ SETUP process once it has started press VOL and it will be cancelled If you want to SETUP...

Page 7: ...the MAIN MENU screen without Remote Control If you misplaced your Remote Control you can still access most settings via the MAIN MENU screen when you press both CH UP 8 8 8 8 8 and DOWN 9 9 9 9 9 on the TV set Some features of your TV set will not be accessible without the Remote Control If you lost your Remote Control contact a Sharp Service Center for a replacement C F o r m o e m SHARP SHARP P ...

Page 8: ...P mode then press CH UP 8 or DOWN 9 to move the mark to LANGUAGE 4 Press VOL or to access LANGUAGE change mode 5 Press CH UP 8 or DOWN 9 to select ENGLISH SPANISH ESPAÑOL or FRENCH FRANÇAIS 6 Press MENU to exit Sleep Timer L You can preset your Television to turn off automatically in increments of 30 60 90 or 120 minutes 1 Press MENU to access MAIN MENU screen 2 Press VOL or to access sleep timer ...

Page 9: ... PICTURE adjust mode VOL UP increase contrast VOL DOWN decrease contrast MAIN MENU screen Video Adjust VOLUME CHANNEL UP 8 DOWN 9 MENU PICTURE TINT COLOR SHARP FAVORITE COLOR RESET CH DOWN 9 CH UP 8 BRIGHT Selected VOL UP button VOL DOWN button item PICTURE To increase contrast To decrease contrast TINT To make skin tones greenish To make skin tones purplish COLOR To increase color intensity To de...

Page 10: ...e weather forecast etc that is independent of the TV programs 1 Press MENU to access MAIN MENU screen 2 Press CH UP 8 or DOWN 9 to move the mark to CLOSED CAPTION 3 Press VOL or to access CLOSED CAPTION setting mode 4 Press CH UP 8 or DOWN 9 to move the mark to either MODE or DATA 5 Press VOL or to change the CLOSED CAPTION setting 6 Press MENU to exit Note If a broadcast has CLOSED CAPTION and th...

Page 11: ...ss MENU to exit VOLUME CHANNEL UP 8 DOWN 9 MENU MAIN MENU screen ENERGY SAVE select mode L This feature lets you lower the power consumption of your TV set which in turn saves you money and minimizes the impact on the environment When this feature is turned on it reduces the brightness of the TV to a level that consumes approximately 20 percent less energy than when the feature is turned off The r...

Page 12: ... to move the mark to SET UP 3 Press VOL or to access SET UP mode then press CH UP 8 or DOWN 9 to move the mark to CH SETTING 4 Press VOL or to access CH SETTING mode 5 Press VOL or to access EZ SETUP mode 6 Press VOL The tuner will automatically search for the broadcasting and cable TV channels The CH No will automatically increase when it appears If you want to stop the EZ SETUP process once it h...

Page 13: ...ress MENU to access MAIN MENU screen 2 Press CH UP 8 or DOWN 9 to move the mark to SET UP 3 Press VOL or to access SET UP mode 4 Press CH UP 8 or DOWN 9 to move the mark to CH SETTING 5 Press VOL or to access CH SETTING mode 6 Press CH UP 8 or DOWN 9 to move the mark to the AIR CABLE then press VOL or to access AIR CABLE mode 7 Press CH UP 8 or DOWN 9 to move the mark to the desired mode 8 Press M...

Page 14: ...at the current channel and will not add any higher channels 2 3 Press MENU to exit Note If you press VOL again while in the CH SEARCH mode auto program will start again and the previously memorized channels will be lost L Adding weak or additional channels or erasing unwanted channels from TV memory 1 1 Press MENU to access MAIN MENU screen then press CH UP 8 or DOWN 9 to move the mark to SET UP 1...

Page 15: ...REEN function despite the presence of a broadcast signal To continue watching TV under these conditions switch the BLUE SCREEN OFF While VCR input mode is selected the BLUE SCREEN will not be shown on your TV even if the BLUE SCREEN is turned on MAIN MENU screen Set Up Continued SET UP mode BLUE SCREEN select mode S L E P T I MER S E T UP E V I DEO AD J US T CA P T I ON C L OS ED ENERGY S A V E D ...

Page 16: ...s each time the INPUT button is pressed INPUT mode can be selected by pressing either the CH UP 8 on the TV remote control when the TV is set to the highest channel stored in memory or by pressing the CH DOWN 9 when it is set to the lowest channel Note When connecting video or audio equipment to the television be sure that the power is turned off in order to prevent damage to either the television...

Page 17: ...s of Remote Control Change Closed Caption mode to OFF Energy Save mode to OFF Unplug the TV and plug it in again after two minutes X X X X X X X X X X X X X X X X X X X X X X X X X X X X X X X X X X X X X X X X X X X X X X X X X X X X X X X X X X X X X X X X X X X X X X X X X X X X X X X X X X X X X X X X X X X X X X X X X X X X X X X X X X X X X X X X X X X X X X X X X X X X X X X X X X X X X X X...

Page 18: ...ce VHF UHF 75 ohm Unbalanced Screen Size 19 Diagonally Measured Terminals Audio Video input x 1 Front x 1 Sound Output 1 0 W RMS x 1 Power Source AC 120 V 60 Hz Power Consumption 69 W Dimensions 1927 64 W x 1731 32 H x 187 8 D 493 mm W x 456 mm H x 479 mm D Weight approx 37 5 lbs 17 0 kg Design and specifications are subject to change without notice 17 20 Bk CR19M10 E p65e 21 5 01 5 41 pm 18 ...

Page 19: ... be obtained upondeliveryoftheSharpproducttogetherwithproofofpurchaseandacopyofthisLIMITEDWARRANTY statement to an Authorized Sharp Service Center or an Authorized Sharp Servicing Dealer In home warranty service may be provided at Sharp s discretion on any Sharp television with the screen size of 27 or larger and on any Sharp Over The Range Microwave Oven This warranty constitutes the entire expre...

Page 20: ...20 Printed in Mexico TINS 7321GJZZ 01P07 MSP SHARP ELECTRONICS OF CANADA LTD 335 BRITANNIA ROAD EAST MISSISSAUGA ONTARIO L4Z 1W9 SHARP CORPORATION 17 20 Bk CR19M10 E p65e 17 5 01 6 19 pm 20 ...

Page 21: ...ension 8 TÉLÉVISEUR COULEUR PAGE Réglage image 9 Sous titrage 10 Économie d énergie 11 Réglage 12 15 PRÉRÉGL AUTO CANAL 12 Réglage canal 13 15 Écran bleu 15 Utilisation des prises d entrée vidéo et audio 16 Avant d appeler un réparateur 17 Spécification 18 Garantie limitée 19 L MODE D EMPLOI L MODÈLE CR19M10 En sa qualité de partenaire ENERGY STAR SHARP a déterminé que ce produit répond aux prescr...

Page 22: ...nces le débrancher afin d économiser de l énergie Lorsque le téléviseur est branché un faible courant continue de circuler même quand l interrupteur d alimentation POWER se trouve en position d arrêt OFF L image peut se trouver parasitée si un syntoniseur FM ou un récepteur radio est placé à proximité du téléviseur et qu il est mis sous tension Dans ce cas mettre l un des deux appareils hors tensi...

Page 23: ...Avec l ongle du pouce soulever la fente dans le sens indiqué par la flèche afin de retirer le couvercle arrière Insérer deux piles AA Respecter scrupuleusement les polarités des bornes e d de la pile et les indications e d situées à l intérieur du compartiment Avant d utiliser votre téléviseur suite Accessoires fournis Télécommande à infrarouge numéro de pièce RRMCG1324CESA Piles sèches de format ...

Page 24: ...consulter la compagnie de télédistribution Ci dessous on trouvera l explication d une des méthodes possibles d utilisation du convertisseur décodeur fourni par la compagnie de télédistribution On notera que cette méthode requiert l utilisation d un commutateur radiofréquence RF avec positions A et B non fourni Position A sur le commutateur RF non fourni Il est possible de visionner tous les canaux...

Page 25: ... POWER Appuyer pour mettre sous tension Appuyer de nouveau pour mettre hors tension PAVÉ NUMÉRIQUE DE COMMANDE À DISTANCE REMOTE KEYPAD Sélectionne directement le canal voulu sur le pavé numérique RETOUR FLASHBACK Rappelle dernier le canal regardé AUGMENTATION RÉDUCTION DU VOLUME VOLUME UP DOWN Pour augmenter le volume Pour diminuer le volume Pour changer ou sélectionner les réglages du téléviseur...

Page 26: ...il a démarré appuyer sur VOL afin de l annuler Pour reprendre le REGLAGE se reporter à la page 12 consacrée au RÉGLAGE Pour annuler PREREGL AUTO CANAL Appuyer sur VOL 5 Une fois PREREGL AUTO CANAL terminé le plus petit numéro de canal mémorisé est affiché Remarque Si PREREGL AUTO CANAL ne mémorise pas tous les canaux diffusés dans la région se reporter à la page 13 pour plus d informations sur la ...

Page 27: ...ndeur Sharp C F o r m o e m SHARP SHARP P M r i o n d d ucts s Mode Demo Pour apprendre plus rapidement à utiliser le téléviseur appuyez simultanément sur les touches de CH UP 8 et de CH DOWN 9 9 9 9 9 du téléviseur et maintenez les enfoncées pendant plus de trois secondes Le téléviseur passe en mode DEMO et explique brièvement ses différentes fonctionnalités Pour annuler le mode DEMO appuyez de n...

Page 28: ...NA F R NCA I S ENG L I SH E S P AÑO L L A E NGU A F R NCA I S ENG L I SH E S P AÑO L L ANGUE A Mode de changement de LANGUE Mode REGLAGE M I U T REG L AGE REG N REG L AGE I MAGE I T RAGE SOUS T L AGE ECONERG I E M I U T REG L AGE N 1 2 0 RE T E S Minuterie de mise hors tension L Vous pouvez programmer votre téléviseur pour qu il s éteigne dans un délai de 30 60 90 ou 120 minutes 1 Appuyer sur MENU...

Page 29: ...our choisir une NUANCE DE COULEUR STANDARD ROUGE ou BLEU FAVORITE COLOR REMISE A ZERO Tous les réglages sont réinitialisés aux niveaux préréglés en usine RESET 1 Appuyer sur MENU pour accéder au MENU PRINCIPAL 2 Appuyer sur CH UP 8 ou DOWN 9 pour déplacer le repère à REGLAGE IMAGE 3 Appuyer sur VOL ou pour accéder au mode de réglage du CONTRASTE 4 Appuyer sur CH UP 8 ou DOWN 9 pour sélectionner le...

Page 30: ...r sur CH UP 8 ou DOWN 9 pour déplacer le repère à MODE ou DONNEE 5 Appuyer sur VOL ou pour modifier le réglage de SOUS TITRAGE 6 Appuyer sur MENU pour sortir Remarque Si une émission a un SOUS TITRAGE et que la touche MUTE est enfoncée le téléviseur passe automatiquement au mode S TITRE Une seconde pression sur MUTE ramène le téléviseur à son état précédent Le mode sous titrage peut ne pas fonctio...

Page 31: ...a luminosité est moins perceptible lorsque l éclairage ambiant est faible 1 Appuyer sur MENU pour accéder au MENU PRINCIPAL 2 Appuyer sur CH UP 8 ou DOWN 9 pour déplacer le repère à ECONERGIE 3 Appuyer sur VOL ou pour accéder au mode de sélection ECONERGIE 4 Appuyer sur VOL ou pour sélectionner MARCHE 5 Appuyer sur MENU pour sortir VOLUME CHANNEL UP 8 DOWN 9 MENU M I U T REG L AGE REG N REG L AGE ...

Page 32: ...augmente auto matiquement lorsqu il apparaît Pour arrêter le processus PREREGL AUTO CANAL une fois qu il a démarré appuyer sur VOL La recherche sera annulée Pour annuler PREREGL AUTO CANAL Appuyer sur VOL 7 Une fois PREREGL AUTO CANAL terminé le plus petit numéro de canal mémorisé apparaît sur l affichage Réglage EC A B L EU N R L A REG L AGE CANA L UE G N PR AN T ENNE E A B L C RE CHERC C E H ANA...

Page 33: ...UP 8 ou DOWN 9 pour déplacer le repère au mode désiré 8 Appuyer sur MENU pour sortir Remarque Les canaux pouvant être reçus par le téléviseur sont les suivants Canaux hertziens ANTENNE Canaux par câble CABLE VHF de 2 à 13 1 Modes HRC et IRC uniquement UHF de 14 à 69 2 à 125 STD HRC et IRC Réglage suite EC A B L EU N R L A REG L AGE CANA L UE G N A B L E S T D C A B L E HRC C A B L E I RC C AN T EN...

Page 34: ... en cours et n ajoute pas d autre canal supérieur 2 3 Appuyer sur MENU pour sortir Remarque Si l on appuie de nouveau sur VOL en mode de RECHERCHE CANAL l opération de préréglage recommence et les canaux précédemment mémorisés sont perdus L Il est possible d ajouter en mémoire des canaux faibles ou supplémentaires ou d effacer des canaux superflus 1 1 Appuyer sur MENU pour accéder au MENU PRINCIPA...

Page 35: ...e si un signal est capté Pour continuer à regarder la télévision dans ces conditions placer ECRAN BLEU en mode ARRET Quand le mode d entrée du magnétoscope est sélectionné l ECRAN BLEU n apparaît pas sur le téléviseur même s il est activé Écran MENU PRINCIPAL M I U T REG L AGE REG N REG L AGE I MAGE I T RAGE SOUS T L AGE ECONERG I E MARC E H EC A B L EU N R ARRE T EC A B L EU N R Mode de sélection...

Page 36: ...nregistré en mémoire ou en appuyant sur CH DOWN 9 quand il est réglé sur le canal le plus bas Remarque Lors de la connexion d un appareil vidéo ou audio au téléviseur s assurer que l alimentation est coupée afin d éviter d endommager soit le téléviseur soit l appareil connecté SHARP entend que ce produit soit utilisé en stricte conformité avec les lois sur le droit d auteur et qu une autorisation ...

Page 37: ...r que les câbles de connexion ne sont pas desserrés ou cassés Se reporter à la page 16 Vérifier les piles de la télécommande Mettrelemodesous titragehorsservice ARRÊT Mode d économie d énergie sur ARRÊT Débrancher le téléviseur et le rebrancher après deux minutes X X X X X X X X X X X X X X X X X X X X X X X X X X X X X X X X X X X X X X X X X X X X X X X X X X X X X X X X X X X X X X X X X X X X ...

Page 38: ...trée de l antenne Déséquilibré de 75 ohm VHF UHF Taille de l écran 19 diagonale mesurés Bornes Entrée Audio Vidéo x 1 Avant x 1 Sortie audio 1 0 W RMS x 1 Alimentation 120 V CA 60 Hz Consommation électrique 69 W Dimensions 1927 64 W x 1731 32 H x 187 8 D 493 mm W x 456 mm H x 479 mm D Poids environ 37 5 lbs 17 0 kg La conception et les spécifications sont sujettes à modification sans préavis 16 20...

Page 39: ...re g Aux produits dont le numéro de série et de modèle ou le marquage CSA CUL ou les deux ont été enlevés ou éffacés h Aux produits de consommation utilisés à des fins de location i Aux coûts d installation configuration et ou programmation Si un défaut de fabrication est décelé dans ce produit Sharp au cours de la période de la garantie la réparation sous garantie est offerte à condition que le p...

Page 40: ...20 Imprimé en Mexico TINS 7321GJZZ 01P07 MSP SHARP ÉLECTRONIQUE DU CANADA LTÉE 335 BRITANNIA ROAD EAST MISSISSAUGA ONTARIO L4Z 1W9 SHARP CORPORATION 16 20 Bk CR19M10 F p65e 17 5 01 6 22 pm 20 ...

Reviews: