Sharp CP-HF200 Operation Manual Download Page 7

E-6

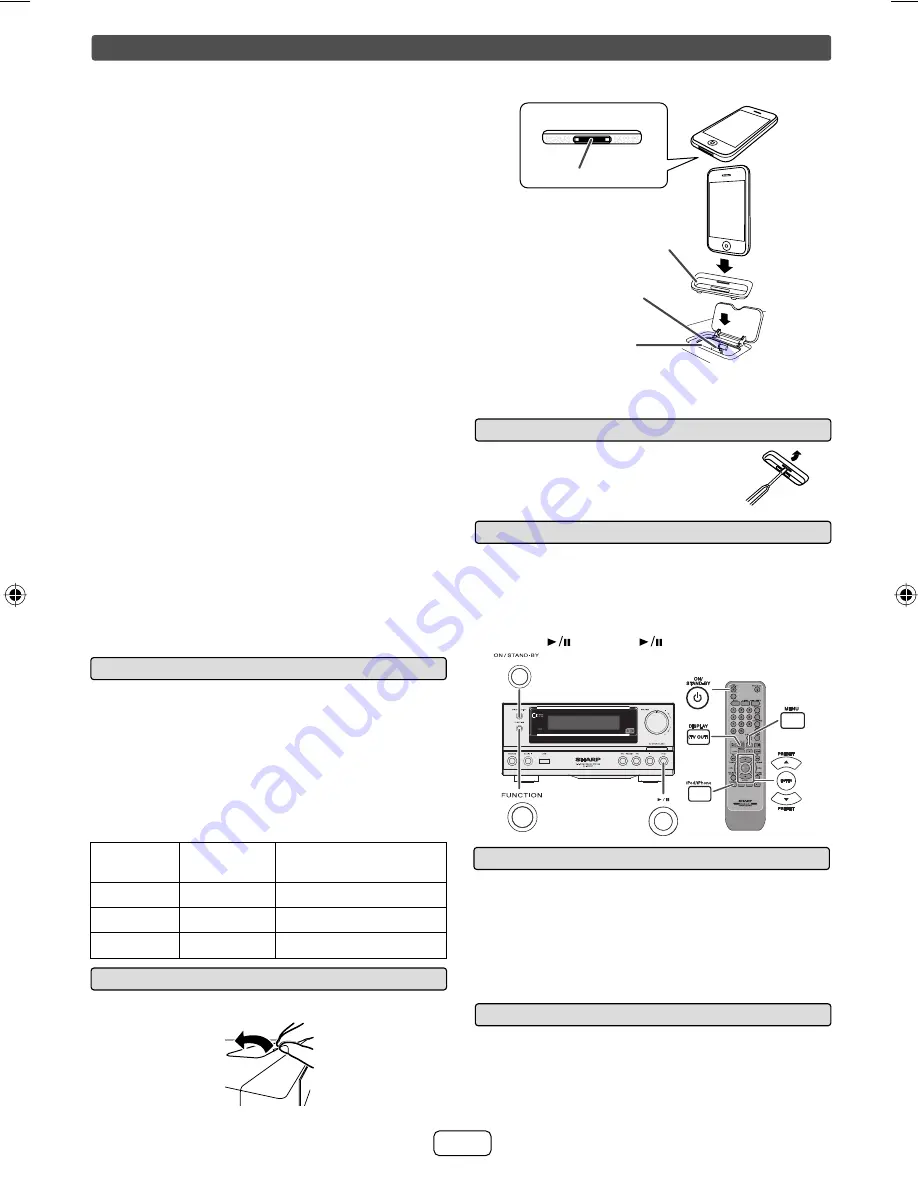
To remove iPod or iPhone adaptor

Insert the tip of a screwdriver (“-” type, small) 
into the adaptor hole as shown and lift upward 
to remove.

iPod or iPhone playback

Press the ON/STAND-BY button to turn the power on.

Press the iPod/iPhone button on the remote control or Function 
button repeatedly on the main unit to select iPod function.

Insert iPod or iPhone unit in iPod dock of main unit.

Press the 

 (iPod/iPhone 

) button to start playback.

1

2

3

4

iPhone playback

Sound will only switch from iPhone to the main unit after 
authentication process is completed in approximately 10 seconds.

Incoming calls will pause the playback and iPhone ringtones will be 
heard from the main unit speakers only. 

Once the calls are answered, the conversation can only be heard 
through the built-in iPhone speaker. Turn on the iPhone speaker or 
undock the iPhone to start conversation.

To disconnect iPod or iPhone

Simply remove the iPod or iPhone from the iPod dock. It is safe to do so 
even during playback.

RRMCGA232AWSA

iPhone

iPhone (bottom)

Dock connector

iPhone adaptor

iPhone dock

iPhone connector

Caution:

Unplug all accessories from the iPod or iPhone before inserting it into 
the dock.

Insert the iPod or iPhone adaptor into unit and connect your iPod 
or iPhone.

2

Listening to the iPod or iPhone

iPhone and iPod operations
Made for:

iPhone 3GS
iPhone 3G
iPhone
iPod touch (3rd generation)
iPod touch (2nd generation)
iPod touch (1st generation)
iPod classic
iPod with video
iPod nano (5th generation)
iPod nano (4th generation)
iPod nano (3rd generation)
iPod nano (2nd generation)
iPod nano (1st generation)
iPod with color display
iPod mini

Caution:

Please update your iPod unit to the latest software version from Apple’s 
homepage before using it.

Notes:

Once the iPod or iPhone is connected to the unit it will begin 
charging.

Error message “This accessory is not made to work with iPhone” 
may appear on the iPhone screen when iPhone battery is low.

The message “This accessory is not made to work with iPhone” 
or “This accessory is not supported by iPhone” may appear on 
the iPhone screen when the iPhone is not properly docked (eg. 
slanting) on this product. If this occurs, please remove and re-dock 
the iPhone.

This product is made for iPhone. To prevent random interference 
when iPhone is docked, the headphone output is disabled.

You may also experience brief audio interference during 
incoming calls.

iPod and iPhone adaptor connection

Notes:

Please use the adaptor supplied with your iPod or iPhone unit.

You can use an audio cable to connect your iPod to the AUDIO IN 
jack if: 

1. 

your iPod adaptor does not fi t into the iPod dock on the main 
unit.

2. 

you have an iPod that does not have an iPod adaptor.

3. 

you have an iPod that does not have an iPod 30 pin connector.


iPhone Adaptor 

No.

iPhone 

Description

Capacity

12

iPhone

4GB & 8GB & 16GB

15

iPhone 3G

8GB & 16GB

15

iPhone 3GS

16GB & 32GB

To insert iPod or iPhone adaptor

Open the iPod cover by pulling up.


1

XL-HF200P_USA_EN.indd   6

XL-HF200P_USA_EN.indd   6

7/16/2010   9:11:01 AM

7/16/2010   9:11:01 AM

Summary of Contents for CP-HF200

Page 1: ...oadcast systems terrestrial satellite cable and or other distribution channels revenue generating streaming applications via Internet intranets and or other networks other revenue generating content distribution systems pay audio or audio on demand applications and the like or on revenue generating physical media compact discs digital versatile discs semiconductor chips hard drives memory cards an...

Page 2: ...the separation between the equipment and receiver Connect the equipment into an outlet on a circuit different from that to which the receiver is connected Consult the dealer or an experienced radio TV technician for help WARNING FCC Regulations state that any unauthorized changes or modifications to this equipment not expressly approved by the manufacturer could void the user s authority to operat...

Page 3: ...lacement parts specified by the manufacturer or have the same characteristics as the original part Unauthorized substitutions may result in fire electric shock or other hazards a b c d e f 20 Safety Check Upon completion of any service or repairs to this product ask the service technician to perform safety checks to determine that the product is in proper operating condition 21 Wall or ceiling mou...

Page 4: ...IC LEGAL RIGHTS YOU MAY ALSO HAVE OTHER RIGHTS WHICH VARY FROM STATE TO STATE Model Specific Section Your Product Model Number Description Warranty Period for this Product Additional Item s Excluded from Warranty Coverage if any Where to Obtain Service What to do to Obtain Service XL HF200P BK HI FI COMPONENT SYSTEM Be sure to have this information available when you need service for your Product ...

Page 5: ...eadphones can cause hearing loss Incorrect AC outlet AC 120 V 60 Hz Installing the AM loop antenna Attaching to the wall Assembling wall screws not supplied AM loop antenna Right speaker FM antenna Video cable not supplied To video input jack Left speaker Red Black Make sure to unplug the AC power cord before making any connections Using other subwoofer You can connect a subwoofer with an amplifie...

Page 6: ...IO IN LINE IN No detection of input signal or very low sound audibility TUNER No reception of broadcast signal CD USB In the stop mode Note However if iPod iPhone is docked the unit will begin charging Charge Mode will be displayed General control To turn the power on The first time the unit is plugged in the unit will enter the demonstration mode Function Main unit Remote control Operation Power ...

Page 7: ...3rd generation iPod touch 2nd generation iPod touch 1st generation iPod classic iPod with video iPod nano 5th generation iPod nano 4th generation iPod nano 3rd generation iPod nano 2nd generation iPod nano 1st generation iPod with color display iPod mini Caution Please update your iPod unit to the latest software version from Apple s homepage before using it Notes Once the iPod or iPhone is connec...

Page 8: ... the PRESET or button to select an item on the menu and then press ENTER button Note When navigating the iPod or iPhone menu with remote control do not operate any of the buttons on the iPod or iPhone unit The volume level is adjusted by pressing the VOL or button on the main unit or the remote control Adjusting the volume on the iPod and iPhone units give no effect iPod and iPhone operations The ...

Page 9: ...CD USB button To repeat desired tracks Perform steps 1 5 in Programed play section on page 8 9 and then press the PLAY MODE button repeatedly until Repeat All appears To cancel repeat play Press the PLAY MODE button repeatedly until Normal appears and disappears Listening to a CD or MP3 WMA disc continued Function Main unit Remote control Operation Play Press in the stop mode Stop Press in the pla...

Page 10: ...A While in the stop mode press the MEMORY button to enter the programing save mode Press the PRESET or button on the remote control to select the desired folder Then press the or button on the remote control to select the desired tracks 1 2 Press the MEMORY button to save the track number Repeat steps 2 3 for other tracks Up to 32 tracks can be programed If you want to check the programed tracks p...

Page 11: ...eatedly on main unit to select USB function Connect the USB memory device that has MP3 WMA format files on the unit When the USB memory is connected to the main unit the device information will be displayed Select desired file to be played back by pressing the or button Press the CD USB button Playback will start and the file name will be displayed Title Artist and Album name are displayed if they...

Page 12: ...tation When a new station is stored in the memory the station previously memorized for that preset channel number will be erased Note The backup function protects the memorized stations for a few hours should there be a power failure or the AC power cord become disconnected 4 5 Listening to the radio RRMCGA232AWSA Tuning Press the ON STAND BY button to turn the power on Press the TUNER BAND button...

Page 13: ...o select Once or Daily and press the ENTER button Within 10 seconds press the or button to select Timer On and press the ENTER button Press the ON STAND BY button to enter the power stand by mode 1 2 3 1 2 3 1 2 3 4 Timer playback Before setting timer Check that the clock is set to the correct time refer to page 11 12 If it is not set you cannot use the timer function For timer playback Plug in US...

Page 14: ...e level is too low increase the volume of the connected device Note To prevent noise interference place the unit away from the television 1 2 3 4 Timer and sleep operation Remote control only continued Desired time 1 99 minutes Sleep operation will automatically stop Timer playback start time Sleep operation The radio compact disc iPod USB Audio In and Line In can all be turned off automatically P...

Page 15: ...ear all the memory by resetting it 1 2 Troubleshooting chart Many potential problems can be resolved by the owner without calling a service technician If something is wrong with this product check the following before calling your authorized SHARP dealer or service center General Symptom Possible cause The clock is not set to the correct time Did a power failure occur Reset the clock Refer page 11...

Page 16: ...Hz Dynamic range 90 dB 1 kHz Amplifier Output power RMS Total 100 watt 50 W per channel into 4 ohms at 1 kHz 10 Total harmonic distortion FTC 37 5 watt minimum RMS per channel into 4 ohms from 100 Hz to 20 kHz 10 Total harmonic distortion Output terminals Speakers 4 ohms 20Hz 20kHz Subwoofer Pre out audio signal 200 mV 10 k ohms at 70 Hz Video output 1 Vp p Headphones 16 50 ohms recommended 32 ohm...

Reviews: