background image

E-8

Random play


Q

The tracks on the disc can be played in random order 
automatically.

To random play all tracks:

Press and hold down PLAY MODE button on the remote 
control until “RANDOM” appears. Press the 

 (CD/USB 

 ) button.

To cancel random play:

Press the PLAY MODE button until “NORMAL” appears 
and  “R” disappears.

Notes:

If you press the 


O

 button during random play, you can move 

to the track selected next by the random operation. On the 
other hand, the 

 button does not allow you to move to 

the previous track. The beginning of the track being played 
will be located.
In random play, the unit will select and play tracks 


O

automatically. (You cannot select the order of the tracks.)

Caution:

After performing repeat play, be sure to press the   (CD/
USB   ) button. Otherwise, the disc will play continuously.

Programed play (CD)


Q

You can choose up to 32 selections for playback in the 
order you like.

While in the stop mode, press the MEMORY button on the 

remote control to enter the programing save mode.

Press the 

 or 

 buttons on the remote control to 

select the desired track.

Repeat play


Q

Repeat play can play one track, all tracks or a programed 
sequence continuously.

To repeat one track:

Press the PLAY MODE button repeatedly until “1-REPEAT” 
appears. Press the 

 (CD/USB 

 ) button.

To repeat all tracks:

Press the PLAY MODE button repeatedly until “ALL 
REPEAT” appears. Press the 

 (CD/USB 

 ) button.

To repeat desired tracks:

Perform steps 1 - 5 in “Programed play” section and 
then press the PLAY MODE button repeatedly until “ALL 
REPEAT” appears.

To cancel repeat play:

Press the PLAY MODE button repeatedly until “NORMAL” 
appears and “ 

 ” disappears.

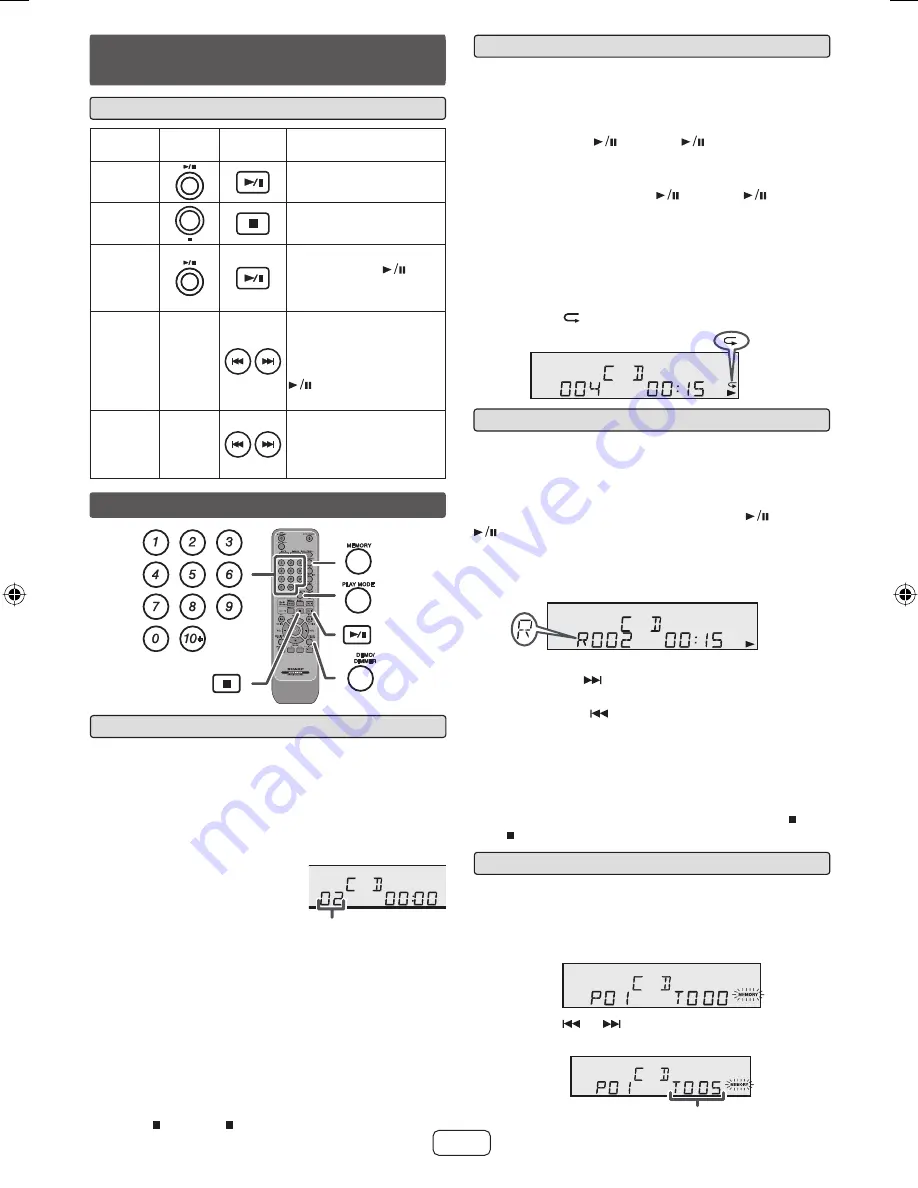
Listening to a CD or MP3/WMA disc 
(continued)

Function

Main 

unit

Remote 

control

Operation

Play

Press in the stop mode.

Stop

Press in the playback 
mode.

Pause

Press in the playback
mode. Press the 


button to resume playback 
from the paused point.

Track up/ 
down

____

Press in the playback or 
stop mode. 
If you press the button in 
the stop mode, press the 

 button to start the 

desired track.

Fast 
forward/ 
reverse

____

Press and hold down in the 
playback mode.
Release the button to 
resume playback.

Various disc functions


Q

Direct track search


Q

RRMCGA232AWSA

By using the Numeric buttons, the desired tracks on the 
current disc can be played.

Use the Numeric buttons on the remote control to select 
the desired track while playing the selected disc.

The Numeric buttons allow you to select up to number 9.


O

When selecting number 10 or higher, use the “10+” 


O

button.

A. For example, to choose 13

Press the “10+” button once.

Press the “1” button.

Press the “3” button.

B. For example, to choose 130

Press the “10+” button twice.

Press the “1” button.

Press the “3” button.

Press the “0” button.

Notes:

A track number higher than the number of tracks on the 


O

disc cannot be selected.
During random play, direct search is not possible.


O

To stop playback:

Press the   (CD/USB  ) button.

Selected track 
number

Advanced CD or MP3/WMA disc playback

Selected track number

XL-DH229P_USA_EN.indd   8

XL-DH229P_USA_EN.indd   8

12/28/2010   3:23:55 PM

12/28/2010   3:23:55 PM

Summary of Contents for CP-DH229P

Page 1: ...ystems terrestrial satellite cable and or other distribution channels revenue generating streaming applications via Internet intranets and or other networks other revenue generating content distribution systems pay audio or audio on demand applications and the like or on revenue generating physical media compact discs digital versatile discs semiconductor chips hard drives memory cards and the lik...

Page 2: ...of the following measures Reorient or relocate the receiving antenna O Increase the separation between the equipment and O receiver Connect the equipment into an outlet on a circuit O different from that to which the receiver is connected Consult the dealer or an experienced radio TV O technician for help WARNING FCC Regulations state that any unauthorized changes or modifications to this equipmen...

Page 3: ...s an improper adjustment of other controls may result in damage and will often require extensive work by a qualified technician to restore the product to its normal operation If the product has been dropped or damaged in e any way and When the product exhibits a distinct change in f performance this indicates a need for service 19 Replacement Parts When replacement parts are required be sure the s...

Page 4: ... HAVE OTHER RIGHTS WHICH VARY FROM STATE TO STATE Model Specific Section Your Product Model Number Description Warranty Period for this Product Additional Item s Excluded from Warranty Coverage if any Where to Obtain Service What to do to Obtain Service XL DH229P MICRO COMPONENT SYSTEM Be sure to have this information available when you need service for your Product One 1 year parts and labor from...

Page 5: ...V 60 Hz Plug in with the lever side facing to the left Attaching to the wall Assembling Wall Screws not supplied AM loop antenna FM antenna Video cable not supplied To video input jack Make sure to unplug the AC power cord before making any connections Wire Installing the AM loop antenna TV Remote control Battery installation Q Use 2 AAA size batteries UM SUM 4 R3 HP 16 or similar Batteries are no...

Page 6: ...l Auto power on function Q When you press any of the following buttons the unit turns on iPod O iPhone CD USB AUDIO IN TUNER BAND on the remote control Selected function is activated O button on the main unit The unit turns on and playback of the last function will start CD TUNER USB iPod AUDIO IN Auto power off function Q The main unit will enter the stand by mode when iPod iPhone is not docked a...

Page 7: ...iPod touch 2 O nd generation iPod touch 1 O st generation iPod classic O iPod with video O iPod nano 5 O th generation iPod nano 4 O th generation iPod nano 3 O rd generation iPod nano 2 O nd generation iPod nano 1 O st generation iPod with color display O iPod mini O Caution Please update your iPod unit to the latest software version from Apple s homepage before using it Notes Once the iPod or iP...

Page 8: ...iew the menu on iPod or iPhone 1 unit Press it again to go back to previous menu Use the PRESET 2 or button to select an item on the menu and then press ENTER button Note When navigating the iPod or iPhone menu with remote control do not operate any of the buttons on the iPod or iPhone unit The volume level is adjusted by pressing the VOL or button on the main unit or the remote control Adjusting ...

Page 9: ... repeat desired tracks Perform steps 1 5 in Programed play section and then press the PLAY MODE button repeatedly until ALL REPEAT appears To cancel repeat play Press the PLAY MODE button repeatedly until NORMAL appears and disappears Listening to a CD or MP3 WMA disc continued Function Main unit Remote control Operation Play Press in the stop mode Stop Press in the playback mode Pause Press in th...

Page 10: ... stop mode press the MEMORY button to 1 enter the programing save mode Press the PRESET 2 or button on the remote control to select the desired folder Then press the or button on the remote control to select the desired tracks Press the MEMORY button to save the folder and track 3 Press the MEMORY button to save the track number 3 Repeat steps 2 3 for other tracks Up to 32 tracks 4 can be programe...

Page 11: ...his product relates to USB mass storage devices and O MP3 players It may however face some irregularities due to various unforeseen reasons from some devices Should this happen turn off the unit and then turn it on again The USB port is only intended for direct connection to O a USB memory device without any cable During CD function MP3 player will not be charging O To play back USB MP3 player wit...

Page 12: ... to turn the power on 1 Press the FUNCTION button on the main unit 2 or TUNER BAND button on the remote control repeatedly to select the desired frequency band FM stereo FM mono or AM Press the TUNING 3 or TUNING or button to tune in to the desired station Manual tuning O Press the TUNING or TUNING or button repeatedly to tune in to the desired station Auto tuning O When the TUNING or TUNING or bu...

Page 13: ...press the 2 or button to select ONCE SET or DAILY SET and press the MEMORY button Within 10 seconds press the 3 or button to select TIMER ON and press the MEMORY button Press the ON STAND BY button to enter the power stand 4 by mode Timer playback Q Before setting timer Check that the clock is set to the correct time refer to O page 11 12 If it is not set you cannot use the timer function For time...

Page 14: ...of the connected device If volume level is too low increase the volume of the connected device Note To prevent noise interference place the unit away from the television Timer and sleep operation Remote control only continued Desired time 90 minutes Sleep operation will automatically stop Timer playback start time Sleep operation Q The radio compact disc iPod and USB can all be turned off automati...

Page 15: ...tting it Troubleshooting chart Many potential problems can be resolved by the owner without calling a service technician If something is wrong with this product check the following before calling your authorized SHARP dealer or service center General Q Symptom Possible cause The clock is not set to O the correct time Did a power failure occur Reset the O clock Refer page 11 When a button is O pres...

Page 16: ...ulti bit D A converter Frequency response 20 20 000 Hz Dynamic range 90 dB 1 kHz Amplifier Q Output power RMS Total 100 watt 50 W per channel into 4 ohms at 1 kHz 10 Total harmonic distortion FTC 37 5 watt minimum RMS per channel into 4 ohms from 100 Hz to 20 kHz 10 Total harmonic distortion Output terminals Speakers 4 ohms 20Hz 20kHz Video output 1 Vp p Headphones 16 50 ohms recommended 32 ohms I...

Reviews: