background image

09/9/8

XL-DH229N EN

E-13

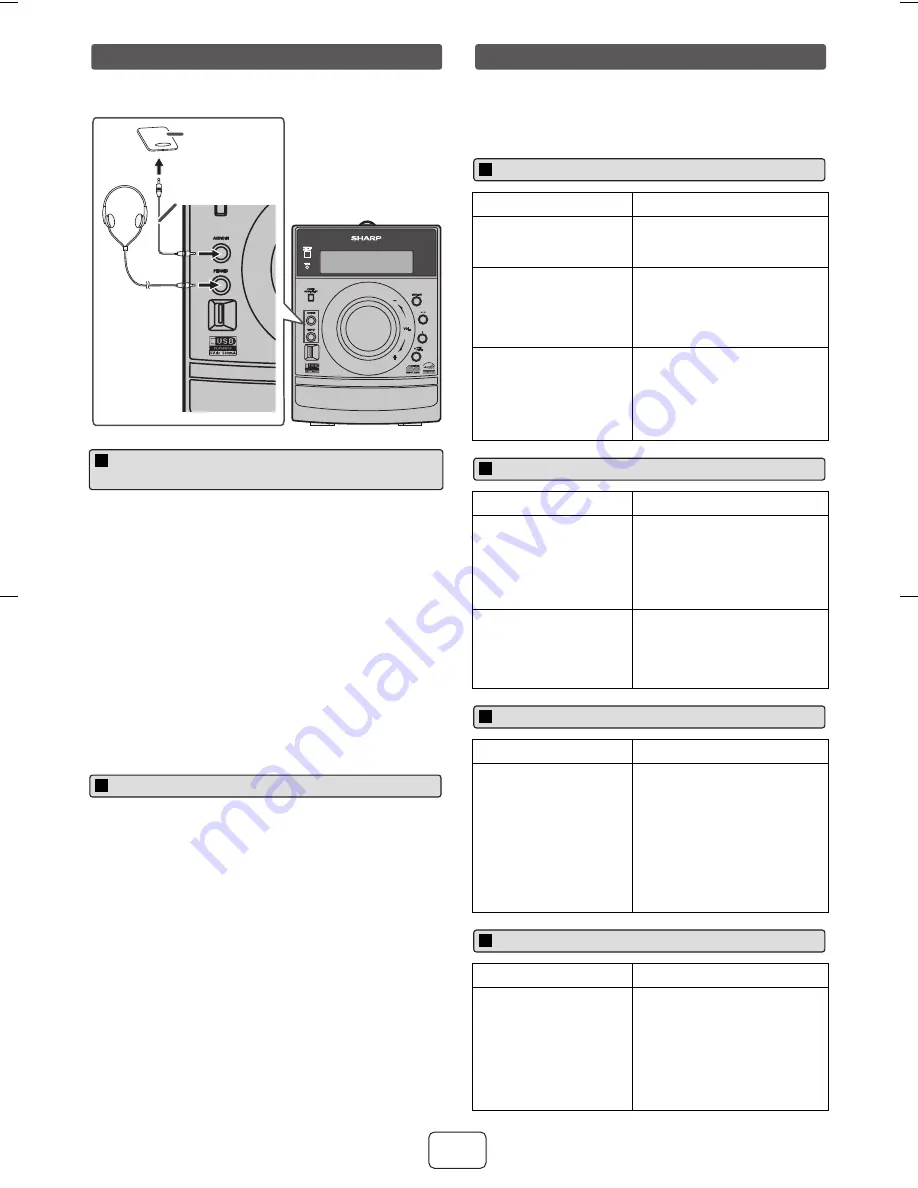
The connection cord is not included. Purchase a 
commercially available cord as shown below.

Note:

To prevent noise interference, place the unit away from the 
television.

Do not turn the volume on to full at switch on and listen
to music at moderate levels. Excessive sound pressure
from earphones and headphones can cause hearing
loss.

Before plugging in or unplugging the headphones,
reduce the volume.

Be sure your headphones have a 1/8" (3.5 mm)
diameter plug and impedance between 16 and 50
ohms. The recommended impedance is 32 ohms.

Plugging in the headphones disconnects the speakers
automatically. Adjust the volume using the VOLUME
control.

Many potential problems can be resolved by the owner 
without calling a service technician.
If something is wrong with this product, check the following 
before calling your authorized SHARP dealer or service 
center.

1

Use a connection cord to connect the portable audio
player etc. to the AUDIO IN jack. When using video
equipment, connect the audio output to this unit and the
video output to a television.

2

Press the ON/STAND-BY button to turn the power on.

3

Press the AUDIO IN button on the remote control or
FUNCTION button repeatedly on main unit to select
AUDIO IN function.

4

Play the connected equipment. If volume level of the
connected device is too high, sound distortion may
occur. Should this happen, lower the volume of the
connected device. If volume level is too low, increase
the volume of the connected device.

Enhancin

g

 your 

s

y

s

tem

M I C R O   C O M P O N E N T  

S

Y

S

T E M

XL-DH229

Audio cable
(not supplied)

Portable audio 
player, etc.

Li

s

tenin

g

 to the playback 

s

ound

s

 of 

portable audio player, etc.

Headphone

s

Symptom

Po

ss

ible cau

s

e

The clock is not set 
to the correct time.

Did a power failure occur?
Reset the clock. (Refer 
page 10)

When a button is 
pressed, the unit 
does not respond.

Set the unit to the power 
stand-by mode and then 
turn it back on.

If the unit still malfunctions, 
reset it. (Refer page 14)

No sound is heard.

Is the volume level set to 
“0”?

Are the headphones 
connected?

Are the speaker wires 
disconnected?

Symptom

Po

ss

ible cau

s

e

Playback does not 
start.

Playback stops in 
the middle or is not 
performed properly.

Is the disc loaded upside 
down?

Does the disc satisfy the 
standards?

Is the disc distorted or 
scratched?

Playback sounds are 
skipped, or stopped 
in the middle of a 
track.

Is the unit located near 
excessive vibrations?

Is the disc very dirty?

Has condensation formed 
inside the unit?

Symptom

Po

ss

ible cau

s

e

The remote control 
does not operate.

Is the AC power cord of the 
unit plugged in?

Is the battery polarity 
correct?

Are the batteries dead?

Is the distance or angle 
incorrect?

Does the remote control 
sensor receive strong 
light?

Symptom

Po

ss

ible cau

s

e

The radio makes 
unusual noises 
continuously.

Is the unit placed near the 
TV or computer?

Is the FM antenna or AM 
loop antenna placed 
properly? Move the 
antenna away from the AC 
power cord if it is located 
nearby.

Trouble

s

hootin

g

 chart

General

CD player

Remote control

Tuner

Summary of Contents for CP-DH229N

Page 1: ...tem consisting of XL DH229N main unit and CP DH229N speaker system Please confirm that only the following accessories are included Remote control x 1 RRMCGA204AWSA AM loop antenna x 1 QANTLA004AWZZ FM antenna x 1 92LFANT1535A Accessories MODEL XL DH229N MICRO COMPONENT SYSTEM OPERATION MANUAL Printed in Malaysia 09L R AS 2 TINSZA604AWZZ ENGLISH ...

Page 2: ...ke An independent license for such use is required For details please visit http mp3licensing com MPEG Layer 3 audio coding technology licensed from Fraunhofer IIS and Thomson Special Note ENERGY STAR Program Information Products that have earned the ENERGY STAR are designed to protect the environment through superior energy efficiency ENERGY STAR is a U S registered mark Made for iPod means that ...

Page 3: ...ed To video input jack not supplied screws wall Attaching to the wall Assembling AC outlet AC 120 V 60 Hz Installing the AM loop antenna Video cable Black Red Left speaker TV AM loop antenna Please ensure that the equipment is positioned in a well ventilated area and ensure that there is at least 4 10 cm of free space along the sides top and back of the equipment Precautions MICRO COMPONENT SYSTEM...

Page 4: ...trol The unit turns on and AUDIO IN function is activated In the stop mode of disc or USB operation the main unit enters the stand by mode after 15 minutes of inactivity Supported iPod models iPod nano software 1 2 above iPod mini software 1 2 above iPod 5th generation software 1 3 above Dock connector equipped Click Wheel model iPod 4th generation software 3 0 2 above Dock connector equipped Clic...

Page 5: ...nction exclude USB function System off stand by operation When the main unit is turned to stand by mode the docked iPod unit will automatically turn to stand by mode Listening to the iPod continued 1 Open the iPod cover by pulling up the tip 2 Insert the iPod adaptor into the iPod dock and connect your iPod 1 Press the ON STAND BY button to turn the power on 2 Press the iPod button on the remote c...

Page 6: ... the playback or pause mode If you press the button in the pause mode press the button to start the desired track Fast forward reverse ____ Press and hold down in the playback mode Release the button to resume playback Display ____ iPod back light ON Press for more than 2 seconds to toggle the video out display between iPod or TV Repeat ____ Press to toggle repeat mode Shuffle ____ Press and hold ...

Page 7: ...Y MODE button until NORMAL appears and R disappears Notes If you press the button during random play you can move to the track selected next by the random operation On the other hand the button does not allow you to move to the previous track The beginning of the track being played will be located In random play the unit will select and play tracks automatically You cannot select the order of the ...

Page 8: ...the remote control to select the desired tracks 3 Press the MEMORY button to save the folder and track number 4 Repeat steps 2 3 for other folder tracks Up to 32 tracks can be programmed 5 Press the CD button to start playback Programmed play MP3 WMA 1 Press the CD button and load an MP3 WMA disc After disc is loaded disc info will be displayed 2 Press the FOLDER button and press the TUNING or but...

Page 9: ... USB mass storage device MP3 player 1 Press the USB button on the remote control or FUNCTION button repeatedly on main unit to select USB function Connect the USB memory device that has MP3 WMA format files on the unit When the USB memory is connected to the main unit the device information will be displayed 2 Select desired file to be played back by pressing the or button 3 Press the USB button P...

Page 10: ...ations To stop the auto tuning press the TUNING or button again To receive an FM stereo transmission Press the TUNER BAND button to select stereo mode and ST indicator will be displayed will appear when an FM broadcast is in stereo If the FM reception is weak press the TUNER BAND button to extinguish the ST indicator The reception changes to monaural and the sound becomes clearer Listening to USB ...

Page 11: ...ps 1 4 to set other stations or to change a preset station When a new station is stored in the memory the station previously memorized for that preset channel number will be erased 1 Press the PRESET or button for more than 0 5 seconds The preset number will flash and the programmed stations will be tuned in sequentially for 5 seconds each 2 Press the PRESET or button again when the desired statio...

Page 12: ...T does not appear 4 Within 10 seconds press the or button to select TIMER SET and press the MEMORY button 5 To adjust the hour press the or button and then press the MEMORY button 6 To adjust the minutes press the or button and then press the MEMORY button 7 Set the time to finish as in steps 5 and 6 above 8 To select the timer playback source CD TUNER USB iPod or AUDIO IN press the or button Pres...

Page 13: ...utton to select ONCE SET or DAILY SET and press the MEMORY button 3 Within 10 seconds press the or button to select TIMER CALL and press the MEMORY button 1 Turn the power on and press and hold down the CLOCK TIMER button 2 Within 10 seconds press the or button to select ONCE SET or DAILY SET and press the MEMORY button 3 Within 10 seconds press the or button to select TIMER OFF and press the MEMO...

Page 14: ... device If volume level is too low increase the volume of the connected device Enhancing your system MICRO COMPONENT SYSTEM XL DH229 Audio cable not supplied Portable audio player etc Listening to the playback sounds of portable audio player etc Headphones Symptom Possible cause The clock is not set to the correct time Did a power failure occur Reset the clock Refer page 10 When a button is presse...

Page 15: ...irt or water on the CDs can cause noise or mistracking If a CD is dirty or does not play properly clean it with a soft dry cloth wiping straight out from the center along the radius In order to ensure proper operation of the CD player preventative maintenance cleaning of the laser pickup lens should be performed periodically Lens cleaners are commercially available Contact your local CD software d...

Page 16: ...lti play compact disc player Signal readout Non contact 3 beam semiconductor laser pickup D A converter Multi bit D A converter Frequency response 20 20 000 Hz Dynamic range 90 dB 1 kHz General Amplifier CD player USB host interface Complies with USB 1 1 Full Speed 2 0 Mass Storage Class Support Bulk only and CBI protocol Support file MPEG 1 Layer 3 WMA Non DRM Bitrate support MP3 32 320 kbps WMA ...

Reviews: