background image


03/12/17

CD-SW200 _2-14.fm


7


CD-SW200


General Information


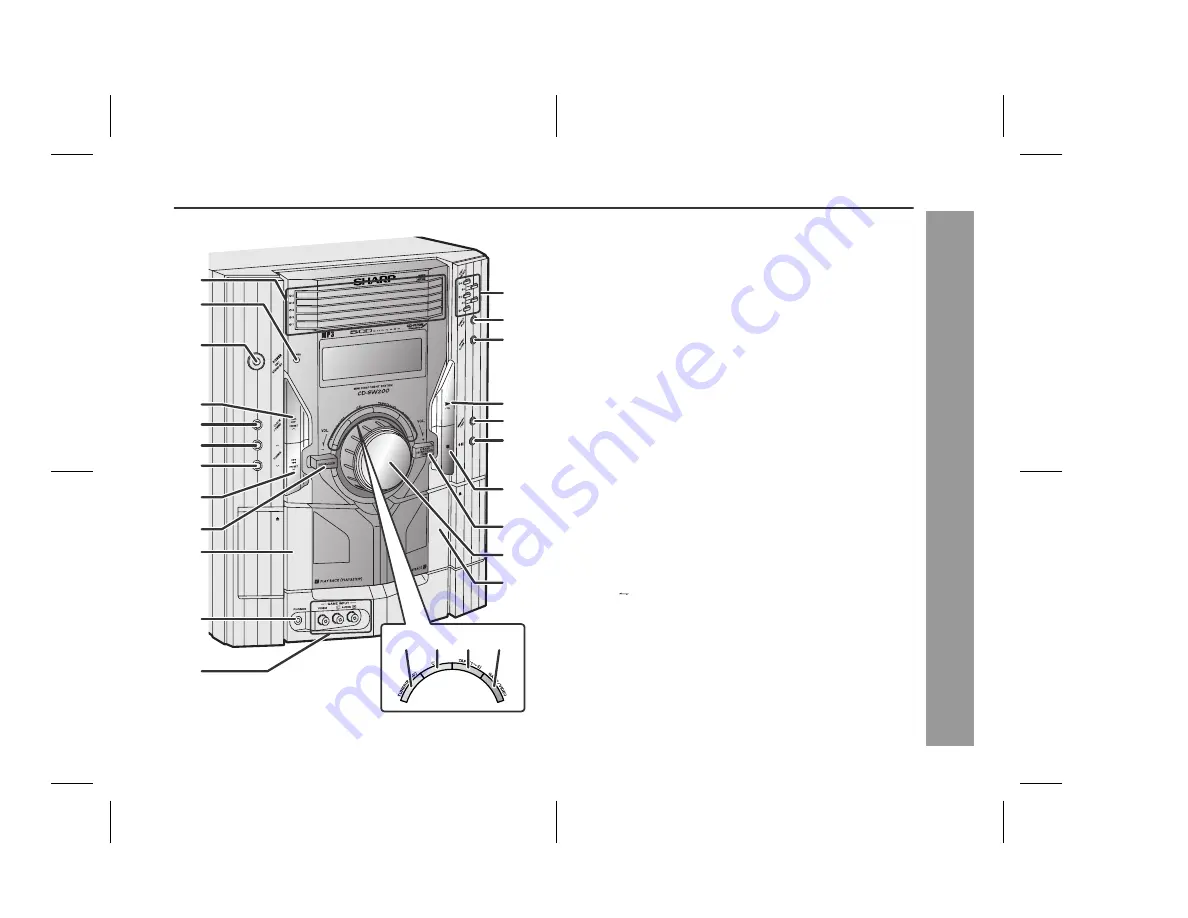
Controls and indicators


Front panel


Reference page

1. Disc Trays . . . . . . . . . . . . . . . . . . . . . . . . . . . . . . . . . . . . . . .  18
2. Timer Indicator  . . . . . . . . . . . . . . . . . . . . . . . . . . . . . . . . . . .  35
3. Power On/Stand-by Button  . . . . . . . . . . . . . . . . . . . . . . . . .  15
4. Disc Track Up or Fast Forward, Tape 2 Fast Forward, 

Tuner Preset Up, Time Up Button  . . . . . . . . . . .  16, 19, 29, 31

5. Clock/Timer Button  . . . . . . . . . . . . . . . . . . . . . . . . .  16, 34, 37
6. Tuning Up Button . . . . . . . . . . . . . . . . . . . . . . . . . . . . . . . . .  28
7. Tuning Down Button  . . . . . . . . . . . . . . . . . . . . . . . . . . . . . .  28
8. Disc Track Down or Fast Reverse, Tape 2 Rewind, 

Tuner Preset Down, Time Down Button  . . . . . .  16, 19, 29, 31

9. Equalizer Mode Select Button   . . . . . . . . . . . . . . . . . . . . . .  15

10. Tape 1 Cassette Compartment  . . . . . . . . . . . . . . . . . . . . . .  30
11. Headphone Jack   . . . . . . . . . . . . . . . . . . . . . . . . . . . . . . . . .  39
12. Game/Video Input Jack  . . . . . . . . . . . . . . . . . . . . . . . . . . . .  38
13. Disc Number Select Buttons . . . . . . . . . . . . . . . . . . . . . . . .  18
14. Disc Direct Play Button  . . . . . . . . . . . . . . . . . . . . . . . . . . . .  21
15. Disc Tray Open/Close Button  . . . . . . . . . . . . . . . . . . . . . . .  18
16. Disc Play or Repeat, Tape Play Button  . . . . . . . . . .  18, 22, 30
17. Memory/Set Button   . . . . . . . . . . . . . . . . . . .  16, 23, 29, 34, 37
18. Tape 2 Record Pause Button   . . . . . . . . . . . . . . . . . . . .  32, 33
19. Disc or Tape Stop Button  . . . . . . . . . . . . . . . . . . . . . . .  19, 31
20. Extra Bass (Surround)/Demo Mode Button  . . . . . . . . .  13, 15
21. Volume Control   . . . . . . . . . . . . . . . . . . . . . . . . . . . . . . . . . .  15
22. Tape 2 Cassette Compartment  . . . . . . . . . . . . . . . . . . . . . .  30
23. Tuner (Band) Button   . . . . . . . . . . . . . . . . . . . . . . . . . . . . . .  28
24. CD Button  . . . . . . . . . . . . . . . . . . . . . . . . . . . . . . . . . . . . . . .  18
25. Tape (1   2) Button  . . . . . . . . . . . . . . . . . . . . . . . . . . . . . . .  30
26. Game/Video Button  . . . . . . . . . . . . . . . . . . . . . . . . . . . . . . .  38

13

15

21

17

2

5
6

3

1

19

22

14

18

11

12

10

  7

  8

 9

24 25 26

23

16

4

20

Summary of Contents for CD-SW200

Page 1: ... SHARP product XL MP130 MINI COMPONENT SYSTEM CD SW200 Mini Component System consisting of CD SW200 main unit CP S200 front speaker and CP SW200 Subwoofer Accessories Please confirm that the following accessories are included MODEL OPERATION MANUAL CD SW200 Note Only the above accessories are included Remote control 1 RRMCGA042AWSA AM loop antenna 1 QANTL0005AWZZ FM antenna 1 92LFANT1746A ...

Page 2: ...and used in accordance with the instructions may cause harmful interference to ra dio communications However there is no guarantee that interference will not occur in a particular installation If this equipment does cause harmful interference to radio or television reception which can be deter mined by turning the equipment off and on the user is encouraged to try to correct the interference by on...

Page 3: ...rface This product should not be placed in a built in installation such as a bookcase or rack unless proper ventilation is provided or the manufacturer s instructions have been adhered to 11 Power Sources This product should be operated only from the type of power source indicated on the marking label If you are not sure of the type of power supply to your home consult your product dealer or local...

Page 4: ...removing covers may expose you to dangerous voltage or other hazards Refer all servicing to qualified service personnel 21 Damage Requiring Service Unplug this product from the wall outlet and refer servicing to qualified service personnel under the following conditions a When the power supply cord or plug is damaged b If liquid has been spilled or objects have fallen into the product c If the pro...

Page 5: ...g to the radio 28 29 Tape Playback Listening to a cassette tape TAPE 1 or TAPE 2 30 31 Tape Recording Recording on a cassette tape 31 33 Advanced Features Timer and sleep operation 34 37 Enhancing your system 38 39 References Troubleshooting chart 39 41 Maintenance 42 Specifications 42 43 CONSUMER LIMITED WARRANTY Back cover ENERGY STAR Program Information Products that have earned the ENERGY STAR...

Page 6: ...m age resulting from use of this unit with a voltage other than that which is specified Volume control The sound level at a given volume setting depends on speaker effi ciency location and various other factors It is advisable to avoid ex posure to high volume levels which occurs while turning the unit on with the volume control setting up high or while continually listening at high volumes Do not...

Page 7: ... 19 29 31 9 Equalizer Mode Select Button 15 10 Tape 1 Cassette Compartment 30 11 Headphone Jack 39 12 Game Video Input Jack 38 13 Disc Number Select Buttons 18 14 Disc Direct Play Button 21 15 Disc Tray Open Close Button 18 16 Disc Play or Repeat Tape Play Button 18 22 30 17 Memory Set Button 16 23 29 34 37 18 Tape 2 Record Pause Button 32 33 19 Disc or Tape Stop Button 19 31 20 Extra Bass Surroun...

Page 8: ... Daily Timer Indicator 35 12 FM Stereo Mode Indicator 28 13 FM Stereo Receiving Indicator 28 14 Tape Play Indicator 30 15 Memory Indicator 23 27 29 16 Extra Bass Indicator 15 17 Disc Repeat Play Indicator 22 18 Disc Pause Indicator 19 19 Disc Play Indicator 18 Rear panel Reference page 1 Cooling Fan 13 2 AC Power Cord 13 3 FM 75 Ohms Antenna Terminal 12 4 FM Antenna Ground Terminal 12 5 AM Loop An...

Page 9: ... 14 fm 9 CD SW200 General Information Front Speaker 1 Tweeter 2 Super Tweeter 3 Woofer 4 Bass Reflex Duct 5 Speaker Wire Subwoofer 1 Subwoofer 2 Bass Reflex Duct 3 Subwoofer Light Up Wire 4 Speaker Wire 1 2 4 3 5 1 1 2 4 3 ...

Page 10: ... 13 Disc Clear Dimmer Button 15 23 14 Disc Random Button 22 15 Disc Stop Button 19 16 Tape Stop Button 30 17 Memory Button 16 23 27 29 34 37 18 Disc Pause Button 20 19 Disc Play or Repeat Button 18 22 20 Tape Play Button 30 21 Tape 2 Record Pause Button 32 33 22 MP3 WMA Navigation Mode Select Button 25 23 MP3 WMA Display Button 20 24 Enter Button 24 25 Clock Timer Button 16 34 37 26 Character Butt...

Page 11: ...ystem connections Left speaker Subwoofer Right speaker Speaker connection see page 12 Antenna connection see page 12 AC power connection see page 13 AC Outlet AC 120 V 60 Hz Make sure to unplug the AC power cord before any connections FM antenna AM loop antenna ...

Page 12: ...S minus terminal and the red wire to the FRONT SPEAKERS plus terminal SUBWOOFER 1 Connect the black wire to the SUBWOOFER minus terminal and the red wire with purple insulation tube to the SUBWOOFER plus terminal 2 Connect the subwoofer light up wire to the SUBWOOFER LIGHT UP jack Caution Assembling Attaching to the wall Wall Screws not supplied ANTENNA AM LOOP FM 75 OHMS GND Never mistake the FRO...

Page 13: ...e better reception Consult your dealer Cooling fan The main unit is built with a cooling fan at the rear of the unit for im proved cooling Please do not cover the opening of the fan with any obstacles as this will block proper ventilation Table Floor Left speaker Main unit Right speaker Subwoofer AC outlet AC 120 V 60 Hz The first time the unit is plugged in the unit will enter the demonstration m...

Page 14: ...ansmitter on the remote control and the sensor on the unit with a soft cloth Exposing the sensor on the unit to strong light may interfere with operation Change the lighting or the direction of the unit Keep the remote control away from moisture heat shock and vi brations Test of the remote control Check the remote control after checking all the connections see pages 11 13 Point the remote control...

Page 15: ...ifferent mode press the EQUALIZER EQUALIZER MODE button repeat edly until the desired sound mode appears Note If the EQUALIZER EQUALIZER MODE button is pressed in the surround mode it will be canceled automatically After use Press the ON STAND BY button to enter the power stand by mode CD SW200 Main unit operation When the VOLUME control is turned clockwise the volume will increase When it is turn...

Page 16: ...e 12 hour or 24 hour display Note The clock can also be set with the remote control 1 Press the ON STAND BY button to turn the power on 2 Press the CLOCK TIMER button 3 Within 10 seconds press the or button to se lect CLOCK and press the MEMORY SET button 4 Press the or button to select 12 hour or 24 hour display and then press the MEMORY SET button AM 12 00 The 12 hour display will appear AM 12 0...

Page 17: ...ter in the display may differ from its actual playback time WMA WMA files are Advanced System Format files that include audio files which are compressed with Windows Media Audio codec WMA is developed by Microsoft as an audio format file for Win dows Media Player MP3 or WMA indicator will light up after the unit reads infor mation on an MP3 or WMA disc Auto power on function When you press any of ...

Page 18: ...up Be sure to place 3 8 cm disc in the middle of the disc trays 5 Press the OPEN CLOSE button to close the disc tray 1 Due to the structure of the disc information it takes longer to read an MP3 WMA disc than a normal CD approximately 20 to 90 seconds 6 You can place discs on the trays 2 5 by following steps 3 5 7 Press the button to start playback 5 12 cm 3 8 cm CD Total number of tracks on the d...

Page 19: ... push the disc tray while it is moving If the power fails while the tray is open wait until the power is re stored If the disc tray is stopped with force ER CD20 will appear on the display for 3 seconds and the unit will not function If this occurs press the ON STAND BY button to enter the power stand by mode and then turn the power on again If TV or radio interference occurs during CD operation m...

Page 20: ...g fast forward the next track will be played Playback of the track will begin when its be ginning is reached during fast reverse To change the display MP3 WMA discs only Track up track down is possible only within individual discs Fast forward fast reverse is possible only within individual discs When the end of the last track is reached during fast forward END will appear on the display and CD op...

Page 21: ... pressed while the disc is stopped press the button to start the desired track on the current disc Notes A track number higher than the number of tracks on the disc can not be selected During random play direct search is not possible 1 Press one of the 1 5 buttons to select the desired disc Selected disc number 2 Within 5 seconds press the DIRECT PLAY button on the main unit CD SW200 Use the direc...

Page 22: ...ot allow you to move to the previous track The be ginning of the track being played will be located In random play the unit will select and play tracks automatically You cannot select the order of the tracks Caution After performing repeat or random play be sure to press the CD button Otherwise the disc s will play continuously To repeat all tracks on up to 5 discs Press the button twice To repeat...

Page 23: ...he function from CD to another the programmed selections will not be cleared During the program operation random play is not possible During programmed play the DIRECT PLAY button will not work 1 While in the stop mode press the MEMORY SET MEMORY button to enter the programming save mode 2 Press one of the 1 5 buttons to select the desired disc Selected disc number 3 Press the direct search button...

Page 24: ...file names on your PC connect words with hyphens This product recognizes the first word as title 1 second one as title 2 and third one as title 3 Up to three words can be recognized Notes MP3 files must have the extension mp3 WMA files must have the extension wma Up to 100 folders or 300 files can be read on the unit If either limit is exceeded no more folders files are displayed This unit recogni...

Page 25: ...op playback NAVI READ appears and the display shows the total number of folders and files on the selected disc 4 Press the NAVIGATION button 5 Press the or cursor but ton on the remote control to select FOL T 1 T 2 or T 3 To search files by folder name select FOL will flash The following steps describe file search by folder 6 Press the ENTER button The total number of folders or titles appears for...

Page 26: ...s the or button to go to the next page of character display 6 Press the CHARACTER button and the active character will be entered in the 2nd row of the display To delete an entered character move the cursor to the charac ter with the or button and press the CLEAR DIMMER but ton on the remote control 7 Repeat steps 5 and 6 to enter characters In the folder or title name search you do not have to en...

Page 27: ...e DIRECT PLAY button on the main unit will not work If you press the RANDOM button in the stop mode the MP3 WMA navigation mode will be canceled If tracks are programmed using track numbers see Pro grammed play on page 23 In the MP3 WMA navigation mode only program by folder or title name are played When you exit the mode the program by folder or title name are cleared When you exit the MP3 WMA na...

Page 28: ...ansmission Press the TUNER BAND button to display the ST indicator will appear when an FM broadcast is in stereo If the FM reception is weak press the TUNER BAND button to extinguish the ST indicator The reception changes to monaural and the sound becomes clearer 1 Press the ON STAND BY button to turn the power on 2 Press the TUNER BAND button repeatedly to select the desired frequency band FM or ...

Page 29: ...ng with preset channel 1 4 Within 30 seconds press the MEMORY SET MEMORY button to store that station in memory If the MEMORY and preset number indicators go out before the station is memorized repeat the operation from step 2 5 Repeat steps 1 4 to set other stations or to change a pre set station When a new station is stored in memory the station previously memorized for that preset channel numbe...

Page 30: ...tape operation the main unit enters the stand by mode after 15 minutes of inactivity Before playback For playback use normal or low noise tapes for the best sound Metal or CrO tapes are not rec ommended Do not use C 120 tapes or poor quality tapes as they may cause malfunctions Before loading a tape into the cassette compartment tighten the slack with a pen or a pencil CD SW200 1 Press the ON STAN...

Page 31: ...ack or stop mode TAPE 2 only Before recording When recording important selections make a preliminary test to ensure that the desired material is properly recorded SHARP is not liable for damage or loss of your recording arising from malfunction of this unit The volume and sound controls can be adjusted with no effect on the recorded signal Variable Sound Monitor For recording use only normal tapes...

Page 32: ...E 2 cassette compartment with the side to be recorded on facing you Wind past the leader of the tape on which recording cannot be performed 4 Press the button Recording will be paused 5 Press one of the 1 5 buttons to select the desired disc 6 Within 5 seconds press the DIRECT PLAY button to start recording Recording is started from the selected disc When the play back of the last track is finishe...

Page 33: ... 2 Press the button 3 Press the button to start recording 1 Tune in to the desired station see page 28 2 Load a cassette into the TAPE 2 cassette compartment with the side to be recorded on facing you Wind past the leader of the tape on which recording cannot be performed 3 Press the button Recording will be paused 4 Press the button to start recording 1 Press the ON STAND BY button to turn the po...

Page 34: ...once timer recording works for one time only at a preset time For example if you are away but want to record a program on a ra dio station Daily timer Daily timer play or daily timer recording works at the same preset time every day For example set the timer as a wake up call every morning 1 Set the daily timer pages 34 36 2 Set the once timer pages 34 36 Start Daily timer Once timer 1 minute or m...

Page 35: ...Y SET button 8 Set the time to finish as in steps 6 and 7 above White Red 9 Switch input with the or button and then press the MEMORY SET button To select the timer playback source CD TUNER TAPE 1 or TAPE 2 To select the timer recording source TUNER When you select the tuner select a station by pressing the or button and then press the MEMORY SET button If a station has not been programmed NO PRES...

Page 36: ...ther unit con nected to the GAME INPUT jacks select GAME in step 9 This unit will turn on or enter the power stand by mode automatically however the connected unit will not turn on or off 1 Press the CLOCK TIMER button 2 Within 10 seconds press the or button to select ONCE or DAILY and press the MEMORY SET button 3 Within 10 seconds press the or button to select ONCE CALL or DAILY CALL and press t...

Page 37: ... seconds press the or button to select SLEEP and press the MEMO RY SET button 4 Press the or button to select the time Maximum 3 hours Minimum 1 minute 3 hours 5 minutes 5 minute intervals 5 minutes 1 minute 1 minute intervals 5 Press the MEMORY SET button SLEEP will appear 6 The unit will enter the power stand by mode automatically after the preset time has elapsed The volume will be turned down ...

Page 38: ... TAPE TUNER GAME VIDEO To record on a tape from game VCR etc Game VCR DVD player etc Red White Yellow Yellow To the line output jacks To video input jack RCA cord not supplied Video cable not supplied Video cable not supplied Yellow TV Yellow Red White CD SW20 1 Connect a video game system VCR DVD etc to the front GAME INPUT VIDEO AUDIO L and R jacks 2 Connect a TV to the rear VIDEO OUT jacks Swit...

Page 39: ...al CD player CD SW200 Symptom Possible cause The clock is not set to the correct time Did a power failure occur Reset the clock Refer to page 16 When a button is pressed the unit does not respond Set the unit to the power stand by mode and then turn it back on If the unit still malfunctions reset it Refer to page 41 No sound is heard Is the volume level set to 0 Are the headphones connected Are th...

Page 40: ...ith proper sound quality Is it a normal tape You cannot record on a metal or CrO tape Cannot erase completely Sound skipping Is there any slack Is the tape stretched Cannot hear treble Are the capstans pinch rollers or heads dirty Sound fluctuation Cannot remove the tape If a power failure occurs during playback the heads remain en gaged with the tape Do not open the compartment with great force S...

Page 41: ...ution This operation will erase all data stored in memory including clock timer settings tuner preset and CD program Before transporting the unit Remove all CDs from the unit Make sure there is no CD in the disc tray Then set the unit to the power stand by mode Carrying the unit with discs left inside can damage the unit Care of compact discs Compact discs are fairly resistant to damage however mi...

Page 42: ... then with a dry cloth Caution Do not use chemicals for cleaning gasoline paint thinner etc It may damage the cabinet finish Do not apply oil to the inside of the unit It may cause malfunc tions Specifications As part of our policy of continuous improvement SHARP reserves the right to make design and specification changes for product im provement without prior notice The performance specification ...

Page 43: ...onse 50 14 000 Hz normal tape Signal noise ratio 55 dB TAPE 1 playback 50 dB TAPE 2 recording playback Wow and flutter 0 3 WRMS Type 3 way type speaker system Super tweeter 2 5 cm tweeter 5 1 8 13 cm woofer Maximum input power 230 W Rated input power 115 W Impedance 6 ohms Dimensions Width 7 1 16 180 mm Height 13 330 mm Depth 8 6 16 212 mm Weight 6 6 lbs 3 0 kg each Type Full Range 8 20 cm subwoof...

Page 44: ...od described herein on behalf of Sharp The warranties described herein shall be the sole and exclusive warranties granted by Sharp and shall be the sole and exclusive remedy available to the purchaser Correction of defects in the manner and for the period of time described herein shall constitute complete fulfillment of all liabilities and responsibilities of Sharp to the purchaser with respect to...

Reviews: