background image

21

Playback

Advanced CD playback (continued)

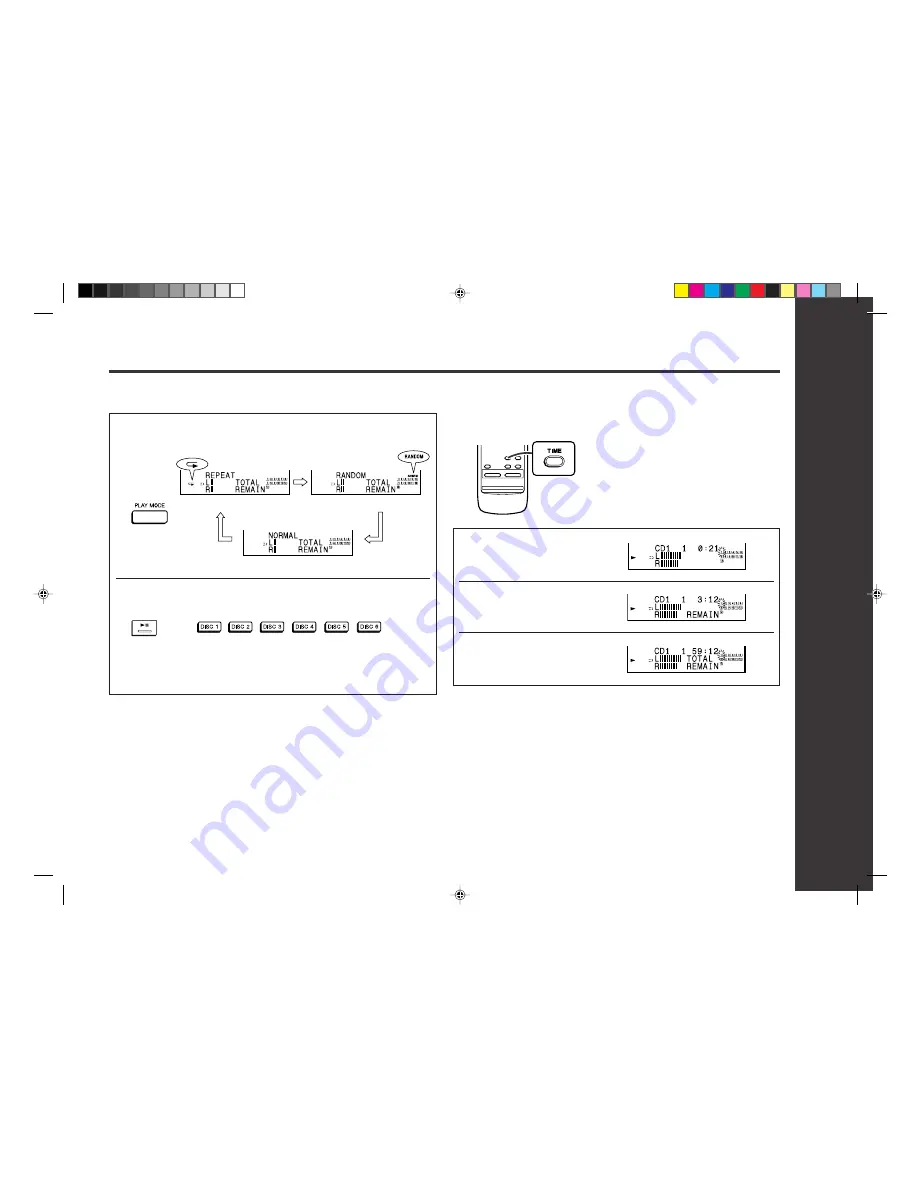
Repeat or Random play

1

Press the PLAY MODE button repeatedly to select the playback
mode.

2

Press the 

06

06

06

06

06

 or one of the DISC 1 - DISC 6 buttons to start play-

back.

or

If playback is started by pressing the 

06

 button, repeat or random play will

be performed on all discs.

If playback is started by pressing one of the DISC 1 - DISC 6 buttons, repeat
or random play will be performed on that disc.

To repeat a programmed sequence:

Perform steps 1 - 6 in the “Programmed play” section and then select the repeat play-
back.

Notes:

After using repeat or random play, be sure to press the 

 button.

Otherwise, the disc(s) will play continuously.

In random play, the CD player will select and play tracks automatically.
(You cannot select the order of the tracks.)

To cancel repeat or random play:

Press the PLAY MODE button repeatedly to select the normal play mode.

Switching the time display

Each time the TIME button on the remote control is pressed during playback
or in the pause mode, the display will change.

The elapsed playing time for the
current track will be displayed.

The remaining playing time for the
current track will be displayed.

The total remaining playing time
for the disc will be displayed.

Notes:

During random play, the total remaining playing time will not be displayed.

Depending on the CD, the playing time display may not match the total playing time
which is indicated on the CD jacket, as the time between tracks is not included.

Normal playback mode

Repeat playback mode

Random playback mode

*RW5000_P18_24(Playback)

00.7.13, 3:14 PM

21

Summary of Contents for CD-RW5000

Page 1: ...this product please read this manual carefully It will guide you in operating your SHARP product CD RW5000 Audio Tower System consisting of CD RW5000 main unit and CP RW5000 speaker system AUDIO TOWER SYSTEM MODEL CD RW5000 OPERATION MANUAL RW5000_P01 48 FRONT BACK 00 7 1 4 33 PM 1 ...

Page 2: ...ser s authority to operate this equipment NOTE It is the intent of Sharp that this product be used in full compliance with the copyright laws of the United States and that prior permission be obtained from copyright owners whenever necessary FOR YOUR RECORDS For your assistance in reporting this unit in case of loss or theft please record below the model number and serial number which are located ...

Page 3: ...r pinched by items placed upon or against them paying particular attention to cords at plugs convenience receptacles and the point where they exit from the appliance 10 Do not use liquid cleaners or aerosol cleaners Use a damp cloth for cleaning 11 Power Lines An outdoor antenna should be located away from power lines 12 Outdoor Antenna Grounding If an outside antenna is connected to the receiver ...

Page 4: ...ack 19 21 Listening to a Cassette Tape 22 Listening to the Radio 23 24 Cassette Recording Recording to a Cassette Tape 25 26 CD R Operation What is CD R or CD RW 27 Recording to a CD R or a CD RW 28 32 Playing discs on the CD R tray 32 Text editing on a CD R or a CD RW 33 35 Finalizing a CD R or a CD RW 36 Erasing CD RW only 37 Advanced Features Timer and Sleep Operation 38 40 Enhancing Your Stere...

Page 5: ...t be held responsible for any damage resulting from use of this unit with a voltage other than that which is specified Volume control The sound level at a given volume setting depends on speaker efficiency location and various other factors It is advisable to avoid exposure to high volume levels which occur while turning the unit on with the volume control setting up high or while continually list...

Page 6: ...cator CD Tray Eject Buttons 18 20 07 CD Trays 18 08 CD CD R CD RW Play Mode Select Button 21 09 CD R CD RW Text Edit Button 33 36 10 Headphone Jack 41 11 CD R CD RW Tray Eject Button 28 12 CD R CD RW Tray 28 13 Control Panel Open Close Button 15 14 Equalizer Mode Select Button 16 15 Extra Bass Button 16 16 Menu Button 17 38 40 17 Display Character Button 15 32 33 18 Jog Dial 17 19 24 28 33 37 38 1...

Page 7: ...ith Indicator 19 23 29 34 42 29 Stop Button with Indicator 19 29 32 33 30 Tape Reverse Play Button with Indicator 22 25 31 31 Tape Button 22 26 39 32 CD R CD RW Record Mode Button 28 31 42 33 Auxiliary Button 42 34 CD R CD RW Record Speed Select Button 29 35 Erase Button 37 36 CD R CD RW Auto Mark Button 31 42 37 Tape Record Pause Button 25 26 42 38 CD CD R CD RW Fast Forward Tape Fast Wind or Tun...

Page 8: ...D R High Speed Record Indicator 11 CD R CD RW Indicator 12 Auto Mark Indicator 13 Erase Indicator 14 Digital Source Indicator 15 Finalize Indicator 16 Memory Indicator 17 CD All Disc Play Indicator 18 Random Play Indicator 19 Music Schedule Indicator 20 Synchronized Recording Indicator 21 CD CD R CD RW Repeat Indicator 22 CD CD R CD RW Pause Indicator 23 Tape Reverse Mode Indicator 24 Sleep Indica...

Page 9: ...AM Loop Antenna Terminal 12 02 Antenna Ground Terminal 12 03 FM Antenna Terminal 12 04 Auxiliary Input Jacks 41 05 Phono Input Jacks 41 06 Digital Input Jack 41 07 Digital Output Jack 41 08 Speaker Terminals 12 09 AC Power Cord 12 RW5000_P04_11 General 00 7 10 3 54 PM 9 ...

Page 10: ...tons No 2 3 16 Tuner Band Button No 21 17 Tape Button No 31 18 Auxiliary Button No 33 19 CD Direct Play Buttons No 6 20 Menu Button No 16 21 CD CD R CD RW Fast Forward Tape Fast Wind or Preset Up Button 19 20 24 29 22 Stop Button No 29 23 Display Button 15 17 32 24 Tape Record Pause Button No 37 25 CD CD R CD RW Play Mode Select Button No 8 26 Clear Button 20 24 27 FM Stereo Mode Button 23 28 Equa...

Page 11: ...minals 1 2 3 4 5 6 Placing the speaker system There is no distinction between the right and the left speakers Right speaker Left speaker Bi amp system This product drives the built in subwoofer unit and the speaker unit composed of the tweeter and woofer for mid to high range frequencies with independent amplifiers which have individual frequency characteristics By amplifying separately the two fr...

Page 12: ...eparation for Use System Connections FM antenna Right speaker Left speaker AM loop antenna 1 2 3 Right speaker Left speaker Blue Black Red AC outlet AC 120 V 60 Hz RW5000_P12_14 Preparation 00 7 8 4 28 AM 12 ...

Page 13: ...rs should be used with this product Do not use other speakers with this unit or use the supplied speakers with other units Do not mistake the right and the left channels The right speaker is the one on the right side when you face the unit Do not let the bare speaker wires touch each other Do not stand or sit on the speakers You may be injured Incorrect Incorrect Connecting the AC power cord After...

Page 14: ...admium battery etc Installing the batteries incorrectly may cause the unit to malfunction Notes concerning use Replace the batteries if the operating distance is reduced or if the operation be comes erratic Periodically clean the transmitter on the remote control and the sensor on the ste reo system with a soft cloth Exposing the sensor on the stereo system to strong light may interfere with opera...

Page 15: ...the unit is set to the power stand by mode When the power is turned on you can open or close the control panel by pressing the control panel open close 7 button Caution Do not push the control panel while it is opening or closing Do not press buttons on the control panel strongly The hinge of the panel may be broken Be careful not to jam your fingers in the control panel Display Brightness 2 level...

Page 16: ...encies and X BASS will appear To cancel the extra bass mode press the X BASS button Bass is emphasized Canceled Equalizer When the EQUALIZER button is pressed the current mode setting will be displayed To change to a different mode press the EQUALIZER button repeatedly until the de sired sound mode appears Treble is reduced Vocals midrange tones are emphasized The sound is not modified Bass and tr...

Page 17: ...2 hour AM12 00 display 1 Press the POWER button to turn the power on 2 Press the MENU button 3 Turn the jog dial to select CLOCK and within 10 seconds press the ENTER button 4 Within 2 minutes press the ENTER button again 5 Turn the jog dial to select the 12 hour or 24 hour display and within 2 minutes press the ENTER button 6 Turn the jog dial to adjust the hour and within 2 minutes press the ENT...

Page 18: ...he music schedule will display only the number of tracks on the disc If the CD contains more than 20 tracks C will appear 6 You can place discs on the trays 2 6 by following the steps 3 5 Note The system will search CD trays until it finds a CD and will not search the rest of the trays 5 12 cm 3 8 cm Total number of tracks Total playing time Means disc inside This system can play audio CD R and CD...

Page 19: ...ton to enter the power stand by mode and then turn the power on again If TV or radio interference occurs during CD operation move the unit away from the TV or radio If a disc is damaged dirty or loaded upside down the disc will be skipped Advanced CD Playback To locate the desired portion For audible fast forward Press and hold down the 2 button during playback For audible fast reverse Press and h...

Page 20: ... the 5 5 5 5 5 or 4 4 4 4 4 button on the remote control or the jog dial on the main unit to select the desired track 4 Press the MEMORY button to save the track number 5 Repeat steps 2 4 for other tracks Up to 32 tracks can be pro grammed 6 Press the 06 06 06 06 06 button to start playback At this time playback will not begin even if one of the DISC 1 DISC 6 buttons is pressed To cancel the progr...

Page 21: ...the CD player will select and play tracks automatically You cannot select the order of the tracks To cancel repeat or random play Press the PLAY MODE button repeatedly to select the normal play mode Switching the time display Each time the TIME button on the remote control is pressed during playback or in the pause mode the display will change The elapsed playing time for the current track will be...

Page 22: ...he button to switch the playback side Then press the 06 button To stop playback Press the button Fast forward rewind on side A To advance the tape press the 2 button To rewind it press the 3 button Fast forward rewind on side B To advance the tape press the 3 button To rewind it press the 2 button Caution To remove the cassette press the button and then open the compartment If a power failure occu...

Page 23: ...e tuner will stop at the first receivable broadcast station Notes When radio interference occurs auto scan tuning may stop automatically at that point Auto scan tuning will skip weak signal stations To stop the auto tuning press the TUNING X or W button again 4 To receive an FM stereo transmission press the ST MODE but ton on the remote control The ST indicator lights up j will appear when an FM b...

Page 24: ... saved in memory can be scanned automatically 1 To scan the preset stations press the PRESET X X X X X or W W W W W button on the remote control for more than 0 5 seconds The preset number will flash and the programmed stations will be tuned in sequentially for 5 seconds each 2 Press the PRESET X X X X X or W W W W W button again when the desired sta tion is located To erase all the contents of th...

Page 25: ... To perform programmed recording 1 Program discs and tracks page 20 2 Press the TAPE REC button 3 Regardless of the tape setting step 5 press the 06 button to record on side A or the 1 button for side B To stop recording Press the button The CD and tape will stop Auto restart function If the recording side is switched from side A to B during recording the system will record the interrupted track o...

Page 26: ...utton to record on side A or the 1 1 1 1 1 button for side B When you press the 06 button on the remote control the system will record on the side specified in step 4 To interrupt recording Press the TAPE REC button To resume recording press the same recording button you pressed in step 5 Other buttons do not allow resuming To stop recording Press the button Note If you hear a whistling noise whil...

Page 27: ...omplies with the SCMS The SCMS limits the production of digital copies to one generation for copyright protection If a digital copy first generation copy is made from a copyright protected digital source audio CD or the like no further digital copying from the second generation is allowed The SCMS does not affect analog recording Audio CD CD R CD RW First genera tion copy CD R CD RW Second genera ...

Page 28: ...RW disc on the CD R CD RW tray label side up 5 Press the CD R CD RW 7 7 7 7 7 button to close the tray CD R or CD RW While the system reads the CD R or CD RW disc mark flashes Wait until it lights up 6 Press the REC MODE button and select the desired CD using the jog dial Within 10 seconds press the ENTER button CD1 CDR to CD6 CDR Records the selected CD only ALL CD CDR Records all CDs RW5000_P27_...

Page 29: ...he recording time is longer than the recordable time of the CD R CD RW disc OVER appears Then the system displays the following information You can record only the recordable tracks by pressing the CD CDR button again Adjusting the recording level You can lower the level if the level of the recording source is high During recording or while recording is paused adjust the recording level using the ...

Page 30: ...d 1CD T EDIT Example Selected ALL T EDIT Each time you press the TRACK EDIT button one track will be added to the total recording tracks Total recording tracks Total recording time Total recording tracks Total recording time Recording to a CD R or a CD RW continued 5 Press the CD CDR button to start recording Perform steps 8 9 on page 29 Recording order of track editing DISC 1 Track 1 Track 2 Trac...

Page 31: ...be increased by one To stop recording Press the button Recording from cassettes Recording starts automatically when the cassette is played 1 Load the cassette See page 22 2 Load the CD R or CD RW disc See page 28 3 Press the REC MODE button S SYNC REC When sound signal is input after pressing the 06 button recording will start automatically MANUAL REC After pressing the 06 button recording will st...

Page 32: ...n the CD R tray the programmed content will be erased when the system enters the stand by mode or when the function is changed to a function other than CDR Random play using the CD R tray stops when all tracks have played once Playing discs on the CD R tray Recording to a CD R or a CD RW continued To check the remaining recording time on the CD R or CD RW discs Press the DISP CHARACTER button whil...

Page 33: ...R button 5 Select the desired character using the jog dial then press the ENTER button To correct a character move the cursor using the 3 or 2 button to the one you want to correct and re enter it Each time you press the DISP CHARACTER button instead of using the jog dial you can skip 12 characters see the table A C D E F G H B 1 3 4 5 6 7 8 2 a c d e f g h b I J K L M S U V W T R N Q P 9 0 O i j ...

Page 34: ...you want to add a new character 3 To enter a space press the ENTER button 4 Select a character to enter using the jog dial then press the ENTER button 5 Press the button to finish To delete a character 1 Perform steps 1 4 in the Naming discs and tracks section on page 33 2 Press the 3 or 2 button on the unit to flash the character to delete 3 Press the DELETE button 4 Press the button to finish 3 ...

Page 35: ... cancel the operation press the button 4 Turn the jog dial to check all the album titles in the memory 5 Press the button to finish After viewing the text memory you can erase it 1 Follow steps 1 4 in the Text memory view 2 Choose the unnecessary album title using the jog dial Then press the ENTER button 3 Press the ENTER button again The text data for the specified disc will be erased If no name ...

Page 36: ...it Do not unplug the power cord and impart shock to the unit during finalizing Finaliz ing will not be correctly performed and consequently proper playback may not be possible When you plug the cord again DISC RECOVER appears and the disc can be recovered If DISC ERROR appears the disc is not recoverable Unfinalizing a disc CD RW only Canceling finalizing of CD RW discs lets you record or edit tex...

Page 37: ...c If it is a CD RW disc UNFINALIZE appears Press the ENTER button to unfinalize it 4 Select the erasing type using the jog dial then press the ENTER button LAST Erases the last track 3 4 Erases the 3rd and 4th tracks 2 4 Erases from the 2nd track to the 4th track ALL Erases all tracks Example Selected ALL ERASE To cancel the operation press the button The music schedule s tracks to be erased flash...

Page 38: ...ill flash for 5 seconds Press the ENTER button during the flash or 5 Turn the jog dial to specify the hour to start and within 10 sec onds press the ENTER button The illustrations show the timer playback setting Timer and Sleep Operation Timer playback The unit turns on and plays the desired source CD CD R CD RW tuner tape at the preset time At the end time the unit enters the power stand by mode ...

Page 39: ... the POWER button to turn the power on 2 Press the MENU button 3 Turn the jog dial to select TIMER PLAY or TIMER REC and then press the ENTER button 4 Press the POWER button to enter the timer stand by mode 13When the preset time is reached playback or recording will start The volume will increase gradually until it reaches the volume you were lis tening to before turning off your system 14When th...

Page 40: ...the setting is changed To cancel the sleep operation Press the POWER button while sleep operation is performed To confirm the remaining sleep time Perform the above steps 2 3 You can also change the sleep time To use timer and sleep operation together Example To fall asleep and wake to the same radio station You can play back the same source only the function cannot be switched 1 Set the desired p...

Page 41: ...o System To the line output jack Red White Red White RCA cord VCR MD deck DSS tuners or DAT decks RCA cord White Red Stereo turntable MD recorder To the line output jack To the Optical Line input jack Connection cable for digital recording Notes This unit can not be used with a stereo turntable which has a ground connecting wire separated from RCA cord No sound is heard during opening the CD R tra...

Page 42: ...ding starts automatically with sound input MANUAL REC After pressing the 06 button recording will start Select one of the above recording types using the jog dial Then press the ENTER button 7 If you have selected MANUAL REC you can turn on or off it using the AUTO MARKER button When you have selected S SYNC REC auto mark function will be turned on and no switching operation is possible A MARK ON ...

Page 43: ... mode and then turn it back on If the unit still malfunctions reset it Refer to page 44 Is the volume level set to 0 Are the headphones connected Are the speaker wires disconnected Cassette deck Symptom Cannot record Cannot record tracks with proper sound quality Cannot erase completely Sound skipping Cannot hear treble Sound fluctuation Cannot remove the tape Possible cause Is the erase protectio...

Page 44: ...data stored in memory including clock and timer settings and tuner and CD presets Before transporting the unit Remove the CD R CD RW disc and all CDs from the unit Your unit checks whether there are any discs inside the unit when the tray is closed CDR NO DISC and CD NO DISC appear if no disc is left Then set the unit to the power stand by mode Carrying the unit with discs left inside can damage i...

Page 45: ...tive maintenance cleaning of the laser pick up lens should be performed periodically Lens cleaners are commercially available Contact your local CD software dealer Cleaning the cabinet Periodically wipe the cabinet with a soft cloth and a diluted soap solution then with a dry cloth Caution Do not use chemically treated cleaning cloths or other chemicals For playback use normal or low noise tape fo...

Page 46: ...ations General Power source AC 120 V 60 Hz Power consumption 200 W Dimensions Width 7 7 8 200 mm Height 13 7 8 352 mm Depth 14 7 8 377 mm Weight 23 8 lbs 10 8 kg Amplifier Output power 100 watts minimum RMS into 6 ohms from 60 Hz to 20 kHz 10 total harmonic distortion Subwoofer 60 W ch 60 Hz 200 Hz 6 ohms 10 T H D Main 40 W ch 200 Hz 20 kHz 6 ohms 10 T H D Output terminals Speakers 6 ohms Headphon...

Page 47: ...nal values of production units There may be some deviations from these values in individual units Speaker Type 3 way type speaker system 2 5 cm Tweeter 5 1 4 13 cm Woofer 5 1 4 13 cm Subwoofer Maximum input power Total 200 W Rated input power Total 100 W Impedance 6 ohms Dimensions Width 8 1 4 210 mm Height 15 7 16 392 mm Depth 13 9 16 345 mm Weight 11 2 lbs 5 1 kg each Specifications RW5000_P43_4...

Page 48: ...rranties described herein shall be the sole and exclusive warranties granted by Sharp and shall be the sole and exclusive remedy available to the purchaser Correction of defects in the manner and for the period of time described herein shall constitute complete fulfillment of all liabilities and responsibilities of Sharp to the purchaser with respect to the Product and shall constitute full satisf...

Reviews: