Sharp CD-MPX200W Operation Manual Download Page 24

03/12/17

CD-MPX200H_500W

E-23

ENGLISH

CD-MPX500W

CD-MPX200W

CD or MP3/WMA disc Playback

MP3/WMA navigation (only for MP3/WMA files) (continued)  

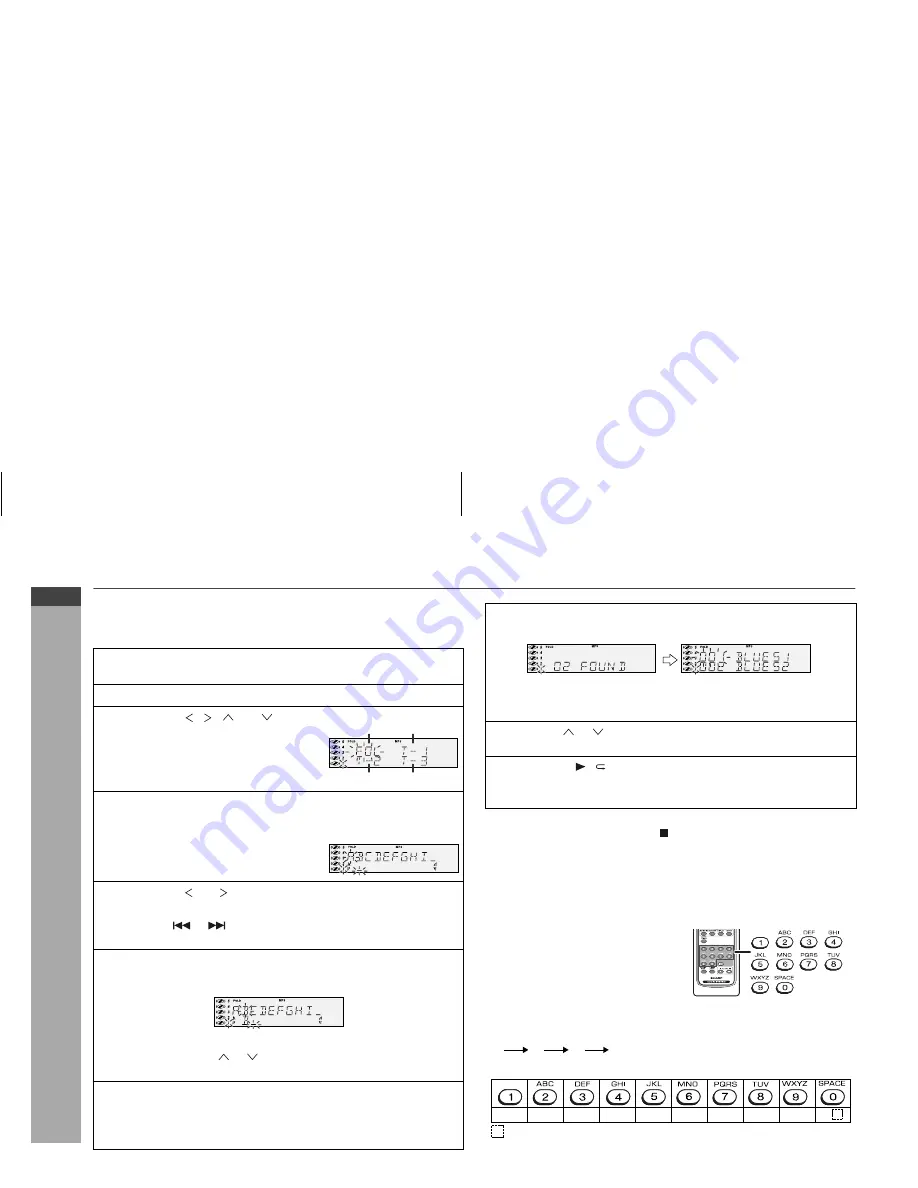
Character search (for folder or title 1/2/3)

By entering a name, you can search files by folder or title 1/2/3 within
one MP3/WMA disc.

To exit the MP3/WMA navigation mode:

In the stop mode, press the CD   button.

Notes:

The unit searches regardless of the case, and names found will
appear in uppercase.
Some symbols do not appear properly.

Character entry with direct buttons:

For example, press “2” four times to enter “C”.

1

Perform steps 1 - 3 in “File search (by folder or title 1/2/3)”
on page 22.

2

Press the NAVIGATION button.

3

Press the  ,  ,   or   cursor
button on the remote control to
select “FOL”, “T-1”, “T-2” or “T-3”.
To search files by folder name,
select “FOL” (will flash).

4

Press the CHARACTER button for 2 seconds.

The display will be ready for editing characters.

1st row: String table

2nd row: Input editor (8 digits)

5

Press the   or   cursor button to select the desired
alphabet.

Press the 

 or 

 button to go to the next page of character 

display.

6

Press the CHARACTER button and the active character will
be entered in the 2nd row of the display.

To delete an entered character, move the cursor to the 
character with the   or   button and press the CLEAR/
DIMMER button on the remote control.

7

Repeat steps 5 and 6 to enter characters.

In the folder (or title) name search, you do not have to enter the 
full name. The unit searches for names beginning with the 
entered characters.

Folder

Title 1

Title 2

Title 3

8

  When finished, press the ENTER button. The unit
  searches for the same name within folders (or titles).

If the search word is not in the folder (or title) name, “NOT 
FOUND” appears and the menu returns.

9

  Use the   or   cursor button to scroll and select a folder 
  (or title).

10

  Press the   /   button to start playback.

All files in the selected folder (or title) are played, and the 
previous display returns.

The direct buttons on the remote 
control can also be used for 
character entry.
In step 5 on the left, use buttons 0 - 
9 to enter alphabets.
Alphabet types change as you 
press a button.

2

A

B

C

1

2 ABC

3 DEF

4 GHI

5 JKL

6 MNO 7 PQRS 8 TUV 9 WXYZ

0     

: indicates a space.

Characters:

Summary of Contents for CD-MPX200W

Page 1: ...lustrações impressas neste manual de operações são para o modelo CD MPX200W CD MPX200W CD MPX500W Se reporter aux pages F 1 à F 40 Consulte las páginas S 1 a S 40 Favor consultar as páginas P 1 a P 40 PORTUGUÊS FRANÇAIS ESPAÑOL Please refer to pages E 1 to E 40 ENGLISH CD MPX500W OPERATION MANUAL MODE D EMPLOI MANUAL DE MANEJO MANUAL DE OPERAÇÃO MINI COMPONENT SYSTEM MINI CHAÎNE SISTEMA MINI COMPO...

Page 2: ...mmunications However there is no guarantee that interference will not occur in a particular installation If this equipment does cause harmful interference to radio or television reception which can be determined by turning the equipment off and on the user is encouraged to try to correct the interference by one or more of the following measures Reorient or relocate the receiving aerial Increase th...

Page 3: ...gital versatile discs semiconductor chips hard drives memory cards and the like An independent license for such use is required For details please visit http mp3licensing com MPEG Layer 3 audio coding technology licensed from Fraunhofer IIS and Thomson Accessories Please confirm that only the following accessories are included Contents Page General Information Precautions 3 Controls and indicators...

Page 4: ...h volume levels Do not turn the volume on to full at switch on and listen to music at moderate levels Excessive sound pressure from earphones and headphones can cause hearing loss Use the unit on a firm level surface free from vibration Keep the unit away from direct sunlight strong magnetic fields excessive dust humidity and electronic electrical equipment home computers facsimiles etc which gene...

Page 5: ...ssette Compartment 27 9 Headphone Socket 36 10 Disc Tray Open Close Button 15 11 Disc Number Select Buttons 15 12 Volume Control 12 13 CD or Tape Stop Button 16 28 14 CD Play or Repeat Tape Play Button 15 19 27 15 CD Track Up or Fast Forward Tape 2 Fast Forward Tuner Preset Up Time Up Button 13 16 26 28 31 16 CD Track Down or Fast Reverse Tape 2 Rewind Tuner Preset Down Time Down Button 13 16 26 2...

Page 6: ... FM Stereo Receiving Indicator 25 14 Tape Play Indicator 27 15 Memory Indicator 20 26 16 Extra Bass Indicator 12 17 Disc Repeat Play Indicator 19 18 Disc Pause Indicator 16 19 Disc Play Indicator 15 Rear panel Reference page 1 AC Voltage Selector 10 2 Cooling Fan FOR CD MPX500W ONLY 9 3 AC Power Lead 10 4 FM 75 Ohms Aerial Socket 8 5 AM Aerial Earth Terminal 8 6 AM Loop Aerial Terminal 8 7 Span Se...

Page 7: ...19 15 Disc Stop Button 16 16 Tape Stop Button 27 17 Memory Button 13 20 26 31 18 Disc Pause Button 16 19 Disc Play or Repeat Button 15 19 20 Tape Play Button 27 21 Tape 2 Record Pause Button 29 22 Tuning Up Cursor Up Button 21 25 23 Disc Track Up or Fast Forward Tape 2 Fast Forward Tuner Preset Up Time Up Cursor Right Button 13 16 26 28 31 24 Disc Track Down or Fast Reverse Tape 2 Rewind Tuner Pre...

Page 8: ...for Use System connections Left speaker Right speaker Speaker connection see page 8 Aerial connection see page 8 Make sure to unplug the AC power lead before any connections FM aerial AM loop aerial AC power connection see page 10 To a Wall socket ...

Page 9: ...plied AM loop aerial Connect the AM loop aerial to the AM and GND terminals Position the AM loop aerial for optimum reception Place the AM loop aerial on a shelf etc or attach it to a stand or a wall with screws not supplied Assembling Attaching to the wall Wall Screws not supplied ANTENNA FM 75 OHMS AM GND AM loop aerial FM aerial Use speakers with an impedance of 6 ohms or more as lower impedanc...

Page 10: ...ing of the fan with any obstacles as this will block proper ventilation The first time the unit is plugged in the unit will enter the demonstration mode You will see words scroll To cancel the demonstration mode When the unit is in the power stand by mode demonstration mode press the X BASS DEMO button The unit will enter the low power consumption mode To return to the demonstration mode When the ...

Page 11: ...reas or countries where the wall socket as shown in illustration 2 is used connect the unit using the AC plug adaptor supplied with the unit as illustrated The AC plug adaptor is not included in areas where the and wall socket and AC power plug can be directly connected see illustration 1 Setting the FM AM span selector The International Telecommunication Union ITU has established that member coun...

Page 12: ... reduced or if the operation becomes erratic Purchase 2 AA size batteries UM SUM 3 R6 HP 7 or similar Periodically clean the transmitter on the remote control and the sensor on the unit with a soft cloth Exposing the sensor on the unit to strong light may interfere with operation Change the lighting or the direction of the unit Keep the remote control away from moisture heat shock and vibrations T...

Page 13: ...de press the EQUALIZER MODE button repeatedly until the desired sound mode appears After use Press the ON STAND BY button to enter the power stand by mode Main unit operation When the VOLUME control is turned clockwise the volume will increase When it is turned anti clockwise the volume will decrease Remote control operation Press the VOLUME or button to increase or decrease the volume When the X ...

Page 14: ... 12 hour display will be skipped To change the 24 hour or 12 hour display 1 Press the ON STAND BY button to turn the power on 2 Press the CLOCK TIMER button 3 Within 10 seconds press the or button to select CLOCK and press the MEMORY button 4 Press the or button to select 24 hour or 12 hour display and then press the MEMORY button The 24 hour display will appear 0 00 23 59 The 12 hour display will...

Page 15: ...yback time Bitrate which is supported by MP3 is 32 320 kbps WMA WMA files are Advanced System Format files that include audio files which are compressed with Windows Media Audio codec WMA is developed by Microsoft as an audio format file for Windows Media Player MP3 or WMA indicator will light up after the unit reads information on an MP3 or WMA disc Bitrate which is supported by WMA is 64 160 kbp...

Page 16: ...e sure to place 8 cm 3 disc in the middle of the disc trays 5 Press button to close the disc tray 1 Due to the structure of the disc information it takes longer to read an MP3 WMA disc than a normal CD approximately 20 to 90 seconds 6 You can place discs on the trays 2 5 by following steps 3 5 7 Press the button to start playback 12 cm 5 8 cm 3 CD Total number of tracks on the disc Total playing t...

Page 17: ...sc tray whilst it is moving If the power fails whilst the tray is open wait until the power is restored If the disc tray is stopped with force ER CD21 will appear on the display for 3 seconds and the unit will not function If this occurs press the ON STAND BY button to enter the power stand by mode and then turn the power on again If TV or radio interference occurs during CD operation move the uni...

Page 18: ... fast forward the next track will be played Playback of the track will begin when its beginning is reached during fast reverse To change the display MP3 WMA discs only Track up track down is possible only within individual disc Fast forward fast reverse is possible only within individual disc When the end of the last track is reached during fast forward END will appear on the display and CD operat...

Page 19: ...uttons are pressed whilst the disc is stopped press the button to start the desired track on the current disc Notes A track number higher than the number of tracks on the disc cannot be selected During random play direct search is not possible 1 Press one of the 1 5 buttons to select the desired disc Selected disc number 2 Within 5 seconds press the button on the main unit Use the direct search bu...

Page 20: ...ck by the random operation On the other hand the button does not allow you to move to the previous track The beginning of the track being played will be located In random play the unit will select and play tracks automatically You cannot select the order of the tracks Caution After performing repeat or random play be sure to press the CD button Otherwise the disc s will play continuously To repeat...

Page 21: ...utton to enter the stand by mode or change the function from CD to another the programmed selections will not be cleared During the programme operation random play is not possible 1 Whilst in the stop mode press the MEMORY button to enter the programming save mode 2 Press one of the 1 5 buttons to select the desired disc Selected disc number 3 Press the direct search buttons on the remote control ...

Page 22: ...le names on your PC connect words with hyphens This product recognises the first word as title 1 second one as title 2 and third one as title 3 Up to three words can be recognised Notes MP3 files must have the extension mp3 WMA files must have the extension wma Up to 100 folders or 300 files can be read on the unit If either limit is exceeded no more folders files are displayed This unit recognise...

Page 23: ...p playback NAVI READ appears and the display shows the total number of folders and files on the selected disc 4 Press the NAVIGATION button 5 Press the or cursor but ton on the remote control to select FOL T 1 T 2 or T 3 To search files by folder name select FOL will flash The following steps describe file search by folder 6 Press the ENTER button The total number of folders or titles appears for ...

Page 24: ...s the or button to go to the next page of character display 6 Press the CHARACTER button and the active character will be entered in the 2nd row of the display To delete an entered character move the cursor to the character with the or button and press the CLEAR DIMMER button on the remote control 7 Repeat steps 5 and 6 to enter characters In the folder or title name search you do not have to ente...

Page 25: ...Y button If you press the RANDOM button in the stop mode the MP3 WMA navigation mode will be cancelled If tracks are programmed using track numbers see Programmed play on page 20 In the MP3 WMA navigation mode only programme by folder or title name are played When you exit the mode the programme by folder or title name are cleared When you exit the MP3 WMA navigation mode programme by track number...

Page 26: ...e TUNER BAND button to select stereo mode and ST indicator will be displayed will appear when an FM broadcast is in stereo If the FM reception is weak press the TUNER BAND button to extinguish the ST indicator The reception changes to monaural and the sound becomes clearer 1 Press the ON STAND BY button to turn the power on 2 Press the TUNER BAND button repeatedly to select the desired frequency b...

Page 27: ...n order starting with preset channel 1 4 Within 30 seconds press the MEMORY button to store that station in memory If the MEMORY and preset number indicators disappear before the station is memorised repeat the operation from step 2 5 Repeat steps 1 4 to set other stations or to change a preset station When a new station is stored in memory the station previously memorised for that preset channel ...

Page 28: ...ion the main unit enters the stand by mode after 15 minutes of inactivity Before playback For playback use normal or low noise tapes for the best sound Metal or CrO tapes are not rec ommended Do not use C 120 tapes or poor quality tapes as they may cause malfunctions Before loading a tape into the cassette compartment tighten the slack with a pen or a pencil 1 Press the ON STAND BY button to turn ...

Page 29: ...ck or stop mode TAPE 2 only Before recording When recording important selections make a preliminary test to ensure that the desired material is properly recorded SHARP is not liable for damage or loss of your recording arising from malfunction of this unit The volume and sound controls can be adjusted with no effect on the recorded signal Variable Sound Monitor For recording use only normal tapes ...

Page 30: ...ith the side to be recorded on facing you Wind past the leader of the tape on which recording cannot be performed 4 Press the button Recording will be paused 5 Press one of the 1 5 buttons to select the desired disc 6 Within 5 seconds press the button to start recording Recording is started from the selected disc When the play back of the last track is finished or the end of the tape is reached th...

Page 31: ...tation see page 25 2 Load a cassette into the TAPE 2 cassette compartment with the side to be recorded on facing you Wind past the leader of the tape on which recording cannot be performed 3 Press the button Recording will be paused 4 Press the TAPE button to start recording 1 Press the ON STAND BY button to turn the power on 2 Load a prerecorded cassette into the TAPE 1 cassette compartment Inser...

Page 32: ...or once timer recording works for one time only at a preset time For example if you are away but want to record a programme on a radio station Daily timer Daily timer play or daily timer recording works at the same preset time every day For example set the timer as a wake up call every morning 1 Set the daily timer pages 31 33 2 Set the once timer pages 31 33 Start Daily timer Once timer 1 minute ...

Page 33: ...ORY button 8 Set the time to finish as in steps 6 and 7 above White Red 9 Switch input with the or button and then press the MEMORY button To select the timer playback source CD TUNER TAPE 1 or TAPE 2 To select the timer recording source TUNER When you select the tuner select a station by pressing the or button and then press the MEMORY button If a station has not been programmed NO PRESET will be...

Page 34: ...automatically however the connected unit will not turn on or off During timer playback or timer recording TIMER indicator light and timer indicator on the display r will blink To stop the blinking follow step Cancelling the timer setting in the timer stand by mode on the right hand side of this page 1 Press the CLOCK TIMER button 2 Within 10 seconds press the or button to select ONCE or DAILY and ...

Page 35: ...10 seconds press the or button to select SLEEP and press the MEMORY button 4 Press the or button to select the time Maximum 3 hours Minimum 1 minute 3 hours 5 minutes 5 minute intervals 5 minutes 1 minute 1 minute intervals 5 Press the MEMORY button SLEEP will appear 6 The unit will enter the power stand by mode automatically after the preset time has elapsed The volume will be turned down 1 minut...

Page 36: ...activated button on the main unit The unit turns on and playback of the last function starts CD TAPE TUNER GAME AUX To record on a tape from game VCR MP3 Player etc 1 Connect a video game system VCR DVD MP3 Player etc to the GAME AUX IN Sockets 2 Press the ON STAND BY button to turn the power on 3 Press the GAME AUX button 4 Play the connected equipment VCR DVD etc To the line output sockets Red R...

Page 37: ...ck the following before calling your authorised SHARP dealer or service centre General CD player Symptom Possible cause The clock is not set to the correct time Did a power failure occur Reset the clock Refer to page 13 When a button is pressed the unit does not respond Set the unit to the power stand by mode and then turn it back on If the unit still malfunctions reset it Refer to page 38 No soun...

Page 38: ...ith proper sound quality Is it a normal tape You cannot record on a metal or CrO tape Cannot erase completely Sound skipping Cannot hear treble Sound fluctuation Is there any slack Is the tape stretched Are the capstans pinch rollers or heads dirty Cannot remove the tape If a power failure occurs during playback the heads remain engaged with the tape Do not open the compartment with great force Sy...

Page 39: ...eration will erase all data stored in memory including clock timer settings tuner preset and CD programme Before transporting the unit Remove all CDs from the unit Make sure there is no CD in the disc tray Then set the unit to the power stand by mode Carrying the unit with discs left inside can damage the unit Care of compact discs Compact discs are fairly resistant to damage however mistracking c...

Page 40: ...g i s e d e k a m o t t h g i r e h t n o i t a c i f i c e p s e c n a m r o f r e p e h T e c i t o n r o i r p t u o h t i w t n e m e v o r p m i y a m e r e h T s t i n u n o i t c u d o r p f o s e u l a v l a n i m o n e r a d e t a c i d n i s e r u g i f s t i n u l a u d i v i d n i n i s e u l a v e s e h t m o r f s n o i t a i v e d e m o s e b l a r e n e G r e y a l p D C r e n u T ...

Page 41: ...xiliary audio signal 500 mV 47 k ohms Frequency response 50 14 000 Hz normal tape Signal noise ratio 55 dB TAPE 1 playback 50 dB TAPE 2 recording playback Wow and flutter 0 3 WRMS Type 3 way type speaker system Super tweeter 5 cm 2 tweeter 13 cm 5 1 8 woofer Maximum input power 40 W Rated input power 20 W Impedance 6 ohms Dimensions Width 180 mm 7 1 16 Height 330 mm 13 Depth 194 mm 7 5 8 Weight 2 ...

Page 42: ...MEMO MÉMORANDUM MEMORÁNDUM MEMORANDO ...

Page 43: ...MEMO MÉMORANDUM MEMORÁNDUM MEMORANDO ...

Page 44: ...TINSZA271AWZZ 07G R KI 1 ...

Page 45: ...TINSZA271AWZZ 07G R KI 1 ...

Reviews: