background image

04/3/22

CD-G10000V(Z)E5.fm

E-46

ENGLISH

TINSZA092AWZZ

4

CD-G10000V

CP-G10000

Refe

rences


!

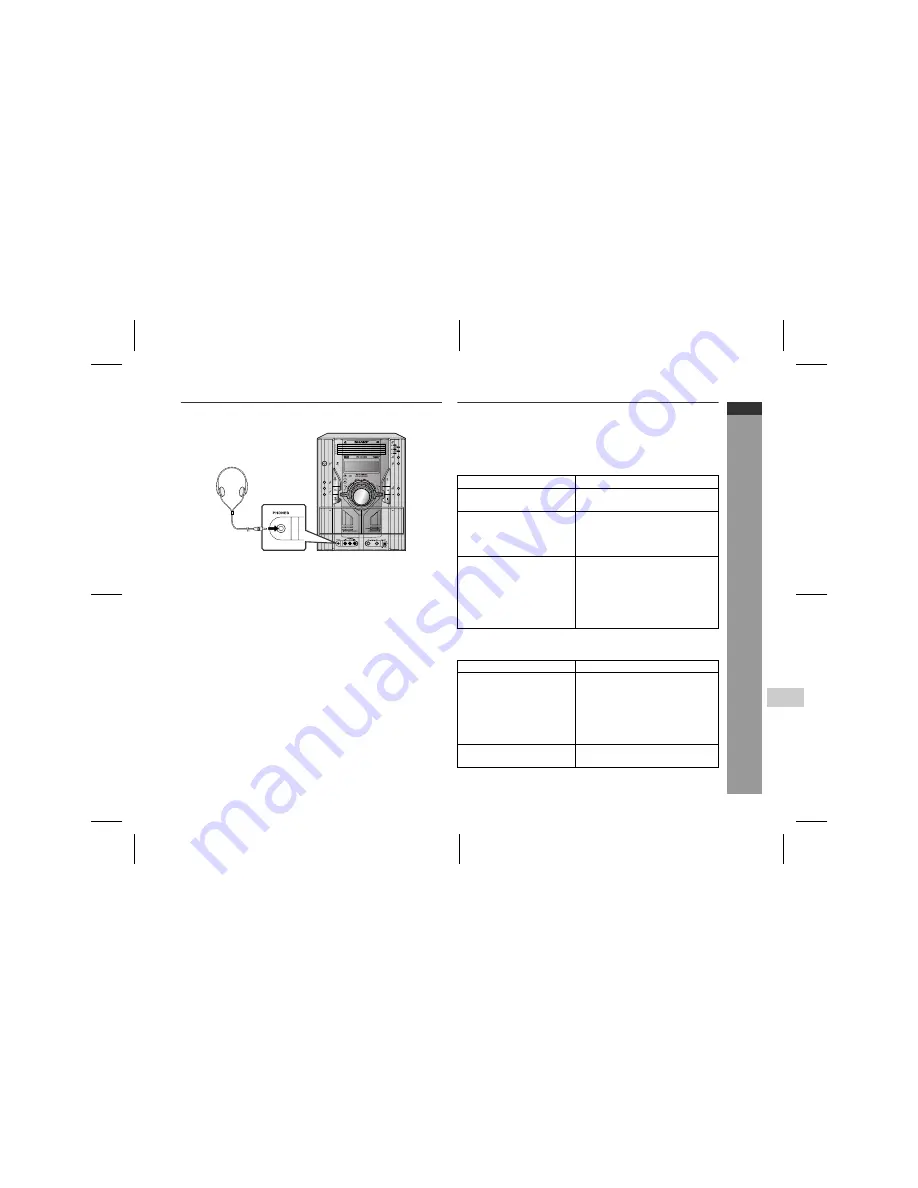
Headphones

"

Before plugging in or unplugging the headphones, reduce the
volume.

"

Be sure your headphones have a 3.5 mm (1/8") diameter plug
and impedance between 16 and 50 ohms. The recommended
impedance is 32 ohms.

"

Plugging in the headphones disconnects the speakers automati-
cally. Adjust the volume using the VOLUME control.

Troubleshooting chart

Many potential problems can be resolved by the owner without call-
ing a service technician.
If something is wrong with this product, check the following before
calling your authorised SHARP dealer or service centre.

!

General


!

Video CD

Symptom

Possible cause

"

The clock is not set to the 
correct time.

"

Did a power failure occur? Reset 
the clock. (Refer to page 18.)

"

When a button is pressed, 
the unit does not respond.

"

Set the unit to the power stand-
by mode and then turn it back on.

"

If the unit still malfunctions, reset 
it. (Refer to page 48.)

"

No sound is heard.

"

Is the volume level set to "0"?

"

Are the headphones connected?

"

Are the speaker wires discon-
nected?

"

Is the karaoke mode set to "L-
CH", "R-CH" or "V-CANCEL"?

Symptom

Possible cause

"

The picture is not dis-
played during playback.

"

Is the TV unplugged?

"

Is the unit connected improperly?

"

Is the input selector on the TV set 
to other than "VCR"?

"

Is the unit being played without 
selecting video CD?

"

The picture quality is poor, 
or it is distorted.

"

Is the disc very dirty?

Summary of Contents for CD-G10000V

Page 1: ... MODÈLE MODELO OPERATION MANUAL MODE D EMPLOI MANUAL DE MANEJO Please refer to pages E 1 to E 50 Se reporter aux pages F 1 à F 50 Consulte las páginas S 1 a S 50 ENGLISH FRANÇAIS ESPAÑOL SHARP CORPORATION CD G10000V SPEAKER SYSTEM ENCEINTES ACOUSTIQUES SISTEMA DE ALTAVOCES MODEL MODÈLE MODELO CP G10000 NTSC PAL ...

Page 2: ...with liquids such as vases shall be placed on the apparatus Note Audio visual material may consist of copyrighted works which must not be recorded without the authority of the owner of the copyright Please refer to the relevant laws in your country CAUTION This product is classified as a CLASS 1 LASER product This product contains a low power laser device To ensure con tinued safety do not remove ...

Page 3: ...reparation for video CD playback 20 Video CD playback 21 23 Advanced video CD playback 24 28 CD playback 29 31 Radio Listening to the radio 32 33 Tape Playback Listening to a cassette tape TAPE 1 or TAPE 2 34 35 Karaoke Playing karaoke 36 37 Tape Recording Recording on a cassette tape 38 40 Advanced Features Timer and sleep operation 41 44 Enhancing your system 45 46 References Troubleshooting cha...

Page 4: ...drawn to the environmental aspects of bat tery disposal This system should only be used within the range of 5 C 35 C 41 F 95 F Warning The voltage used must be the same as that specified on this unit Using this product with a higher voltage other than that which is specified is dangerous and may result in a fire or other type of acci dent causing damage SHARP will not be held responsible for any d...

Page 5: ... 33 35 13 Equaliser Mode Select Button 17 14 Tape 1 Cassette Compartment 34 15 Game Video Input Sockets 45 16 Headphone Socket 46 17 Disc Number Select Buttons 21 18 Disc Direct Play Button 24 19 Disc Tray Open Close Button 21 20 Video CD Play or Repeat or Select or Resume CD MP3 Disc Play or Repeat Tape 1 Play Tape 2 Forward Play Button 21 27 29 34 35 21 Memory Set Button 18 30 33 41 44 22 Tape 2...

Page 6: ...CD Indicator 24 7 CD Indicator 29 8 MP3 Disc Indicator 31 9 Extra Bass Indicator 17 10 Sleep Indicator 44 11 Tape 2 Record Indicator 39 12 Timer Play Indicator 42 13 Timer Recording Indicator 42 14 Tape 2 Reverse Play Indicator 35 15 Tape 1 Play or Tape 2 Forward Play Indicator 34 35 16 Tape Reverse Mode Indicator 35 17 Karaoke Mode Indicator 37 18 FM Stereo Mode Indicator 32 19 Daily Timer Indica...

Page 7: ...oling Fan 12 2 AC Voltage Selector 12 3 Subwoofer Pre output Socket 15 4 AC Power Lead 9 12 5 FM 75 Ohm Aerial Terminal 9 10 6 FM Aerial Earth Terminal 9 10 7 AM Loop Aerial Socket 9 10 8 Span Selector Switch 13 9 Video Output Socket 11 10 Front Speaker Terminals 9 10 11 Surround Speaker Terminals 9 10 1 6 5 4 3 2 7 8 9 11 10 ...

Page 8: ...ss Reflex Duct 4 Speaker Terminals Surround speaker 1 Full range Speakers 2 Speaker Terminals Active subwoofer Reference page 1 Power Indicator 16 2 Subwoofer 3 Bass Reflex Duct 4 Power Switch 16 5 Volume Control 16 6 Crossover Frequency Control 16 7 AC Voltage Selector 15 8 Cooling Fan 9 Subwoofer Input Socket 15 10 AC Power Lead 15 1 3 9 8 4 2 1 2 2 1 4 3 5 6 10 7 ...

Page 9: ...On Stand by Button 17 18 Clock Timer Button 18 41 44 19 MP3 Disc Display Button 31 20 Disc Direct Search Buttons 24 21 Memory Set Button 18 30 33 41 44 22 Disc Random Button 29 23 Video CD Skip or Previous CD MP3 Disc Track Down or Fast Reverse Tape 2 Fast Wind Tuner Preset Down Time Down Button 18 22 33 35 24 Disc Pause Button 22 25 Video CD Skip or Next CD MP3 Disc Track Up or Fast Forward Tape ...

Page 10: ...eaker connection see page 10 Aerial connection see page 10 AC power connection see page 12 To a wall socket Make sure to unplug the AC power lead before making any connections AM loop aerial FM aerial Front speaker right Surround speaker right Surround speaker left Front speaker left Subwoofer connection see page 15 ...

Page 11: ...he red wire to the FRONT SPEAKERS terminal Surround speakers Connect the black wire to the SURROUND SPEAKERS terminal and the grey wire to the SURROUND SPEAKERS terminal Caution Assembling Attaching to the wall Wall Screws not supplied Connect the speaker wires to the speakers first then to the unit Never mistake the FRONT SPEAKERS and the SURROUND SPEAKERS terminals The unit or the speakers may b...

Page 12: ...TV monitor through the TV ANTENNA CABLE input Be sure to turn on the VCR and set the VCR s input mode to auxiliary Notes The speakers are magnetically shielded Therefore they do not affect the display even you use them near the TV However some colour variation may occur depending on the type of TV used If colour variation occurs Turn off the TV from the power switch After 15 30 minutes turn the TV...

Page 13: ... the unit first the unit will enter the demonstration mode see page 13 Notes The unit will start the tape initialisation when plugged in to the AC socket During this process initialising sound will be heard and the unit cannot be turned on Wait until the process is finished Unplug the AC power lead from the wall socket if the unit will not be in use for a prolonged period of time AC Plug Adaptor I...

Page 14: ...u require better reception Consult your dealer Note When an external FM aerial is used disconnect the supplied FM aerial wire 1 Press the ON STAND BY button to enter the stand by mode 2 Set the SPAN SELECTOR switch on the rear panel as follows For 50 kHz FM interval 9 kHz in AM 50 9 For 100 kHz FM interval 10 kHz in AM 100 10 3 Whilst pressing down the button and the X BASS DEMO but ton press the ...

Page 15: ...M 3 R6 HP 7 or similar Periodically clean the transmitter on the remote control and the sensor on the unit with a soft cloth Exposing the sensor on the unit to strong light may interfere with operation Change the lighting or the direction of the unit Keep the remote control away from moisture heat shock and vibrations Test of the remote control Check the remote control after checking all the conne...

Page 16: ...g the AC power lead After checking all the connections have been made correctly plug the AC power lead of this unit into the wall socket Note Unplug the AC power lead from the wall socket if the unit will not be in use for a prolonged period of time AC Plug Adaptor In areas or countries where a wall socket as shown in illustration is used connect the unit using the AC plug adaptor supplied with th...

Page 17: ... anti clockwise to decrease the volume Crossover frequency control Adjust the high frequency cut off point Frequencies higher than the set frequency are removed To emphasise the bass turn this control towards 35 Hz and increase the volume Notes Observe the following to avoid malfunction and sound distortion Do not set the volume too high on the main unit The subwoofer may be damaged Before you swi...

Page 18: ...on to enter the power stand by mode Main unit operation When the VOLUME control is turned clockwise the volume will increase When it is turned anti clockwise the vol ume will decrease Remote control operation Press the VOL or button to increase or decrease the volume When the power is first turned on the unit will enter the extra bass mode which emphasises the bass frequencies and X BASS will appe...

Page 19: ...change the 24 hour or 12 hour display Note The clock can also be set with the remote control 1 Press the ON STAND BY button to turn the power on 2 Press the CLOCK TIMER button 3 Within 10 seconds press the or button to se lect CLOCK and press the MEMORY SET button 4 Press the or button to select 24 hour or 12 hour display and then press the MEMORY SET button 0 00 The 24 hour display will appear 0 ...

Page 20: ...rsion 2 0 PBC is an abbreviation of Playback control You can enjoy the following two types of playback depending on the disc Notes Analogue system CDVs 12 cm cannot be played Photo CDs and CD ROMs cannot be played Symbol Size 8 cm 3 12 cm 5 Label sides 1 side 1 side Audio recording format Digital max 20 min Digital max 74 min Video recording format MPEG 1 Disc type Features Video CDs without PBC v...

Page 21: ...e or an NTSC disc in the PAL mode the vertical size of the picture will not be modi fied If a multi mode TV is equipped with an input selector switch set the switch to MULTI MODE For the details refer to the TV operation manual Do not change the video output format during playback If you do the picture signal may not be output properly Picture may be distorted when the setting is switched This is ...

Page 22: ...op automatically When there is no disc in one of the disc trays 1 5 the empty tray will be skipped to the next tray with a disc To exchange other discs whilst playing a disc Press one of the 1 5 buttons for the stopped disc and within 5 seconds press the OPEN CLOSE button and exchange discs To remove the discs In the stop mode press the 1 5 button and within 5 seconds press the OPEN CLOSE button 1...

Page 23: ...the disc tray is stopped with force ER CD20 will appear on the display for 3 seconds and the unit will not function If this occurs press the ON STAND BY button to enter the power stand by mode and then turn the power on again If TV or radio interference occurs during CD operation move the unit away from the TV or radio If a disc is damaged dirty or loaded upside down the disc will skip Auto power ...

Page 24: ...activating the playback control function Video CD with P B C only You can play a video CD with P B C without activating the playback control function In this case the menu screen will not appear and the disc will be played in the same way as a video CD without P B C Notes The P B C function can also be cancelled whilst in the playback mode Some video CDs with P B C cannot be played back when the P...

Page 25: ...n the current disc Notes A track number higher than the number of tracks on the disc can not be selected During random play direct search is not possible For MP3 discs you can select the track number but cannot select the folder by pressing the direct search button s This function does not work during P B C play Cancel the P B C mode when playing video CDs with P B C 1 Press one of the 1 5 buttons...

Page 26: ...function does not work during programmed play 1 Whilst in the playback mode press the BOOKMARK button on the re mote control when the desired scene is displayed B M will appear on the TV screen for a few seconds 2 Repeat step 1 Up to 9 scenes can be marked If more than 9 bookmarks are created bookmarks will be erased in the order they were created 1 Whilst in the stop or playback mode hold down th...

Page 27: ...n the stop mode This function is not available with an audio CD or MP3 disc Caution This function does not work in the P B C mode which will be automatically cancelled when you press the DIGEST DIGEST TIME SEARCH button This function does not work during programmed play 1 Whilst in the playback mode hold down the DIGEST DI GEST TIME SEARCH button to enter the time search mode 2 Use the direct sear...

Page 28: ...ing programmed play Resume play This function is to restart playback from the point where it has stopped Notes Resume play cannot be activated when the function is changed from CD VIDEO CD to another or the unit is set to the power stand by mode Resume play cannot be performed whilst opening the disc tray or after changing the disc This function does not work during P B C play Cancel the P B C mod...

Page 29: ...setting will not work during video CD and MP3 disc play back Changing the TV screen display You can check the operation of the main unit by the on screen dis play During stop mode During playback Note The displays may differ depending on the discs 1 Press the VCD AUTO VCD button until VCD ON appears on the TV screen 2 Press the SELECT RESUME button Press the VCD AUTO VCD button until VCD AUTO appe...

Page 30: ... Press the DIRECT PLAY button NORMAL will appear for 2 seconds Notes If you press the button during random play you can move to the next track by the random operation On the other hand the button does not allow you to move to the previous track The beginning of the track being played will be located In random play the CD player will select and play tracks auto matically You cannot select the order...

Page 31: ... not be cleared During the programme operation random play is not possible During programmed play the DIRECT PLAY button will not work When the MEMORY SET MEMORY button is pressed in P B C mode it will be cancelled automatically and the unit will be switched to the programme mode 1 Whilst in the stop mode press the MEMORY SET MEMORY button to enter the programming save mode 2 Press one of the 1 5 ...

Page 32: ...fer from its actual playback time To change the display MP3 discs only Whilst in the stop mode or playback mode press the DISPLAY but ton Each time the button is pressed the display will change as follows When in the stop mode When in the playback mode To select the desired folder or track by name MP3 discs only Note After selecting a disc with one of the 1 5 buttons the display will not change ev...

Page 33: ... again To receive an FM stereo transmission Press the TUNER BAND button to display the ST indicator will appear when an FM broadcast is in stereo If the FM reception is weak press the TUNER BAND button to extinguish the ST indicator The reception changes to monau ral and the sound becomes clearer 1 Press the ON STAND BY button to turn the power on 2 Press the TUNER BAND button repeatedly to select...

Page 34: ... Store the stations in memory in order starting with preset channel 1 4 Within 30 seconds press the MEMORY SET MEMORY button to store that station in memory If the MEMORY and preset number indicators go out before the station is memorised repeat the operation from step 2 5 Repeat steps 1 4 to set other stations or to change a pre set station When a new station is stored in memory the station previ...

Page 35: ... TAPE TUNER GAME Before playback For playback use normal or low noise tapes for the best sound Metal or CrO tapes are not rec ommended Do not use C 120 tapes or poor quality tapes as they may cause malfunctions Before loading a tape into the cassette compartment tighten the slack with a pen or a pencil 1 Press the ON STAND BY button to turn the power on 2 Press the TAPE 1 2 button to select TAPE 1...

Page 36: ...s the TAPE 1 2 button to select TAPE 2 3 Open the cassette door by pushing the area marked 4 Load a cassette into the TAPE 2 cassette compart ment with side A facing you 5 Press the button to choose one side or both sides To listen to both sides To play both sides start from side A When playback starts from side B side A will not be played For endless repeat play of both sides To listen to one sid...

Page 37: ...ophones away from each other Caution When not using the microphone remove it from the MIC socket When connecting or disconnecting the microphone set the MIC LEVEL control to MIN When using only one microphone unplug the other 1 Set the MIC LEVEL control to MIN to protect the speakers from shock noise and to avoid disturbing noises 2 Connect the microphone s to the MIC 1 or MIC 2 socket or both soc...

Page 38: ... Background music have been recorded on one of the two channels and only the BGM on the other The function will not work properly with discs which do not belong to this group Discs on which vocal has been recorded on the left channel and music on the right may not play properly Recording of mixed sound to a cassette tape You can record mixed sound from the microphone and CD VIDEO CD TUNER TAPE 1 o...

Page 39: ...ted with no effect on the recorded signal Variable Sound Monitor For recording use only normal tapes Do not use metal or CrO tapes Recording can be operated in the TAPE 2 compartment The TAPE 1 is for playback only Erase prevention tab of cassette tapes When recording on a cassette tape make sure that the erase prevention tabs are not removed Cassettes have removable tabs that prevent accidental r...

Page 40: ... Press the CD VIDEO CD CD button 3 Load a cassette into the TAPE 2 cassette compartment with side A facing you Wind past the leader of the tape on which recording cannot be performed 4 Press the button to choose one side or both sides To record on both sides To record on only one side 5 Press the TAPE 2 but ton Recording will be paused 6 Press one of the 1 5 buttons to select the desired disc 7 Wi...

Page 41: ...rding will be paused 5 Press the SELECT RESUME button to record on side A or the TAPE 2 button for side B To record on both sides begin with side A If recording is start ed from side B the tape will not switch over to side A 1 Press the ON STAND BY button to turn the power on 2 Load a prerecorded cassette into the TAPE 1 cassette com partment Insert a blank tape into the TAPE 2 cassette com partme...

Page 42: ...ce timer play or once timer recording works for one time only at a preset time For example if you are away but want to record a programme on a radio station Daily timer Daily timer play or daily timer recording works at the same preset time every day For example set the timer as a wake up call every morning 1 Set the daily timer pages 41 43 2 Set the once timer pages 41 43 Start Daily timer Once t...

Page 43: ...hen press the MEMORY SET button 8 Set the time to finish as in steps 6 and 7 above White Red 9 Switch input with the or button and then press the MEMORY SET button To select the timer playback source CD VIDEO CD TUNER TAPE 1 or TAPE 2 To select the timer recording source TUNER When you select the tuner select a station by pressing the or button and then press the MEMORY SET button If a station has...

Page 44: ...ecording using another unit con nected to the GAME INPUT sockets select GAME in step 9 This unit will turn on or enter the power stand by mode automatically however the connected unit will not turn on or off 1 Press the CLOCK TIMER button 2 Within 10 seconds press the or button to select ONCE or DAILY and press the MEMORY SET button 3 Within 10 seconds press the or button to select ONCE CAL or DAI...

Page 45: ...n 3 Within 10 seconds press the or button to select SLEEP and press the MEMO RY SET button 4 Press the or button to select the time Maximum 3 hours Minimum 1 minute 3 hours 5 minutes 5 minute intervals 5 minutes 1 minute 1 minute intervals 5 Press the MEMORY SET but ton SLEEP will appear 6 The unit will enter the power stand by mode automatically after the preset time has elapsed The volume will b...

Page 46: ...prevent noise interference place the unit away from the televi sion To record sounds of game VCR etc Game system VCR DVD player etc Red White Yellow Yellow To the line output sockets RCA lead not supplied Video cable not supplied Red White 1 Connect a video game system VCR DVD etc to the front GAME INPUT VIDEO AUDIO L and R sockets 2 Connect a TV to the rear VIDEO OUT socket Switch the TV input to...

Page 47: ...sed SHARP dealer or service centre General Video CD Symptom Possible cause The clock is not set to the correct time Did a power failure occur Reset the clock Refer to page 18 When a button is pressed the unit does not respond Set the unit to the power stand by mode and then turn it back on If the unit still malfunctions reset it Refer to page 48 No sound is heard Is the volume level set to 0 Are t...

Page 48: ...e disc very dirty Has condensation formed inside the unit Symptom Possible cause Cannot record Is the erase prevention tab re moved Cannot record tracks with proper sound quality Is it a normal tape You cannot record on a metal or CrO tape Cannot erase completely Sound skipping Is there slack in the tape Is the tape stretched Cannot hear treble Are the capstans pinch rollers or heads dirty Sound f...

Page 49: ...ting the unit Remove all CDs from the unit Make sure there is no CD in the disc tray Then set the unit to the power stand by mode Carrying the unit with discs left inside can damage the unit Maintenance Cleaning the tape handling parts Dirty heads capstans or pinch rollers can cause poor sound and tape jams Clean these parts with a cotton swab moistened with commercial head pinch roller cleaner or...

Page 50: ...10 5 kg 23 1 lbs Video output format PAL NTSC Type 5 disc multi play compact disc player Signal readout Non contact 3 beam semiconductor laser pickup D A converter 1 bit D A converter Frequency response 20 20 000 Hz Dynamic range 90 dB 1 kHz Output power Front speakers MPO 530 W 265 W 265 W 10 T H D RMS 270 W 135 W 135 W 10 T H D RMS 144 W 72 W 72 W 0 9 T H D Surround speakers MPO 250 W 125 W 125 ...

Page 51: ...ions Width 220 mm 8 11 16 Height 420 mm 16 9 16 Depth 430 mm 16 15 16 Weight 5 5 kg 12 1 lbs each Type Full range speaker system 10 cm 4 speaker 2 Maximum input power 130 W Rated input power 65 W Impedance 16 ohms Dimensions Width 200 mm 7 7 8 Height 420 mm 16 9 16 Depth 430 mm 16 15 16 Weight 4 0 kg 8 8 lbs each Power source AC 110 127 220 230 240 V 50 60 Hz Power consumption 130 W Output power M...

Page 52: ...CD G10000V CP G10000 VIDEO CD MINI SYSTEM SPEAKER SYSTEM U P DOWN ...

Reviews: