


09/12/
3
1
CD-DH
8
99N (
S
EC-LAG) EN.fm
E-11
In thi
s
ex
a
mple, the clock i
s
s
et for the 12-ho
u
r (AM 12:00)
di
s
pl
a
y.
To confirm the time display:
Pre
ss
the CLOCK/TIMER
bu
tton. The time di
s
pl
a
y will
a
ppe
a
r for
ab
o
u
t 5
s
econd
s
.
Note:
The “CLOCK” will
a
ppe
a
r or time will
b
e di
s
pl
a
yed when
the AC power
su
pply i
s
re
s
tored
a
fter
a
power f
a
il
u
re or
u
npl
u
gging the
u
nit. If incorrect, re
a
dj
us
t the clock
as
follow
s
.
To readjust the clock:
Perform “
S
etting the clock” from
s
tep 1. If the “CLOCK”
doe
s
not
a
ppe
a
r in
s
tep 2,
s
tep
3
(for
s
electing the 12-ho
u
r
or 24-ho
u
r di
s
pl
a
y) will
b
e
s
kipped.
To change the 12-hour or 24-hour display:
Once timer:
Once timer pl
a
y work
s
for one time only
a
t
a
pre
s
et time.
Daily timer:
D
a
ily timer pl
a
y work
s
a
t the
sa
me pre
s
et time every d
a
y.
For ex
a
mple,
s
et the timer
as
a
w
a
ke-
u
p c
a
ll every
morning.
Using the once timer and daily timer in combination:
For ex
a
mple,
us
e the once timer to li
s
ten
a
r
a
dio progr
a
m,
a
nd
us
e the d
a
ily timer to w
a
ke
u
p.
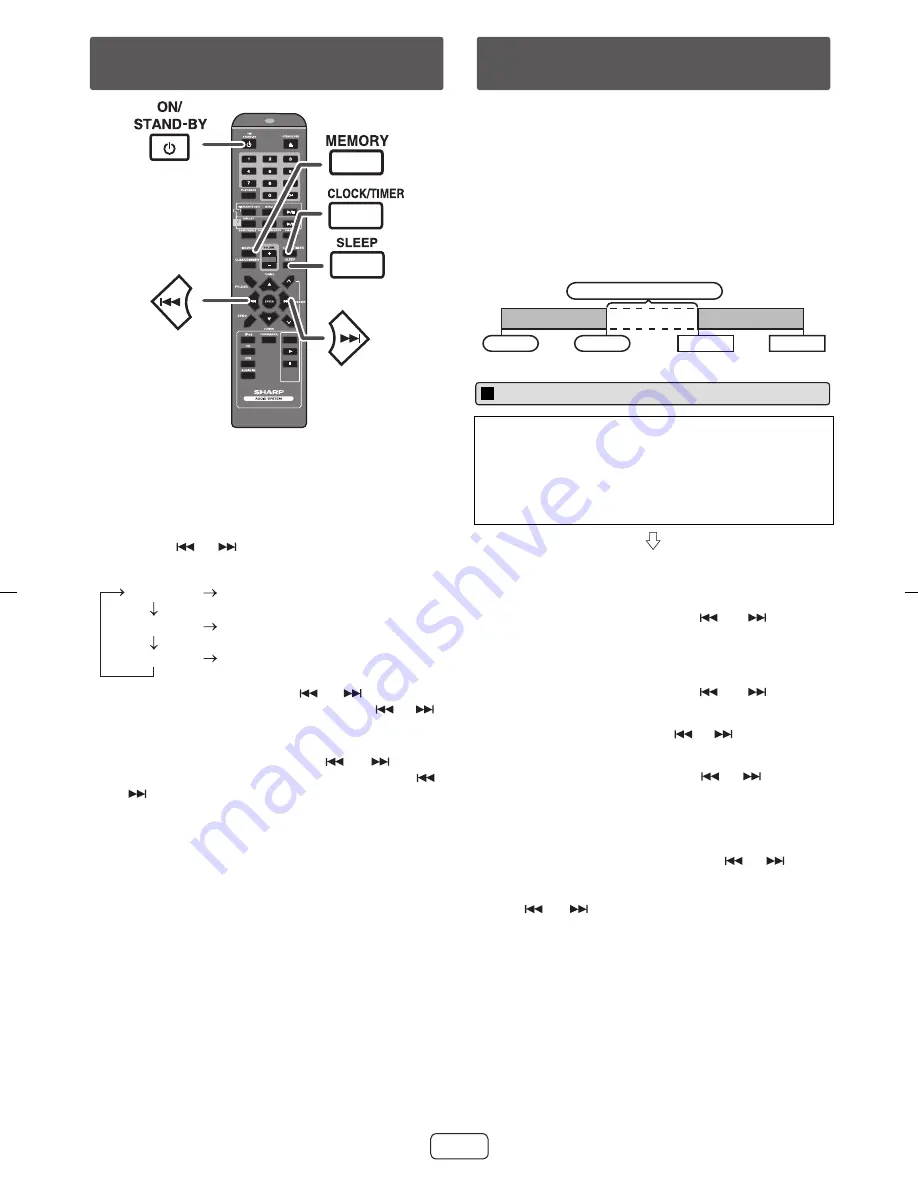
1
Pre
ss
the ON/
S
TAND-BY
bu
tton to t
u
rn the power on.
2
Pre
ss
the CLOCK/TIMER
bu
tton.
3
Within 10
s
econd
s
, pre
ss
the MEMORY
bu
tton.
Pre
ss
the
or
bu
tton to
s
elect 12-ho
u
r or
24-ho
u
r di
s
pl
a
y
a
nd then pre
ss
the MEMORY
bu
tton.
The 12-ho
u
r di
s
pl
a
y will
a
ppe
a
r.
(AM 12:00 - PM 11:59)
The 12-ho
u
r di
s
pl
a
y will
a
ppe
a
r.
(AM 0:00 - PM 11:59)
The 24-ho
u
r di
s
pl
a
y will
a
ppe
a
r.
(0:00 - 2
3
:59)
4
To
a
dj
us
t the ho
u
r, pre
ss
the
or
bu
tton
a
nd
then pre
ss
the MEMORY
bu
tton. Pre
ss
the
or
bu
tton once to
a
dv
a
nce the time
b
y 1 ho
u
r. Hold it
down to
a
dv
a
nce contin
u
o
us
ly.
5
To
a
dj
us
t the min
u
te
s
, pre
ss
the
or
bu
tton
a
nd then pre
ss
the MEMORY
bu
tton. Pre
ss
the
or
bu
tton once to
a
dv
a
nce the time
b
y 1 min
u
te.
1
Cle
a
r
a
ll the progr
a
mmed content
s
. [Refer to “F
a
ctory
re
s
et, cle
a
ring
a
ll memory” on p
a
ge 14 for det
a
il
s
.]
2
Perform “
S
etting the clock” from
s
tep 1 onw
a
rd
s
.
Setting the clock (Remote control
only)
CD
USB
TAPE
“AM 12:00”
“AM 0:00”
“0:00”
Before setting timer:
●
Check th
a
t the clock i
s
s
et to the correct time (refer to
p
a
ge 11). If it i
s
not
s
et, yo
u
c
a
nnot
us
e the timer
f
u
nction.
●
For timer pl
a
y
ba
ck: Pl
u
g in U
S
B or lo
a
d di
s
c/c
ass
ette
or dock iPod to
b
e pl
a
yed.
1
Pre
ss
the ON/
S
TAND-BY
bu
tton to t
u
rn the power on.
2
Pre
ss
a
nd hold the CLOCK/TIMER
bu
tton.
3
Within 10
s
econd
s
, pre
ss
the
or
bu
tton to
s
elect “ONCE
S
ET” or “DAILY
S
ET”,
a
nd pre
ss
the
MEMORY
bu
tton.
S
et the clock to the correct time if
“ONCE
S
ET” or “DAILY
S
ET” doe
s
not
a
ppe
a
r.
4
Within 10
s
econd
s
, pre
ss
the
or
bu
tton to
s
elect “TIMER
S
ET”,
a
nd pre
ss
the MEMORY
bu
tton.
5
To
a
dj
us
t the ho
u
r, pre
ss
the
or
bu
tton
a
nd then
pre
ss
the MEMORY
bu
tton.
6
To
a
dj
us
t the min
u
te
s
, pre
ss
the
or
bu
tton
a
nd
then pre
ss
the MEMORY
bu
tton.
7
S
et the time to fini
s
h
as
in
s
tep
s
5
a
nd 6
ab
ove.
8
To
s
elect the timer pl
a
y
ba
ck
s
o
u
rce (CD, TUNER, U
S
B,
iPod, TAPE or AUDIO IN), pre
ss
the
or
bu
tton.
Pre
ss
the MEMORY
bu
tton.
When yo
u
s
elect the t
u
ner,
s
elect
a
s
t
a
tion
b
y pre
ss
ing
the
or
bu
tton,
a
nd then pre
ss
the MEMORY
bu
tton. If
a
s
t
a
tion h
as
not
b
een progr
a
mmed, “NO
PRE
S
ET” will
b
e di
s
pl
a
yed
a
nd timer
s
etting will
b
e
c
a
nceled.
9
Adj
us
t the vol
u
me
us
ing the VOLUME control,
a
nd then
pre
ss
the MEMORY
bu
tton. Do not t
u
rn the vol
u
me
u
p
too high.
10
Pre
ss
the ON/
S
TAND-BY
bu
tton to enter the power
s
t
a
nd-
b
y mode. The “TIMER” indic
a
tor light
s
u
p
a
nd
the
u
nit i
s
re
a
dy for timer pl
a
y
ba
ck.
Timer and sleep operation (Remote
control only)
Once timer
D
a
ily timer
S
t
a
rt
S
top
1 min
u
te or more
S
t
a
rt
S
top
Timer playback


