background image

10

B E F O R E   O P E R A T I N G

Before operating your new microwave oven make
sure you read and understand this operation
manual completely.

Before the oven can be used, follow these
procedures:

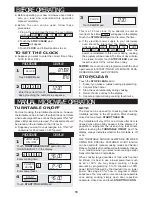
1. Plug in the oven. Close the door. The oven display

will show  

SHARP     SIMPLY         THE

BEST

PRESS

CLEAR

AND

PRESS       CLOCK 

 .

2. Touch the STOP/CLEAR pad.

    will appear.

3. Touch CLOCK and follow directions to set.

:

TO SET THE CLOCK

Suppose you want to enter the correct time of day
12:30 (A.M. or P.M.).

P R O C E D U R E

D I S P L A Y

1

2

This is a 12 hour clock. If you attempt to enter an
incorrect clock time,               will appear in the display.
Touch the STOP/CLEAR pad and re-enter the time.

If the electrical power supply to your microwave
oven should be interrupted, the display will inter-
mittently show

 SHARP

SIMPLY

THE

BEST

.

 PRESS       CLEAR        AND          PRESS    CLOCK 

  after the

power is reinstated. If this occurs during cooking,
the program will be erased. The time of day will also
be erased. Simply touch STOP/CLEAR  pad and
reset the clock for the correct time of day.

NOTE:

 Your oven can be programmed with the door

open except for START/TOUCH ON, MINUTE PLUS,
SENSOR REHEAT and POPCORN.

ERROR

STOP/CLEAR

Touch the STOP/CLEAR pad to:
1. Erase if you make a mistake during programming.
2. Cancel kitchen timer.
3. Stop the oven temporarily during cooking.
4. Return the time of day to the display.
5. Cancel a program during cooking, touch twice.

M A N U A L   M I C R O W A V E   O P E R A T I O N

Touch CLOCK pad.

ENTER

TURNTABLE ON

TIME

TURNTABLE ON

Enter the correct time of
day by touching the numbers in sequence.

12:30

000

TURNTABLE ON

CLOCK

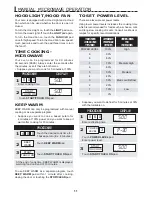
For most cooking, the turntable should be on; however
the turntable can be turned off so that it does not rotate
when extra large dishes, such as the popular 13"x9"x2"
glass utility casserole, are used. The casserole should
be placed on the turntable so that it is level.

Suppose you want to cook lasagna in a 13"x9"x2"
casserole for 45 minutes on 40% power.

TURNTABLE ON/OFF

P R O C E D U R E

D I S P L A Y

1

2

3

4

3

12:30

000

TURNTABLE ON

Touch CLOCK pad.

CLOCK

NOTE:

The door can be opened for checking food and the
turntable will stay in the off position. After checking,
close door and touch START/TOUCH ON.

The turntable will stay off for one minute after door is
opened when time-of-day appears in the display. It is
possible to reprogram the oven during that minute
without touching the TURNTABLE ON/OFF pad. The
display always indicates whether the turntable is off
or on.

THE TURNTABLE SHOULD ALWAYS BE ON WHEN
USING THE SPECIAL FEATURES. On/Off function
can be used with manual cooking modes and Sensor
Reheat. Turntable off condition will automatically change
to on condition when you select auto cooking except
Sensor Reheat and CompuBake.

When cooking large quantities of food which cannot
be stirred, it is best to use a lower power level such
as 40 or 50%. You may speed cooking of large
amounts by programming 5 to 10 minutes on 100%
power (HIGH) followed by the desired time on lower
power. See page 23 for how to program multiple
sequences. You may wish to reverse a large casserole
once during cooking; simply open door, reposition
casserole, close door and touch START/TOUCH ON.

1 2 3 0

Touch TURNTABLE ON/OFF pad and note
TURNTABLE OFF in the display.

ENTER

TURNTABLE 

ON

 OFF

Enter cooking time.

45.00

000

TURNTABLE 

ON

 OFF

P-40

000

TURNTABLE 

ON

 OFF

Enter power level.

POWER

LEVEL

4 5 0 0

4

START

TOUCH ON

45.00

000

TURNTABLE 

ON

 OFF  COOK

Touch START/TOUCH ON pad.

TURNTABLE

ON / OFF

Summary of Contents for Carousel R-1870

Page 1: ... H E R A N G E C O N V E C T I O N M I C R O W A V E O V E N R e a d a l l i n s t r u c t i o n s c a r e f u l l y b e f o r e u s i n g t h e o v e n O P E R A T I O N M A N U A L MODELS R 1870 R 1871 R 1872 ...

Page 2: ...ner residue to accumulate on sealing surfaces c Do not operate the oven if it is damaged It is particularly important that the oven door close properly and that there is no damage to the 1 door bent 2 hinges and latches broken or loosened 3 door seals and sealing surfaces d The oven should not be adjusted or repaired by anyone except properly qualified service personnel F O R C U S T O M E R A S S...

Page 3: ...11 Turntable On Off 10 Hood Light Hood Fan 11 Time Cooking Microwave 11 Keep Warm 11 Microwave Features 12 17 CompuDefrost 12 CompuDefrost Chart 12 Manual Defrost 13 Sensor Cooking 13 Instant Sensors 14 Instant Sensor Reheat 14 Instant Sensor Popcorn 14 Popcorn Chart 14 Instant Sensor Chart 14 Sensor Cook 15 Sensor Cook Chart 15 Sensor Cook Recipes 16 17 Manual Convection Automatic Mix Operation 1...

Page 4: ...ise In no event shall Sharp be liable or in any way responsible for any damages or defects in the Product which were caused by repairs or attempted repairs performed by anyone other than an authorized servicer Nor shall Sharp be liable or in any way responsible for any incidental or consequential economic or property damage Some states do not allow the exclusion of incidental or consequential dama...

Page 5: ...This appliance should be serviced only by qualified service personnel Contact nearest Sharp Authorized Servicer for examination repair or adjustment 11 Do not cover or block any openings on the appliance 12 Do not store or use this appliance outdoors Do not use this product near water for example near a kitchen sink in a wet base ment or near a swimming pool and the like 13 Do not immerse cord or ...

Page 6: ...ecommended that a separate circuit serving only the oven be provided The oven is equipped with a 3 prong grounding plug It must be plugged into a wall receptacle that is properly installed and grounded DO NOT UNDER ANY CIRCUM STANCES CUT OR REMOVE THE GROUNDING PIN FROM THE PLUG Notes 1 If you have any questions about the grounding or electrical instructions consult a qualified electrician or serv...

Page 7: ...only It should not be used to dry clothes or newspapers Your oven is rated 850 watts by using the IEC Test Procedure In using recipes or package directions check food a minute or two before the minimum time and add time accordingly Eggs sausages fruits vegetables Popcorn Baby food General ABOUT FOOD Puncture egg yolks before cooking to prevent explosion Pierce skins of potatoes apples squash hot d...

Page 8: ...s it is approved for microwave oven use ALWAYS use potholders to prevent burns when handling utensils that are in contact with hot food Enough heat from the food can transfer through utensils to cause skin burns Avoid steam burns by directing steam away from the face and hands Slowly lift the farthest edge of a dish s covering and carefully open popcorn and oven cooking bags away from the face Sta...

Page 9: ...that need tenderizing DO NOT use metal twist ties Yes For reheating Yes To cover for reheating and cooking Do not use recycled paper towels which may contain metal filings Yes Yes Use for reheating and defrosting Follow manufacturer s directions Yes Yes Use brands specially marked for microwave use DO NOT allow plastic wrap to touch food Vent so steam can escape Yes Check manufacturer s recommenda...

Page 10: ...GHT button Push for on off Front of Microwave 13 14 17 18 3 2 1 4 6 5 6 7 8 9 10 11 15 16 12 FRONT VIEW 10 Auto Touch control panel 11 Time display Digital display 99 minutes 99 seconds 12 Ventilation openings 13 Light cover 14 Grease filters 15 Removable ceramic turntable The turntable will rotate clockwise or counterclockwise Only remove for cleaning 16 Removable turntable support Place the turn...

Page 11: ...will light in the display to indicate features and cooking instructions Number next to the control panel illustration indicates page on which there are feature descriptions and usage information 24 20 21 22 11 23 10 11 10 23 10 18 19 19 19 18 18 14 12 14 23 13 15 ...

Page 12: ...owever the turntable can be turned off so that it does not rotate when extra large dishes such as the popular 13 x9 x2 glass utility casserole are used The casserole should be placed on the turntable so that it is level Suppose you want to cook lasagna in a 13 x9 x2 casserole for 45 minutes on 40 power TURNTABLE ON OFF P R O C E D U R E D I S P L AY 1 2 3 4 3 12 30000 TURNTABLE ON Touch CLOCK pad ...

Page 13: ...TART TOUCH ON pad Enter cooking time APPROXIMATE PERCENTAGE OF POWER COMMON WORDS FOR POWER LEVELS TOUCH POWER LEVEL PAD ONCE THEN TOUCH 5 0 0 5 00000 TURNTABLE ON OFF COOK KEEP WARM KEEP WARM can only be programmed with manual cooking or as a separate program Suppose you want to cook a baked potato for 4 minutes at 100 power and you want to keep it warm after cooking for 30 minutes Suppose you wa...

Page 14: ...stals are thawed Shielding prevents cooking from occurring before the center of the food is defrosted Use small smooth strips of aluminum foil to cover edges and thinner sections of the food COMPU DEFROST CHART Ground Meat once twice Remove any thawed pieces after each stage Let stand covered for 5 to 10 minutes After each stage of defrost cycle rearrange and if there are warm or thawed portions s...

Page 15: ...en oven door or touch STOP CLEAR during this part of the cooking SENSOR REHEAT POPCORN REGULAR SENSOR BAKED POTATO FROZEN VEG SOFT FRESH VEG FRESH FROZEN BACON FISH cycle The measurement of vapor will be interrupted If this occurs will appear and sensor cooking will be interrupted To continue cooking touch the STOP CLEAR pad and select cooking time and power When sensor detects the vapor emitted f...

Page 16: ...en according to directions T O U C H P O P C O R N P A D POPCORN CHART F O R A M O U N T 3 0 and 3 5 oz bag Regular size twice 1 5 and 1 75 oz bag Snack size once INSTANT SENSOR CHART Leftovers such as rice potatoes vegetables casserole Soups Canned entrees and vegetables 4 32 oz Place in dish or casserole slightly larger than amount to be reheated Flatten if possible Cover with lid plastic wrap o...

Page 17: ...Place on paper towel lined turntable After cooking remove from oven wrap in aluminum foil and let stand 5 to 10 minutes Cover with lid or plastic wrap After cooking stir and let stand 3 minutes covered Wash and place in casserole Add no water if vegetables have just been washed Cover with lid for tender vegetables Use plastic wrap for tender crisp vegetables Stir before standing if possible After ...

Page 18: ...n on the towels Cover with another paper towel Microwave using SENSOR COOK for Bacon Crumble and reserve bacon 2 Combine chicken broth vegetables and seasonings in 4 quart casserole Cover with vented plastic wrap Microwave using SENSOR COOK for Baked potatoes Vegetables should be tender 3 Stir in evaporated milk Re cover with vented plastic wrap Microwave using SENSOR REHEAT Less Stir in parsley L...

Page 19: ...ver with lid Microwave using SENSOR COOK for Fresh vegetables hard Carrots should be tender crisp Drain 2 Stir in remaining ingredients Cover and microwave using SENSOR REHEAT Savory Flounder Fillets Makes 4 servings 3 4 cup of corn flake crumbs 3 tablespoons chopped parsley 2 teaspoons grated lemon peel 1 On waxed paper combine corn flake crumbs parsley lemon peel and paprika Dip fillets in beate...

Page 20: ...ture Suppose you want to preheat until 350 F and then cook 25 minutes at 375 F convection NOTE To preheat and cook with the same temperature enter same temperature in steps 2 and 3 When the oven reaches the programmed temperature it will automatically hold at the preheat temperature for 30 minutes and then the display will change to time of day Whenever STOP CLEAR pad is touched during this 30 min...

Page 21: ... BAKE pad 325F COOKING TIME ENTER Touch number pads to select time 0 0 5 2 25 00 PRESS START Touch number pad for desired temperature Ex Pad 6 for 350 F PREHEAT With the exception of those foods that cook best by convection heating alone most foods are well suited to mix cooking using either LOW MIX BAKE or HIGH MIX ROAST The marriage of these two cooking methods produces juicy meats moist and ten...

Page 22: ...tempt to enter more or less than the allowed weight or will appear in the display If you enter more or less than the allowed number or will appear in the display 3 To broil other foods or foods above or below the weight or number allowed on the chart below follow instructions in the Sharp Carousel Convection Microwave Cookbook See Broiling Chart Touch START TOUCH ON pad After broil preheat cycle e...

Page 23: ... minutes Internal temperature of white meat should be 170o F and of dark meat 180o F Low 3 Turkey breast 3 0 6 0 lb 1 4 2 7 kg Season as desired Place on low rack After the cycle ends cover foil and let stand 10 minutes Internal temperature of white meat should be 170o F Low 4 Pork 2 0 3 5 lb 0 9 1 5 kg Boneless pork loin is recommended because it cooks evenly Place on low rack After cooking remov...

Page 24: ...HELP MIX COV DEFROST SENSOR P A N S I Z E Q T Y START TOUCH ON START TOUCH ON P R O C E D U R E Ideal for packaged cake mix or your own recipe for 13 x9 x2 pan Prepare according to package or recipe directions and place in a greased and floured 13 x9 x2 baking pan After the preheat is over place pan in oven centered on low rack Cool before frosting and serving Ideal for packaged brownie mix or you...

Page 25: ...ples of 1 minute by repeatedly touching the MINUTE PLUS pad during manual cooking using microwave convection mix or broil Suppose you want to heat a cup of soup for one minute MINUTE PLUS P R O C E D U R E Touch MINUTE PLUS pad NOTE 1 Touch MINUTE PLUS pad within 1 minute after cooking closing the door touching the STOP CLEAR pad or during cooking Minute Plus cannot be used to start the oven if an...

Page 26: ...sh 3 times French Touch On allows you to cook at 100 power by touching the START TOUCH ON continuously Touch On is ideal for melting cheese bringing milk to just below boiling etc The maximum cooking time is 3 minutes Suppose you want to melt cheese on a piece of toast TOUCH ON NOTE 1 Note time it takes for frequently used foods and program that time in the future 2 Touch TOUCH ON pad within 1 min...

Page 27: ... get any of the liquid cleaner in the perforations on the wall or ceiling or any door surfaces Rinse thoroughly and polish dry WAVEGUIDE COVER The waveguide cover is located on the ceiling in the oven cavity It is made from mica so requires special care Keep the waveguide cover clean to assure good oven performance Carefully wipe with a damp cloth any food spatters from the surface of the cover im...

Page 28: ...touch glass when light is on Do not use light for long time use such as a night light Light cover Screw Light bulbs CHARCOAL FILTER Charcoal Filter Sharp Part Number RK 220 is used for No vented recirculated installation The filter should be changed every 6 to 12 months depending on use 1 Disconnect power to the oven at the circuit breaker panel or by unplugging 2 Remove 3 screws that secure louve...

Page 29: ... 1 Place one cup of water in a glass measuring cup in the oven and close the door securely Operate the oven for two minutes at HIGH 100 A Does the light come on in the oven YES _____ NO _____ B Does the cooling fan work YES _____ NO _____ Put your hand over the top ventilation openings C Does the turntable rotate when the TURNTABLE ON OFF pad is touched and TURNTABLE ON is in the display YES _____...

Page 30: ..._________________________________________________ Address____________________________________________________________________________ City ____________________________________ State ____________ Zip ______________________ Daytime Phone No ___________________________________________________________ Please send me ______ cookbooks at 10 25 each ________ Illinois sales tax if applicable per book 44 n...

Page 31: ...PARA PRECALENTAR Y COCINAR CON COVECCION Toque SENSOR REHEAT una vez El horno comenzará a funcionar automáticamente El SENSOR REHEAT se puede programar con o sin la plataforma giratoria en funcionamiento Ver Cuadro de Recalentamiento de Sensor Instantáneo en la página 14 RECALENTAMIENTO DE SENSOR INSTANTANEO Cuando el horno alcance la temperatura programada automáticamente se mantendrá a esa tempe...

Page 32: ...OMATIC MIX Your oven can be programmed to combine preheating and automatic mix cooking operations See page 19 for information SHARP SIMPLY THE BEST PRESS TO PREHEAT AND COOK WITH CONVECTION Touch SENSOR REHEAT once The oven will start automatically SENSOR REHEAT can be programmed with turntable on or off See Instant Sensor Chart on page 14 INSTANT SENSOR REHEAT When the oven reaches the programmed...

Reviews: