background image

17

ENTER

: Select

: Enter

MENU

: Exit

RETURN

: Back

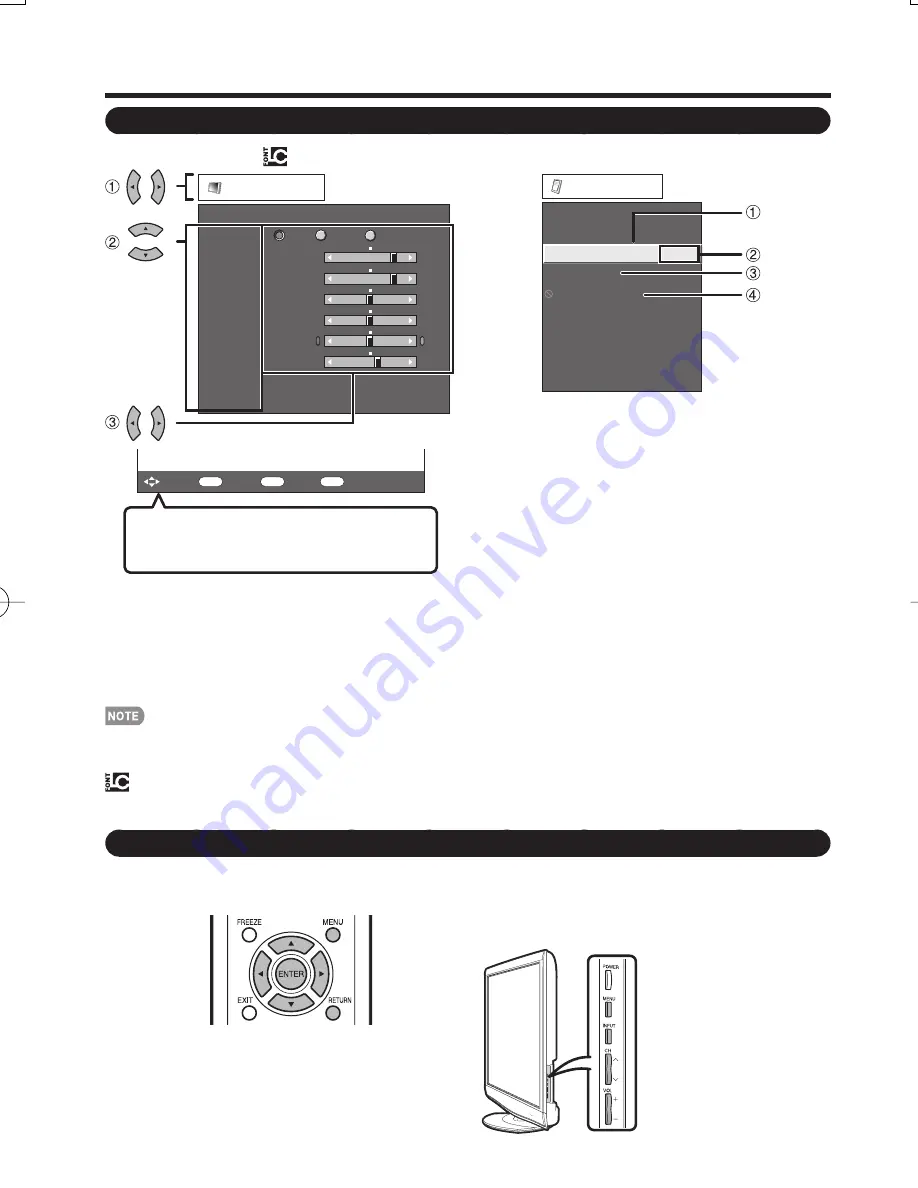
The bar above is an operational guide for 
the remote control. The bar will change in 
accordance with each menu setting screen.

Item displayed in yellow

•  This indicates the item currently selected.
• Press 

ENTER

 to go to the adjustment screen for this 

item.

2

 Item in brackets

•  This indicates the current setting for the item.

3

 Item displayed in white

•  This indicates that the item can be selected.

4

 Item displayed in gray

•  This indicates that the item cannot be selected.
  There are various reasons why the items cannot be 

selected, but the main reasons are as follows:

—Nothing is connected to the selected input terminal.
—The function is not compatible with the current input 

signal.

1

  Press 

MENU

 to display the MENU screen.

2  

Press 

c

/

d

 to select the desired menu.


Press 

a

/

b

 to select a specifi c adjustment item, 

and then press 

ENTER

.


Press 

a

/

(or 

c

/

d

) to select or adjust the 

desired setting, and then press 

ENTER

.

3

  Press 

MENU

 to exit.

On-Screen Display Menu Operation

MENU:


Press to open or close the menu screen.

a

/

b

/

c

/

d

:

  Press to select a desired item on the screen or 

adjust a selected item.

ENTER:


Press to go to the next step or complete the 
setting.

RETURN:


Press to return to the previous step.

MENU:


MENU

 on the remote 

control.

INPUT:


ENTER

 on the remote 

control.

CH

r

/

s

:

  Cursor 

a

/

b

 on the 

remote control.

VOL

k

/

l

:

  Cursor 

c

/

d

 on the 

remote control.

Menu Operation Buttons

Using the control panel of the main unit

You can also operate the menu with the control panel 
of the main unit.
Button operations on the control panel correspond to 
the ones on the remote control as shown below.

Using the remote control

Use the following buttons on the remote control to 
operate the menu.

On-Screen Display Menu

Option

[No]

Program Title Display

Favorite CH

[Off]

Operation Lock Out

Demo Mode

Digital Caption Info.

Caption Setup

Audio Only

PC Audio Select

 [Input 4 (PC)]

Output select

[Fixed]

Example

Picture

Contrast

OPC

Brightness

Color

Tint

Sharpness

Advanced

Reset

[

b

30]

[    0]

[    0]

[    0]

[  

b

2]

0

a

30

a

30

a

30

a

10

b

40

b

30

b

30

b

30

b

10

Backlight

[

b

12]

a

16

b

16

Off

On

On : Display

Example

 LCFONT embedded

Menu options differ in the selected input modes, but the operating procedures are the same.
The screens in the operation manual are for explanation purposes (some are enlarged, others cropped) and may vary slightly 
from the actual screens.

 LCFONT:

This product is embedded with LC Font technology, which was developed by SHARP Corporation for clearly displaying easy-
to-read characters on LCD screens.


LC-C46̲5277UN̲E.indb   17

LC-C46̲5277UN̲E.indb   17

2009/03/18   18:18:10

2009/03/18   18:18:10

Summary of Contents for AQUOS LC-C4677UN

Page 1: ...OPERATION MANUAL ENGLISH To avoid scratching the frame or screen please use a soft lint free cloth for cleaning Approved cleaning cloths are available directly from Sharp in single 00Z LCD CLOTH or triple 00Z LCD CLOTH 3 packs Call 1 800 BE SHARP for ordering or VISIT www sharpusa com SharpDirect Always use the AC cord supplied with the TV Operation manual g2 languages IMPORTANT Please read this o...

Page 2: ...gnetic interference with electric appliances such as radios and televisions use shielded cables and connectors for connections The lightning flash with arrow head symbol within an equilateral triangle is intended to alert the user to the presence of uninsulated dangerous voltage within the product s enclosure that may be of sufficient magnitude to constitute a risk of electric shock to persons The...

Page 3: ...his equipment generates uses and can radiate radio frequency energy and if not installed and used in accordance with the instructions may cause harmful interference to radio communications However there is no guarantee that interference will not occur in a particular installation If this equipment does cause harmful interference to radio or television reception which can be determined by turning t...

Page 4: ...mation 15 Power Sources This product should be operated only from the type of power source indicated on the marking label If you are not sure of the type of power supply to your home consult your product dealer or local power company For products intended to operate from battery power or other sources refer to the operating instructions 16 Overloading Do not overload wall outlets extension cords o...

Page 5: ...eaks Heat The product should be situated away from heat sources such as radiators heat registers stoves or other products including amplifiers that produce heat The Liquid Crystal panel is a very high technology product with 2 073 600 pixels giving you fine picture details Occasionally a few non active pixels may appear on the screen as a fixed point of blue green or red Please note that this does...

Page 6: ...ly on a larger than life flat panel display Care should be taken to place or install the display where it cannot be pushed pulled over or knocked down Care should be taken to route all cords and cables connected to the flat panel display so that they cannot be pulled or grabbed by curious children WALL MOUNTING IF YOU DECIDE TO WALL MOUNT YOUR FLAT PANEL DISPLAY ALWAYS Use a mount that has been re...

Page 7: ...verse order Setting the TV on the Wall CAUTION This TV should be mounted on the wall only with the AN 52AG4 SHARP wall mount bracket The use of other wall mount brackets may result in an unstable installation and may cause serious injuries Installing the TV requires special skill that should only be performed by qualified service personnel Customers should not attempt to do the work themselves SHA...

Page 8: ...ht GREEN indicating you have power to the television If the POWER indicator on the television still does not light up press POWER on the remote control to turn the power on IMPORTANT IF THE UNIT DOES NOT POWER ON UNPLUG THE TELEVISION FROM THE OUTLET AND REPEAT THE INSTALLATION STEPS IF YOU STILL ENCOUNTER NO POWER PLEASE CONTACT US AT 1 800 BE SHARP QUICK REFERENCE Attach your antenna to the back...

Page 9: ...f internal circuit etc F type connector should be finger tightened only CAUTION Improper use of batteries can result in chemical leakage or explosion Be sure to follow the instructions below Do not mix batteries of different types Different types of batteries have different characteristics Do not mix old and new batteries Mixing old and new batteries can shorten the life of new batteries or cause ...

Page 10: ...AUDIO terminal shared for INPUT 4 and INPUT 6 4 Antenna Cable in INPUT 1 terminals INPUT 2 terminals AUDIO OUTPUT terminals INPUT 3 terminals SERVICE terminal INPUT 5 terminal HDMI 1 2 3 1 1 See page 11 for external equipment connection 2 See page 17 for button operations 3 See page 8 for connecting the AC cord 4 See page 24 for details on the PC Audio Select function The illustrations in this ope...

Page 11: ...MPONENT terminals take priority over the VIDEO INPUT 1 and S VIDEO INPUT 2 terminals 2 To enjoy 1080p display capability connect your external equipment using a component cable and set the equipment to 1080p output 3 When using an HDMI DVI conversion cable input the audio signal to AUDIO terminal of INPUT 6 When you input the audio signal via the AUDIO terminal with INPUT 6 set PC Audio Select to ...

Page 12: ...s selected in Antenna setting Press c d to select Start and then press ENTER When Cable is selected in Antenna setting Press a b to select Analog Digital Search Start to search both analog and digital broadcasts or to select Analog Search Start to search only analog broadcasts and then press ENTER The Channel search will start automatically To exit the Channel search screen select Cancel and then ...

Page 13: ...g every minute Select Off by pressing SLEEP to cancel the sleep timer The TV will enter standby when the remaining time reaches 0 When the sleep timer is set its indicator on the TV lights red FLASHBACK Press FLASHBACK to switch to the previously tuned channel Press FLASHBACK again to switch back to the currently tuned channel FLASHBACK will not work if no channel has been changed after the TV is ...

Page 14: ...audio for the program This feature is called Multi channel Television Sound MTS The TV with MTS can receive mono sound stereo sound and Secondary Audio Programs SAP The SAP feature allows a TV station to broadcast other information which could be audio in another language or something completely different like weather information You can enjoy Hi Fi stereo sound or SAP broadcasts where available S...

Page 15: ...losed Caption information display 2 Press CC while the Closed Caption information is still on the screen Press repeatedly until you select the desired closed caption service Depending on the number of caption services in the signal being received you will see information such as 1 2 or 1 4 displayed 1 2 means the first of two services Example If a program has three services Digital CC ENG CC1 and ...

Page 16: ...the screen Dot by Dot 1080i p only Detects the resolution of the signal and displays an image with the same number of pixels on the screen Full Screen 720p only You can select Full Screen only when receiving a 720p signal S Stretch Smart stretch Suitable for stretching 4 3 programs to fill the screen Zoom Suitable for viewing wide screen 2 35 1 aspect ratio programs in full screen When using Dot b...

Page 17: ...to go to the next step or complete the setting RETURN Press to return to the previous step MENU MENU on the remote control INPUT ENTER on the remote control CHr s Cursor a b on the remote control VOLk l Cursor c d on the remote control Menu Operation Buttons Using the control panel of the main unit You can also operate the menu with the control panel of the main unit Button operations on the contr...

Page 18: ... the picture to your preference with the following picture settings Selected item cbutton dbutton Backlight The screen dims The screen brightens Contrast For less contrast For more contrast Brightness For less brightness For more brightness Color For less color intensity For more color intensity Tint Skin tones become reddish Skin tones become greenish Sharpness For less sharpness For more sharpne...

Page 19: ... Surround Surround function allows you to enjoy realistic live sound On Surround function is on Off Normal sound Audio menu is grayed out when Output Select is set to Variable See page 24 For some discs setup may be required on your DVD player In this case please refer to the operation manual of your DVD player Bass Enhancer This function allows you to enjoy bass enhanced sound On Bass Enhancer fu...

Page 20: ...operation Yes Skips the input No Does not skip input Input Label Lets you set the input terminal displayed when using the INPUT SOURCE menu or channel display Press a b c d to select the new name for the input mode You cannot change labels if the INPUT SOURCE is TV On Screen Display Menu No Operation Off When set to Enable the power will automatically shut down if there is no operation for 3 hours...

Page 21: ...ode or the signal type The ranges can be seen on the position setting screen Adjustments are stored separately according to input source Reset If complex adjustments are made and the settings cannot be restored to normal you can reset the settings to the factory preset values 1 Return to the factory preset values displays on the screen If you have already set the Secret No input the 4 digit secret...

Page 22: ...es All ages admitted PG Parental guidance suggested Some material may not be suitable for children PG 13 Parents strongly cautioned Some material may be inappropriate for children under 13 R Restricted Under 17 requires accompanying parent or adult guardian age varies in some jurisdictions NC 17 No one 17 and under admitted X X is an older rating that is unified with NC 17 but may be encoded in th...

Page 23: ...esent within the context of the theme 18 Adults Intended for viewers 18 years and older and might contain depictions of violence which while related to the development of plot character or themes are intended for adult viewing Could contain graphic language and portrayals of sex and nudity On Screen Display Menu Canadian French Ratings Example MPAA TV Guidelines Can English Ratings Can French Rati...

Page 24: ...C IN or INPUT 6 HDMI Input 4 PC Select this item when the audio signal is input via the INPUT 4 PC IN terminal using an analog RGB cable Input 6 HDMI Select this item when the audio signal is input via the INPUT 6 HDMI terminal using an HDMI DVI conversion cable When PC Audio Select is set to Input 6 HDMI sound will not be produced if you use only an HDMI certified cable to connect HDMI compatible...

Page 25: ...t the image from several types of demo mode 120Hz Demo 1 120Hz Demo 2 10 bit Demo Feature Demo Auto Play If you select Auto Play you need to set playback type Continuous Play Demos continuously 10 min Play Demos every 10 minutes 20 min Play Demos every 20 minutes This function will be canceled when you press EXIT on the remote control unit When Demo Mode is set to Feature Demo pressing FREEZE paus...

Page 26: ...lease wait for the update screen to appear Do not unplug the AC cord The picture will temporarily go dark until the Software Update display appears Wait several minutes and do not unplug the AC cord OK Example 30 Now updating Do not unplug AC cord Update Version UXXXXXX2 CAUTION Do not remove the USB memory device or unplug the AC cord while the software is being updated 7 When the software is suc...

Page 27: ...e may look dark in a room that is too bright Is the sleep timer set See page 13 Check the power control settings See page 19 The unit s internal temperature has increased Remove any objects blocking vent or clean Is connection to other components correct See page 11 Is correct input signal source selected after connection See page 24 Is the correct input selected See page 24 Is picture adjustment ...

Page 28: ...w Mode or the signal type The ranges can be seen on the position setting screen 0 Although it can choose now it is toggle operation in inside 1 Only available when 4 3 signal is being input 5 6 Only available when 4 3 signal is being input 8 PC Available except when UXGA is being input AV Only available when 1080i p is being input 9 Only available when 720p is being input Toggle Input terminal num...

Page 29: ...connector Side INPUT 3 AV in INPUT 5 HDMI in with HDCP SERVICE Software update OSD language English French Spanish Power Requirement AC 120 V 60 Hz Power Consumption 254 W 0 5 W Standby with AC 120 V 290 W 0 5 W Standby with AC 120 V Weight TV stand 48 5 lbs 22 0 kg 61 7 lbs 28 0 kg TV only 41 9 lbs 19 0 kg 52 9 lbs 24 0 kg Dimension W g H g D TV stand 43 53 64 g 30 31 64 g 12 13 16 inch 49 3 8 g ...

Page 30: ...duct Software composition The software included in this product is comprised of various software components whose individual copyrights are held by SHARP or by third parties Software developed by SHARP and open source software The copyrights for the software components and various relevant documents included with this product that were developed or written by SHARP are owned by SHARP and are prote...

Page 31: ...e are permitted Correction of defects in the manner and for the period of time described herein shall constitute complete fulfillment of all liabilities and responsibilities of Sharp to the purchaser with respect to the Product and shall constitute full satisfaction of all claims whether based on contract negligence strict liability or otherwise Sharp does not warrant nor shall Sharp be liable or ...

Page 32: ...1113 49 3 8 1254 45 9 16 1157 0 15 3 4 400 25 41 64 651 0 19 1 4 489 32 9 64 816 2 1 64 51 5 23 32 145 34 9 64 867 15 3 4 400 12 13 16 325 3 61 64 100 4 45 64 119 4 27 64 112 5 1 4 133 14 17 32 369 21 7 64 536 30 31 64 774 28 5 32 715 17 21 64 440 2 21 64 59 40 19 64 1023 4 22 43 64 575 6 20 3 4 527 ...

Reviews: