LC-32HT3U/LC-37HT3U/LC-42HT3U
3 – 2
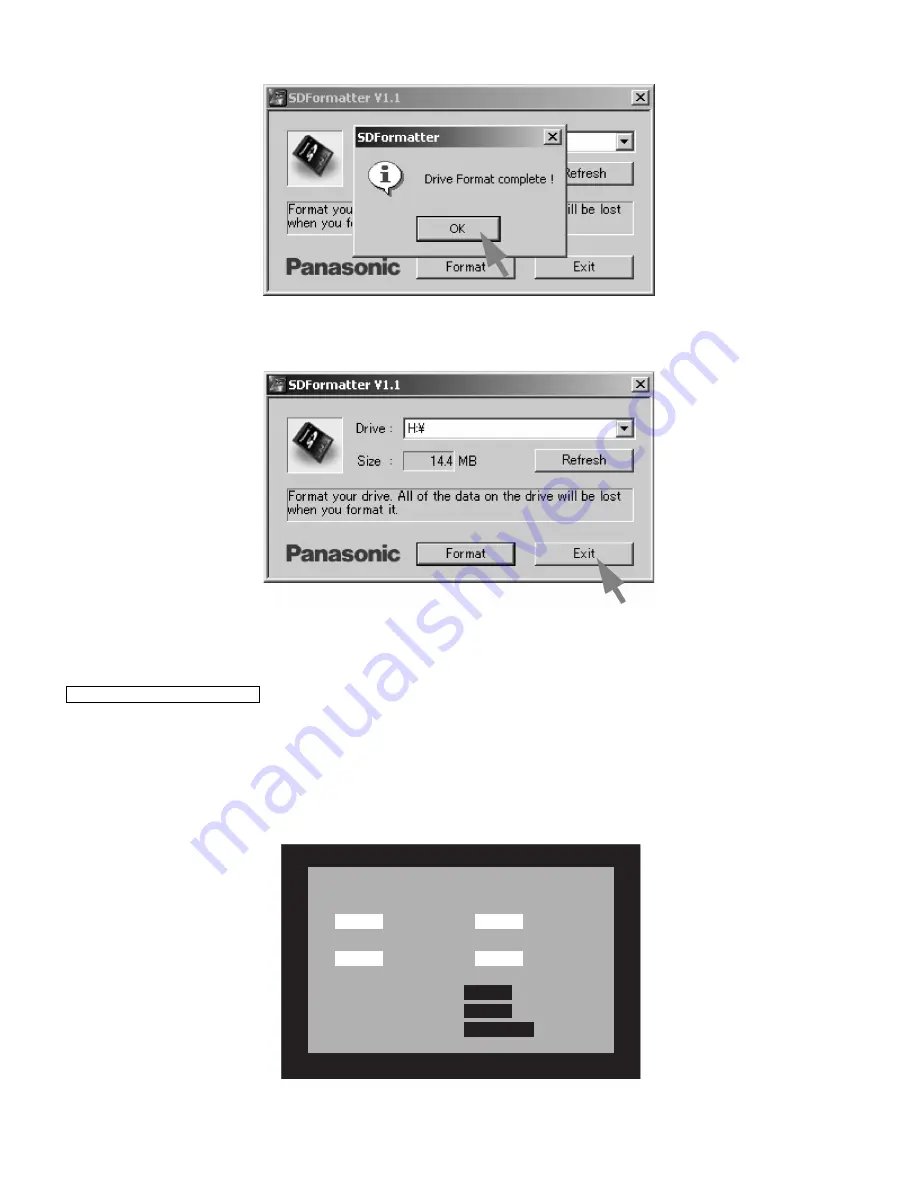
2. When the formatting is over, the following window appears. Click [OK].
3. Click [Exit] to finish the formatting.
NOTE: When you are done, take out the SD card once to make sure it is finished, and then insert it again.
4. Copy the binary image file HT3UAxxx.SDC (named temporarily) for version upgrade to the root directory (folder) of the SD card drive.
NOTE: In the SD card drive, do not store other folders or unrelated files, or more than one binary image files for version upgrade.
Now the SD card for version upgrade is ready.
5. Shut off the AC power (i.e. unplug the AC cord).
6. Insert the SD card for version upgrade (prepared as above) into the service socket located lower side from center at terminals, under DIGITAL
AUDIO OUTPUT terminal in the rear of the unit, in a way that the cut corner of the SD card comes at the upper side.
NOTE: If the SD card is inserted in a wrong way, the card will go deep inside the unit beyond retrieval. Take due care to insert the SD card correctly.
7. Turn on the AC power (i.e. plug in the AC cord).
8. After the unit startup, the system upgrade screen as shown below appears within 15~30 seconds.
How to upgrade the software
< SYSTEM UPGRADE >
MAIN
EEPROM
SD-CARD
MONITOR
OK
NG
OK
NG
NG
NG
26 %
NO DATA
100 %
DETECT
OK
OK
OLD Version
U0611093
NEW Version
U0611152
Boot Version
CFE-HT3U 1.00
BOISE_HT3U
Summary of Contents for Aquos LC 32HT3U
Page 50: ...LC 32HT3U LC 37HT3U LC 42HT3U 5 4 4 SYSTEM BLOCK DIAGRAM SYSTEM BLOCK DIAGRAM ...
Page 53: ...LC 32HT3U LC 37HT3U LC 42HT3U 6 3 MAIN Unit Side B ...
Page 57: ...LC 32HT3U LC 37HT3U LC 42HT3U 7 2 2 SCHEMATIC DIAGRAM MAIN Unit 1 20 ...
Page 58: ...LC 32HT3U LC 37HT3U LC 42HT3U 7 3 MAIN Unit 2 20 ...
Page 59: ...LC 32HT3U LC 37HT3U LC 42HT3U 7 4 MAIN Unit 3 20 ...
Page 60: ...LC 32HT3U LC 37HT3U LC 42HT3U 7 5 MAIN Unit 4 20 ...
Page 61: ...LC 32HT3U LC 37HT3U LC 42HT3U 7 6 MAIN Unit 5 20 ...
Page 62: ...LC 32HT3U LC 37HT3U LC 42HT3U 7 7 MAIN Unit 6 20 ...
Page 63: ...LC 32HT3U LC 37HT3U LC 42HT3U 7 8 MAIN Unit 7 20 ...
Page 64: ...LC 32HT3U LC 37HT3U LC 42HT3U 7 9 MAIN Unit 8 20 ...
Page 65: ...LC 32HT3U LC 37HT3U LC 42HT3U 7 10 MAIN Unit 9 20 ...
Page 66: ...LC 32HT3U LC 37HT3U LC 42HT3U 7 11 MAIN Unit 10 20 ...
Page 67: ...LC 32HT3U LC 37HT3U LC 42HT3U 7 12 MAIN Unit 11 20 ...
Page 68: ...LC 32HT3U LC 37HT3U LC 42HT3U 7 13 MAIN Unit 12 20 ...
Page 69: ...LC 32HT3U LC 37HT3U LC 42HT3U 7 14 MAIN Unit 13 20 ...
Page 70: ...LC 32HT3U LC 37HT3U LC 42HT3U 7 15 MAIN Unit 14 20 ...
Page 71: ...LC 32HT3U LC 37HT3U LC 42HT3U 7 16 MAIN Unit 15 20 ...
Page 72: ...LC 32HT3U LC 37HT3U LC 42HT3U 7 17 MAIN Unit 16 20 ...
Page 73: ...LC 32HT3U LC 37HT3U LC 42HT3U 7 18 MAIN Unit 17 20 ...
Page 74: ...LC 32HT3U LC 37HT3U LC 42HT3U 7 19 MAIN Unit 18 20 ...
Page 75: ...LC 32HT3U LC 37HT3U LC 42HT3U 7 20 MAIN Unit 19 20 ...
Page 76: ...LC 32HT3U LC 37HT3U LC 42HT3U 7 21 MAIN Unit 20 20 ...
Page 77: ...LC 32HT3U LC 37HT3U LC 42HT3U 7 22 DIGITAL MINI PWB Unit ...
Page 78: ...LC 32HT3U LC 37HT3U LC 42HT3U 7 23 M E M O ...
Page 105: ...LC 32HT3U LC 37HT3U LC 42HT3U 27 9 PACKING PARTS LC 32HT3U 37HT3U S2 S3 S1 S3 S3 S5 S4 S3 S6 ...
Page 107: ...LC 32HT3U LC 37HT3U LC 42HT3U 29 10 PACKING PARTS LC 42HT3U S7 S4 S4 S2 S1 S3 S4 S4 S5 S6 ...
Page 109: ...LC 32HT3U LC 37HT3U LC 42HT3U ...


