background image

50

AV Connections

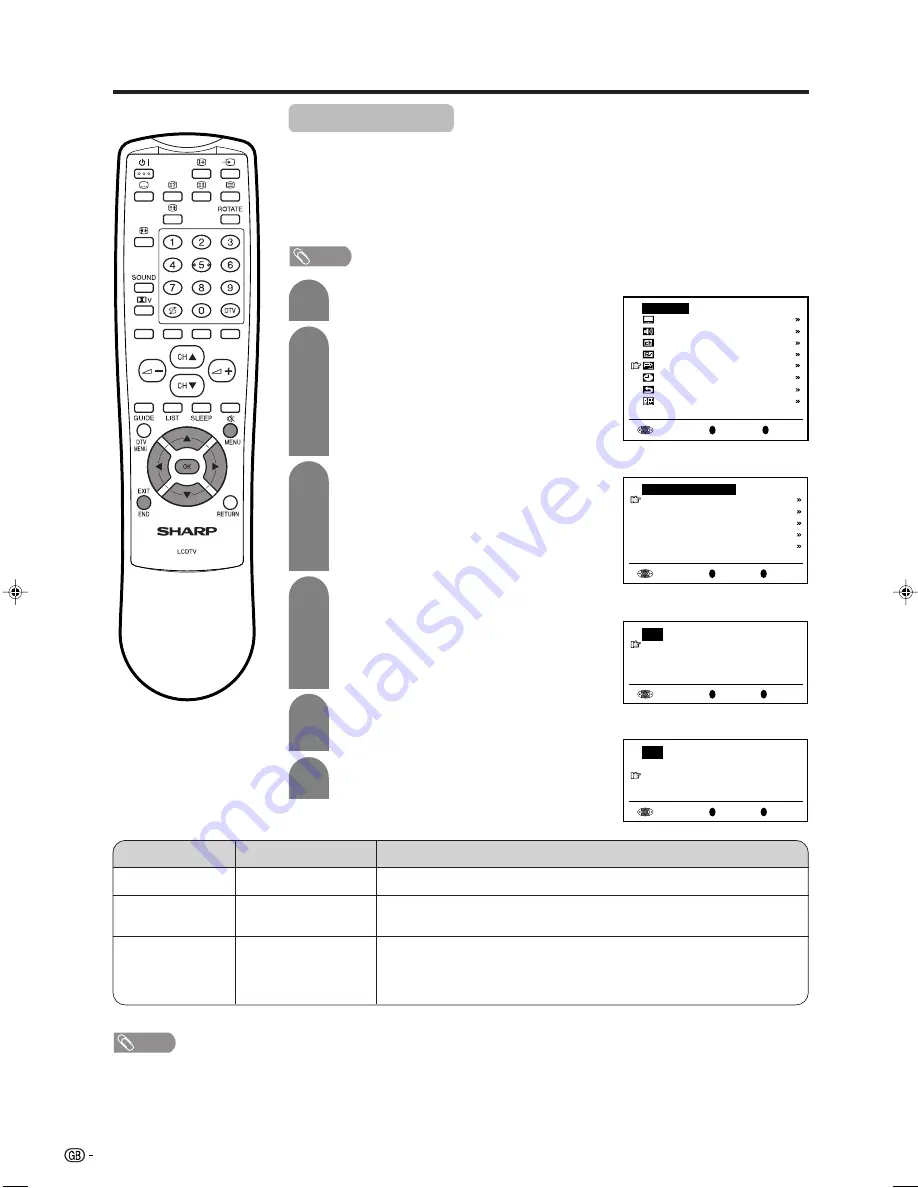
It is possible to manually adjust various settings for connections with external devices on
the “AV connections” screen.

[1] AV1/AV2/AV3

Select the appropriate signal type and colour standard for the signals from the video
equipment connected to the AV1, AV2 or AV3 terminal.

“Programmes” and “First installation” appear only when PIN for Child
lock is entered.

Press 

MENU

 to display the TV menu.

Press 

a

/

b

 to select “AV connections”, and

then press 

OK

.

Press 

a

/

b

 to select “AV1”, “AV2”, “AV3 (Y/

C)”, or “AV3(CVBS)”, and then press 

OK

.

Press 

a

/

b

 to select the desired item, and

then press 

OK

.

Press 

c

/

d

 to select the desired “Signal type”,

“AFC” and “Colour system”, and then press

OK

.

Press 

END

 to exit.

OK

Back

R

End

E

TV menu

  Picture    
  Sound
  Programmes
  Features
  AV connections
  Timer functions
  First installation
  Language

OK

Back

R

End

E

  AV2

  Signal type      [ Auto]
  AFC              [Mode1]
  Colour system    [ Auto]

Choice/Input value

Adjustment item

Description

Signal type*

AFC

Colour system

Auto, CVBS, Y/C

To select the signal type of external equipment.

Mode1, Mode2

To select frequency control modes. Mode1 is suitable for DVD players
or decoders, and Mode2 is suitable for VCRs or Camcorders.

Auto, PAL, SECAM,

N358 (NTSC 3.58),
N443 (NTSC 4.43),

PAL60, PAL-M, PAL-N

Colour norm

* “Signal type” is only visible when the AV2 is selected.

NOTE

Note:

If no (colour) image displays, try to change to a different signal type.

Depending on the compatibility with the various types of equipment, the picture may become skewed. In this case, select the “AFC”
(Automatic Frequency Control) mode that will improve the picture.

Switching between AV input signals may be slow, depending on the settings in “Colour system”. If you want to speed up signal
switching, switch “Auto” in “Colour System” to the current reception colour system.

OK

Back

R

End

E

  AV1

  AFC              [Mode1]
  Colour system    [ Auto]

OK

Back

R

End

E

  AV connections

  AV1
  AV2
  AV3(Y/C)
  AV3(CVBS)
  For programmes
   

Useful features

2

1

3

4

5

6

Example when AV2 is

selected:

Example when AV1 is

selected:

NOTE

lc22ad1e_en_p47_52

04.2.2, 11:19 AM

50

Summary of Contents for AQUOS LC-22AD1E

Page 1: ...ON LCD FARBFERNSEHGERÄT TÉLÉVISION COULEUR À ÉCRAN À CRISTAUX LIQUIDES LCD OPERATION MANUAL BEDIENUNGSANLEITUNG MODE D EMPLOI LC 22AD1E ENGLISH LC 22AD1E FRANÇAIS DEUTSCH OPERATION MANUAL MODE D EMPLOI BEDIENUNGSANLEITUNG ...

Page 2: ...corporating a 3A fuse Should the fuse need to be replaced a BSI or ASTA approved BS 1362 fuse marked or ASA and of the same rating as above which is also indicated on the pin face of the plug must be used Always refit the fuse cover after replacing the fuse Never use the plug without the fuse cover fitted In the unlikely event of the socket outlet in your home not being compatible with the plug su...

Page 3: ...c Programme Guide 24 Setting the theme 25 Mode 25 Audio language 26 Subtitle language 26 Service list type 27 Rearrange TV services 28 Rearrange radio services 28 New TV services 29 New radio services 29 Installed TV services 30 Installed radio services 30 Uninstalled TV services 30 Uninstalled radio services 30 Country 31 System software 31 Icons 32 Common Interface 32 Useful features 33 Selectin...

Page 4: ...rt internal parts For the same reason do not spill water or liquid on the product 10 Servicing Do not attempt to service the product yourself Removing covers can expose you to high voltage and other dangerous conditions Request a qualified service person to perform servicing 11 Repair If any of the following conditions occur unplug the AC cord from the AC outlet and request a qualified service per...

Page 5: ...n the life of the product Do not place the product on a bed sofa rug or other similar surface since they can block ventilation openings This product is not designed for built in installation do not place the product in an enclosed place such as a bookcase or rack unless proper ventilation is provided or the manufacturer s instructions are followed The LCD panel used in this product is made of glas...

Page 6: ...Antenna cable 1 Page 5 11 and 12 Page 5 Page 6 Page 6 Page 10 Already connected to the LCD TV set Page 6 Manufactured under license from BBE Sound Inc Licensed by BBE Sound Inc under USP4638258 5510752 and 5736897 BBE and BBE symbol are registered trademarks of BBE Sound Inc Manufactured under license from Dolby Laboratories Dolby Pro Logic and the double D symbol are trademarks of Dolby Laborator...

Page 7: ...e remote sensor window B OPC Headphone jack Remote control sensor indicator OPC indicator STANDBY ON indicator OPC sensor window Remote control sensor window _ _ 1 Open the battery cover 2 Insert two supplied AA size batteries Place batteries with their terminals corresponding to the e and f indications in the battery compartment 3 Close the battery cover CAUTION Improper use of batteries can resu...

Page 8: ...e an outdoor antenna The following is a brief explanation of the types of connections that are used for coaxial cable Antenna cable supplied For viewing only digital broadcasts you do not need to connect the antenna cable ex For viewing both analogue and digital broadcasts ex For viewing analogue broadcasts Antenna cables commercially available If your outdoor antenna uses a 75 ohm coaxial cable w...

Page 9: ...nd system I Start search X MAIN POWER OK End E First installation Language English Deutsch Français Español Italiano Nederlands Svenska Português Suomi Türkçe OK Back R End E First installation Automatic search Country UK Colour system PAL Sound system I Start search Press OK to begin the automatic programme search Press END to exit Cancel R Start search 759 25MHz Auto B G 0 1 E 02 2 E 04 3 U 02 4...

Page 10: ...d the country you live in select the country from the list which shares the same time zone Press OK to enter the setting Installation screen displays Press OK to go to the next step Press a b to select Service scan and then press OK Search screen displays Press OK and Search finds all the digital broadcasting channels viewable in your area The Search menu disappears and you can watch the programme...

Page 11: ...or window Remote control sensor indicator A red indicator blinks when the TV set receives the remote control signal Upper control panel CH s r MENU TV VIDEO X X X X X MAIN POWER OPC sensor window OPC Optical Picture Control indicator A green indicator lights when Brightness is set to auto To change the vertical angle of the LCD TV set tilt the screen up to 5 degrees forward or 10 degrees backward ...

Page 12: ...ctionality in the near future Use the opening under the centre terminal cover to guide cables to the right side Cautions when bundling the cables If you connect cables to every rear terminal on the left side bundle the AV S Video and optical fibre cables along with the AC cord together and guide them through the opening on the right side terminal cover For the two SCART cables guide them through t...

Page 13: ... mode Hold the current teletext page See page 55 5 f WIDE MODE TV External input mode Change the wide image mode See page 42 6 SOUND Select the sound multiplex mode See pages 53 and 54 7 Select Virtual Dolby Surround settings See page 37 8 A Flashback Press to return to the previous channel in normal viewing mode Press to return to the previous page in TELETEXT mode 9 il ik VOLUME Set the volume S...

Page 14: ... source For example when viewing an image from AV2 press DTV to switch to the Digital TV mode Press DTV again to return to AV2 screen 21 Colour RED GREEN YELLOW BLUE TELETEXT mode Select a page See page 55 DTV mode The coloured buttons are used to select correspondingly to the coloured items in the menu screen 22 CHa CHb TV External input mode Select the channel TELETEXT mode Set the page See page...

Page 15: ... video modes TV Select this when viewing analogue TV broadcasts DTV Select this when viewing digital TV broadcasts AV1 and 2 Select this when viewing the signals from the video equipment connected to the AV IN 1 and 2 terminals AV3 Select this when viewing the signals from the video equipment connected to the AV IN 3 terminals using the VIDEO or S VIDEO terminal for video input If both VIDEO and S...

Page 16: ...ute to turn off the Mute function Sound on is displayed NOTE When Volume i k l is pressed in the Mute mode the sound turns on and the volume indicator is displayed The Mute function is cancelled when B B B B B is pressed S o u n d o f f S o u n d o n Volume 50 Volume 10 Using 0 9 on the remote control unit Select the channels directly by pressing buttons 0 9 When selecting the channel using 0 9 fi...

Page 17: ...services 22 System software 31 Access restrictions Maturity rating 22 TV services 23 Radio services 23 Audio lang 26 Subtitle lang 26 List of DTV menu items to help you with operations Numbers within brackets indicate the page where the topic is explained NOTE mark indicates in some cases PIN input may be required The illustrations and on screen displays in this manual are for explanation purposes...

Page 18: ...ct Service scan and then press OK 5 Press a b to select Search and then press OK Guide Setup Preference Guide Setup Preference Search Found TV services Found radio services Store Discard Search Service lists System setting Installation Access restrictions Languages Time Zone Banner duration Time Zone GMT 1 00 Amsterdam Berlin Bern GMT Lisbon London GMT 1 00 Brussels Copenhagen GMT 1 00 Luxembourg ...

Page 19: ...ress the GREEN button to display the Setup menu Found radio services The Found radio services function is used to see which new radio services were found after performing a search or after Reinstalling all services Press a b to select Service scan and then press OK Press a b to select Found radio services and then press OK 4 5 3 1 2 4 5 Guide Setup Preference Guide Setup Preference Country Service...

Page 20: ...en press OK Press GREEN button to display the Setup menu Discard Discard all services stored NOTE This item can only be selected after performing Search or Reinstall all services Press a b to select Service scan and then press OK Press a b to select Discard and then press OK Press c d to select Yes and then press OK 4 5 6 3 1 2 4 5 6 Guide Setup Preference Guide Setup Preference Country Service sc...

Page 21: ...anguages Time Zone Banner duration Banner duration 4 2 8 16 Unit seconds 3 Press p 1 2 Press p to turn off the info banner and the detailed programme information While the info banner is displaying press p again to display the detailed programme information Info banner You can see the info banner while you are watching a programme Health Sport 1 BBC ONE 14 47 Current affairs 13 30 13 45 Min left 0...

Page 22: ... display the DTV Menu screen 1 2 Press a b to select System setting and then press OK Press the GREEN button to display the Setup menu 4 Press a b to select Languages and then press OK 5 Press a b to select Subtitle and then press OK Guide Setup Preference Languages Time Zone Banner duration Subtitle Audio Teletext Press a b to select the desired language and then press OK Subtitle nld eng ger fin...

Page 23: ...TV features Guide Setup Preference Languages Time Zone Banner duration Press a b to select the desired language and then press OK 6 Teletext nld eng ger fin fra Languages listed in the list differ to each programme baq Basque cat Catalan ces Czech wel Welsh dan Danish ger German dut Dutch gre Greek eng English fin Finnish fre French gla Gaelic glg Galician cro Croatian ita Italian nor Norwegian po...

Page 24: ...ere If not enter the factory preset PIN 1234 See page 47 for setting PIN 5 Press c d to select Yes and then press OK Country Service scan Reinstall all services System software Reinstall all services Yes No 3 Press a b to select Access restrictions and then press OK 4 Press a b to select Maturity rating and then press OK If you already set the PIN enter it here If not enter the factory preset PIN ...

Page 25: ...ess OK Press the GREEN button to display the Setup menu Radio Services Use this function to restrict certain Radio services for viewing 4 Press a b to select Radio services and then press OK If you already set the PIN enter it here If not enter the factory preset PIN 1234 See page 47 for setting PIN 5 Press a b to select the Radio services you want to restrict then press c d to select the programm...

Page 26: ...ct a programme from EPG while reading the programme information on the screen Now Next 999 ZDF Discovery Theme Mode 14 00 Heute Sport 999 ZDFdok National Geographic 14 00 Streit um Drei 997 ZDFinfo Gesun dheit Sport 14 00 Info aus den Landern 12 BBC Home Affairs Committee 14 00 Home Affairs Committee 11 BBC NEW BBC News 14 00 BBC World News 10 BBC TEXT Mona the Vampire 13 45 Neighbours 7 BBC CHOIC...

Page 27: ...o Gesun dheit Sport 14 00 Info aus den Landern 12 BBC Home Affairs Committee 14 00 Home Affairs Committee 11 BBC NEW BBC News 14 00 BBC World News 10 BBC TEXT Mona the Vampire 13 45 Neighbours 7 BBC CHOICE Newsround 13 45 House Invaders 2 BBC TWO Anthony Ant 13 45 UGetMe 1 BBC ONE Trading Treasures 13 45 Passport To The Sun Press GUIDE 1 2 Press the GREEN button to change to radio mode Now Next 99...

Page 28: ... to select the desired language and then press OK Press the GREEN button to display the Subtitle language screen Guide Setup Preference Audio lang Subtitle lang Audio language nld eng ger fin fra Guide Setup Preference Audio lang Subtitle lang Subtitle language nld eng ger fin fra Languages listed in the list differ to each programme This setting is disabled if the channel is changed or the progra...

Page 29: ...t Service list type and then press OK Press a b to select Original list of services or User definable list of services and then press OK Service list type User definable list of services Original list of services NOTE When Original list of services is selected the settings for TV service lists and Radio service lists are disabled and you cannot select TV service lists Radio service lists and Acces...

Page 30: ...teps 6 and 7 until all desired channels are arranged 8 Guide Setup Preference Service lists System setting Installation Access restrictions Service list type TV service lists Radio service lists Rearrange TV services New TV services Installed TV services Uninstalled TV services Rearrange TV services 2 BBC TWO 1 BBC ONE 7 BBC CHOICE 10 BBC TEXT 11 BBC NEWS 24 Rearrange TV services 2 BBC TWO 1 BBC O...

Page 31: ...ect TV service lists and then press OK Press a b to select the New TV services and then press OK The services found by search are listed 4 Press a b to select the New radio services and then press OK Guide Setup Preference Service lists System setting Installation Access restrictions Service list type TV service lists Radio service lists Rearrange TV services New TV services Installed TV services ...

Page 32: ...ervices and then press OK Press a b to select the channel you want to delete from the list then press c d to select the item and then press OK The channel you deleted is moved to Uninstalled TV service list 4 Press a b to select the Uninstalled TV services and then press OK Guide Setup Preference Rearrange TV services New TV services Installed TV services Uninstalled TV services Installed TV servi...

Page 33: ...u already set the PIN enter it here If not enter the factory preset PIN 1234 See page 47 for setting PIN 5 Press a b to select the country where you are located and then press OK Guide Setup Preference Service lists System setting Installation Access restrictions Country Service scan Reinstall all services System software Country fin esp fra gbr grc NOTE The following information is supported by s...

Page 34: ...pears 2 Insert the compatible CA card The caution screen disappears and you can view the programme CA system supported by Crypto Works MediaGuard VIAccess Conax Nagra Vision Irdeto NOTE To view paid TV broadcasting you need to make a contract with a service provider Please contact a service provider for details The Common Interface Module and the CA card are neither supplied nor optional accessori...

Page 35: ...tures AV connections Timer functions Language The menus can be used to adjust the various settings of your LCD TV set Select the desired menu item by following the steps below Selecting menu items Using TV Menus Using Direct Control Menu Press MENU on the main unit to display the TV menu Press CH s r to select the desired menu item The cursor moves up or down The cursor indicates the selected menu...

Page 36: ...Headph sound Stereo AV audio sig Sound1 2 Dolby Virtual off Treble Bass Balance 0 0 0 0 OK Back R End E Programmes Automatic search Manual adjustment Sort Erase programme range Enter Change name OK Back R End E Features Brightness bright Cool climate off V Position 0 Rotate horizontally off Rotate vertically off Auto power off off Speaker Detachable On screen display Child lock OK Back R End E AV ...

Page 37: ... purple Adjustment item Contrast Colour Black level Sharpness Red Blue Green Tint Reset Choice Value range 0 60 30 30 30 30 30 30 30 30 30 30 30 30 Press Right d Increase contrast Higher colour intensity More brightness Sharp picture More blue More green Towards green Tint is only visible when N358 or N443 signal has been input into the unit Reset value Press OK OK Back R End E Picture menu Contra...

Page 38: ... choices differ depending on whether or not a NICAM or A2 stereo signal is received See pages 53 and 54 Sound1 Sound2 Sound1 2 on off 30 30 30 30 30 30 Press Right d Increase headphones volume For stronger treble For stronger bass Increase the volume of the right speaker Adjustment item Headph vol Loudsp sound Headph sound AV audio sig Dolby Virtual Treble Bass Balance NOTE In the AV audio sig ite...

Page 39: ...nd does not work when sound is output from the headphones When on is selected in the Dolby Virtual setting you cannot adjust Balance For some discs setup may be required on your DVD In this case please refer to the operation manual of your DVD player OK Back R End E TV menu Picture Sound Programmes Features AV connections Timer functions First installation Language OK Back R End E Sound menu Headp...

Page 40: ...rch Store progr from OK Back R End E 0 1 E 02 2 E 04 3 U 02 4 U 04 5 E 05 6 E 08 7 E10 8 9 10 11 12 13 14 15 16 17 18 19 21 22 23 24 SHARP ZDF ARD RTL SAT1 Pro7 OK Back R End E Programmes Automatic search Manual adjustment Sort Erase programme range Enter Change name OK Back R End E TV menu Picture Sound Programmes Features AV connections Timer functions First installation Language 2 1 3 Useful fe...

Page 41: ...d E Programmes Automatic search Manual adjustment Sort Erase programme range Enter Change name Programmes Continued 2 Manual adjustment Individual settings of programmes can be adjusted Adjustment item Channel Frequency Name Colour system Sound system Skip Description The channel changes to the higher or lower channel Receivable frequencies depending on TV norm installation site and range Programm...

Page 42: ...R End E 0 1 E 02 2 E 04 3 U 02 4 U 04 5 E 05 6 E 08 7 E10 8 9 10 11 12 13 14 15 16 17 18 19 21 22 23 24 SHARP ZDF ARD RTL SAT1 Pro7 Erase programme range OK Back R End E 0 1 E 02 2 E 04 3 U 02 4 U 04 5 E 05 6 E 08 7 E10 8 9 10 11 12 13 14 15 16 17 18 19 21 22 23 24 SHARP ZDF ARD RTL SAT1 Pro7 OK Back R End E Programmes Automatic search Manual adjustment Sort Erase programme range Enter Change name...

Page 43: ...ept the name entered and then press END to exit Enter Change name OK Back R End E 0 1 _02 2 E 04 3 U 02 4 U 04 5 E 05 6 E 08 7 E10 8 9 10 11 12 13 14 15 16 17 18 19 21 22 23 24 SHARP ZDF ARD RTL SAT1 Pro7 Enter Change name OK Back R End E 0 1 E 02 2 E 04 3 U 02 4 U 04 5 E 05 6 E 08 7 E10 8 9 10 11 12 13 14 15 16 17 18 19 21 22 23 24 SHARP ZDF ARD RTL SAT1 Pro7 Enter Change name OK Back R End E 0 1...

Page 44: ...h the Euro SCART AV IN1 or AV IN2 and it receives information of 16 9 format through the audio video control pin the TV selects Full automatically The Wide mode screen will disappear automatically after 4 seconds Depending on the selected screen size upper and lower part of an image might be cut in DTV mode Description In this mode the picture is progressively stretched toward each side of the scr...

Page 45: ...n off Normal vertical image orientation off This feature is inactive Detachable Select this when using internal speaker Adjustable item range medium Brightness 60 Suitable for viewing in well lit areas Saves energy dark Brightness 20 Sufficiently bright when viewing in dim areas auto Screen brightness adjusts according to the ambient light of the room to conserve power consumption When setting to ...

Page 46: ... te Cool climate may cause image noise If this occurs turn the function off 2 1 3 4 5 Press MENU to display the TV menu Press a b to select Features and then press OK Press a b to select V Position and then press OK Press c d to make the adjustment Press END to exit V Position 2 1 3 4 5 OK Back R End E TV menu Picture Sound Programmes Features AV connections Timer functions First installation Lang...

Page 47: ... to connect the speaker jack and cable polarity L properly The speaker jacks have plus L and minus polarity Plus is red and minus is black The cables are also divided into plus and minus When connecting the left right speakers be sure to connect the plus minus jacks with the correct cables NOTE Note See page 10 for bundling the cables of the external speakers Unplug the AC cord from the AC outlet ...

Page 48: ...it OK Back R End E Features Brightness bright Cool climate off V Position 0 Rotate horizontally off Rotate vertically off Auto power off off Speaker Detachable On screen display Child lock OK Back R End E On screen display Position bottom Sound info yes Time no Alarm time no Sleep time no Choice Value range Adjustment item Description To select the position of the On screen display To select wheth...

Page 49: ...OK Press a b to select Child lock and then press OK When changing the PIN for the first time enter factory preset PIN 1234 with 0 9 If not for the first time simply enter your current PIN When the PIN is correctly entered the Child lock screen appears Press a b to select Change PIN and then press OK The currently defined PIN is displayed Input the new four digit PIN e g 5678 with 0 9 and then pres...

Page 50: ... The lock is activated everyday unless no is selected Input the start and end time for a once only Child Lock The length of the period should be up to 24 hours Warning The timer takes its clock information from the Teletext broadcast The teletext broadcast may be in a different time zone and therefore child lock timer may not activate as expected Choice Input value no yes no HH MM HH MM no HH MM H...

Page 51: ...ly Change PIN 1234 Reset For individual progr only OK Back R End E 0 1 E 02 2 E 04 3 U 02 4 U 04 5 E 05 6 E 08 7 E10 8 9 10 11 12 13 14 15 16 17 18 19 21 22 23 24 SHARP ZDF ARD RTL SAT1 Pro7 NOTE Note When a Child Lock is activated the Programmes and First installation items are not displayed in the TV menu and cannot be selected Perform steps 1 to 3 in 1 Changing Resetting PIN to display the Chil...

Page 52: ...put value Adjustment item Description Signal type AFC Colour system Auto CVBS Y C To select the signal type of external equipment Mode1 Mode2 To select frequency control modes Mode1 is suitable for DVD players or decoders and Mode2 is suitable for VCRs or Camcorders Auto PAL SECAM N358 NTSC 3 58 N443 NTSC 4 43 PAL60 PAL M PAL N Colour norm Signal type is only visible when the AV2 is selected NOTE ...

Page 53: ...RN to return to the For programmes screen Press a b to select Sound from AV1 and then press c d to select the desired sound source Press END to exit OK Back R End E For programmes AV control voltage no RGB select no For decoder connected to AV1 Sound from AV1 Dec OK Back R End E For programmes AV control voltage no RGB select no For decoder connected to AV1 Sound from AV1 Dec OK Back R End E AV co...

Page 54: ...the specified time everyday The volume of the alarm sound is selected OK Back R End E Timer functions Time Sleep Timer no Alarm no Alarm volume 0 0 Useful features 7 3 1 4 5 6 NOTE You have to first set the current Time to adjust Sleep timer Alarm and Alarm volume settings Sleep Timer NOTE The Sleep timer screen automatically disappears in 3 seconds After you set the sleep timer turning off MAIN P...

Page 55: ...ed Each time you press SOUND the mode changes as follows Monaural The LCD TV set is receiving a monaural broadcast Each time you press SOUND the mode changes between Nicam and Mono NICAM broadcast selection Mo n o S t e r e o S o u n d 1 S o u n d 2 S o u n d 1 2 Mo n o Mo n o N i c a m NOTE Note If approximately 3 seconds pass without a button being pressed the mode setting is automatically termi...

Page 56: ...eiving a bilingual programme the Sound 1 mode is automatically selected Each time you press SOUND the mode changes as follows A2 stereo broadcasts Mo n o S t e r e o S o u n d 1 S o u n d 2 S o u n d 1 2 Mo n o NOTE Note If approximately 3 seconds pass without a button being pressed the mode setting is automatically terminated and the LCD TV set returns to normal mode setting The setting can be se...

Page 57: ...h time you press m the screen switches as shown upper right If you select a programme with no Teletext signal No Teletext available displays 1 TELETEXT 2 3 RED GREEN YELLOW BLUE TELETEXT When viewing the Teletext information Press CHa a a a a to increase the page number Press CHb b b b b to decrease the page number Button functions Colour RED GREEN YELLOW BLUE You can select a group or block of pa...

Page 58: ...ess l to display the TOP Overview as shown below 1 2 3 Select the desired block or group by using a b c d Press OK to display the selected block or group pages Press l to exit the TOP Overview screen 4 5 NOTE Subtitle will not be displayed when the service does not contain the subtitle information Press MENU to display the Character set screen 1 2 3 Using Teletext menu Select desired character set...

Page 59: ...ill appear on the Display Press p again within the three second interval the channel display is on the screen Time information will display on the lower left of the screen for about three seconds Even when you change the TV channel you can display the time information with steps 2 3 above NOTE The time is not captured when a selected channel has no Teletext information NOTE The time display cannot...

Page 60: ...n viewing video from the VIDEO input terminal do not connect anything to the S VIDEO input terminal For details concerning usage and connection of external devices see the respective instruction manuals It is possible to enjoy video and sound by connecting a VCR and home video game system to the terminals located on the rear of the main unit When connecting an external device turn off the power of...

Page 61: ... Video input PAL SECAM NTSC 7 BLUE input 14 Not used 21 Plug shield Decoder Connecting a VCR or decoder through the 21 pin Euro SCART AV IN 1 RGB AV IN 2 AV Connecting external devices 21 pin Euro SCART AV AV IN 2 1 Audio right output 8 Audio video control 15 Chroma S Video input 2 Audio right input 9 Earth 16 Not used 3 Audio left output 10 Not used 17 Earth for video 4 Common earth for audio 11 ...

Page 62: ...als Connecting a camcorder or a home video game system AV IN 3 Outputting audio AUDIO OUT It is possible to output audio from the LCD TV set through the AUDIO OUT terminals PCM audio outputs from the terminal To optical digital input of external audio devices Optical fibre cable Camcorder Home video game system S Video cord To S VIDEO input terminal To S Video output terminal To AV IN 3 terminals ...

Page 63: ...ts such as picture size made correctly See page 42 Adjust the picture tone See pages 35 and 44 Is the room too bright The picture may look dark in a room that is too bright Check the input signal setting See page 50 The unit s internal temperature has increased Remove any objects blocking vent or clean Check the sleep timer setting See page 52 Is connection to other equipments correct See pages 58...

Page 64: ...OUT UHF VHF 75 q Din type Digital AV IN 1 SCART AV in RGB in TV out AV IN 2 SCART AV in out S Video in AV IN 3 S VIDEO VIDEO AUDIO AUDIO OUT Digital audio output SP OUTPUT External speaker L and R Front Headphones ø 3 5 mm jack Front OSD language English German French Spanish Italian Swedish Dutch Portuguese Finnish Turkish Power requirement DC 13 V AC 110 V 240 V 50 60 Hz Power Consumption 70 W 1...

Page 65: ...63 Dimensional drawings Unit mm 91 5 250 183 99 53 582 492 6 270 2 367 180 7 510 462 420 43 9 100 100 ...

Page 66: ...e details on the respective countries Country Recycling Information for that Country Sweden The Netherlands Belgium Switzerland Please use the Swedish electronics recycling system called ELRETUR and see the website at http www el kretsen se Please use the Dutch electronics recycling system called ICT Milieu and see the website at http www nederlandict nl index php Please use the Belgian electronic...

Page 67: ... the procedure below 1 Press MENU to display the TV menu 2 Press a b to select Features and then press OK to display the Features screen 3 Press a b to select Child lock then press OK 4 The PIN input menu appears 5 Input 3001 with 0 9 The Child lock setting menu appears A new PIN can now be input ADVANCED CHILD LOCK will now be disengaged We suggest that you remove this instruction from the manual...

Reviews: