background image

15

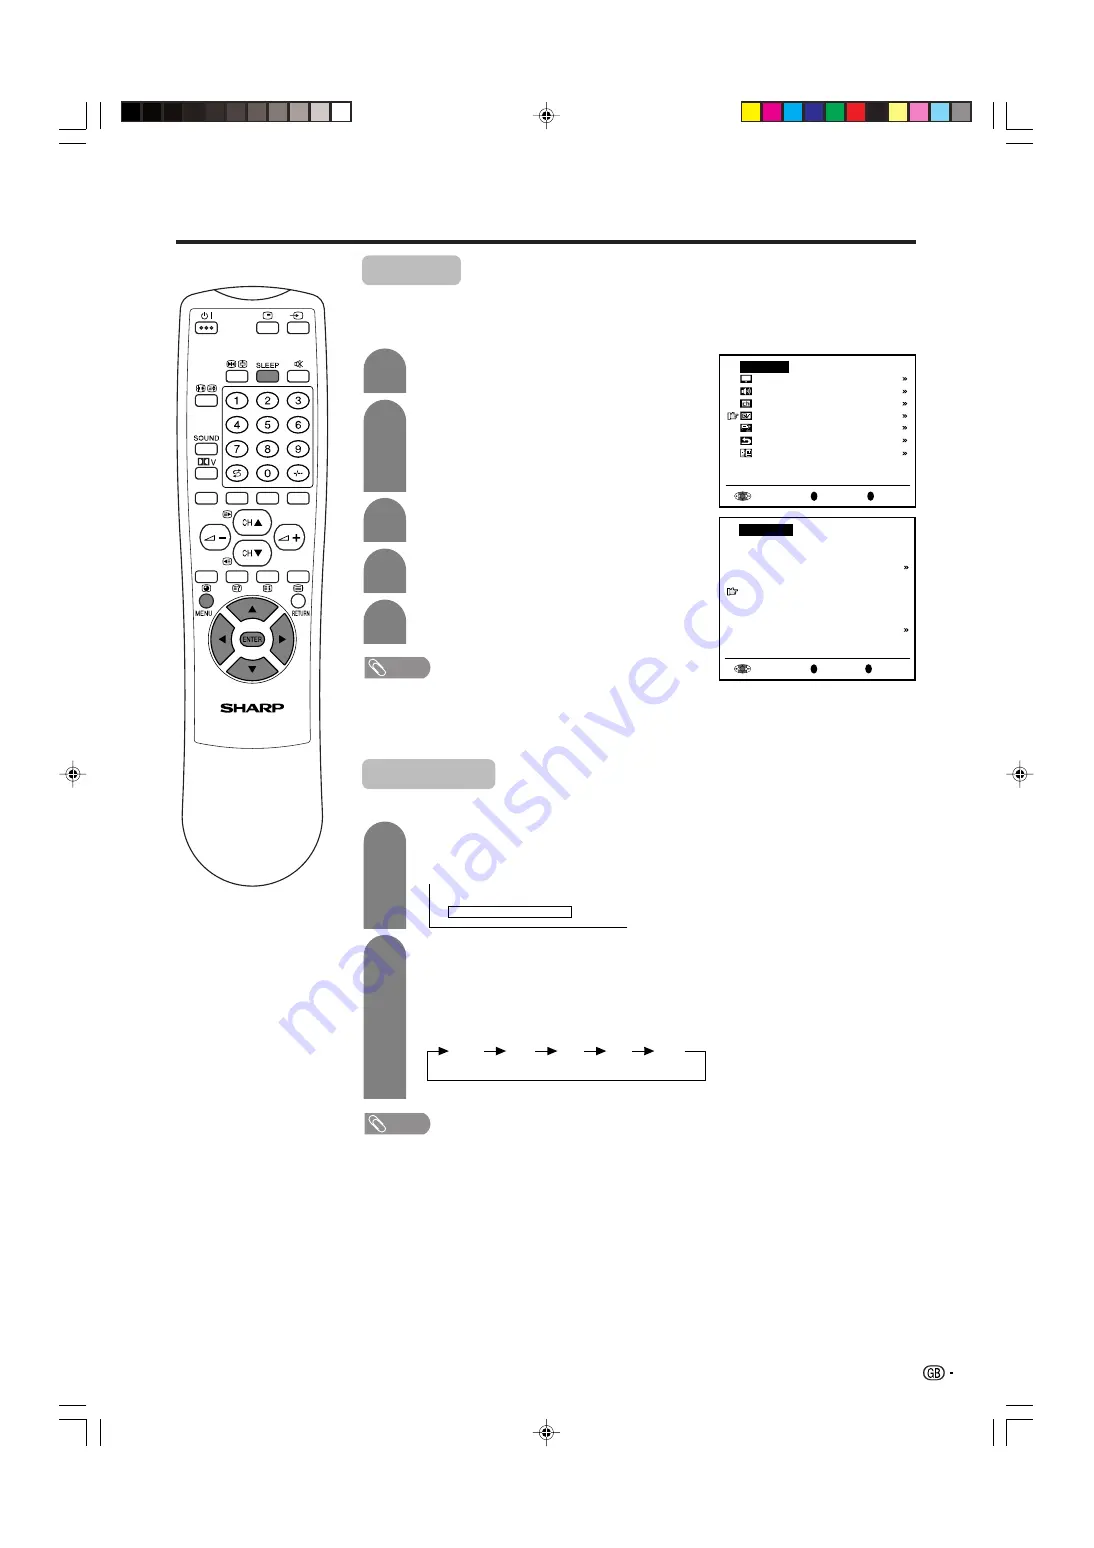
Useful features

2

1

3

4

5

2

1

Press 

MENU

 to display the TV menu.

Press 

a

/

b

 to select “Features”, and then

press 

ENTER

.

Press 

a

/

b

 to select “Booster”, and then

press 

ENTER

.

Press 

c

/

d


to select “auto” or “off”, and then

press 

ENTER

.

Press 

MENU 

to exit.

Back

R

End

M

TV menu

  Picture    
  Audio
  Preset
  Features
  AV connections
  First installation
  Language

Booster

Press 

SLEEP

.

• Remaining time displays when sleep timer has

been set.

Each time you press 

SLEEP

, the remaining

time switches as shown below.

• When the time has been set, countdown

automatically starts.

• Five minutes before the preset of time expires,

the remaining time displays each minute.

NOTE

te:

Select “off” by pressing 

SLEEP

 to cancel the sleep timer.

• When the sleep timer is working, its indicator on the Display lights red.

When set to “auto”, picture noise is reduced for TV broadcast signal strength from
moderate regions.
Automatically sets to “off” for a strong electrolytic signal that has a constant level.

Back

R

End

M

  Features

  Brightness      [bright]
  Quick shoot       [ off]
  V.Position        [   

0

]

  AV-IN3/OUT        [ IN3]
  Booster           [auto]
  Auto power off    [ off]
  Speaker     [Detachable]
  On-screen display  

NOTE

te:

In regions with pronounced changes in TV signal strength or very strong signal strength,
the effect is negligible and may produce instability. In such case, turn the setting “off”.
The built-in TV booster cannot handle regions with extremely weak signal strength. After
consulting with the store of purchase, please attach an external booster antenna.

Sleep timer

Allows you to set a time when the TV automatically switches to standby.

30

off

60

90

120

S l e e p   T i m e r   3 0

(minutes)

lc22aa1m_en_p13_18

04.2.25, 3:08 PM

15

Summary of Contents for Aquos LC-22AA1M

Page 1: ...LCD COLOUR TELEVISION OPERATION MANUAL LC 22AA1M ENGLISH LC 22AA1M Printed in Japan TINS B066WJZZ 04P01 JKG Printed on 100 post consumer recycled paper 03 11 27 5 07 PM ...

Page 2: ...g with headphones 11 Sound volume 12 Changing channels 12 Useful features 13 Selecting menu items 13 Booster 15 Sleep timer 15 Picture 16 Audio 17 Hi fi sound 17 Dolby Virtual 18 Features 19 Quick shoot 20 V Position 20 Selecting speakers 21 Connecting external speakers 21 On screen display 22 Wide mode 23 AV connections 24 Preset 25 Using FREEZE setting 28 NICAM broadcast selection 29 A2 stereo b...

Page 3: ...or the same reason do not spill water or liquid on the product 10 Servicing Do not attempt to service the product yourself Removing covers can expose you to high voltage and other dangerous conditions Request a qualified service person to perform servicing 11 Repair If any of the following conditions occur unplug the AC cord from the AC outlet and request a qualified service person to perform repa...

Page 4: ...roduct Do not place the product on a bed sofa rug or other similar surface since they can block ventilation openings This product is not designed for built in installation do not place the product in an enclosed place such as a bookcase or rack unless proper ventilation is provided or the manufacturer s instructions are followed The LCD panel used in this product is made of glass Therefore it can ...

Page 5: ...ntenna cable Pages 5 and 10 Page 5 Page 6 Page 6 Page 8 Page 6 Manufactured under license from BBE Sound Inc Licensed by BBE Sound Inc under USP4638258 5510752 and 5736897 BBE and BBE symbol are registered trademarks of BBE Sound Inc Manufactured under license from Dolby Laboratories Dolby Pro Logic and the double D symbol are trademarks of Dolby Laboratories Trademarks LC 22AA1M lc22aa1m_en_p01_1...

Page 6: ...EEP POWER OPC HEADPHONE HEADPHONE jack OPC indicator SLEEP timer indicator POWER Standby indicator OPC sensor window Remote control sensor window _ _ 1 Open the battery cover 2 Insert two supplied AA size batteries Place batteries with their terminals corresponding to the e and f indications in the battery compartment 3 Close the battery cover CAUTION Improper use of batteries can result in chemic...

Page 7: ... TV set to off when connecting the AC adapter Unplug the AC adapter from the LCD TV set and power outlet when the LCD TV set is not to be used for a long period of time Household power outlet MAIN POWER Preparation Using the supplied antenna cable connect the room antenna terminal to the antenna terminal on the TV set Refer to the figure below Antenna cable supplied Room antenna terminal 75 ohm ty...

Page 8: ...the TV set can be watched most comfortably How to adjust the angle Hold the carrying handle and tilt the screen while steadying the stand with your other hand VOL l k POWER Standby indicator A green indicator lights when the power is on and a red indicator lights when in the standby mode the indicator will not light when the main power is off Remote control sensor window OPC indicator The Optical ...

Page 9: ...NT AUDIO L AUDIO R VIDEO S VIDEO AV IN1 Carrying handle AUDIO L AUDIO R VIDEO AV IN2 EXTERNAL SPEAKER 4q 5W Before connecting cables and cords into the rear terminals remove the terminal covers Push in the tabs and pull out the covers carefully To mount the terminal cover insert the 2 hooks on the bottom of the cover into the cabinet and press on the upper part of the cover until the tab locks in ...

Page 10: ...ENU screen 11 C CHANNEL INFORMATION Display the channel information 12 b INPUT SOURCE Select an input source TV AV1 AV2 AV3 COMPONENT See page 11 13 SLEEP Set the Sleep timer See page 15 14 e MUTE Mute the sound See page 12 15 0 9 TV External input mode Set the channel TELETEXT mode Set the page 16 o Digit for channel select Change the digits of the selected TV channel See page 12 17 Colour RED GR...

Page 11: ...ur system PAL Sound system B G Start search Press ENTER to begin the automatic programme search The screen shows whatever is on channel 1 when the search is finished Press MENU to exit Cancel R Start search 759 25MHz Auto B G 0 1 E02 2 E04 3 U02 4 U04 5 E05 6 E08 7 E10 8 SHARP 9 10 11 12 13 14 15 16 17 18 19 21 22 23 24 Start search Search is completed 0 1 E02 2 E04 3 U02 4 U04 5 E05 6 E08 7 E10 8...

Page 12: ...is additionally provided for the AV IN1 input If both the S video terminal and normal video terminals are connected with cables the S video input terminal takes priority AV2 Video equipment connected to the AV IN2 input terminals AV3 AV3 mode is used to adjust the preset settings and IN3 or OUT can be selected AV3 indication is not displayed when OUT is selected See page 19 COMPONENT Video equipme...

Page 13: ...tor shifts left To mute the sound Press e Mute to temporarily turn off the sound Sound off is displayed Press e Mute to turn off the Mute function Sound on is displayed NOTE When i k l is pressed in the Mute mode the sound turns on and the volume indicator is displayed The Mute function is cancelled when B B B B B is pressed S o u n d o f f S o u n d o n Volume 42 Volume 5 Using 0 9 on the remote ...

Page 14: ...POWER TV VIDEO The menus can be used to adjust the various settings of your LCD TV set Select the desired menu item by following the steps below Selecting menu items Using TV Menus Using Direct Control Menu Press MENU on the main unit to display the TV menu Press CH s r to select the desired menu item The cursor moves up or down The cursor indicates the selected menu item Press TV VIDEO to display...

Page 15: ...onnections AV1 AV2 AV3 COMPONENT Back R End M Audio menu Sound via TV Headph vol 3 TV sound Stereo Headph sound Stereo Audio output Sound1 2 Dolby Virtual off Treble Bass Balance 0 0 0 0 Back R End M Features Brightness bright Quick shoot off V Position 0 AV IN3 OUT IN3 Booster auto Auto power off off Speaker Detachable On screen display First installation Language English Back R End M Back R End ...

Page 16: ...is working its indicator on the Display lights red When set to auto picture noise is reduced for TV broadcast signal strength from moderate regions Automatically sets to off for a strong electrolytic signal that has a constant level Back R End M Features Brightness bright Quick shoot off V Position 0 AV IN3 OUT IN3 Booster auto Auto power off off Speaker Detachable On screen display NOTE te In reg...

Page 17: ...m Contrast Colour Black level Sharpness Red Blue Green Tint Reset Choice Value range 0 30 60 30 0 30 30 0 30 30 0 30 30 0 30 30 0 30 30 0 30 Press Right d Increase contrast Higher colour intensity More brightness Sharp picture More blue More green Towards green Tint is only visible when N358 or N443 signal has been input into the unit Reset value Press ENTER Back R End M Picture menu Contrast 30 C...

Page 18: ...olby Virtual 1 Treble 1 Bass 1 Balance 1 2 NOTE In the Audio output item mono video recorders should select Sound1 or Sound2 Stereo video recorders should select Sound1 2 so that the desired sound can be selected when playing back the video Back R End M Audio menu Sound via TV Headph vol 3 TV sound Stereo Headph sound Stereo Audio output Sound1 2 Dolby Virtual off Treble Bass Balance 0 0 0 0 Back ...

Page 19: ...olby Virtual setting you cannot adjust Balance For some discs setup may be required on your DVD In this case please refer to the operation manual of your DVD player Back R End M TV menu Picture Audio Preset Features AV connections First installation Language Back R End M Audio menu Sound via TV Headph vol 3 TV sound Stereo Headph sound Stereo Audio output Sound1 2 Dolby Virtual on Treble Bass Bala...

Page 20: ...oderate regions off This feature is inactive Detachable Select this when using internal speaker Adjustable item range normal Brightness 60 Suitable for viewing in well lit areas Saves energy dark Brightness 20 Sufficiently bright when viewing in dim areas auto Screen brightness adjusts according to the ambient light of the room to conserve power consumption When setting to auto make sure no object...

Page 21: ...k shoot may cause image noise If this occurs turn the function off 2 1 3 4 5 Press MENU to display the TV menu Press a b to select Features and then press ENTER Press a b to select V Position and then press ENTER Press c d to make the adjustment Press MENU to exit V Position 2 1 3 4 5 Back R End M TV menu Picture Audio Preset Features AV connections First installation Language Back R End M Feature...

Page 22: ... 2 2 3 3 3 3 3 Put the lid back down Useful features Make sure to connect the speaker jack and cable polarity L properly The speaker jacks have plus L and minus polarity Plus is red and minus is black The cables are also divided into plus and minus When connecting the left right speakers be sure to connect the plus minus jacks with the correct cables NOTE N See page 8 for bundling the cables of th...

Page 23: ...splay Position bottom Sound info yes Sleep Timer no Choice Value range Adjustment item Description To select the position of the On screen display To select whether or not sound information is to be displayed when a channel has been selected To select information to be displayed in the On screen display To activate the On screen display use the C button Sound info Sleep Timer Position bottom top y...

Page 24: ...nal contains no WSS information the function will not work even if enabled The Wide mode screen will disappear automatically after 4 seconds Description In this mode the picture is progressively stretched toward each side of the screen For 16 9 squeeze pictures For 16 9 letterbox pictures Bars may appear on the top and bottom with some programmes The Wide mode is switched automatically based on WS...

Page 25: ...Y C To select the signal type of external equipment Mode1 Mode2 To select frequency control modes Mode1 is suitable for DVD players or decoders and Mode2 is suitable for VCRs or Camcorders Auto PAL SECAM N358 NTSC 3 58 N443 NTSC 4 43 PAL60 Colour norm 1 Signal type is only visible when the AV1 is selected 2 You can only select Auto PAL N358 N443 in Colour system when COMPONENT is selected NOTE Not...

Page 26: ...NU to exit Back R End M Automatic search Colour system PAL Sound system B G Store progr from Start search Store progr from Back R End M 0 1 E02 2 E04 3 U02 4 U04 5 E05 6 E08 7 E10 8 9 10 11 12 13 14 15 16 17 18 19 21 22 23 24 SHARP ZDF ARD RTL SAT1 Pro7 Back R End M Preset Automatic search Manual adjustment Sort Erase programme range Enter Change name Back R End M TV menu Picture Audio Preset Feat...

Page 27: ...e name Preset Continued 2 Manual adjustment Individual settings of programmes can be adjusted Adjustment item Channel Frequency Name Colour system Sound system Skip Description The channel changes to the higher or lower channel Receivable frequencies depending on TV norm installation site and range Programme name up to five characters Colour norm TV norm Channel numbers with a RED mark on the left...

Page 28: ... End M 0 1 E02 2 E04 3 U02 4 U04 5 E05 6 E08 7 E10 8 9 10 11 12 13 14 15 16 17 18 19 21 22 23 24 SHARP ZDF ARD RTL SAT1 Pro7 Erase programme range Back R End M 0 1 E02 2 E04 3 U02 4 U04 5 E05 6 E08 7 E10 8 9 10 11 12 13 14 15 16 17 18 19 21 22 23 24 SHARP ZDF ARD RTL SAT1 Pro7 Back R End M Preset Automatic search Manual adjustment Sort Erase programme range Enter Change name Erase programme range ...

Page 29: ...ro7 Enter Change name Back R End M 0 1 E02 2 E04 3 U02 4 U04 5 E05 6 E08 7 E10 8 9 10 11 12 13 14 15 16 17 18 19 21 22 23 24 SHARP ZDF ARD RTL SAT1 Pro7 Enter Change name Back R End M 0 1 E02 2 E04 3 U02 4 U04 5 E05 6 E08 7 E10 8 9 10 11 12 13 14 15 16 17 18 19 21 22 23 24 SHARP ZDF ARD RTL SAT1 Pro7 Back R End M Preset Automatic search Manual adjustment Sort Erase programme range Enter Change nam...

Page 30: ...press SOUND the mode changes as follows Monaural The LCD TV set is receiving a monaural broadcast Each time you press SOUND the mode changes between Nicam and Mono NICAM broadcast selection Mo n o S t e r e o S o u n d 1 S o u n d 2 S o u n d 1 2 Mo n o Mo n o N i c a m NOTE Note If approximately 3 seconds pass without a button being pressed the mode setting is automatically terminated and the LCD...

Page 31: ...l programme the Sound 1 mode is automatically selected Each time you press SOUND the mode changes as follows A2 stereo broadcasts Mo n o S t e r e o S o u n d 1 S o u n d 2 S o u n d 1 2 Mo n o NOTE Note If approximately 3 seconds pass without a button being pressed the mode setting is automatically terminated and the LCD TV set returns to normal mode setting The setting can be selected individual...

Page 32: ... CHa a a a a w to increase the page number Press CHb b b b b x to decrease the page number Button functions Colour RED GREEN YELLOW BLUE You can select a group or block of pages displayed in the coloured brackets at the bottom of the screen by pressing the corresponding Colour RED GREEN YELLOW BLUE on the remote control unit Upper half Lower half Full 0 9 Directly select any page from 100 to 899 b...

Page 33: ...2 3 Select the desired subpage by using c d RED GREEN 0 9 directly selects the desired subpage Press j to exit the subpage screen If you press w x CHa a a a a CHb b b b b the present page will change to the next previous page and simultaneously exit the subpage screen Displaying TOP Overview When receiving TOP Teletext you can read a TOP text overview 4 Press m to display Teletext Press l to displ...

Page 34: ...e character set pressing ENTER will change the letters to magenta for an instant and then return them back to yellow West Europe English French Scandinavian Czech German Spanish Italian East Europe Polish French Scandinavian Czech German Slovenian Croatian Italian Rumanian Turkish Greek English French Scandinavian Turkish German Spanish Italian Greek Cyrillic English Russian Estonian Czech German ...

Page 35: ...connections see the manuals of your external devices You can enjoy picture and sound by connecting a VCR or a home video game system to the terminals located on the rear of the TV set When connecting an external device turn off the power of the main unit first to prevent any possible damage Connecting external devices Examples of external devices that can be connected Example Camcorder Home video ...

Page 36: ...sized pictures by connecting two or more external devices When connecting an external device use care to connect the video and audio cables to the corresponding terminals To AV IN2 3 terminal To audio video output terminal To COMPONENT input Video terminal To COMPONENT output Audio terminal To AV IN1 terminal To audio video output terminal Video Audio L Audio R Audio L Audio R Y PB PR VCR DVD Play...

Page 37: ...V3 as an output terminal select Features in the menu and set AV IN3 OUT to OUT See page 19 The factory setting for AV IN3 OUT is IN3 Connect to a VCR audio amplifier etc NOTE Note When using the Y PB and PR input for COMPONENT no video output will be made to the AV output terminal but audio will be made for connection to external audio systems lc22aa1m_en_p36_40 04 2 25 3 14 PM 36 ...

Page 38: ...cture or sound just noise Make sure the antenna cable is properly connected Bad reception can be considered Picture is not clear Make sure the antenna cable is properly connected Bad reception can be considered Picture is light or improperly tinted Check colour adjustment NTSC mode The picture is too dark Check if Brightness is set to Dark Check Contrast and Black level adjustment Fluorescent lamp...

Page 39: ...on the screen or colours fade Is the unit receiving interference from other devices Transmission antennas of radio broadcasting stations or amateur radios and cellular phones may also cause interference Use the unit as far apart as possible from devices that may cause possible interference Cautions regarding use in high and low temperature environments When the unit is used in a low temperature sp...

Page 40: ...AV IN 2 Composite video Audio AV IN 3 OUT Composite video Audio IN Composite Video Audio OUT COMPONENT Y PB PR Audio SP OUTPUT External speaker L and R Front Headphones ø 3 5 mm jack Front OSD language English Chinese Arabic Power requirement DC 13 V AC 110 V 240 V 50 60 Hz Power Consumption 59 W 1 4 W at Standby AC 110 240 V with AC Adapter 47 W DC 13 V Weight 10 0 kg w o accessories Accessories ...

Page 41: ...40 Dimensional drawings Unit mm 582 492 6 270 2 367 180 7 510 462 44 420 110 75 7 250 182 4 100 100 84 69 lc22aa1m_en_p36_40 04 2 25 3 14 PM 40 ...

Reviews: