background image

EN-14

BEFORE CALLING FOR SERVICE

The following conditions do not denote equip-

ment malfunctions

Unit does not operate

• The unit will not operate if it is turned on im-

mediately after it is turned off. The unit will not 

operate immediately after the mode is changed. 

This is to protect the unit. Wait 3 minutes before 

operating the unit.

Unit does not send out warm air

• In heating operation, the indoor fan may not 

start for 2 to 5 minutes after the unit is turned on 

to prevent cold air from blowing out of the unit. 

• The unit is defrosting. Wait for 3 to 12 min-

utes. During defrosting, the red HEAT lamp  

(

) on the unit flashes.

Odors

• Carpet and furniture odors that entered into the 

unit may be sent out from the unit.

Cracking noise

• This sound is generated by the friction of the 

unit expanding or connecting due to a tempera-

ture change.

Swishing noise

• The soft, swishing noise is the sound of the re-

frigerant flowing inside the unit.

Mist seen at indoor air outlet

• In cooling operation, this is caused by the differ-

ence between the room air temperature and the 

air discharged.

Water vapor

• In heating operation, water vapour may flow out 

of the outdoor unit during defrosting.

The outdoor unit does not stop

• After stopping the operation, the outdoor unit 

will rotate its fan for about a minute to cool down 

the unit.

Check the following points before calling for 

service.

The unit does not operate

• Check if the circuit breaker has tripped or the 

fuse has blown.

The unit does not cool(or heat) the room ef-

fectively

• Check the filters. If dirty, clean them.

• Check the outdoor unit to make sure nothing is 

blocking the air inlet or outlet.

• Check the temperature setting is proper setting. 

• Make sure windows and doors are closed tight-

ly. 

The unit does not receive the remote control 

signal

• Check whether the remote control batteries 

have become old and weak.

• Try to send the signal again with the remote 

control pointed properly towards the unit’s sig-

nal receiver window.

• Check whether the remote control batteries are 

installed properly.

AYX36RU_OM_3_lang.indb   14

2014-09-10   19:58:16

Summary of Contents for AE-X36RU

Page 1: ...PAÑOL CLIMATISEUR INDIVIDUEL EN DEUX PARTIES MODE D EMPLOI ACONDICIONADOR DE AIRE TIPO SPLIT MANUAL DE INSTRUCCIONES INDOOR UNIT OUTDOOR UNIT UNITÉ INTÉRIEURE UNITÉ EXTÉRIEURE UNIDAD INTERIOR UNIDAD EXTERIOR AY X36RU AE X36RU AYX36RU_OM_3_lang indb 1 2014 09 10 19 58 12 ...

Page 2: ...AYX36RU_OM_3_lang indb 2 2014 09 10 19 58 12 ...

Page 3: ...OTE CONTROL EN 6 CHANGING F C DISPLAY EN 6 BASIC OPERATION EN 7 ADJUSTING THE AIR FLOW DIRECTION EN 8 TURBO FAN OPERATION EN 8 SLEEP OPERATION EN 9 COMFORT OPERATION EN 9 TEMP BUTTON EN 10 DISPLAY BUTTON EN 10 TIMER OPERATION EN 11 LOCK BUTTON EN 12 AUXILIARY MODE EN 12 TIPS ON SAVING ENERGY EN 12 NOTES ON OPERATION EN 13 MAINTENANCE EN 13 BEFORE CALLING FOR SERVICE EN 14 CONTENTS AYX36RU_OM_3_lan...

Page 4: ...e period described herein shall constitute complete fulfillment of all liabilities and responsibilities of SHARP to the customer with respect to the Product and shall constitute full satisfaction of all claims whether based on contract negligence strict liability or otherwise In no event shall SHARP be liable or in any way responsible for any damages or defects in the Product which were caused by ...

Page 5: ...ff when not using the unit for an extended period of time Check the outdoor unit mounting rack periodically for wear and to make sure it is firmly in place Do not place objects on the outdoor unit nor step on it This could cause injury or damage to the air conditioner This unit is designed for residential and light commercial use only Do not use for other applications such as in a kennel or greenh...

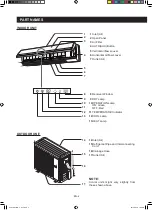
Page 6: ... 9 DRY Lamp 10 OPERATION Lamp ON Green OFF Red 11 TEMPERATURE Indicator 12 COOL Lamp 13 HEAT Lamp 14 Inlet Air 15 Refrigerant Pipe and Interconnecting Cord 16 Drainage Hose 17 Outlet Air NOTE Actual units might vary slightly from those shown above OUTDOOR UNIT 1 2 3 4 5 6 7 8 9 10 11 12 13 14 15 16 17 PART NAMES AYX36RU_OM_3_lang indb 4 2014 09 10 19 58 12 ...

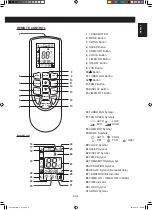
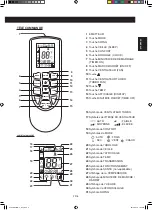
Page 7: ...on DISPLAY 8 9 10 11 12 13 14 15 16 TURBO FAN Symbol 17 FAN SPEED Symbols AUTO LOW MID HIGH 18 COMFORT Symbol 19 MODE Symbols AUTO COOL DRY FAN HEAT 20 CLOCK Symbol 21 SLEEP Symbol 22 DISPLAY Symbol 23 TEMP Symbol 24 TRANSMITTING Symbol 25 OPERATION Symbol 26 HEALTH Symbol Not applicable 27 TEMPERATURE Indicator 28 TIMER ON TIMER OFF Indicator 29 TIME Indicator 30 LOCK Symbol 31 SWING Symbol MODE ...

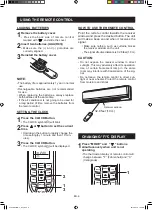
Page 8: ...cover 2Insert two batteries AAA R03 Make sure the and polarities are correctly aligned 3Reinstall the battery cover NOTE The battery life is approximately 1 year in normal use Rechargeable batteries are not recommended for use When replacing the batteries always replace both batteries at the same time If the air conditioner is not going to be used for a long period of time remove the batteries fro...

Page 9: ...on the remote control will not display COOL DRY HEAT mode The temperature setting range 61 86 F 16 30 C FAN mode The temperature will not change regardless of the temperature indicator on the remote control and indoor unit 4Press the FAN button to set the desired fan speed LOW MID HIGH In the DRY mode the fan speed is preset to LOW and cannot be changed NOTE AUTO MODE In the AUTO mode the temperat...

Page 10: ...al adjustment louver is posi tioned at the lowest position in the COOL or DRY mode for an extended period of time this may result in condensation ADJUSTING THE AIR FLOW DIRECTION TURBO FAN OPERATION HORIZONTAL AIR FLOW DIRECTION Adjust the horizontal air flow direction using the louver lever manually OFF The unit runs at extra high fan speed to reach the desired room temperature faster 1In the COO...

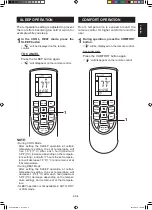
Page 11: ...after each hour maximum 5 4 F 3 C increase depending on the tempera ture setting and after 7 hours the set tempera ture will decrease 1 8 F 1 C and remain set at that temperature During HEAT Mode After setting the SLEEP operation at certain temperature setting the set temperature will decrease 1 8 F 1 C after each hour maximum 5 4 F 3 C decrease depending on the temper ature setting and remain set...

Page 12: ...e remote control 1 The temperature indicator on the indoor unit will change each time you press the TEMP button 1During operation press the TEMP but ton to select the set temperature or the room temperature on the indoor unit No display The indoor unit will display the set tempera ture The indoor unit will display the room tempera ture for 3 seconds then change to the set temperature TEMP BUTTON N...

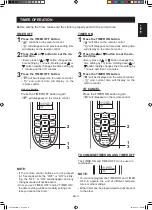
Page 13: ...tton to set the de sired time Every press of or button changes the time setting by 1 minute Holding down or button rapidly changes the time setting by 1 minute and then 10 minutes 3Press the TIMER ON button will be displayed on the remote control and current time will display on the remote control TO CANCEL Press the TIMER ON button again will disappear on the remote control TO COMBINE TIMER ON AN...

Page 14: ...rol LOCK BUTTON TIPS ON SAVING ENERGY Below are some simple ways to save energy when you use your air conditioner Set the proper temperature Setting too higher or lower than necessary temperature point will result in increased power consumption Block direct sunlight and prevent drafts Blocking direct sunlight during cooling operation will reduce power consumption Close the windows and doors during...

Page 15: ...the outside air and releases it into the room The outside temperature therefore greatly affects the heating efficiency If the heating efficiency is reduced due to low outside temperatures use an additional heater It takes time to warm up and heat the entire room because of the forced air circulation sys tem MAINTENANCE Be sure to stop the operation and turn off the circuit breaker before performin...

Page 16: ... seen at indoor air outlet In cooling operation this is caused by the differ ence between the room air temperature and the air discharged Water vapor In heating operation water vapour may flow out of the outdoor unit during defrosting The outdoor unit does not stop After stopping the operation the outdoor unit will rotate its fan for about a minute to cool down the unit Check the following points ...

Page 17: ...E F C FR 6 FONCTIONNEMENT DE BASE FR 7 RÉGLAGE DE LA DIRECTION DU FLUX D AIR FR 8 FONCTION VENTILATEUR TURBO FR 8 FONCTION DE VEILLE FR 9 FONCTION CONFORT FR 9 TOUCHE TEMP FR 10 TOUCHE D AFFICHAGE FR 10 FONCTION MINUTERIE FR 11 TOUCHE DE VERROUILLAGE FR 12 MODE AUXILIAIRE FR 12 CONSEILS SUR LES ÉCONOMIES D ÉNERGIE FR 12 AUTRES REMARQUES SUR LE FONCTIONNEMENT FR 13 ENTRETIEN FR 13 AVANT D APPELER L...

Page 18: ...manière et pour la période décrites dans le présent document constituera l accomplissement complet de toutes responsabilités et obligations de SHARP au client en ce qui concerne le Produit et constituera la satisfaction pleine de toute réclamation contractuelle ou attribuable à la négligence et la responsabilité absolue ou autre SHARP ne saurait en aucun cas être tenu responsable des dommages ou d...

Page 19: ... disjoncteur lorsque l appareil n est pas utilisé pendant une période prolongée Vérifiez périodiquement l usure du rack de montage de l unité extérieure afin de vous assurer qu il reste fixé fermement en place Ne placez pas d objet et ne marchez pas sur l unité extérieure Ceci pourrait causer des blessures ou endommager le système de climatisation Cet appareil est conçu pour un usage commercial lé...

Page 20: ...de FONCTIONNEMENT Marche Vert Arrêt Rouge 11 Voyant de TEMPÉRATURE 12 Voyant FRAIS 13 Voyant CHAUD 14 Bouche d entrée Air 15 Conduite de réfrigérant et cordon d interconnexion 16 Tuyau de vidange 17 Bouche de sortie Air REMARQUE Les unités réelles peuvent différer légè rement de celles présentées ci dessus UNITÉ EXTÉRIEURE 1 2 3 4 5 6 7 8 9 10 11 12 13 14 15 16 17 NOMENCLATURE AYX36RU_OM_3_lang in...

Page 21: ...E 8 9 10 11 12 13 14 15 16 Symbole de VENTILATEUR TURBO 17 Symboles de VITESSE DU VENTILATEUR AUTO FAIBLE MOYENNE ÉLEVÉE 18 Symbole de CONFORT 19 Symboles de MODE AUTO FRAIS SEC VENT CHAUD 20 Symbole de l HORLOGE 21 Symbole de VEILLE 22 Symbole de l AFFICHAGE 23 Symbole de TEMP 24 Symbole de TRANSMISSION 25 Symbole de FONCTIONNEMENT 26 Symbole de SANTÉ non applicable 27 Affichage de la TEMPÉRATURE...

Page 22: ...isser le couvercle 2Insérez deux piles AAA R03 Assurez vous que les polarités et sont correctement alignées 3Réinstallez le couvercle de la télécommande REMARQUE La durée de vie des piles est d environ un an dans des conditions d utilisation normales Il n est pas recommandé d utiliser des piles re chargeables Lors du remplacement des piles remplacez tou jours les deux piles simultanément Si le cli...

Page 23: ...chée sur la télécommande Mode FRAIS SEC CHAUD La température peut être réglée dans l intervalle 16 30 C 61 86 F Mode VENTILATEUR La température ne change pas quelle que soit la température affichée sur la télécommande et sur l unité intérieure 4Appuyez sur la touche VENTILATEUR FAN pour régler la vitesse de ventilateur sou haitée En mode SEC la vitesse du ventilateur est réglée sur FAIBLE et ne pe...

Page 24: ...e former RÉGLAGE DE LA DIRECTION DU FLUX D AIR FONCTION VENTILATEUR TURBO DIRECTION HORIZONTALE DU FLUX D AIR Ajustez manuellement la direction horizontale du flux d air avec le levier du volet ARRÊT L unité fonctionne à une vitesse de ventilateur très élevée pour atteindre plus rapidement la température ambiante désirée 1En mode FRAIS ou CHAUD pressez la touche VENTILATEUR TURBO TURBO FAN s affic...

Page 25: ...r heure augmentation maximum de 3 C 5 4 F selon le réglage de température Après 7 heures la température souhaitée diminue de 1 C 1 8 F puis reste réglée à cette température En mode CHAUD Une fois la fonction de VEILLE activée pour cer tains réglages de température la température souhaitée diminue de 1 C 1 8 F par heure diminution maximum de 3 C 5 4 F selon le réglage de température puis reste régl...

Page 26: ...de 1 L affichage de la température sur l unité intérieure change à chaque fois que vous pressez la touche TEMP 1Durant le fonctionnement pressez la touche TEMP pour sélectionner la tem pérature souhaitée ou la température de la pièce sur l unité intérieure Pas d affichage L unité intérieure affiche la température sou haitée L unité intérieure affiche la température de la pièce pendant 3 secondes p...

Page 27: ...e d une minute Garder pressé la touche ou fait avancer rapidement le réglage d heure d une minute puis de 10 minutes 3Appuyez sur la touche MINUTERIE DE DÉMARRAGE TIMER ON s affiche sur la télécommande et l heure courante s affichent sur la télécommande POUR ANNULER Appuyez à nouveau sur la touche MINU TERIE DE DÉMARRAGE TIMER ON disparait de la télécommande POUR COMBINER LES MINUTERIES DE DÉMARRA...

Page 28: ...lques méthodes simples vous permettant d économiser de l énergie durant l utilisation de votre climatiseur sont décrites ci dessous Réglez une température appropriée En réglant le thermostat à une température plus faible ou plus élevée que nécessaire vous augmentez la consommation énergétique de l appareil Bloquez les rayons directs du soleil et évitez les courants d air Bloquer la lumière directe...

Page 29: ...rieur et la libère dans la pièce La température de l air extérieur affecte ainsi considérablement le rendement de chauf fage Si le rendement de chauffage est réduit à cause de températures extérieures basses utilisez un chauffage d appoint Le préchauffage et chauffage de la pièce entière peut prendre du temps à cause du système de circulation d air forcé ENTRETIEN Assurez vous de débrancher le cor...

Page 30: ... eau à l entrée d air extérieure En mode refroidissement ceci est causé par la différence de température entre l atmosphère intérieure et l air évacué Vapeur d eau En mode chauffage de la vapeur d eau peut être rejetée de l unité extérieure durant le dégi vrage L unité extérieure ne s arrête pas Après l arrêt du fonctionnement l unité exté rieure fait tourner son ventilateur pendant envi ron une m...

Page 31: ...CIONAMIENTO BÁSICO ES 7 AJUSTE DE LA DIRECCIÓN DE LA CORRIENTE DE AIRE ES 8 FUNCIONAMIENTO DEL TURBOVENTILADOR EN 8 FUNCIONAMIENTO DEL MODO NOCTURNO EN 9 MODO COMODIDAD ES 9 TECLA TEMP ES 10 TECLA DISPLAY ES 10 FUNCIONAMIENTO DEL TEMPORIZADOR ES 11 TECLA DE BLOQUEO ES 12 MODO AUXILIAR ES 12 ALGUNOS CONSEJOS PARA AHORRAR ENERGÍA ES 12 OBSERVACIÓN SOBRE EL FUNCIONAMIENTO ES 13 MANTENIMIENTO ES 13 AN...

Page 32: ...ento serán las únicas otorgadas por SHARP y el único recurso a disposición del cliente La corrección de los defectos en el modo y durante el periodo descrito aquí completará todas las responsabilidades de SHARP con respecto al cliente en relación al Producto y supondrá la satisfacción plena de todas las reclamaciones ya se basen en contrato negligencias responsabilidad limitada o de cualquier otro...

Page 33: ...de corte cuando no vaya a utilizar la unidad por un periodo de tiempo prolongado Examine periódicamente el soporte de montaje de la unidad exterior para determinar si está desgastado y asegurarse de que la unidad está convenientemente sujeta No coloque nada en la unidad exterior ni se suba encima ya que podría provocar lesiones o daños en el acondicionador de aire Esta unidad está diseñada para un...

Page 34: ...10 Indicador de FUNCIONAMIENTO Encendido verde Apagado rojo 11 Indicador de TEMPERATURA 12 Indicador de FRÍO 13 Indicador de CALOR 14 Entrada de aire 15 Tubo refrigerante y cable conector 16 Manguera de desagüe 17 Salida de aire NOTA Los aparatos pueden diferir ligeramente de los indicados en las ilustraciones UNIDAD EXTERIOR 1 2 3 4 5 6 7 8 9 10 11 12 13 14 15 16 17 DESIGNACIÓN DE LAS PIEZAS AYX3...

Page 35: ...OCIDAD DEL VENTILADOR AUTO BAJO MEDIO ALTO 18 Símbolo de COMFORT 19 Símbolos de MODO AUTO FRÍO SECO VENTILADOR CALOR 20 Símbolo del RELOJ 21 Símbolo del modo NOCTURNO 22 Símbolo de PANTALLA 23 Símbolo de TEMPERATURA 24 Símbolo de TRANSMISIÓN 25 Símbolo de FUNCIONAMIENTO 26 Símbolo de SALUD no aplicable 27 Indicador de TEMPERATURA 28 Indicador del TEMPORIZADOR ENCEN DIDO TEMPORIZADOR APAGADO 29 Ind...

Page 36: ...e posterior del mando a dis tancia marcada con y deslice la tapa 2Inserte dos pilas AAA R03 Asegúrese de que las polaridades y están correctamente alineadas 3Coloque de nuevo la tapa del comparti mento de las pilas NOTA Las pilas duran un año aproximadamente No se recomienda el uso de pilas recargables Al sustituir las pilas cambie siempre las dos Si el acondicionador de aire no se va a utilizar d...

Page 37: ...tan cia no se mostrará Modo FRÍO SECO CALOR El rango de ajuste de temperatura 16 30 C 61 86 F Modo VENTILADOR La temperatura no cambiará con independencia del indicador de temperatura del mando a distan cia y la unidad interior 4Pulse la tecla FAN para ajustar la velocidad del ventilador deseada Cuando la unidad funciona en el modo SECO la velocidad del ventilador se ajusta en BAJO y no se puede m...

Page 38: ...tor de ajuste vertical se ha situado en la posición más baja en el modo FRÍO o SECO durante un periodo prolongado de tiem po puede formarse condensación AJUSTE DE LA DIRECCIÓN DE LA CORRIENTE DE AIRE FUNCIONAMIENTO DEL TURBOVENTILADOR DIRECCIÓN DEL CORRIENTE DE AIRE HORIZONTAL Ajuste la dirección del flujo de aire horizontal con la palanca del deflector A P A GADO El ventilador de la unidad funcio...

Page 39: ... máximo de 5 4 F 3 C en función del ajuste de temperatura y tras 7 horas la temperatura establecida se reducirá 1 8 F 1 C y permanecerá invariable en dicha temperatura En modo CALOR Tras establecer el modo NOCTURNO en un ajuste de temperatura dado la temperatura es tablecida bajará 1 8 F 1 C cada hora con una bajada máxima de 5 4 F 3 C en función del ajuste de temperatura y permanecerá invaria ble...

Page 40: ...ia 1 El indicador de temperatura en la unidad in terior cambiará cada vez que pulse la tecla TEMP 1Con la unidad en funcionamiento pul se la tecla TEMP para seleccionar la temperatura ajustada o la temperatura de la habitación en la unidad interior Sin display La temperatura mostrará la temperatura ajustada La unidad interior mostrará la temperatura durante tres segundos y a continuación cambiará ...

Page 41: ...to Si mantiene pul sado la tecla o se cambia rápidamente la hora primero en intervalos de 1 minuto y a continuación de 10 minutos 3Pulse la tecla TIMER ON aparecerá en el mando a distancia y aparecerá la hora actual en el mando a distancia PARA CANCELAR Pulse de nuevo la tecla TIMER ON desaparecerá en el mando a distancia PARA COMBINAR EL TEMPORIZADOR EN CENDIDO Y EL TEMPORIZADOR APAGADO Los modos...

Page 42: ... A continuación se incluyen varios consejos sencillos para ahorrar energía al usar el acondicionador de aire Ajuste la temperatura correcta La selección de una temperatura más alta o más baja de lo necesario aumentará el consumo de energía Evite los rayos solares directos y las corrientes de aire Si bloquea la exposición del aparato a los rayos solares directos cuando utilice la unidad para enfria...

Page 43: ...rae el calor del aire exterior y lo libera en la habita ción Por esta razón la temperatura del aire ex terior influye en gran medida en la eficacia de la calefacción Si la eficacia de la calefacción se reduce debido a temperaturas bajas exteriores utilice un ca lentador adicional El proceso de calentamiento de toda la habitación puede llevar cierto tiempo dado que la unidad em plea un circuito de ...

Page 44: ...riar se desprende niebla por la diferencia entre la temperatura del aire en la ha bitación y el aire que sale de la unidad Vapor de agua En el modo de calor puede salir vapor de agua de la unidad exterior durante el descongelado La unidad exterior no se detiene Después de detener el funcionamiento el venti lador de la unidad exterior girará durante aproxi madamente un minuto para enfriar la unidad...

Page 45: ...AYX36RU_OM_3_lang indb 15 2014 09 10 19 58 26 ...

Page 46: ...AYX36RU_OM_3_lang indb 15 2014 09 10 19 58 26 ...

Page 47: ...AYX36RU_OM_3_lang indb 15 2014 09 10 19 58 26 ...

Page 48: ...AYX36RU_OM_3_lang indb 16 2014 09 10 19 58 26 ...

Reviews: