

1
2
3
1
1
2
1
2
2
4 x
3
4
1
2
4 x
Terms and conditions apply. Online registration only.
Register your manufacturers
guarantee online within
14 days of purchase at
www.registertoday.co.uk/sharp
and enter into a prize draw to
win a Sharp Soundbar
TUNING SETUP
DTV
Tuning Mode
DVB Antenna
Operator
Scan Type
Network ID
Frequency
Symbol Rate
DVB-T
Others
Full
Auto
Auto
Auto
1
2 (ARC)
SCART
DIGITAL
AUDIO OUT
OPTICAL
L
R
VIDEO/Y
Pb
Pr
1
2 (ARC)
SCART
DIGITAL
AUDIO OUT
OPTICAL
L
R
VIDEO/Y
Pb
Pr
1
2 (ARC)
SCART
DIGITAL
AUDIO OUT
OPTICAL
L
R
VIDEO/Y
Pb
Pr
H
I
J
K
L
G
F
E
D
C
B
A
M
L
K
J
I
H
G
F
E
D
C
B
A
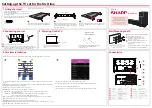
Audio shared for Video/Composite
and component/ YPbPr
Video Input (green) and HD
input (Ypbpr)
Input is used only
by service centres
Digital Audio
Digital Optical Audio Output
HDMI 1
HDMI input
HDMI 2
HDMI input (ARC)
L/R
Video/YPbPr
SCART
SCART
input
SAT IN
Satellite Input
RF in
RF / TV aerial input
HDMI 3
HDMI input
Earphones
Earphone input
Service Input
CI card in
Common interface module
USB 2.0 x2
USB port 2.0
M
When you fi rst turn on the set, you will be welcomed by the First Time Installation screen as shown.
Once you have decided the options as described below, select Auto Tuning and press OK on the remote
control.
Language
: Select your preferred on-screen display language. This will change the language in which the
menus and associated information is displayed in.
Country
: Select the country which the TV is to be used in.
Environment
: Use this option to select either Home or Store mode.
Home
Mode:
Power saving mode which reduces the energy used (by reducing the power
to the LED/LCD panel).
Store
Mode
: The picture will be brighter and you can personalise the settings within the
picture settings menu (Contrast, Brightness, Colour etc.
Note
: In Home Mode, the TV will switch itself to the standby mode after 4 hours in the event that the
buttons on the remote control or TV are not used.
Auto-Tuning:
Starts the tuning process with the selected parameters.
Sorting by LCN
: Automatically sorts the channel listing in logical order where main channels on 1, 2, 3, 4, 5
etc will be BBC 1, BBC 2, ITV, Channel 4, Channel 5 etc.
The next screen allows you to choose the tuning mode of the TV.
For normal broadcast TV such as Freeview, the Tuning Mode should be DTV (Digital TV)
Press OK on the remote to begin the tuning process.
The TV will show you a progress indicator displaying which channels have been found.
Remote Control:
Installing Batteries
TV Control Stick
Connectivity
2 Connecting your set
4 First time installation
3
Powering On the TV
Wall Mounting the TV
Place the TV set on a fl at and clean surface with
the panel facing downwards to avoid damage.
When the stand feet are installed correctly the
stand feet will be longest at the front of the TV
and shortest at the back with the feet pointing
away from each other.
When the stand/feet are in the correct position, secure
the feet to the underside of the TV set using 4 screws
provided.
Switch on the television by pressing
the TV control stick located on the
TV set.
Insert the batteries supplied into the remote
control and press the standby button to
power on the TV.
TV control stick
Connect the TV to your power socket.
If you wish to use the TV to receive Freeview/Saorview channels,
connect the RF input from the TV to your outdoor Digital TV aerial.
If you do not wish to receive Freeview/Saorview, skip this step.
Used for attaching the stand
to the TV set (fi g.2)
Back/Shortest
Front/Longest
1 Fitting the stand
For the stand installation, there is one type of screw
provided as shown below.
To complete the stand installation you will require a
cross head screw driver.
Place the TV set on a fl at and clean surface with the
panel facing downwards to avoid damage.
TV panel must be facing downwards.
Setting up the TV set for the fi rst time
1
2
3
Remove the four screws that are supplied
in the wall mounting holes.
The wall mount can now be easily
attached to the mounting holes on
the rear of the TV.
Install the wall mounting bracket to the
television as advised by the bracket
manufacturer.
The picture shows the use of spacers, which
are not applicable to all sets/installations.
For the dimensions of the VESA mounting,
please refer to the Technical Specifi cations
section of this document.
Image for illustration only.


