background image

TV set

E6

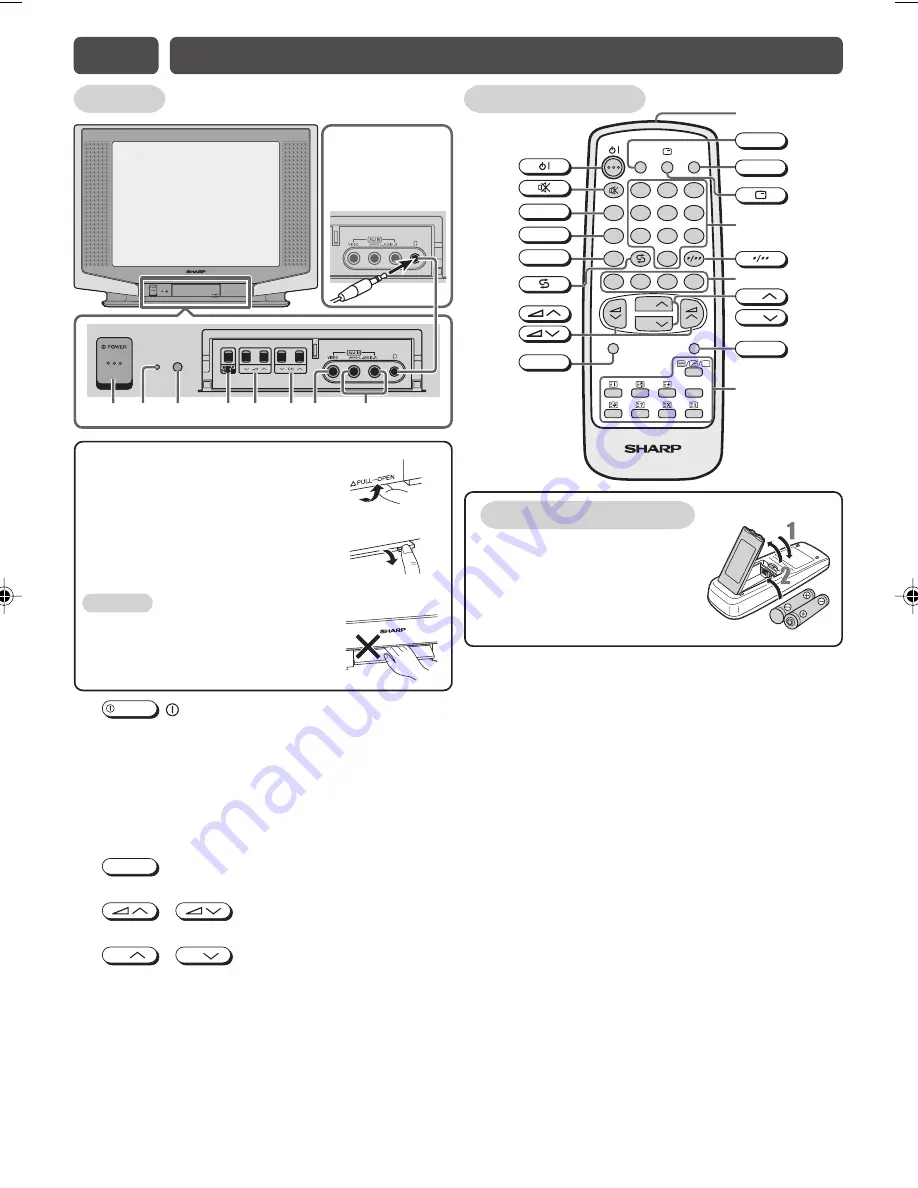
PART NAMES

9

Headphone jack 

•  Insert headphone  
  plug into headphone  
  jack to listen to audio  
 with 

headphone.

1

4 5

6

2

3

7

8

To open the door

Using the projection located under
the “

PULL-OPEN” indication,

pull and lift the door open.

To close the door

Using the projection, lower the
door until closed.

Caution:

• When opening or closing the door,

do not insert your fingers into the
gap between the door and front
panel. This may result in an injury.

1

POWER

   POWER switch

Turns on and off the main power.

2

Power indicator

Power can be turned on by the remote control
when the indicator is lit red.

3

Infrared sensor window

Receives the infrared wave from the remote
control.

4

MENU/PRESET

 MENU/PRESET button

Tunes the channels. Used for MENU setup.

5

 / 

 Volume up/down buttons

Adjusts the volume.

6

CH

 / 

CH

 Channel up/down buttons

Selects the channels. Tunes or sets the channels.

7

Video input terminal (AV-2 IN)

Connects to a camcorder, video game, etc.

8

Audio input terminals (AV-2 IN)

Connects to a camcorder, video game, etc.

9

Headphone jack

Use to listen to the audio with headphone.

Remote control

!

Turns the TV on or to Standby mode.

@

Mutes the sound and restores sound to previous level.

#

Switches between main and sub sound, and stereo
and monaural sound.

$

Switches between MOVIE, MUSIC, NEWS and
CUSTOM.

%

Switches between “OFF” or “ESS” (during receiving
signal stereo) and “OFF” or “EPS” (during receiving
signal monaural).

^

Returns to previously viewed channel.

&

Adjusts the volume. Used for MENU setup.

*

Resets all settings.

(

Switches POWER SAVE mode on or off.

)

Switches between TV broadcasts and AV input
programmes.

Q

Displays the channel and timer settings on the screen.

W

Number

 buttons

E

Switches between one- or two-digit mode channel
selection.

R

Colour

 buttons

Operate the Favourite Channel and Teletext functions.

T

Selects the channel. Used for MENU setup.

Y

Calls the MENU screen.

U

Teletext

 buttons

Operate the Teletext functions.

I

Infrared transmitter window

Aim this window at the infrared sensor window on your
TV set.

Installing batteries

1

Pull up or replace back the
battery cover.

2

Insert two batteries (size
AA). Be sure to match the
battery 

j

/

k

 terminals.

POWER

SAVE

TV/VIDEO

SOUND MODE

SURROUND

NORMAL

TV/TEXT

1

2

3

4

5

6

7

8

0

9

MENU

LIST

B

A

C

D

MPX

CH

CH

SURROUND

SOUND MODE

MPX

MENU

NORMAL

CH

CH

TV/VIDEO

POWER SAVE

!

(

)

Q

E

W

R

U

I

T

Y

@

#

$

%

^

&

*

29L-FG5RU(05-08)EN

6/2/06, 8:26 AM

5

Summary of Contents for 29L-FG5RU

Page 1: ...eries TINS C440WJZZ 06P05 MSP E7 BASIC OPERATION Turn on the power On screen display language selection Channel selection Adjusting volume E8 CHANNEL SETTING E9 PICTURE OR SOUND ADJUSTMENT E10 TIMER SETTING On timer Off timer Reminder on screen timer Beep reminder E11 FEATURES Blue back Auto select Power save 16 9 mode Child lock E12 USEFUL FEATURES Channel Timer display Channel recall TV Video se...

Page 2: ...Ventilation Do not place this TV set in a confined area such as on a bookshelf or in a built in case Leave adequate space behind the TV for proper ventilation Servicing To reduce the risk of electric shock do not remove the back of the cabinet This TV set contains dangerous voltage Power cord protection To prevent electrical shock do not subject the AC power cord to damage by bending or twisting i...

Page 3: ... supplied 300 ohm twin lead flat feeder not supplied 75 ohm impedance converter not supplied Antenna in VCR To antenna in terminal To RF out terminal If your outdoor antenna uses a 75 ohm coaxial cable with a standard DIN45325 plug IEC 169 2 plug it into the antenna jack at the rear of the set If your outdoor antenna uses a 300 ohm twin lead flat feeder connect a 300 ohm to 75 ohm impedance conver...

Page 4: ...To PB CB Red To PR CR To audio out L R terminals To colour difference component video out terminals Watching DVD Press TV VIDEO to select COMPONENT DVD input screen Turn on the DVD player and begin playback For playback of monaural audio connect the external source to the audio input left terminal on the front or rear of the TV set MONO to hear the same sound from both speakers The audiovisual cor...

Page 5: ...with headphone Remote control Turns the TV on or to Standby mode Mutes the sound and restores sound to previous level Switches between main and sub sound and stereo and monaural sound Switches between MOVIE MUSIC NEWS and CUSTOM Switches between OFF or ESS during receiving signal stereo and OFF or EPS during receiving signal monaural Returns to previously viewed channel Adjusts the volume Used for...

Page 6: ...2 1 0 With the number buttons on remote control To select a one digit channel such as 5 press 5 If 5 is indicated press to select one digit input and then press 5 again To select a two digit channel such as 15 press to select the two digit input Press 1 and then press 5 Adjusting volume Adjust volume using The volume bar disappears approximately five seconds after the volume has been adjusted When...

Page 7: ... system to AUTO for normal TV reception The AUTO mode automatically detects the receiving signal system and changes the reception system of the TV set When the picture is not stable switching to an appropriate system may improve the picture quality Switching SOUND SYSTEM Set the system to AUTO for normal TV reception The AUTO mode automatically detects the receiving signal system and changes the r...

Page 8: ...h background background SHARPNESS For less sharpness For more sharpness PICTURE NR see note below ON OFF DYNAMIC SOFT CUSTOM STANDARD SOFT CUSTOM TINT can only be selected and adjusted when receiving NTSC broadcasts AV input Picture Noise Reduction Noise might be generated on images when playing deteriorated video tapes or when receiving broadcasts with relatively weak signals In these cases set P...

Page 9: ...F F SE L ECT CH AD JUST RE TURN MENU T I MER ON 8 0 0 POS I T I ON 7 8 VOLUME 2 3 OF F BE EP REM I NDER OF F SE L ECT CH AD JUST RE TURN MENU Off timer Automatically turns power off after a set length of time has passed Repeat step 1 to 3 of ON TIMER Press CH CH to select OFF Press to set time for TV to turn off Maximum time that can be preset is 12 hours and 50 minutes Timer start to count down a...

Page 10: ... F 1 5 0 BE EP REM I NDER OF F POWER SAVE TV VIDEO SOUND MODE SURROUND NORMAL 1 2 3 4 5 6 7 8 0 9 MENU B A C D CH CH MPX LIST LIST CH CH MENU T I MER ON POS I T I ON VOLUME OF F BE EP REM I NDER ON E11 FEATURES Blue back Automatically turns the screen blue if a broadcast signal is not received Press MENU to call MENU screen Press CH CH to select FEATURE Press to display FEATURE menu Press CH CH to...

Page 11: ...five seconds E11 FEATURES Continued POWER SAVE TV VIDEO SOUND MODE SURROUND NORMAL 1 2 3 4 5 6 7 8 0 9 MENU B A C D CH CH MPX LIST LIST CH CH MENU POWER SAVE F EATURE AUTO SE L ECT ON POWER SAV E OF F BLUE BACK OF F CH I LD LOCK 1 6 9 MODE OF F Example Connect the video equipment to the front AV 2 IN terminals Input mode AV2 is automatically selected 8 AV2 F EATURE AUTO SE L ECT ON POWER SAV E ON ...

Page 12: ...on again To turn OFF or to change setting of CHILD LOCK mode While CHILD LOCK ON screen appear Enter 4 digits PASSWORD using Number buttons 0 9 on the remote control For example 0000 Press to clear the entered number If the wrong PASSWORD is entered PASSWORD INCORRECT screen will appear Input the PASSWORD again in this case If you forget your PASSWORD please input 2398 to enter then change to new ...

Page 13: ...itches back to the channel you were watching just before the current channel Press The channel previously viewed returns to the screen Example After switching from channel 5 to channel 7 is pressed the channel will change to channel 5 Press again to return to channel 7 5 7 5 7 TV Video selection Switches between TV broadcasts and AV input programmes Each time you press the TV VIDEO the input switc...

Page 14: ... mode Each time you press the SOUND MODE the mode switches between MOVIE MUSIC NEWS and CUSTOM MOVIE Movie mode MUSIC Music mode NEWS News mode CUSTOM Custom mode OVI E M USI C M EWS N USTOM C 100 300 1K 3K 8K SOUND SURROUND OF F EQUAL I Z ER BALANCE 0 AVL ON BASS ON EQUAL I Z ER MUS I C NEWS MOV I E CUSTOM 100 300 1K 3K 8K USTOM C 100 300 1K 3K 8K SE L ECT CH AD JUST RE TURN MENU Favourite channe...

Page 15: ...ach time you press MPX the mode switches between STEREO and MONO Bilingual Each time you press MPX the mode switches between MAIN and SUB AM C I N EO R E T S 9 4 NO O M 9 4 AM C I N 1 M 9 4 AM C I N 2 M 9 4 NO O M 9 4 EO R E T S 9 4 NO O M 9 4 The setting can be selected individually for each channel position NICAM I National and regional broadcast system used in the UK and Hong Kong NICAM B G Nat...

Page 16: ...e transmitted using different systems Your SHARP TV is adjusted to receive two Teletext systems namely FLOF and LIST which are automatically identified by the receiver You can easily identify them by the manner in which they appear on the screen Teletext 100 F 200 300 400 FLOF News Sports Movie Weather Teletext LIST POWER SAVE TV VIDEO SOUND MODE SURROUND NORMAL 1 2 3 4 5 6 7 8 0 9 MENU B A C D CH...

Page 17: ...pages that you have previously stored in the memory See E14 LIST mode for more information on Teletext page memory list Press again to switch from LIST mode to FLOF system Index Press to return to the index page If the Teletext transmission data contains HITLIST signal press will enter to HITLIST screen Press again will exit HITLIST screen Reset Press to return to the index page and exit Teletext ...

Page 18: ...ST to change from FLOF system to LIST mode Enter the Teletext page number 3 digits using the Number buttons 0 9 For example To select page 315 Press LIST for more than 2 seconds followed by the Colour button A B C or D for page number storage For example C Repeat steps 4 and 5 to store other page number Press twice to exit the Teletext mode POWER SAVE TV VIDEO SOUND MODE SURROUND NORMAL 1 2 3 4 5 ...

Page 19: ...0 9 MENU B A C D CH CH MPX LIST LIST Colour buttons LIST 100 100 315 LIST Teletext 100 200 315 400 LIST Teletext 100 200 315 400 FLOF Teletext News Sports Movie Weather F F How colour buttons work in FLOF mode If link page data are transmitted from the TV station each link page can be viewed by pressing the Colour buttons A B C and D If no link page data are transmitted pressing each Colour button...

Page 20: ...ol Try fine tuning to correct Contrast setting in picture mode might be all the way to the minus side Press the NORMAL button on the remote control to correct Increase the volume Problems Remote control does not work Bars on screen Picture distorted Picture rolls vertically No colour Poor reception on some channels Picture weak Picture lines or streaks Picture ghosting Picture blurred Sound OK pic...

Page 21: ...put 2 front 1 rear 1 Audio video output 1 rear Headphone jack 1 front DVD input COMPONENT IN 1 rear Sound Output 7 5 W RMS 2 total 15 W RMS Power Source AC 220 240V 50 60 Hz Power Consumption 138 W Dimensions 810 W 618 H 516 5 D mm Weight 41 5 kg Approx Design and specifications are subject to change without notice Receiving system These receiving systems encompassing all currently available techn...

Page 22: ...SHARP CORPORATION ...

Reviews: