


35
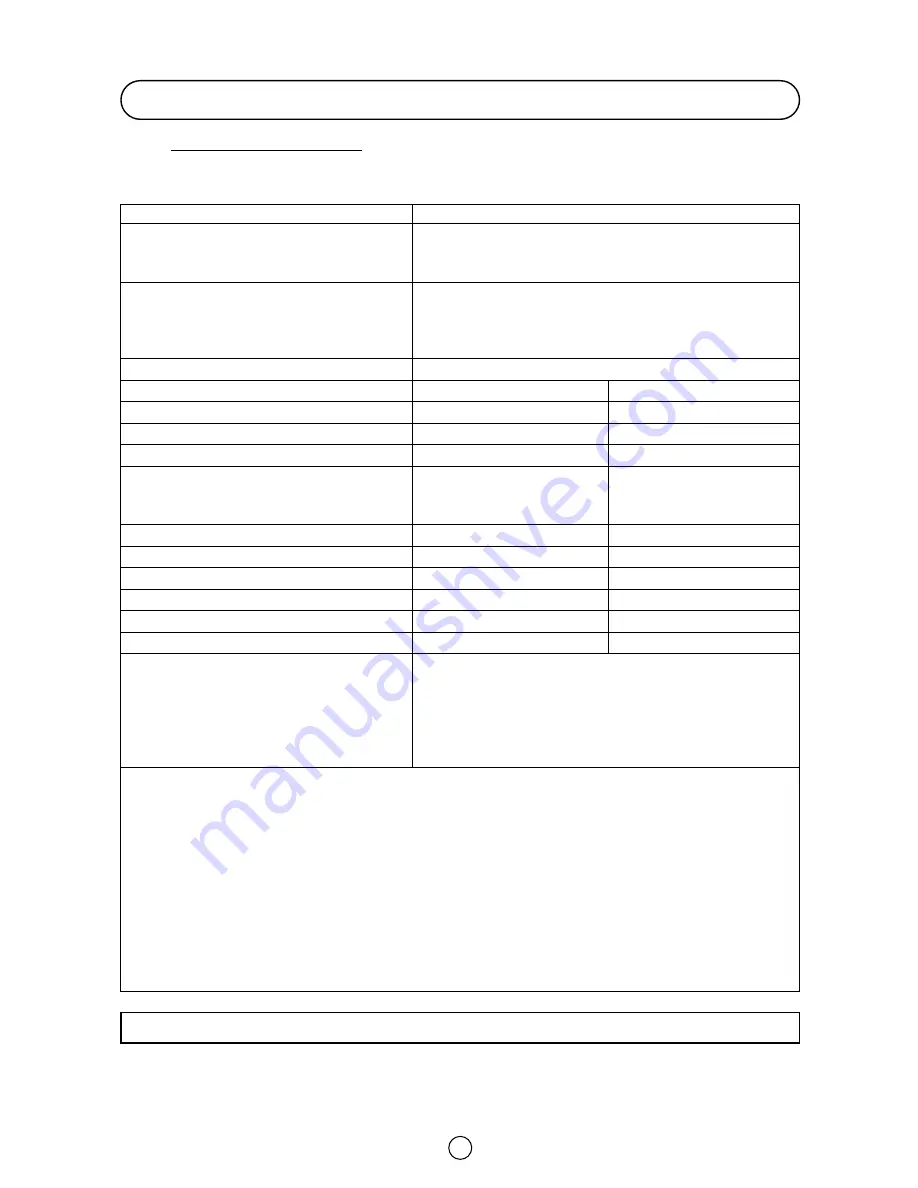
General Specifications for Television Receiver
Item :
IC Solid State Colour TV Receiver
Models:
28JW-73H, 32JW-73H
Receiving Broadcast Standard
CCIR TV Standard system PAL- I
Receiving Channel
VHF :
IR A-J (CH 01 - CH 09)
UHF :
CH 21 - CH 69 (I 21 - 69)
CATV:
CC 01 - CC 68 (Hyperband)
Receiving System
Sound:
FM MONO
DIGITAL STEREO NICAM
Colour System:
PAL (SECAM & NTSC by AV inputs)
Field Frequency:
PAL 50/60 Hz Capability
Power Source
220V-240V AC 50Hz
28JW-73H
32JW-73H
Power Consumption at 240V AC 50Hz
80 W max.
85 W max.
Power Consumption at (Stand-by)
3 W max.
3 W max.
Audio Output:Internal speaker:
Left/Right:
10 + 10 W (mpo)
10 + 10 W (mpo)
Dimensions (Approx.)
width:
784 m/m.
878 m/m.
height:
498 m/m.
558 m/m.
depth:
517 m/m.
572 m/m.
Viewing Area (diagonal measurement)
66 cm (28")
76 cm (32")
Weight (Approx.)
33.5 Kg
46 Kg
Speaker (2 pcs.)
6x13 cm
6x13 cm
Antenna Input Impedance
VHF/UHF 75 ohm Unbalanced
Safety
CE - MARK
EMC
CE - MARK
Accessories & etc.
a) User Instruction
Yes
b) Quick Start Guide
Yes
c) Typical Connections
Yes
d) Remote Control
Yes
e) Battery
2 pcs.
Other Features list
●
Digital Comb Filter
●
Digital Stereo NICAM
●
Auto Installation System
●
ON-OFF Timer
●
ACSS function (Auto Channel Sorting System)
●
Child Lock System
●
99 Channel Programming System
●
21-pin Euro SCART Connector (RGB)
●
Cable and Hyperband
●
21-pin Audio/Video Connector (AV-1) with S-Video Input
●
Teletext
●
21-pin Audio/Video Connector (AV-2)
●
OSD System (On Screen Display)
●
Front Audio/Video Input Terminal
●
Tint Control
●
NTSC Playback AV Input
●
NTSC Hue Control
●
Front S-Video Input Terminal
●
ECO mode
●
Blue Back Noise Mute Function
●
Wide Mode Function
●
Headphone Terminal
NOTE: THE “AV LINK” FUNCTION IS NOT AVAILABLE IN THIS MODEL.


