background image

13

1

2

3

4

5

6

7

8

9

0

LIST

MENU

?

X

i

S

I

TV/VIDEO

TV/TEXT REMOTE CONTROL 

CH 

CH 

S O R T

P I C T U R E
T I M E R

                        E X I T

T U N I N G

Channel Setting (Continued)

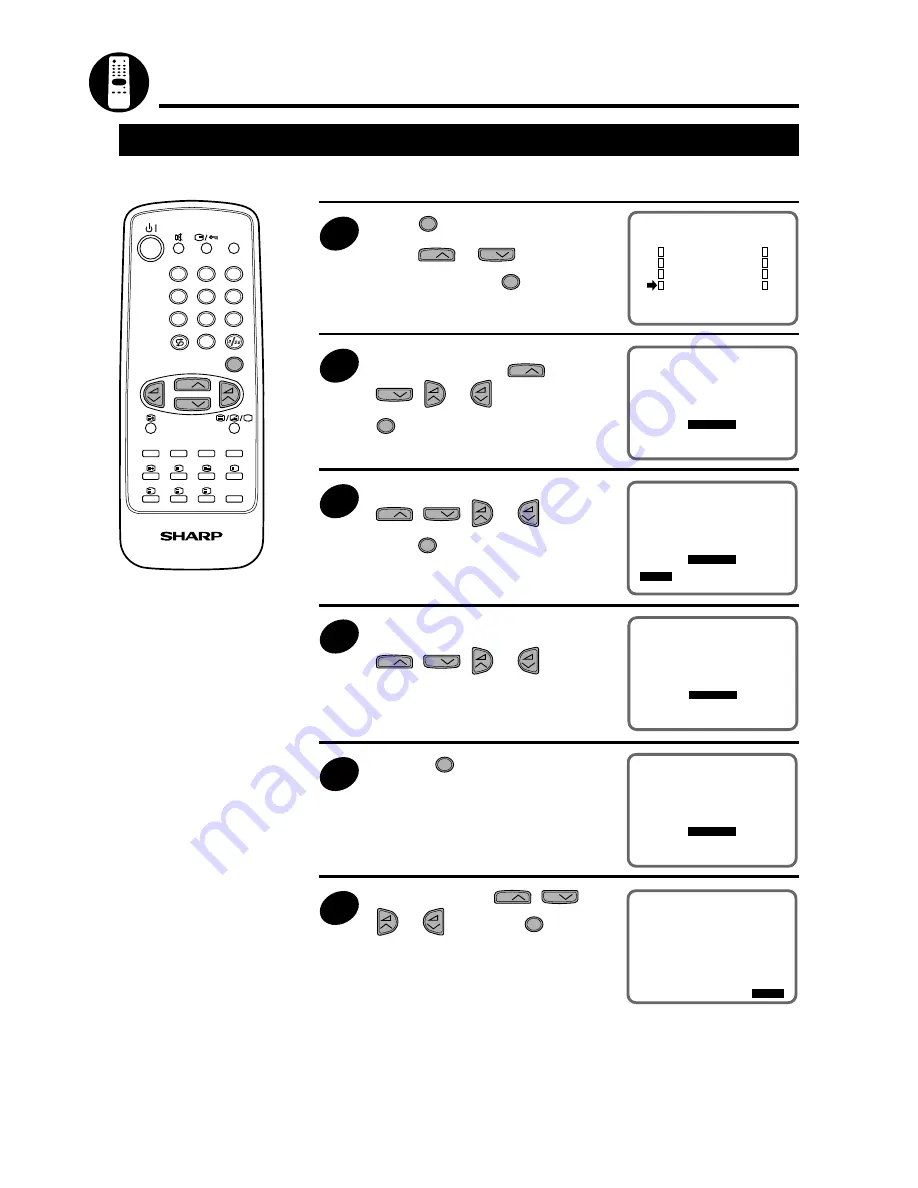
Manual Channel Sorting

When moving channel 20 from preset channel 12 to preset channel 30, follow the steps below:

1

Press 

MENU

 to call the MAIN menu

screen.
Press 

CH 

 or 

CH 

 to select

“SORT”, and press 

MENU

.

2

Select channel 20 of the preset
channel 12 field with 

CH 

,

CH 

 or 

, and press

MENU

.

3

Move the cursor to “MOVE” with

CH 

CH 

 or 

, and

press 

MENU

.

4

Move to the next screen with

CH 

CH 

 or 

 and

select preset channel 30.

5

Pressing 

MENU

 will insert channel 20

in the preset channel 30 field.
Preset channels over preset
channel 31 will be automatically
sorted.

6

Select “EXIT” with 

CH 

CH 

,

 or 

, and press 

MENU

 to

return to the normal Screen.


    S O R T                       1 / 6

                      1 / 6

  1  

  1   CH

CH  2     7  

  2     7   CH  

CH  1   1 3  

1   1 3   CH  

CH  7

  2  

  2   CH

CH  3     8  

  3     8   CH

CH1 2   1 4  

1 2   1 4   CH

CH7 1

7 1

  3  

  3   CH

CH1 9     9  

1 9     9   CH

CH1 3   1 5  

1 3   1 5   CC

CC  1

  1

  4  

  4   CH

CH  5     1  

  5     1   CH

CH1 6   1 6  

1 6   1 6   CC

CC  2

  2

  5  

  5   CH

CH  8   1 1  

  8   1 1   CH

CH1 7   1 7  

1 7   1 7   CC

CC  3

  3

  6  

  6   CH

CH  9  

1 2

1 2


CH

CH2 

  1 8  

1 8   CC

CC6 4

                        E X I T

    S O R T                       1 / 6

1 / 6

  1  

  1   CH

CH  2     7  

  2     7   CH  

CH  1   1 3  

1   1 3   CH  

CH  7

  2  

  2   CH

CH  3     8  

  3     8   CH

CH1 2   1 4  

1 2   1 4   CH

CH7 1

  3  

  3   CH

CH1 9     9  

1 9     9   CH

CH1 3   1 5  

1 3   1 5   CC

CC  1

  4  

  4   CH

CH  5     1  

  5     1   CH

CH1 6   1 6  

1 6   1 6   CC

CC  2

  5  

  5   CH

CH  8   1 1  

  8   1 1   CH

CH1 7   1 7  

1 7   1 7   CC

CC  3

  6  

  6   CH

CH  9

  9  

1 2  

1 2   CH

CH2 

  1 8  

1 8   CC

CC  4

  4

  S E L E C T E D : C H 2


M O V E

      D E L E T E

                              E X I T

    S O R T                       2 / 6

2 / 6

1 9  

1 9   CC

CC  9   2 5  

  9   2 5   CC

CC1 4   3 1  

1 4   3 1   CC

CC4 4

4 4

  2  

  2   CC  

CC  1   2 6  

1   2 6   CC

CC1 8   3 2  

1 8   3 2   CC

CC4 5

4 5

2 1  

2 1   CC

CC1 1   2 7  

1 1   2 7   CC

CC1 9   3 3  

1 9   3 3   CC

CC4 6

4 6

2 2  

2 2   CC

CC1 2   2 8  

1 2   2 8   CC

CC2 1   3 4  

2 1   3 4   CC

CC4 7

4 7

2 3  

2 3   CC

CC1 3   2 9  

1 3   2 9   CC

CC2 3   3 5  

2 3   3 5   CC

CC4 8

4 8

2 4  

2 4   CC

CC  6  

  3  

3   CC

CC4 3

4 3

  3 6  

3 6   CC  

CC  5

                              E X I T

    S O R T                       2 / 6

2 / 6

1 9  

1 9   CC  

CC  1   2 5  

1   2 5   CC

CC1 8   3 1  

1 8   3 1   CC

CC4 4

  2  

  2   CC

CC1 1   2 6  

1 1   2 6   CC

CC1 9   3 2  

1 9   3 2   CC

CC4 5

2 1  

2 1   CC

CC1 2   2 7  

1 2   2 7   CC

CC2 1   3 3  

2 1   3 3   CC

CC4 6

2 2  

2 2   CC

CC1 3   2 8  

1 3   2 8   CC

CC2 3   3 4  

2 3   3 4   CC

CC4 7

2 3  

2 3   CC

CC  6   2 9  

  6   2 9   CC

CC4 3   3 5  

4 3   3 5   CC

CC4 8

2 4  

2 4   CH

CH1 4

1 4  

  3  

3   CH

CH2 


3 6  

3 6   CC  

CC  5

                              E X I T

    S O R T                       2 / 6

2 / 6

1 9  

1 9   CC  

CC  1   2 5  

1   2 5   CC

CC1 8   3 1  

1 8   3 1   CC

CC4 4

4 4

  2  

  2   CC

CC1 1   2 6  

1 1   2 6   CC

CC1 9   3 2  

1 9   3 2   CC

CC4 5

4 5

2 1  

2 1   CC

CC1 2   2 7  

1 2   2 7   CC

CC2 1   3 3  

2 1   3 3   CC

CC4 6

4 6

2 2  

2 2   CC

CC1 3   2 8  

1 3   2 8   CC

CC2 3   3 4  

2 3   3 4   CC

CC4 7

4 7

2 3  

2 3   CC

CC  6   2 9  

  6   2 9   CC

CC4 3   3 5  

4 3   3 5   CC

CC4 8

4 8

2 4  

2 4   CH

CH1 4     3  

1 4     3   CC

CC2 


3 6   CC  

CC  5


E X I T

Summary of Contents for 15JF-26H

Page 1: ...OPERATION MANUAL COLOUR TELEVISION MODEL 15JF 26H Please read this operation manual carefully before using the colour television PRINTED ON ENVIRONMENTALLY FRIENDLY PAPER ...

Page 2: ...e gN 1 gW MhI4 6K h Yhe gN 1 gW MhI4 6K h Yhe gN 1 gW MhI4 6K h Yhe gN 1 gW MhI4 6K h Yhe gN 1 gW MhI4 6K h Yhe gN 1 gW MhI4 6K h Yhe gN 1 gW MhI4 6K h Yhe gN 1 gW MhI4 6K h Yhe gN 1 gW MhI4 6K h Yhe gN 1 gW MhI4 6K h Yhe gN 1 gW MhI4 6K h Yhe gN 1 gW MhI4 6K h Yhe gN 1 gW MhI4 6K h Yhe gN 1 gW MhI4 6K h Yhe gN 1 gW MhI4 6K h Yhe gN 1 gW MhI4 6K h Yhe gN 1 gW MhI4 6K h Yhe gN 1 gW MhI4 6K h Yhe gN...

Page 3: ...wires in the mains lead are coloured in accordance with the following code Blue Neutral Brown Live As the colours of the wires in the mains lead of this product may not correspond with the coloured markings identifying the terminals in your plug proceed as follows The wire which is coloured blue must be connected to the plug terminal which is marked N or coloured black The wire which is coloured b...

Page 4: ...causing serious injury to a child or an adult and serious damage to the TV set Use only with a cart or stand recommended by the manufacturer or sold with the TV set Never remove the back of the cabinet as there is high voltage inside the TV set Please call for service Unplug the power cord from the wall outlet immediately if the TV set begins to make unusual noises or gives off smoke or an odd sme...

Page 5: ...bnail pull up the slit as indicated by the arrow to remove the battery cover Insert two batteries 1 5 V size AA Be sure to match the battery terminals with the marks inside the compartment General Information Safety Precautions 3 Accessories 4 Remote Control Battery Installation 4 Installing your TV Aerial Connecitons 5 Typical Connections 5 Location of Controls 6 Channel Setting Initial Setting A...

Page 6: ... set SCART PERITELEVISION Rear of TV SCART PERITELEVISION SCART terminal Aerial terminal Typical Connections Enjoy the stunning visuals of a VCR or DECODER by connecting them to this TV set through its Euro SCART 21 Pin terminal Please refer to the Operation Manual of your VCR for details Typical connection VCR and TV through the RF terminal SCART PERITELEVISION LINE 2 IN DECODER LINE 1 IN OUT TES...

Page 7: ...iously viewed programme 23 TV VIDEO Select button 23 19 21 SOUND MUTE button 22 POWER STANDBY button 15 Programme Select buttons 15 REVEAL button Teletext 25 HALF PAGE button Teletext 25 22 CLOCK button Teletext 25 VOLUME UP DOWN button Increases sound Decreases sound These are also used for menu setup 15 CANCEL button Teletext 25 RESET button Teletext 25 Single Double Entry button 15 Text Mix Pic...

Page 8: ...NG screen will be displayed After Initial Setting Auto Tuning Automatically tunes in and presets receivable TV stations 1 The AUTO TUNING screen will appear by holding down on the TV set for more than 2 seconds 2 Repeat step 2 above Initial setting To stop AUTO TUNING press MENU on the remote control When AUTO TUNING is not done select EXIT by using CH or CH on the remote control or press on the T...

Page 9: ... store channels in the order you prefer The following steps are carried out using the remote control Manual Tuning Setting a TV station to a desired programme position 1 Press MENU to call the MAIN menu screen 2 Press CH or CH to select TUNING and press MENU 3 Press CH or CH to select PR position and select the programme number 1 99 with or 4 Press CH or CH to select CH and select the channel numb...

Page 10: ... after setting the channels the Child Lock Mode has been activated To cancel the settings make sure to set key mark to OFF If you are using a decoder premiere Decoder Canal plus etc please disconnect it before using the tuning TUNING and SORT menus PR 1 CH 1 SKIP OFF FINE LOCK OFF EXIT 1 2 3 4 5 6 7 8 9 0 LIST MENU X i S I TV VIDEO TV TEXT REMOTE CONTROL CH CH ...

Page 11: ...l the MAIN menu screen 2 Press CH or CH to select TUNING and press MENU 3 Press CH or CH to select the FINE position 4 Press and hold or until the best tuning position is found 5 Press CH or CH to select EXIT and press MENU to return to the normal screen SORT PICTURE TIMER EXIT TUNING SORT PICTURE TIMER EXIT TUNING PR 1 CH 1 SKIP OFF FINE EXIT LOCK OFF PR 1 CH 1 SKIP OFF FINE EXIT LOCK OFF PR 1 CH...

Page 12: ...number 1 99 you wish to skip with or 4 Press CH or CH to select SKIP and press MENU to select SKIP ON The programme number will turn from white to red 5 Repeat steps 3 and 4 if you wish to skip other programmes 6 Press CH or CH to select EXIT and press MENU to return to the normal screen SORT PICTURE TIMER EXIT TUNING SORT PICTURE TIMER EXIT TUNING PR 3 CH 4 SKIP OFF FINE EXIT LOCK OFF PR 3 CH 4 S...

Page 13: ...r CH to select SKIP and press MENU to select SKIP OFF The displayed programme number will turn from red to white 5 Repeat steps 3 and 4 if you wish to cancel skipping other programmes 6 Press CH or CH to select EXIT and press MENU to return to the normal screen 1 2 3 4 5 6 7 8 9 0 LIST MENU X i S I TV VIDEO TV TEXT REMOTE CONTROL CH CH SORT PICTURE TIMER EXIT TUNING SORT PICTURE TIMER EXIT TUNING ...

Page 14: ...64 EXIT SORT 1 6 1 6 1 1 CH CH 2 7 2 7 CH CH 1 13 1 13 CH CH 7 2 2 CH CH 3 8 3 8 CH CH12 14 12 14 CH CH71 3 3 CH CH19 9 19 9 CH CH13 15 13 15 CC CC 1 4 4 CH CH 5 1 5 1 CH CH16 16 16 16 CC CC 2 5 5 CH CH 8 11 8 11 CH CH17 17 17 17 CC CC 3 6 6 CH CH 9 9 12 12 CH CH2 18 18 CC CC 4 4 SELECTED CH2 2 MOVE DELETE EXIT SORT 2 6 2 6 19 19 CC CC 9 25 9 25 CC CC14 31 14 31 CC CC44 44 2 2 CC CC 1 26 1 26 CC C...

Page 15: ...C 2 4 CH CH 5 1 CH CH17 16 CC CC 3 5 CH CH 8 11 CH CH 2 17 CC CC 4 6 CH CH 9 12 CH CH 7 18 CC CC 5 EXIT SORT 1 6 1 6 1 CH 2 7 CH 1 13 CH71 2 CH 3 8 CH12 14 CC 1 3 CH19 9 CH16 15 CC 2 4 CH 5 1 CH17 16 CC 3 5 CH 8 11 CH 2 17 CC 4 6 CH 9 12 CH 7 18 CC 5 EXIT SORT PICTURE TIMER EXIT TUNING Channel Setting Continued Channel Sorting Delete 1 Press MENU to call the MAIN menu screen Press CH or CH to sele...

Page 16: ...go to step 2 If a picture does not appear on the screen go to step 1 1 Turn on the power by pressing A picture appears on the screen 2 Select the programmes Example When selecting programme position 5 5 When selecting programme position 23 2 3 3 Adjust the volume Decreases the volume Increases the volume PR 1 PR 1 PR 5 PR 23 PR PR 2 NOTE If you go away on a trip or will not be at home for a consid...

Page 17: ...steps 3 and 4 above to adjust other items 6 By selecting N you can reset the picture parameters to the factory setting Press MENU to restore the factory setting N ON mode 7 You can clear the on screen display by selecting EXIT with CH or CH and press MENU Selected item CONTRAST COLOUR BRIGHTNESS SHARPNESS TINT NORMAL TINT N 1 2 3 4 5 6 7 8 9 0 LIST MENU X i S I TV VIDEO TV TEXT REMOTE CONTROL CH C...

Page 18: ... When the preset time in the above example 8 hours and 30 minutes has passed the power turns on and a picture appears on the screen When the TV set is in the Standby mode the ON Timer indicator remains flashing in red As a safety precaution in case nobody is at home when the TV set turns on automatically the TV set will turn off itself automatically within 120 minutes any button of the remote cont...

Page 19: ... time select EXIT with CH or CH and press MENU When the preset time in the above example 1 hour and 30 minutes has passed the TV set turns to Standby mode In the event of a power cut disconnection of the plug or the TV set is turned off with the Power button on the TV set all the data on the OFF Timer will be cancelled The TIMER settings will remain if you exit the TIMER setting screen using EXIT ...

Page 20: ...mes 6 Press CH or CH to select EXIT and press MENU You can also block the SCART connection If you want to set Child Lock for the channel using a decoder Premiere Decoder Canal Plus etc you also need to set Child Lock in the SCART programme mode CAUTION When you select a locked channel the TV picture will be blue and the mark appears on the screen Press to unlock the channel Since the remote contro...

Page 21: ...ogramme position set with the Child Lock 1 Select the child locked programme position 2 Hold down for more than 2 seconds The picture of the child locked programme is displayed 1 2 3 4 5 6 7 8 9 0 LIST MENU X i S I TV VIDEO TV TEXT REMOTE CONTROL CH CH PR 5 ...

Page 22: ...ing Child Lock Releasing the Child Locked programme 1 Select the child locked programme position 2 Press MENU to call the MAIN menu 3 Press CH or CH to select TUNING and press MENU 4 When the Child Lock symbol reappears on the screen press and hold down for 4 seconds to enter the Fine Tuning menu 5 Tuning screen is displayed Press CH or CH to select LOCK OFF by and press MENU 6 If you wish to unlo...

Page 23: ...d returns to the screen Example If is pressed after switching from channel 5 to channel 7 the programme will change to that of channel 5 Press again to return to the programme of channel 7 Sound Mute Mutes the sound 1 Press The symbol appears on the screen and the sound is silenced 2 Press again The sound is turned on again 1 2 3 4 5 6 7 8 9 0 LIST MENU X i S I TV VIDEO TV TEXT REMOTE CONTROL CH C...

Page 24: ...e current programme number the timer and other settings on the screen 1 Press The time remaining for the ON Timer OFF Timer and the Programme number appears on the screen When no Timer is set nothing appears on the screen 2 Press once again The programme number ON Timer and OFF Timer display disappears and the screen returns to the normal screen 1 2 3 4 5 6 7 8 9 0 LIST MENU X i S I TV VIDEO TV TE...

Page 25: ...d 4 Press to superimpose a Teletext broadcast onto the current TV programme screen MIXED Mode 5 Press to exit the TELETEXT Mode Fast Page Selection 1 Select the TV channel which is broadcasting the Teletext programme you would like to watch 2 Press to select the TELETEXT Mode 3 To recall a page number displayed in the coloured brackets simply press the corresponding coloured button 1 2 3 4 5 6 7 8...

Page 26: ...NCEL button Cancel the Teletext information and restores the TV picture is shown on the screen The TV programme cannot be changed while in Teletext Cancelled mode When a change takes place in the Teletext information the upper time of the cancelled page or some other indication of special pages is shown on the screen To restore the Teletext press NOTE This button can be used together with while wa...

Page 27: ...ed button corresponding to the coloured brackets on the screen for page number storage 5 Enter the Teletext page number using the 0 9 digit buttons enter three digits 6 Repeat steps 4 and 5 until the numbers for the desired pages have been entered 7 Press S for more than two seconds to store the page numbers you wish to store in memory STORE appears on the screen 8 Press twice to exit the TELETEXT...

Page 28: ...Picture distorted Picture rolls vertically No colour Poor reception on some channels Picture weak Picture lines or streaks Picture ghosting Picture blurred Sound OK picture poor Picture OK sound poor No picture or sound Quick Service Check List Problems Possible Causes Solutions Try a new channel to check for possible station trouble The TV set not plugged in Outlet power OFF Power button of the T...

Page 29: ... 2 EN61000 3 3 CE MARK Design and specifications are subject to change without notice Euro SCART 21 Pin Terminal For greater A V enjoyment various audio and video devices may be connected via the Euro SCART 21 Pin Terminal For example one can revel in the stunning visuals from a VCR and the dynamic sounds of an audio system For your interest here is just one example of an integrated A V system 1 A...

Page 30: ...SHARP ELECTRONICA ESPAÑA S A SHARP ELECTRONICS U K LTD Sharp House Thorp Road Newton Health Manchester M40 5BE PRINTED IN SPAIN TINS 7247BMN0 09 02 ...

Reviews: