background image

5

1

Getting star

ted

MAIN FEATURES

Substantial copying functions

Zoom copying from 50% to 200% in 1% increments can be performed.

Continuous copying of maximum 99 sheets can also be performed.

Automatic document feeding through the single pass feeder (SPF) can be performed.

Toner save mode reduces toner consumption by approximately 10%.

User programs allow setting/modification of functions for customer’s needs.

Scan once/ Print many

This copier is equipped with a 1-page memory buffer. This memory allows the
copier to scan an original 1 time only and make up to 99 copies. This feature allows for
improved workflow, reduced operating noise from the copier and reduced wear and tear
on the scanning mechanism. This feature provides for a higher reliability.

Printer feature

This copier can be used as a laser printer.

Environmentally friendly design

Paper output tray is housed in the copier for space saving.

Preheat mode and auto power shut-off mode are provided to reduce power consumption
in standby mode.

Summary of Contents for 1451 - AL B/W Laser

Page 1: ...Digital Laser Copier Printer Operation Manual MODEL AL 1451 ...

Page 2: ...rence MODEL NUMBER SERIAL NUMBER DATE OF PURCHASE Dealer Address City State Zip Telephone Service Station Address City State Zip Telephone To obtain service or to obtain product literature accessories or supplies please call 1 630 378 3590 in the USA or 1 877 SHARP CC toll free 905 568 7140 in Canada For customer assistance please visit http www sharp usa com for USA or http www sharp ca for Canad...

Page 3: ...the paper tray 13 POWER TO COPIER 15 POWER ON 16 Initial settings of operation panel 16 3 MAKING COPIES PAPER 17 NORMAL COPYING 18 Stream feeding mode 20 EXPOSURE ADJUSTMENT PHOTO COPYING 20 REDUCTION ENLARGEMENT ZOOM 21 BYPASS FEED special paper 22 TWO SIDED COPYING 23 4 SPECIAL FUNCTIONS DESCRIPTION OF SPECIAL FUNCTIONS 24 TONER SAVE MODE 24 USER PROGRAMS power save modes auto clear time stream ...

Page 4: ...rger 31 When copier is not in use 32 6 COPIER TROUBLE MISFEED REMOVAL 33 A Misfeed in the paper feed area 34 B Misfeed in the fusing area 34 C Misfeed in the transport area 35 D Misfeed in the SPF 37 TROUBLESHOOTING 38 STATUS INDICATORS 39 AUTOMATIC EXPOSURE ADJUSTMENT 40 7 APPENDIX SPECIFICATIONS 41 SUPPLY PART NUMBERS AND STORAGE 43 MOVING INSTRUCTIONS 44 INDEX CONTENTS ...

Page 5: ...tinent to the use of the copier Warns the user that injury to the user or damage to the copier may result if the contents of the warning are not properly followed Cautions the user that damage to the copier or one of its components may result if the contents of the caution are not properly followed Notes provide information relevant to the copier regarding specifications functions performance oper...

Page 6: ... of the CDRH standards This means that the copier does not produce hazardous laser radiation For your safety observe the precautions below Do not remove the cabinet operation panel or any other covers The copier s exterior covers contain several safety interlock switches Do not bypass any safety interlock by inserting wedges or other items into switch slots MAIN FEATURES High speed laser copying S...

Page 7: ...s needs Scan once Print many This copier is equipped with a 1 page memory buffer This memory allows the copier to scan an original 1 time only and make up to 99 copies This feature allows for improved workflow reduced operating noise from the copier and reduced wear and tear on the scanning mechanism This feature provides for a higher reliability Printer feature This copier can be used as a laser ...

Page 8: ...button TD cartridge Drum cartridge Drum cartridge handle Fusing unit release lever Charger cleaner Original table Operation panel Paper tray Front cover Side cover open button Original cover Side cover Power cord socket Power switch Handle Handle Paper output tray Paper output tray extension Parallel interface connector Paper guides Manual bypass ...

Page 9: ...indicator p 21 Copy ratio display key p 21 Display Displays the specified copy quantity zoom copy ratio user program code and error code ON LINE indicator Lights up when the machine is used as a printer For description of the ON LINE indicator see the printer operation manual Power save indicator Lights up when the copier is in a power save mode p 24 25 Zoom keys Use to select any reduction or enl...

Page 10: ...ved If the copier is moved from a cool place to a warm place condensation may form inside the copier Operation in this condition will cause poor copy quality and malfunctions Leave the copier at room temperature for at least 2 hours before use Do not install your copier in areas that are damp humid or very dusty exposed to direct sunlight poorly ventilated subject to extreme temperature or humidit...

Page 11: ...ed area CAUTIONS ON HANDLING Be careful in handling the copier as follows to maintain the performance of this copier Do not drop the copier subject it to shock or strike it against any object Do not expose the drum cartridge to direct sunlight Doing so will damage the surface green portion of the drum cartridge causing smudges on copies Store spare supplies such as drum cartridges andTD cartridges...

Page 12: ...terface cable IBM PC AT or compatible computer If anything is not included or is damaged contact our Technical Assistance Department at 1 630 378 3590 in the USA or 1 877 SHARP CC toll free 905 568 7140 in Canada Save the carton and packing materials These can be re used for transporting the machine should it be necessary UNPACKING Be sure to hold the handles on both sides of the copier to unpack ...

Page 13: ...ve all pieces of tape shown in the illustration below Then open the original cover and remove protective materials and 2 Use a coin or suitable object to remove the screw Store the screw in the paper tray because it will be used if the copier has to be moved p 14 ...

Page 14: ... the fusing unit by pulling the strings upward one at a time Protective pins CAUTION tape 3 Push gently on both sides of the front cover to open the cover 4 Remove theTD cartridge from the bag Remove the protective paper Hold the cartridge on both sides and shake it horizontally four or five times Hold the tab of the protective cover and pull the tab to your side to remove the cover 4 or 5 times ...

Page 15: ... pressing the round projections near the side cover open button When closing the covers be sure to close the front cover securely and then close the side cover If the covers are closed in the wrong order the covers may be damaged LOADING COPY PAPER installing the paper tray 1 Raise the handle of the paper tray and pull the paper tray out until it stops ...

Page 16: ...e front of the paper tray To store the pressure plate lock rotate the lock to fix it on the relevant location Screw Pressure plate lock 4 Adjust the paper guides on the paper tray to the copy paper width and length Squeeze the lever of paper guide and slide the guide to match with the width of the paper Move paper guide to the appropriate slot as marked on the tray Paper guide B Paper guide A 5 Fa...

Page 17: ...tion Insert the attached power cord into the power cord socket at the rear of the copier If you use the copier in a country other than the country where the copier was purchased you will need to make sure that your local power supply is compatible with your model If you plug the copier into an incompatible power supply irreparable damage to the copier will result 2 Plug the other end of the power ...

Page 18: ...of a run is made or power is turned on The settings of the power save modes can be modified See page 25 USER PROGRAMS The copier will return to the initial settings a preset amount of time after the last copy is made The preset amount of time auto clear time can be changed See page 25 USER PROGRAMS Initial settings of operation panel The copier assumes the initial settings when the copier is turne...

Page 19: ...4 lbs Invoice 5 1 2 x 8 1 2 A4 210mm x 297mm B5 182mm x 257mm A5 148 5mm x 210mm A6 105mm x 148 5mm Special Transparency Letter 8 1 2 x 11 media film A4 210mm x 297mm Envelope Commercial 10 4 1 8 x 9 1 2 Monarch 3 7 8 x 7 1 2 International DL 110mm x 220mm International C5 162mm x 229mm Do not use envelopes that have metal clasps plastic snappers string closures windows linings self adhesive patch...

Page 20: ... SPF 1 Make sure that no original is left on the original table 2 Adjust the original guides to the size of originals 3 Set the originals face up in the document feeder tray Before feeding originals in the document feeder tray be sure to remove any staples or paper clips from them Before placing curled or wavy originals into the document feeding tray be sure to flatten them If not original misfeed...

Page 21: ... press down the original cover lightly If the original cover is not securely closed the copies may be striped or blurred A book an original which has been folded or a crumpled original 4 Set the number of copies using the two copy quantity keys Press the clear key to clear an entry if a mistake is made A single copy can be made with the initial setting i e when 0 is displayed Press the right copy ...

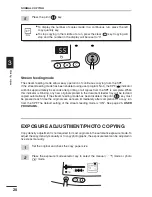
Page 22: ...plete While this indicator is blinking any new originals placed in the document feeder tray will be fed and copied automatically If the stream feeding mode has been disabled the print key must be pressed each time the originals are set even immediately after completion of a copy run from the SPF The default setting of the stream feeding mode is ON See page 25 USER PROGRAMS EXPOSURE ADJUSTMENT PHOT...

Page 23: ...g the zoom ratio press and hold down the copy ratio display key When the key is released the display will return to the copy quantity display To reset the ratio to 100 press the copy ratio selector key repeatedly until the 100 indicator lights up To select a preset copy ratio To select a zoom ratio EXPOSURE ADJUSTMENT PHOTO COPYING Preset reduction and enlargement ratios are 50 64 78 129 and 200 W...

Page 24: ...ument feeder tray or face down on the original table The original image must be smaller than the paper or media for copying If the original image is bigger than the paper or media this may cause smudges on the edges of the copies 2 Set the paper guides to the copy paper width Insert a single sheet of copy paper print face down into the feed slot of the manual bypass Copying will begin automaticall...

Page 25: ... original with the second original on the original table and close the original cover Make sure that the first and second originals are oriented in the same way on the original table Both the first and second originals can be set in the SPF but they must be set separately If the stream feeding mode for the SPF has been enabled set the second original after the SPF indicator goes out See page 20 3 ...

Page 26: ...copier selections and press the print key using the normal copying procedure Auto power shut off mode When the copier enters the auto power shut off mode the power save indicator will light up and other indicators will go out The auto power shut off mode saves more power than the preheat mode but requires a longer time before starting copying To copy from the auto power shut off mode press the pri...

Page 27: ...toner save mode is now active To return to the standard mode repeat the procedure but use the dark key to select exposure level 5 in step 3 USER PROGRAMS power save modes auto clear time stream feeding mode The user programs allow the parameters of certain functions to be set changed or canceled as desired Setting the power save modes auto clear time and stream feeding mode 1 Press and hold down t...

Page 28: ... min 5 120 min 4 Stream feeding 0 OFF 1 ON mode 5 Auto power shut 0 OFF 1 ON off mode Factory default settings are indicated with an asterisk 5 Press the print key The right hand number in the display will be steadily lit and the entered value will be stored To change the setting or to set another mode press the clear key The copier will return to step 2 6 Press the light or dark key to return to ...

Page 29: ...ure given below After the copier stops it may be possible to make a few more copies by taking theTD cartridge out of the copier shaking it horizontally then reinstalling it If copying is not possible after this operation replace the TD cartridge During long copy run of a dark original the ready indicator may blink the indicator light up and the copier stop even though toner is left The copier will...

Page 30: ...ired indicator will light up indicating that replacement of the drum cartridge will be needed soon For more information on purchasing the drum cartridge see SUPPLY PART NUMBERS AND STORAGE on page 43 When the indicator begins to blink the copier will stop operating until the cartridge is replaced Replace the drum cartridge at this time Do not remove the protective cover on the drum portion black p...

Page 31: ...use smudges on the copies 5 Gently install the TD cartridge To install the TD cartridge see page 12 INSTALLING THE TD CARTRIDGE 6 Close the front cover and then the side cover by pressing the round projections near the side cover open button The drum replacement required indicator will go out and the ready indicator will light up When closing the covers be sure to close the front cover securely an...

Page 32: ...ord from the outlet Do not use thinner benzene or other volatile cleaning agents Doing so may cause deformation discoloration deterioration or malfunction Cabinet Wipe the cabinet with a soft clean cloth Original table and original cover Stains on the glass cover or SPF roller will also be copied Wipe the glass cover and SPF roller with a soft clean cloth If necessary dampen the cloth with a glass...

Page 33: ...y holding the tab Set the charger cleaner onto the right end of the transfer charger gently slide the cleaner to the left end and then remove it Repeat this operation two or three times Slide the charger cleaner from the right end to the left end along the groove of the transfer charger If the cleaner is stopped on the way smudges on copies may occur 4 Return the charger cleaner to its original po...

Page 34: ...ies and user maintenance When copier is not in use To prevent entry of dust and foreign matter store the copier as follows 1 Remove the power cord and secure the copier using tape four locations USER MAINTENANCE ...

Page 35: ...y is pressed When the SPF misfeeds an original sheet the copier will stop and the SPF misfeed indicator will blink while the misfeed indicator will remain off For a misfeed of originals in the SPF see E Misfeed in the SPF on page 37 1 Open the side cover while pressing the side cover open button 2 Check the misfeed location Remove the misfed paper following the instructions for each location in th...

Page 36: ... Doing so may damage the drum and cause smudges on copies If the paper has been fed through the manual bypass do not remove the misfed paper through the manual bypass Toner on the paper may stain the paper transport area resulting in smudges on copies 2 Close the side cover by pressing the round projections near the side cover open button The misfeed indicator will go out and the ready indicator w...

Page 37: ...er on the paper may stain the paper transport area resulting in smudges on copies 3 Raise the fusing unit release lever and then close the side cover by pressing the round projections near the side cover open button The misfeed indicator will go out and the ready indicator will light up C Misfeed in the transport area 1 Lower the fusing unit release lever Fusing unit release lever 2 Push gently on...

Page 38: ...eed in the SPF An original misfeed may occur at one of three locations if the misfed original is seen from the document feeder tray A in the document feeder tray if the misfed original is not seen from the document feeder tray B in the exit area or C under the feeding roller Remove the misfed original following the instructions for each location A Open the feeding roller cover and pull the origina...

Page 39: ...ler rotating knob C Open the original cover and rotate the roller rotating knob to remove the misfed original from the document feeder tray or exit area If it is difficult remove the misfed original from under the feeding roller A number may appear in the display after a minus sign indicating the number of the originals that must be returned to the document feeder tray Clear the misfeed and return...

Page 40: ... Press the print key to cancel the auto power shut off mode Copies are too dark or too light Is the copier in the photo exposure mode Cancel the photo exposure mode Dust dirt smudges appear on copies Original table or original cover dirty Clean regularly Use a clean original Original smudged or blotchy 17 13 14 33 17 43 Paper misfeeds frequently 31 Striped copies Is transfer charger clean Clean th...

Page 41: ... be replaced Replace it with a new one TD cartridge replacement required indicator Indication See page Cause and remedy CH is steadily lit in the display CH is blinking in the display Misfeed indicator Blinking SPF misfeed indicator Paper tray is not securely installed Push the tray in securely The TD cartridge is not installed Check if the cartridge is installed Side cover is open Close the side ...

Page 42: ... 3 Press and hold down the exposure mode selector key for approximately 5 seconds The photo indicator will go out and the AUTO indicator will begin to blink One or two exposure indicators corresponding to the automatic exposure level which has been selected will light up 4 Press the light or dark key to lighten or darken the automatic exposure level as desired If exposure level 2 is selected the t...

Page 43: ...opy speed 14 copies min Continuous copying Max 99 copies subtractive counter First copy time 9 6 seconds normal copying mode Approximately Copy ratio Variable 50 to 200 in 1 increments total 151 steps Fixed 50 64 78 100 129 200 Exposure system Original table Moving optical source slit exposure stationary platen with automatic exposure SPF Moving original Copy paper feed One paper tray with automat...

Page 44: ... Standby Background noise level Sound Pressure Level LPA bystander positions Copying 40 dB A Standby Background noise level Noise emission measurement in accordance with ISO 7779 First copy time may differ depending on operating conditions such as power supply voltage and room temperature As a part of our policy of continuous improvement SHARP reserves the right to make design and specification ch...

Page 45: ...st Supply Part number Usable life TD cartridge AL 100TD Approx 6 000 sheets AL 110TD Approx 4 000 sheets Drum cartridge AL 100DR Approx 18 000 sheets Based on copying onto letter type paper at 5 toned area The life of the TD cartridge which has been included in the copier at the factory is approximately 2 000 sheets Proper storage 1 Store the supplies in a location that is clean and dry at a stabl...

Page 46: ...ver If the covers are closed in the wrong order the covers may be damaged 5 Raise the handle of the paper tray and pull the paper tray out until it stops 6 Push the center of the pressure plate down until it locks in place and lock the plate using the pressure plate lock which has been stored in the front of the paper tray 7 Use a coin or suitable object to attach to the left side of the copier th...

Page 47: ...t 28 E Enlargement 21 Exposure adjustment 20 F Features 4 Fixed copy ratio 21 Fusing unit release lever 6 34 I Initial settings 16 Installation location 8 TD cartridge 12 L Light key 20 Loading copy paper 13 M Maintenance 30 Manual bypass 22 Manual exposure 20 Manual feeding 22 Misfeed removal fusing area 34 lower paper feed area 36 paper feed area 34 SPF 37 transport area 35 Moving instructions 4...

Page 48: ...e packing materials 11 R Ready indicator 7 Reduction 21 Replacement drum cartridge 28 TD cartridge 27 INDEX S Screw 11 14 Single pass feeder SPF 18 Special paper 17 Specifications copier 41 paper 17 SPF 18 Status indicators 39 Supply life 43 part number 43 storage 43 T TD cartridge indicator 7 39 installation 12 replacement 27 Toner save mode 24 Total number of copies 26 Transfer charger 6 31 Trou...

Page 49: ...47 7 Appendix MEMO ...

Page 50: ...48 7 Appendix MEMO ...

Page 51: ... residential installation This equipment generates uses and can radiate radio frequency energy and if not installed and used in accordance with the instructions may cause harmful interference to radio communications However there is no guarantee that interference will not occur in a particular installation If this equipment does cause harmful interference to radio or television reception which can...

Page 52: ...NA 2001J KS TINSE0677QSZZ SHARP ELECTRONICS CORPORATION Sharp Plaza Mahwah New Jersey 07430 2135 www sharp usa com SHARP ELECTRONICS OF CANADA LTD 335 Britannia Road East Mississauga Ontario L4Z 1W9 SHARP CORPORATION ...

Reviews: