background image

X-TATIC PRO

16

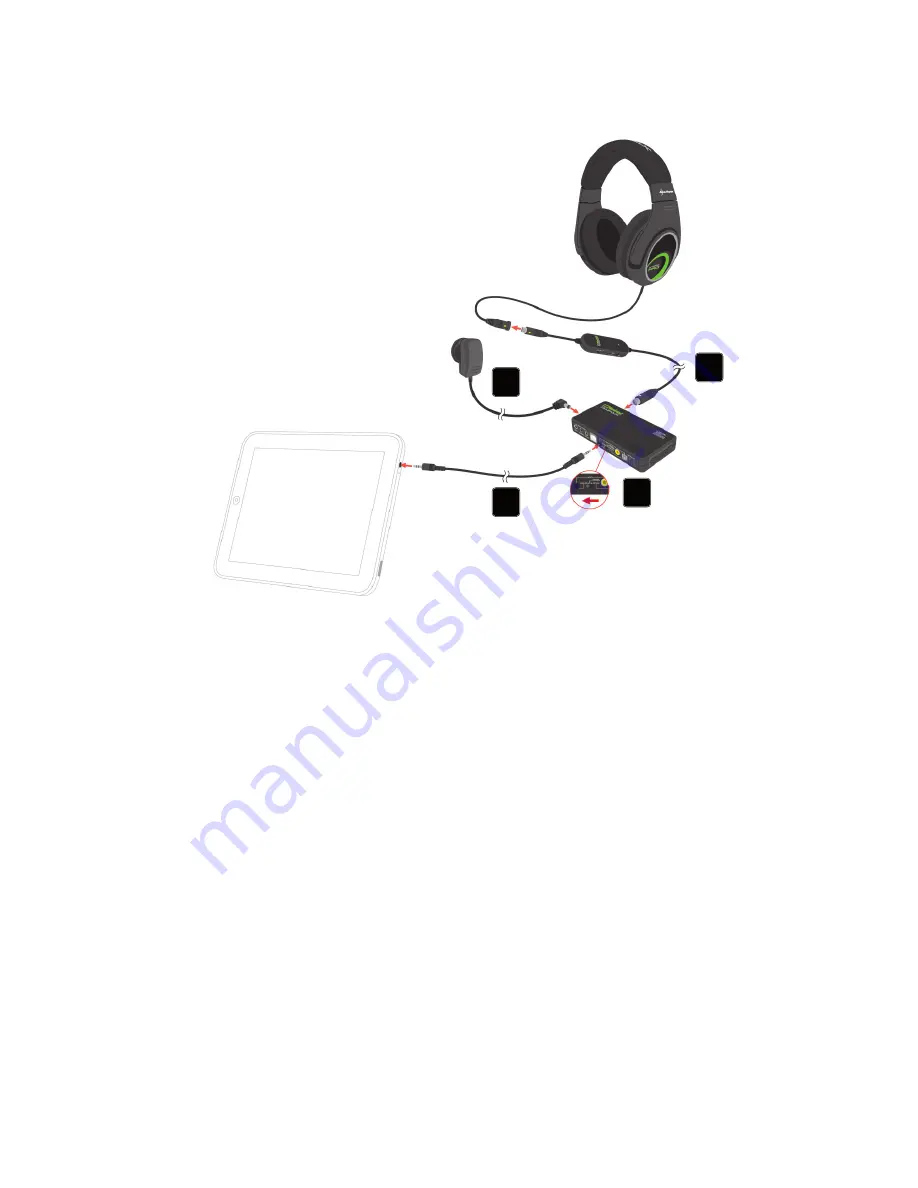
9. Connecting to a tablet PC 

  (or other sound source with 3.5 mm analog connector)

1.   Connect the X-Tatic PRO to the SCU by plugging the breakaway cable’s G9 male  

  connector (white arrow) to the SCU’s G9 female socket (silver indication). 

2.   Connect the included 3.5 mm analog connection cable to the analog audio output  

  of your tablet PC (or other compatible device) and the 3.5 mm audio input of the  

 SCU. 

3.   Toggle the audio input selector switch to “Analog”.

4.   Connect the power adapter of the X-Tatic to a wall outlet and the SCU‘s ISO    

  power jack.

5.   Switch on the SCU and the audio source. The X-Tatic PRO is ready for use.

Note:  

Under this configuration the SCU will receive a stereo input signal. The default setting 

is a sound playback through the front and subwoofer speakers. If you wish a surround 

sound processing through Dolby

®

 Pro Logic

®

 II, you may enable this function by pres-

sing the respective button (PLII) on the SCU.

1

2

3

4

Summary of Contents for X-Tatic PRO

Page 1: ...Manual...

Page 2: ...nt 9 6 Connecting to Xbox 360 9 7 Connecting to Playstation 3 11 8 Connecting to PC 13 9 Connecting to a tablet PC 16 or other sound source with 3 5 mm analog connector 10 Connecting to a DVD player 1...

Page 3: ...ecoder E Power supply incl travel adapters EU US and UK F Optical connection cable S PDIF G USB microphone cable for PS3 and PC H Chat cable for Xbox 360 3 5 mm jack 2 5 mm jack I Coaxial connection c...

Page 4: ...may be switched off at any time 3 The SCU at a glance 1 Power on off 2 Switch on off Pro Logic II 3 Volume up 4 Volume down 5 Optical audio output S PDIF 6 Optical audio input S PDIF 7 Coaxial audio i...

Page 5: ...creasing decreasing the master volume LED flashing fast Input signal Dolby Digital 5 1 Maximum Master volume White LED constantly on Input signal Not Dolby Digital 5 1 Dolby Pro Logic II off Master vo...

Page 6: ...The Pro Logic II decoder is switched off If you wish a surround sound pro cessing through Dolby Pro Logic II you may enable this function by pressing the respective button PLII on the SCU 1 Switch on...

Page 7: ...n the microphone to the front and into the desired position 5 2 Connecting the breakaway cable 1 Plug the G9 male connector yellow arrow of the breakaway cable into the G9 female connector yellow arro...

Page 8: ...he interlock button of the travel adapter 2 Turn it into counter clockwise direction and remove it 5 4 Master volume adjustment The master volume can be adjusted in two different ways 1 Using the mast...

Page 9: ...l indicate the current volume level with different colors see above 3 Adjust the volume to your liking red LED color maximum volume level green LED color minimum volume level Note To adjust another ch...

Page 10: ...nd the SCU s optical audio input grey lid 3 Toggle the audio input selector switch to Optical 4 Connect the chat cable for Xbox 360 to the Xbox 360 chat cable connector on the X Tatic s in line volume...

Page 11: ...r PS3 and the SCU s optical audio input grey lid 3 Toggle the audio input selector switch to Optical 4 Connect the USB microphone cable for PS3 to the SCU s USB connector and the respective USB connec...

Page 12: ...s input and output device Note In this menu you may also adjust the microphone intensity setting The default value for this setting is 3 and does normally not need to be adjusted when using the X Tati...

Page 13: ...SCU s optical audio input grey lid 3 Toggle the audio input selector switch to Optical 4 Connect the power adapter of the X Tatic to a wall outlet and the SCU s ISO power jack 5 Connect the USB microp...

Page 14: ...X TATIC PRO 14 Control Panel All Control Panel Items Sound Recording Right click USB PnP Sound device and choose Set as default device from the context menu...

Page 15: ...owing screenshots are for illustration only and may vary depending on your operating system and or hard ware configuration Control Panel All Control Panel Items Sound Playback Right click the Digital...

Page 16: ...ice and the 3 5 mm audio input of the SCU 3 Toggle the audio input selector switch to Analog 4 Connect the power adapter of the X Tatic to a wall outlet and the SCU s ISO power jack 5 Switch on the SC...

Page 17: ...f your DVD player or other compatible device and the coaxial audio input of the SCU 3 Connect the power adapter of the X Tatic to a wall outlet and the SCU s ISO power jack 4 Toggle the audio input se...

Page 18: ...outputs of the SCU and the sound system headset 2 Connect the optical cable remove protective caps on both ends to the optical audio output of the sound source and the SCU s optical audio input grey l...

Page 19: ...ical audio input of the amplifier other compatible device 3 Connect the power adapter of the X Tatic to a wall outlet and the SCU s ISO power jack 4 Switch on the SCU the audio source and the amplifie...

Page 20: ...on PlayStation 3 PS3 and the respective images logos are registered trademarks or trademarks of Sony Computer Entertainment Inc Xbox Xbox 360 Xbox Live Microsoft and the respective images logos are re...

Reviews: