

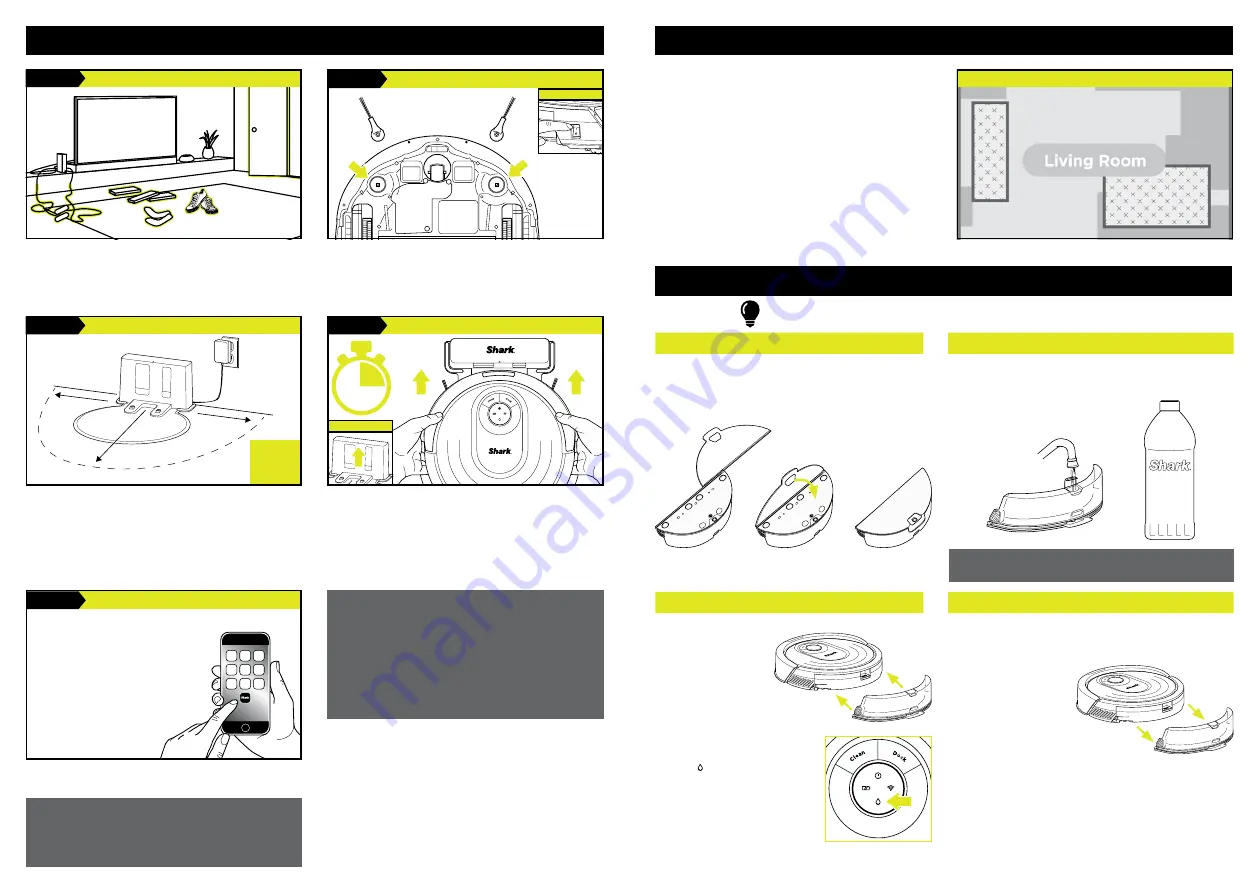
PLACE
DOCK
ON BARE
FLOOR
SET UP THE DOCK
5 ft.
3 ft.
3 ft.
STEP 3
PREP THE ROBOT
STEP 2
• Remove protective film from robot and dock.
• Attach side brushes.
• Power on your robot using the side switch.
Search “SharkClean” in the app store or scan the
QR code on the front cover to download the app.
DOWNLOAD THE APP
STEP 5
SETUP
Place robot on dock to charge. The dock indicator
light will turn
blue
and the robot will beep when
charging begins.
CHARGE THE ROBOT
STEP 4
5 ft.
3 ft.
3 ft.
INDICATOR
First
Charge
6
h
SharkClean™
App Features
✔
Scheduling
✔
No-Go Zones
✔
Go Zones
✔
Mopping Modes
✔
Vacuum Modes
✔
Carpet Detection
..........Side Brushes..........
• Before cleaning, clear cords and remove small
objects like clothing or toys that are less than
2.8” tall.
• Open interior doors in rooms you want your robot
to clean.
• To use the app, your phone must be
connected to a 2.4 GHz network. The app
will not work on a 5 GHz network.
•
DO NOT
use a VPN or a proxy server.
• Make sure Wi-Fi isolation is turned off on the router.
CAN’T CONNECT?
Restart your phone
Reboot your robot
• Press the power button on the side of the ROBOT to
the OFF position for 10 seconds, then press it again
to turn power back ON.
Reboot your router
• Unplug the router power cable for 30 seconds, then
plug it back in. Allow several minutes for your router
to reboot completely.
Two Easy Steps If You’re Stuck:
1.
Having trouble connecting to your robot? Call
1-855-460-5425
for robot support.
2.
For additional help, visit:
sharkclean.com/
support
• How-to Videos
• Troubleshooting
• FAQs
• Tips & Tricks
Smart Home Setup
To set up voice control using Google Home or
Amazon Alexa, visit
sharkclean.com/app
for
instructions.
PREP YOUR HOME
STEP 1
• Find a
permanent location
for the dock in a spot
with a strong Wi-Fi signal.
• Place the dock on bare floor, away from rugs or
carpets, with its back against the wall.
• Attach the landing mat to the bottom of the dock.
• Plug in the dock. The indicator light will illuminate
green when the dock has power.
Step 1. Explore Run
– First, the robot will wander
around exploring your home as it creates a map.
Step 2. Carpet Detection Run
– As it vacuums row
by row, the robot will also detect carpets and rugs
to avoid later, when mopping.
Now you’re ready to clean.
BEFORE YOU CLEAN
Your robot will need to complete 2 different runs
WITHOUT the fluid reservoir attached
before it
can mop.
INTERACTIVE MAP WITH CARPET DETECTION
HOW TO SET UP VACMOP™ MODE
Attach the fluid reservoir to your robot to enter
VACMOP Mode
.
In this mode, your robot will vacuum and mop simultaneously.
ATTACH MOPPING PAD
FILL FLUID RESERVOIR
• Insert the flat edge of the pad through the slot
in the fluid reservoir.
• Secure to the back of the reservoir.
• Fill with VACMOP starter cleaning solution or with
room temperature water, up to the MAX
fill line.
INSERT RESERVOIR INTO ROBOT
REMOVE MOP ACCESSORIES AFTER USE
• Firmly push the
reservoir into the
back of the robot.
(Do not remove
the dust bin.)
• BOTH sides of the
reservoir should
CLICK when it
slides into place
completely.
• The water droplet
icon ( ) will
illuminate when
reservoir is
properly inserted.
•
Your robot is
ready to
simultaneously
vacuum and mop
your hard floors.
• Slide out the fluid reservoir.
• Pour out the cleaning solution or water.
• Remove the pad and
follow the care
instructions on the
back of the pad.
POWER
FOR BEST RESULTS, USE
SHARK® VAC
MOP
FLOOR CLEANER.


