ventilAtion • ventilAtion • BelÜftunG • AerAzione • ventilAcion
1
2
46
Page 1: ...SPEED R SPEED R V01 221111 ...
Page 2: ...e p 6 9 Advice for use p 10 11 Chin strap p 12 15 Visor Sunshield p 16 27 Textile parts p 28 35 Cleaning p 36 37 Easy Fit p 38 39 Sharktooth p 40 41 Mask p 42 43 Chin cover p 44 Ventilation p 45 47 Warranty p 48 53 Legal information p 54 55 Anatomie des Helmes p 3 Ein Helm in Ihrer Größe p 6 9 Ratschläge zum Gebrauch p 10 11 Kinnriemen p 12 15 Visier Sonnenblende p 16 27 Innenfutter p 28 35 Reinig...
Page 3: ...on 4 Low ventilation 5 spoiler 6 Handle sunshield 7 Breath guard 8 Back plate 1Visier 2 Sonnenblende 3 Obere Belüftung 4 Kinnbelüftung 5 Spoiler 6Taste sonnenblende 7 Breath guard 8 Emblem 1 Visiera 2 Parasole 3 Ventilazione superiore 4 Ventilazione Mentoniera 5 Spoiler 6 Levetta parasole 7 Paranaso 8 Defletiole 1 Pantalla 2Visor solar 3Ventilación superior 4 Frontal ventilación 5 Spoiler 6 Palanc...
Page 4: ...t Just because you are wearing a helmet does not mean you should neglect driving carefully Standard This SHARK SPEED R helmet has been approved and conforms to the ECE R 22 05 standard It therefore meets the requi rements imposed on all the countries that recognise this standard in their territory and for racing Warning for French traffic the Highway Code requires safety reflectors supplied separa...
Page 5: ...izzare caschi omologati solamente ECE ma solo caschi omologati anche DOT FMVSS 218 Muchas gracias por haber elegido un SPEED R El SPEED R es un casco de calidad perfectamenteadaptadoparausosobre circuito ElSPEED Rcontienetodalaexperiencia de SHARK en el campo de la seguridad ha sido diseñado exclusivamente para ser utilizado en vehículos motorizados de dos ruedas De acuerdo con las normas internac...
Page 6: ... est à la limite de sortir il est soit trop grand soit la jugulaire n est pas bien serrée Renouveler l essai jusqu à trouver la taille idéale Attention même pour un parcours très court ne prêtez pas votre casque si la taille n est pas parfaitement adaptée Il est absolument indispensable que lors de toute utilisation votre casque soit bien posi tionné page 12 15 Vérifiez que la tension de la jugula...
Page 7: ...ßband indem sie es ungefähr 2 cm über den Augenbrauen positionieren An dieser Stelle ist Ihr Kopfumfang am größ ten Vergleichen Sie das Messergebnis mit der Größentabelle Probieren Sie die SPEED R aus diedemMessergebnisamnächstenliegt Begin nenSieIhreTestsmitderunterenGrößefürIhren Kopfumfang Wenn Sie einen zu harten Druck spüren versuchen Sie die nächste Größe Ihr Kopf muss recht fest gehalten we...
Page 8: ...in dieser Bedienungsanleitung richtig angepasst wurde siehe Seite 12 15 Un casco su misura Affinché il casco possa garantire una protezione efficace pur rimanendo confortevole è necessario adattarlo perfettamente al proprio utente È essenziale scegliere la misura corretta Misurare la circonferenza della propria testa utilizzando un metro a nastro posizionato a circa 2 cm sopra le soppraciglia punt...
Page 9: ...rticular Verifique que con la correa apretada el casco no pueda descalzarse de su cabeza al intentar hacerlo bascular con las manos forzando hacia adelante Si el casco se sale o está al límite de salirse bien es demasiado grande o que la cor rea no está bien apretada Haga otras pruebas hasta encontrar la talla ideal Atención incluso para un recorrido muy corto no use su casco si la talla no está p...
Page 10: ...humbs so that they are properly positioned Position the protective parts of the chin strap buckle correctly and fasten it in accordance with the recommendations that are appropriate to the versions and country see page 12 15 Check that the tension and therefore the posi tioning of the helmet are correct for all positions 2 REMOVING THE HELMET Release the chin strap hold the two sections slightly a...
Page 11: ...ne ottimale 2 Togliere il casco Slacciare il cinturino spostare leggermente ogni lato afferrare il casco procedendo come quando è stato indossato quindi toglierlo Consejos de utilización 1 PONERSE EL CASCO Una vez abierta la hebilla de la cor rea para ponérselo debe coger el casco a nivel de las fijaciones de las correas y separar ligeramente hacia el exterior cada uno de sus lados para facilitar ...
Page 12: ...fall Never apply lubricating or acid products or grease or solvents to the chin strap buckle parts Kinnriemen Der Kinnriemen muss unter dem Kinn richtig geschlossen sein um sicher zu gehen dass der Helm einen festen Halt hat ohne am Hals zu drücken Achtung Nie mit dem nicht anges chnallten oder unzureichend gespann ten Kinnriemen fahren Auch wenn die Innenverkleidung Ihnen ein Gefühl des Halts ver...
Page 13: ...ar un cierre del casco sin causar molestias ni dolor Atención no circular nunca con la cor rea sin cerrar o insuficientemente tensa Incluso si el revestimiento interior le procura una sensación de sujeción su casco puede salirse en caso de caída No aplicar nunca un producto lubricante o ácido ni grasa o disolvente en los elementos de la hebilla de la correa 13 ...
Page 14: ...imbottitura si trovi tra il cinturino ed il vostro collo Pasar el extremo largo de la correa yugular por dentro de las dos anillas cui dando de colcar bien la protección entre la correa y el cuello Faire revenir le bout de la jugu laire en passant entre les deux anneaux comme indiqué sur le schéma Then bring the end of the chin strap back through the two rings as shown on the diagram Schlingen Sie...
Page 15: ...vitare problemi respiratori Tirar del extremo de la correa hasta notar resistencia y una cierta presión de la correa sobre la garganta sin apretar demasiado pues afectaría la respiración Bien clipser la pression de la partie libre de la jugulaire pour éviter qu elle ne claque ou se détache en roulant Remember to fasten the press stud on the unattached end of the chin strap to prevent it flapping o...
Page 16: ...ische Klasse 1 und hohem Sicherheitsni veau präsentieren können Die Außenseite wurde mit einer kratzfesten Schicht behandelt um die Lebensdauer Ihres Visiers zu verlängern Die Innenseite profitiert von einer exklusiven Antibeschlag Schicht Für ein Höchstmaß an Effizienz ist sie reaktivierbar Es wird empfohlen Ihr Visier regelmäßig zu pfle gen VISIERA La visiera del vostro casco SPEED R é il risul ...
Page 17: ...omme dans le cercle de l écran B 1 Partially open the visor in intermediate position A in order to align the visor lock 1 between the visor rotation axis 2 and the under plate screw 3 as in detail B 1 Öffnen Sie das Visier ein wenig in die mittlere Position A so dass sich die Schraube für die Basisplatte in einer Linie mit der Einfassung des Visiers befindet 1 Porre la visiera in posizione interme...
Page 18: ...nt Les galets se dégagent de leur gorge 2 Rotate the visor locks a quarter turn toward the front of the helmet The lock cams rolls are then released from there grooves 2 Die Visiersicherungen etwa eine viertel Umdrehung in Pfeilrichtung drehen Die Arretierungen löst sich und die Sicherung läuft frei 2 Fare ruotare di un quarto di giro la leva di blocco sblocco in avanti I meccanismi escono dalla s...
Page 19: ...til clipping 1 Das Visier mit der Öffnung auf den Dre hpunkt schieben bis es einrastet 1 Posizionare la visiera nell apposito asse e spingerla indietro fino all arresto 1 Posicionar la pantalla en los alojamientos de rotación y empujarla hacia atrás hasta su enganche 1 2 Positionner l écran en position intermédiaire 2 Adjust the visor in intermediate position 2 Das Visier in Mittelstellung bringen...
Page 20: ... gegen das Visier drücken und dabei um eine viertel Umdre hung in Pfeilrichtung drehen NICHT MIT GEWALT ÜBERPRÜFEN SIE OB DAS VISIER RICHTIG SITZT BEVOR SIE DEN HELM BENUTZEN 3 Esercitare una pressione sul meccanismo di blocco sblocco ed effettuare un quarto di giro verso la parte posteriore del casco per ritornare alla posizione iniziale Ripetere l operazione sull altro lato Non forzare mai Verif...
Page 21: ...sor But we ÉCRAN VISOR VISIERS VISIERA PANT ALL A recommend you to contact your retailer to make this operation Warning Foryoursafety donotridewithavisor that does not guarantee you a perfect visibility Warning If your visor after a period of use does not guarantee you an excellent visibility it is absolutely necessary to change it 1 Regulierung der Reibungsstärke Mithilfe des Schlüssels Nr 6 von ...
Page 22: ...e supplied in your tear off kit Assemble The supports are mounted on ec ÉCRAN VISOR VISIERS VISIERA PANT ALL A ziosamente in fabbrica Non è consigliabile di modificare queste impostazioni tuttavia il sis tema di rotazione brevettato SHARK rende pos sibile regolare la visiera Ma vi raccomandiamo di rivolgersi al proprio rivenditore per farlo Attenzione Per motivi di sicurezza non condurre mai con u...
Page 23: ...i La visiera del SPEED R è predisposta per rice vere i supprti dei ter off Per installarli è neces sario perforare con un utensile appuntito o con la vite autoperforante la plastica in maniera da poter alloggiare la testa della vite del supporto del tear off I supporti dei tear of e le viti sono forniti con il vostro kit di tear off Montaggi i supporti sono montati su supporti predisposti fateli r...
Page 24: ...with an Inte gral sun shield with external controls Warning this sun shield can be used only in bright glare and when you are not riding in an area in which you risk having a sudden change in visibility a tunnel for example In all situa tions of reduced visibility at the beginning or end of the day at night when it is raining or foggy etc the sun shield must be kept in the high position so that yo...
Page 25: ...utile la superficie esterna del parasole del casco SPEED R è stata sottoposta a tratta mento antigraffi Per la relativa manutenzione e pulizia attenersi a quanto indicato per la pulizia della visiera esterna Attenzione qualora la visiera e o il parasole dopo un certo tempo d utilizzo non garantisca no più una visibilità eccellente è assolutamente necessario sostituirla o Vi consigliamo di verifi c...
Page 26: ...ttleren Befestigungsstift mithilfe eines Schraubenziehers oder irgend A B C pare soleil Sun shield SONNENBLENDE parasole EL PARA SOL einem spitzen Gegenstand Abb A Ziehen Sie die Sonnenblende vorsichtig nach unten Abb B Nehmen Sie die Sonnenblende seitlich heraus Abb C Rimozione Abbassare il parasole Premere il nasello di fissaggio centrale con un cacciavite o una qualsiasi punta Fig A Tirare il p...
Page 27: ...ion Befestigen Sie die Sonnenblende seitlich auf der einen und dann auf der anderen Seite Abb A B Drücken Sie mit einem Schraubenzieher oder einem spitzen Gegenstand auf den zen tralen Befestigungsstift und befestigen Sie die Sonnenblende wieder indem Sie sie leicht anheben Rimontaggio Eseguire cronologicamente l operazione in senso inverso Abbassare il pulsante di manipolazione Agganciare il para...
Page 28: ...ctorily We treat surfaces to limit the risk of mould and bacteria Warning although they are selected for their quality of resistance and satisfactory wear all the interior padding is subject to normal wear depending on use and care and maintenance the length of use and also the degree of acidity of your perspiration If you note any wear we advise you to replace the interior padding in order to kee...
Page 29: ...dei cuscinetti per le guance con spessori e densità diversi nel caso in cui la selezione standard non soddisfi la morfologia del vostro viso Los textiles Los textiles y espumas de confort del SPEED R le permitirán apreciar lo mejor posible las prestaciones de su casco Las partes en contacto con la piel están reali zadas en un tejido que le garantiza un agra dable contacto y una buena absorción de ...
Page 30: ...ponding chapter 2 Cheeks lateral pad unclip the chin cover starting by the upper part of the cheek A Take off the plastic part from the set B Free the cheek pad by sliding it along the chin strap 3 Inner lining at the front unclip the forehead support by pulling towards the rear At the rear free the rigid plastic part which is stuck between the shell and the polystyrene by pressing towards the out...
Page 31: ...razione all in dietro Nella parte posteriore sfilare la parte plastificata rigida inserita tra la calotta e il polis tirolo esercitando una pressione verso l esterno del casco Potete dunque estrarre la calotta DESMONTAJE 1 Almohadilla del cuello quitar la tapa del mentón ver capítulo correspondiente 2 Las mejilleras almohadillas laterales Abra la tapa de barbilla comenzando por la parte superior d...
Page 32: ...Textiles Textile parts TEXTILIEN TESUTI Los textiles MISE EN PLACE Installation EINBAU Italien à traduire MONTAJE 1 2 3 32 ...
Page 33: ...n ding chapter IMPORTANT check that the chin straps are not folded under the cheek pads EINBAU 1 Innenpolster Stecken Sie den vorderen Teil vorne in die dafür vorgesehene Aussparung Die Druckknöpfe müssen sorgfältig geschlossen werden Stecken Sie die Mitte des Plastikteils so weit wie möglich hinten zwischen Außenschale und EPS Innenschale 2 Wangen Seitenpolster Stecken Sie den Kinnriemen in die M...
Page 34: ...Textiles Textile parts TEXTILIEN TESUTI Los textiles MISE EN PLACE Installation EINBAU Montaggio MONTAJE 1 2 3 34 ...
Page 35: ...entre la calotay el poliestireno 2 Las mejilleras almohadillas laterales Ponga las correas en la parte central de almo hadillas clip de las almohadillas Inserte en la medida de lo posible la parte rígida central entre la calota y el poliestireno Cuidado No dañe el poliestireno 3 A continuación ponga el cubre menton véase en el capítulo correspondiente IMPORTANTE compruebe que las correas no se dob...
Page 36: ... that all interior parts are perfectly dry before using the helmet Reinigung des Innenraums Die inneren Stoffteile sind waschbar Um sie nicht zu beschädigen ist es wichtig genau die nachstehenden Hinweise zu befolgen Die Wangenpolster und das Oberkopf Polster müssen mit der Hand mit lauwarmem Sei fenwasser ungefähr 30 gewaschen werden Keine aggressiven Reinigungsmittel verwen den sondern entweder ...
Page 37: ...ómulos y la cofia deben lavarse a mano con agua jabonosa templada 30 aproximadamente No utilizar productos detergentes agresivos Utilizar bien un detergente para textil delicado y a dosis reducidas o bien un jabón de Marsella Es indispensable dejar secar completamente los textiles y espumas antes de su utilización Dicho secado debe efectuarse a temperatura ambiente No planchar nunca los elementos ...
Page 38: ...igned to provide additional comfort for eyeglasses wea rers with the SHARK EASY FIT The 2 cheeks are made with inserted comfort foam that can be removed to provide the pas sage to the glasses arms These pockets may contain or not specific comfort foam The SPEED R is delivered without this foam to faci litate the insertion of the branches of glasses If you do not wear glasses and if you wish to hav...
Page 39: ... a livello delle tempie potete inserire all interno delle tasche del sistema Easy FIT la gommapiuma fornita nel sacchetto contenente il manuale d uso del casco Per montare o togliere questa gommapiuma seguite le istruzioni spiegate nelle foto foto A B C Utilizzare o meno della gommapiuma di confort EASY FIT non ha alcuna influenza sulle performance del vostro casco a livello di protezione EASY FIT...
Page 40: ...SHARK SPEED R is desig ned to be equipped with audio system SHARKTOOTH This very efficient com munication system can be mounted in the SPEED R very easily while main taining the good safety performances of your helmet well within the limits of the valid standards WARNING SHARK disclaims all liability in case of adaptation into the SPEED R of a communication system other than the SHARKTOOTH Automat...
Page 41: ... in caso di uso nel SPEED R di un sistema di comunicazione dif ferente dallo SHARKTOOTH Il vostro rivenditore SHARK puo darvi tutte le informazioni ed i consigli tecnici Sharktooth Pre instalación de equipo de audio El casco SHARK SPEED R está diseñado para ser equipado con el sistema de audio Sharktooth Este sistema muy efi caz de comunicación puede ser mon tado muy fácilmente en el SPEED R y le ...
Page 42: ...the 3 pins of box support of the helmet into the oblong holes of the mask To lock it slide the small mask it following the arrow direction see photo Kleiner Atemabweiser Sommer Ausbau Schieben Sie den Atemabweiser zur anderen Seite und entfernen Sie die Pins Einbau Der Atemabweiser ist am Helm durch ein Bayonett System befestigt Stecken Sie die 3 Pins aus der mitgelieferten Box in die längli chen ...
Page 43: ...cherina Máscara pequeña de verano Extracción Realizar un movimiento en el sen tido inverso del montaje para extraer la máscara de su alojamiento Instalación La máscara pequeña se fija por un sistema de bayoneta Insertar las tres piezas del soporte en las ranu ras de la máscara Ejercer un movimiento siguiendo la dirección de la flecha che ver foto para bloquear la máscara 43 ...
Page 44: ... by the threa ding of the rigid support between the shell and the chin polystyrene Ihr Speed R wurde mit einem Kinns chutz ausgestattet welcher den Lärm reduziert und Sie vor Windturbulenzen und Kälte schützt Il vostro SPEED R é equipaggiato di un sottogola che vi isolerà al meglio dal rumore dalle turbolenze dell aerodinamica e dal freddo Questo sottogola si fissa uni camente infilando il support...
Page 45: ... in open or closed position by sliding the cursor from side to side See photo Oberekopfbelüftung Dieser Luf teinlass wird durch verschieben des Reglers geöffnet oder geschlossen siehe Foto Aerazioni superiori L entrata d aria frontale si regola in posizione aperta o chiusa spostando il cursore lateralmente vedere foto Ventilaciones superiores Esta entrada de aire frontal se régula en po sición abi...
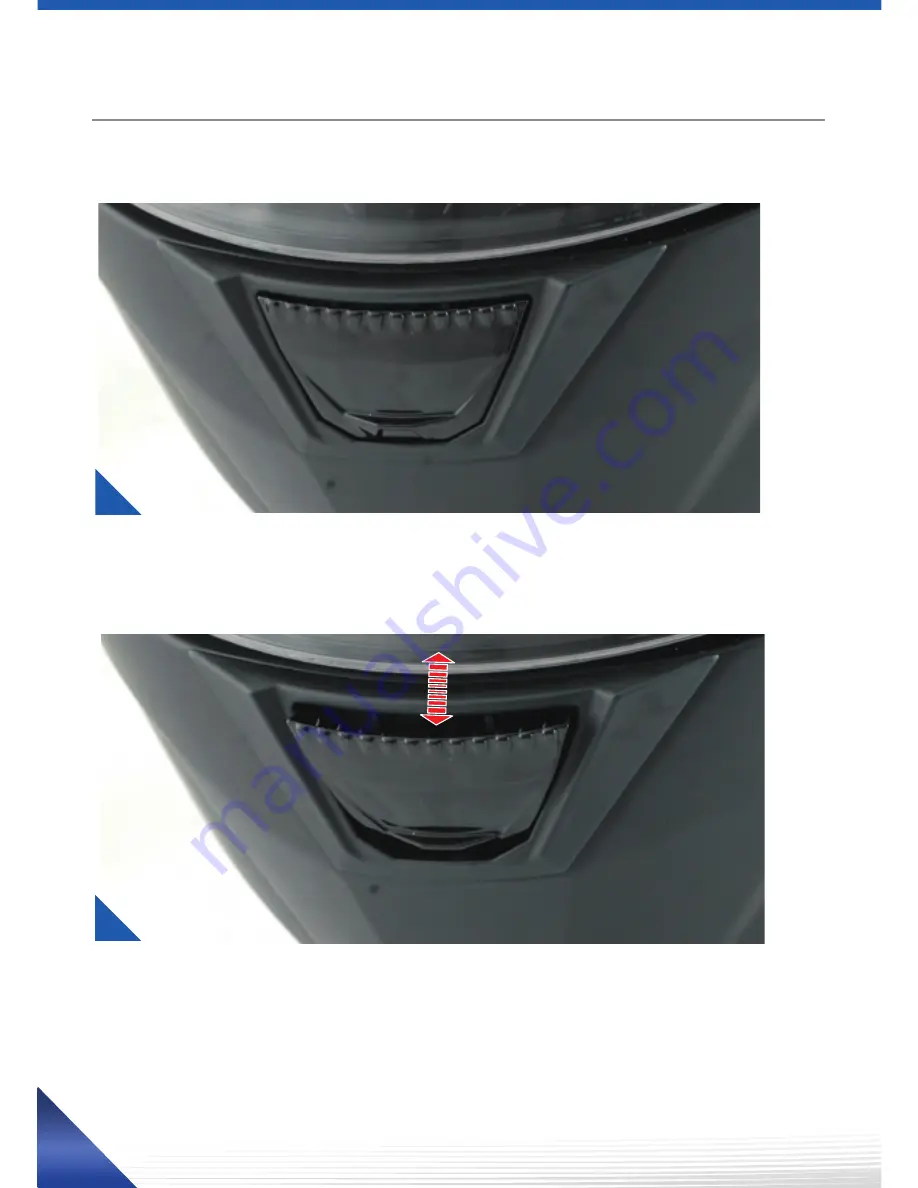
Page 46: ...VENTILATION Ventilation BELÜFTUNG AERAZIONE VENTILACION 1 2 46 ...
Page 47: ...tionen Sie erlaubt einen Luftfluss über die Innenseite des Visiers um die Gefahr des Bes chlagens zu verringern Mit offener Klappe besteht diese Funktion permanent Sie erlaubt außerdem ein Eindringen der Luft um die Belüftung Ihres Gesichts zu optimie ren Aerazione mentoniera 2 funzioni permette di garantire un flusso d aria sulla su perficie interna della visiera al fine di limitare i rischi di a...
Page 48: ...e défauts cou verts par la garantie toutes les conséquences subjectives dues à l utilisation problèmes de confort de taille de bruits ou sifflements d aérodynamique etc SHARK ne peut être tenu responsable de l indisponibilité temporaire qu en gendre la mise à niveau du casque afin de satisfaire son propriétaire Dans tous les cas 5 ans est la période maximum de garantie le remplacement d un quelcon...
Page 49: ...o ultra violet light in particular for the decorative colours In addi tion SHARK cannot consider subjective considerations related to use of the helmet as defects covered by the warranty problems with comfort size noise or whist ling aerodynamics etc SHARK cannot be held liable for the temporary non availability of the helmet while it is being enhanced to satisfy the needs of its owner In all case...
Page 50: ... wird SHARK dem Käufer zu vorteilhaften Bedingungen entweder einen neuen Helm oder sollte dieser nicht mehr lieferbar sein ein in Preis und Optik gleichwertiges Modell zur Verfügung stellen Sollte ein gleichwertiges Modell nicht lieferbar sein ist der Käu fer zum Rücktritt vom Vertrag berechtigt SHARK ist nicht verpflichtet einen Ersatzhelm für den Zeitraum der Bearbeitung eines Garantiefalls unen...
Page 51: ...s sottacqua assenza di manutenzione o cura 5 Invecchiamento dovuto al normale utilizzo dei tessuti e delle imbottiture interne l aspetto delle parti esterne o della visiera graffi segni ecc 6 Esposizione prolungata ed anormale a luci ultra vio lette in particolare per i colori della decorazione Inoltre Shark non può coprire con il suo servizio di garanzia eventuali problemi riguardanti considerazi...
Page 52: ...uier daño causado por 1 Una caída o accidente tanto durante su uso condu ciendo el vehículo como por golpes o arañazos sufri dos por el casco cuando sea transportado depositado o guardado por el usuario 2 Una alteración o modificación del casco hecha por el usuario o un tercero Incorporación modificación o elimi nación de elementos originales del casco o aplicación o añadido al mismo de pegamento ...
Page 53: ...rvas SHARK se reserva el derecho de llevar a cabo traba jos dentro del periodo de garantía utilizando piezas de repuesto de las versiones más recientes compatibles con el modelo en cuestión y no puede garantizar la perfecta armonía de la pintura o elementos decorati vos asociados con elementos de producción específica o ediciones limitadas Además el deterioro natural de los colores después de un p...
Page 54: ...t be used at night or in poor visibility conditions Rechtliche Hinweise Dieser Helm wurde speziell für den Gebrauch durch Motorrad fahrer entwickelt Dieser Helm unterliegt keiner technischen Änderung Um ein Mindestmaß an Sicher heit zu gewährleisten muss dieser Helm entsprechend eingestellt und dann getragen wer den Jeder Helm muss nach jeder stärkeren Kraf taufnahme Unfall unbedingt ersetzt werde...
Page 55: ...ustituido Atención No aplicar pinturas adhesivos gaso linas ni disolventes sobre el casco Sólo pueden montarse en este casco las pantallas homologa das 050154 y comercializadas bajo la marca SHARK VZ100 Esta pantalla está fabricada en poli carbonato inyectado Para conservar su excelente calidad óptica y evitar los problemas por abrasión no utilizar en su limpieza productos a base de alco hol disol...
Page 56: ...ssern Die in diesem Dokument enthaltenen Bilder sind der alleinige Besitz von SHARK Jede Vervielfältigung ist untersagt Il presente manuale d istruzioni non è un documento contrattuale SHARK si riserva il diritto di ottimizzare la qualità della produzione Le immagini riportate nel presente documento sono di proprietà esclusiva di SHARK Ripro duzione vietata Este manual de uso no es un documento co...