ShareTech HiGuard V Quick Installation Manual Download Page 3

English QIG (Quick Install Guide)


I. Hardware Installation (HiGuard X and V)
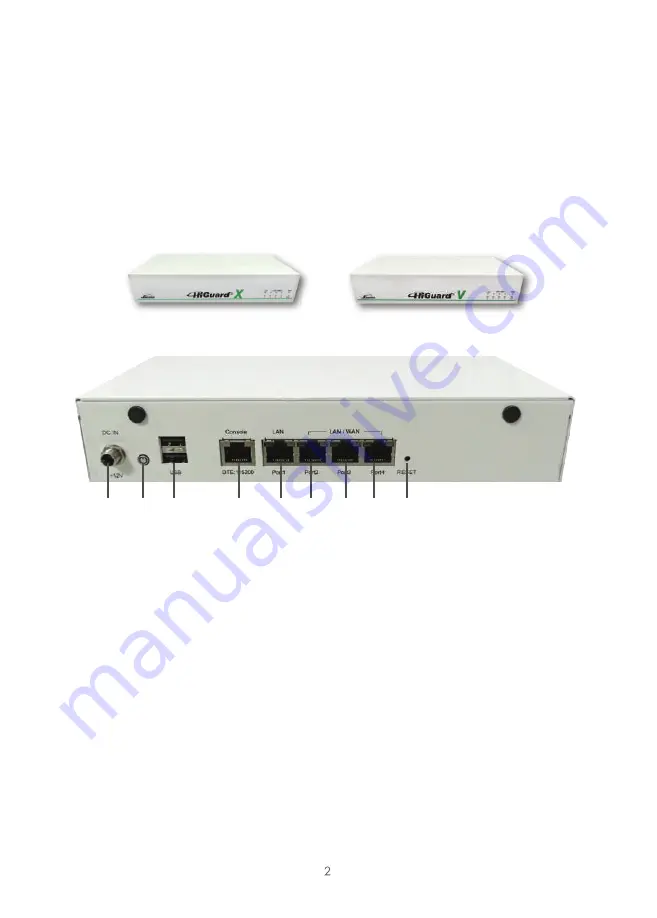
1. Appearance 

    Front panel

1. Power Connection
2. Power Button
3. USB ports

4. Console Port  
5. LAN port
6. Port 2 

(Custom port)

7. Port 3 

(Custom port)

8. Port 4 

(Custom port) 

9. RESET

100-240V AC, 50-60Hz adapter 
In red color when power off; in blue color when power on.
USB 2.0 performs an instant recovery using USB sticks during 
system suspend. Wireless 3G, 4G/LTE are supported to offer 
uninterrupted WAN connectivity.  
For inspecting settings remotely.
Gigabit Ethernet LAN port that connects to the intranet
Gigabit Ethernet WAN/LAN-PHY Flexible Interface
Using a pointed object, press the button on the steadily for 15 
seconds and then release it. 

HiGuard X

Rear panel 

HiGuard V

Interfaces

1

2

3

4

5

6

7

8

9

Summary of Contents for HiGuard V

Page 1: ...QUICK INSTALLATION GUIDE X V...

Page 2: ...Index English QIG Quick Installation Guide I Hardware Installation 1 Appearance 2 Deployment II System Setting Easy system configuration steps 1 2 2 2 2 3 4 4 10 10 10 11 12 12...

Page 3: ...0 performs an instant recovery using USB sticks during system suspend Wireless 3G 4G L TE are supported to offer uninterrupted WAN connectivity For inspecting settings remotely Gigabit Ethernet LAN p...

Page 4: ...Connect LAN RJ45 and Cat 5e to the device LAN Ethernet Port Configure a LAN with DHCP and you ll obtain 192 168 1 x 24 IP segment automatically After getting the IP ping 192 168 1 1 to ensure network...

Page 5: ...wser Setup Wizard https 192 168 1 1 Acct PW admin admin Select a preferred language Setup LAN Setup WAN URL Blacklist Security Setting Mail Management available in HiGuard X II System Setting Easy sys...

Page 6: ...2 168 1 1 in the address bar 1 2 Enter login Account Password Chrome will pop up for authentication please enter admin account admin password to log in And select a preferred language for interf aces...

Page 7: ...ill automatically pop up to guide you through the configuration NOTE A step by step wizard will wipe all your data and settings before saving new settings 2 1 Setup LAN Please enter your IP address an...

Page 8: ...igure WAN setting The default gateway is 255 255 255 0 DHCP A connection method that IP address is assigned by a router switch in the perimeter IP address subnet mask and default gateway are not requi...

Page 9: ...default Administrators can enable the function select match level enter blacklisted URL or IP or select default categories 2 4 Setup Security Settings Security settings are switched on by default Admi...

Page 10: ...re switched on by default Administrators can choose manually to switch off if it is not required 2 6 Setup Completed T o save your configuration settings click the Save button in the lower right corne...

Page 11: ...1 2 3 USB 4 Console 5 LAN 6 Port 2 7 Port 3 8 Port 4 9 RESET 100 240V AC 50 60Hz USB 3G 4G USB WAN LAN WAN LAN WAN LAN 15 1 2 3 4 5 6 7 8 9 HiGuard X HiGuard V...

Page 12: ...2 RJ45 Cat 5e LAN DHCP 192 168 1 x 24 IP IP Ping 192 168 1 1...

Page 13: ...STEP 1 STEP 2 IP 192 168 1 1 admin admin LAN WAN URL HiGuard X...

Page 14: ...STEP 1 Chrome 1 1 Chrome https 192 168 1 1 1 2 Chrome admin admin...

Page 15: ...1 3 2 1 LAN IP STEP2...

Page 16: ...2 2 WAN WAN STATIC IP 255 255 255 0 DHCP IP PPPOE IP IP STATIC...

Page 17: ...2 3 URL URL IP 2 4 IP...

Page 18: ...2 5 HiGuard X 2 6 120...

Reviews: