background image


2. USER INTERFACE 

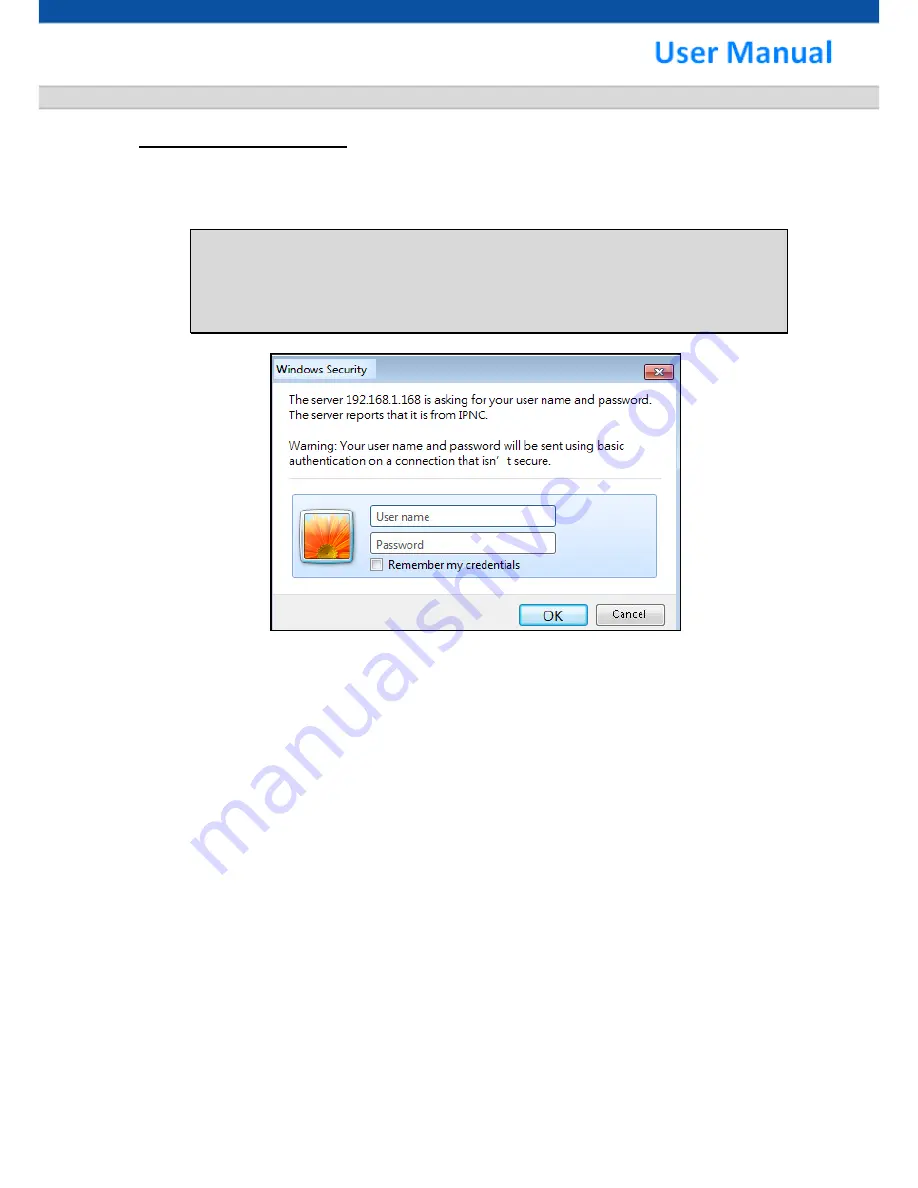
2.1 Login 


1.


Start the browser, and input 

http://192.168.1.168/

 in the address field, then press 

Enter

.   

NOTE: 

It is strongly suggested that the user browse with Internet Explorer. Browsers other than 
Internet Explorer are NOT fully supported when the manual published, hence, the 
manufacturer WILL NOT BE LIABLE FOR ANY LOSS OR DAMAGE CAUSED. 


2. 

Enter 

User Name


and 

Password


In the prompt window, and click 

OK

.


The default User Name and Password is 

admin


and 

9999

. You will need to enter the account 

and password every time whenever you restart the application or reconnect.


Summary of Contents for SNC-WD2312DN

Page 1: ...IP Camera Setting Manual Thanks for purchasing our product Before operating the unit please read the instructions carefully and keep this manual for future reference...

Page 2: ...sun Direct sunlight or severe ray may cause fatal damage to sensor and internal circuit 6 Power Cord Protection Touching the wet power cord with hands or touching the power cord with wet hands may res...

Page 3: ...ormal heat 13 Servicing Do not attempt to repair this unit yourself as opening or removing covers may expose you to dangerous voltage or other hazards Refer all servicing to qualified service personne...

Page 4: ...1 INSTALLATION 1 1 2 DIRECT LINK 2 1 3 LINK VIA HUB POE HUB 2 2 USER INTERFACE 3 2 1 LOGIN 3 2 2 INTERFACE OVERVIEW 4 1 Live View 5 2 Video 6 3 Image 9 4 Audio 15 5 DateTime 16 6 Network 17 7 Alarm 21...

Page 5: ...he Power Adapter Connect the RJ 45 LAN cable to the IP CAM PoE IP setting for PC NB Please see the suggested IP address Disable the anti virus software and firewall Turn on the PC NB and log in Window...

Page 6: ...ready the main page setting window of IP CAM will show on 1 3 Link via Hub PoE Hub Applied only to models with PoE function Make sure PC installed with JAVA Version 6 Update 30 or above 1 Run the IE...

Page 7: ...r Browsers other than Internet Explorer are NOT fully supported when the manual published hence the manufacturer WILL NOT BE LIABLE FOR ANY LOSS OR DAMAGE CAUSED 2 Enter User Name and Password In the...

Page 8: ...ction pages The functions each page performs are listed in the table below More information will be given in the following sections Whenever the adjustment completed click Submit to save the settings...

Page 9: ...may vary by region Full Screen Zoom in Upload File Function enabled when SD card is inserted Snapshot Zoom out Start Record Default Size Stop Record Alarm Status Disable Audio Enable Audio Motion Sta...

Page 10: ...080P Suggested Frame rate 30 25 20 15 10 5 3 1 NTSC 25 20 15 12 10 5 3 1 PAL Bitrate 4000 Default adjustable Rate Control VBR CBR OFF Stream2 Video Streams Dual Resolution H264 QVGA VGA D1 MPEG4 QVGA...

Page 11: ...play and enter the desired texts accordingly Text Position Top Left Top Right Stream2 OSD Date Time Check the box to enable Date Time display Text Check the box to enable Text display and enter the de...

Page 12: ...ting page to enable Privacy Mask 2 Press Add button to add the blue rectangle max 16 and enable the display accordingly 3 Adjust the Zone Position of the selected Mask by using the direction keys 4 Ad...

Page 13: ...c Back Light Lens Exposure Day Night ROI and Advanced settings Basic TV System System Type NTSC PAL Local Display NTSC PAL Off Color Setting Saturation 0 20 Sharpness 0 10 Black Level 0 20 Gamma 0 45...

Page 14: ...st the settings from the drop down list accordingly Off Disable Back Light Handle function D WDR D WDR Level Off Low Middle High WDR WDR Weight Low Middle High HLC HLC Level 0 20 HLC Mode All Day Nigh...

Page 15: ...11 Lens Lens Setting Lens Mode Auto Iris Manual Lens Speed 0 20 Auto Iris Lens Mode Show Focus Det On Off LSC On Off LSC Weight 0 100 LSC On Digital Zoom Setting Digital Zoom 1 8X...

Page 16: ...1000 1 2000 1 4000 1 8000 1 16000 Second NTSC 1 25 1 50 1 100 1 240 1 500 1 1000 1 2000 1 4000 1 8000 1 16000 1 30000 Second PAL Auto Shutter Max 1 60 1 120 1 240 1 500 1 1000 1 2000 1 4000 1 8000 1...

Page 17: ...els w o IR Mode Color Black White Auto External IR Optimizer 0 20 AGC Thres 0 20 Auto Mode AGC Margin 0 20 Auto Mode Night Output Low High Delay Low Middle High Night Input Low High External Mode Trig...

Page 18: ...e On Off Defog Mode Auto Manual Defog Handle On Defog Level Low Middle High Defog Handle On White Balance WB Mode AWB ATW Push Lock Manual Push Lock Lock Push Lock Mode and press the button Color Temp...

Page 19: ...udio Modify the settings of audio Audio Enable Audio Check the box to enable Audio Mode MIC Speaker Both Audio Input Sample Rate 8Khz 64Kbps 16Khz 128Kbps Input Volume 0 100 Audio Output Output Volume...

Page 20: ...Date Format DD MM YYYY YYYY MM DD MM DD YYYY Time Format 12Hrs 24Hrs TimeZone GMT 12 GMT 12 Date Time Sync Set Manual Select Date and Time from the calendar and list accordingly Sync Current PC Synchr...

Page 21: ...work and IP address including Connection DDNS SMTP FTP and Advanced Network Connection Use DHCP Click to use DHCP Static IP Click to enter IP Address Mask Gateway DNS PPPoE Click to enter Account and...

Page 22: ...18 DDNS Enable DDNS Check to Enable DDNS and fill up all the necessary items accordingly SMTP SmtpAuth Check to enable SMTP Authentication and fill up all the necessary items accordingly...

Page 23: ...he necessary info for FTP settings accordingly Advanced RTSP Port Setting H264 Main Stream Enter the corresponding number H264 Sub Stream Enter the corresponding number MPEG4 Main Stream Enter the cor...

Page 24: ...corresponding number RTSP Over HTTP Enter the corresponding number RTSP Over TCP Enter the corresponding number Multicast Check to enable Multicast SNMP Setting SNMP Server Enter the corresponding add...

Page 25: ...PPORT Single MJPEG Check to enable Motion Ethernet Lost Check to enable Ethernet Lost DI1 MODE On Off DI1 Level Low High Alarm Action Upload via FTP Check to enable this action and select file format...

Page 26: ...22 Motion Detection Sensitivity System Defined Click to select System Defined Sensitivity Level Low Medium High Custom Click to select Custom Sensitivity Level Default 50...

Page 27: ...orage and files upload including Device Recording and Schedule Device SD Card Detect if there is any SD card mounted Usage Used space of the SD card Free Available space of the SD card SD Card Format...

Page 28: ...Storage Save and select the file format Recording Format H 264 MPEG4 Vary with Video Resolution settings Size 5 10 sec Auto Enabled after inserting SD card File path Select the File path to save the...

Page 29: ...camera 2A Version Display the 2A version of the camera Firmware Update Select the file path and press the Update button to proceed Operation IPCAM Restart Press the Restart button to reboot the camer...

Page 30: ...can type the text you want in the blank area and move the black rectangle in the right to decide the position where you want to put the text It supports for multi language Multicast Please input your...

Page 31: ...roup of Pictures Click Profile and GOP you can select Profile Type Profile Level and GOP of the Stream Select Profile Type to Base Main or High which means the stream compression quality Select Profil...

Page 32: ...nd you can drag the bar to set the QOS priority The number represents an ID of device Once you enable the QOS mode the packet priority will be arranged by the ID number you set Download JAVA CA To avo...

Page 33: ...hen press enter to run the CA certificate process 3 Wait until the process runs to 100 4 Completed Press any key to quit 2 Delete the CA certificate 1 Run the IP Camera CA certificate Tool and please...

Page 34: ...un the IP Camera CA certificate Tool and please make sure that JVE was updated to version 7 01 Press any key for continuing this process or press Ctrl C to quit this process 2 Press 3 and then press e...

Page 35: ...Name Password Change the login User Name and Password Authority Change the authority level of users User List User list of this IP camera Add Del User Add Delete the user System Log Log List Login li...

Page 36: ...Tour Recording Home Returning relevant functions shall be supported and usable for Speed Dome or Motorized Lens models here No function buttons will be shown or enabled if the camera does not have sup...

Page 37: ...115200 selectable Protocol Customize Pelco D Pelco P Adjust the speed of Zoom in out Adjust the speed of the camera s Pan Right Left movement Adjust the speed of the camera s Tilt Up Down movement PT...

Page 38: ...34 Customize Setting Stop Up Down Left Right Zoom in Zoom out Wide Tele SET Create and define commands...

Reviews: