background image

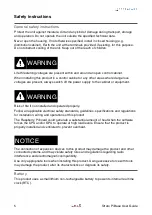
Worn-out or defective batteries can compromise the function of this product.

KEEP OUT OF REACH OF CHILDREN

. Swallowing may lead to serious injury or death in 

as little as 2 hours due to chemical burns and potential perforation of the esophagus. 
Immediately see doctor.

Replace the RTC lithium battery before it is completely discharged. Replace the battery 
every 5 years even if the battery is still working properly. The lithium battery must be 
replaced only with an identical 

CR1025

 Lithium / Manganese Dioxide (Li/MnO2) battery.

Do not throw lithium batteries into fire, do not solder on the cell body, do not recharge, do 
not open, do not short-circuit, do not reverse polarity, do not heat above 100°C and protect 
from direct sunlight, moisture and condensation.

Dispose of used batteries according to local regulations and the battery manufacturer's 
instructions.

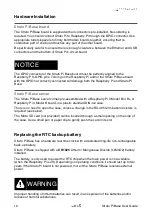
The RTC backup battery holder is soldered to the bottom layer of the circuit board, 
between the GPIO connectors. In the Strato Pi Base server, the battery is not accessible 
from the outside. You should first remove the case top body to gain access to the Strato Pi 
Base circuit board.

Before opening the Strato Pi Base case, disconnect all power sources, any connection to 
external devices, including USB cables.

Use a non-conductive pin or small tool to help extract the battery from its holder. Insert the 
new battery with a gentle push. You don't need tools to insert the battery. The battery is 
held into place by a spring contact.

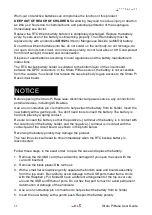
Be sure to insert the battery so that the positive (+) terminal of the battery is in contact with 
the outer body of the battery holder, and the negative (-) terminal is in contact with the 
contact pad of the circuit board, as shown in the photo below.

Reversing the battery polarity may damage the product.

The real time clock will reset its time immediately when the RTC backup battery is 
disconnected.

Follow these steps, in the exact order, to open the case and replace the battery:

1. Remove the microSD card (the card will be damaged if you open the case with the 

card still inserted)

2. Remove the black plastic DIN rail hook

3. With a small flat screwdriver gently separate the bottom case and boards assembly 

from the top cover. Be careful to avoid damage to the USB ports metal frame. Units 
with the Raspberry Pi 4 Model B have a different arrangement of the top cover cuts 
around the USB and Ethernet ports. Do not flex that part to much to avoid permanent 
deformation of damage of the enclosure

4. Use a non-conductive pin or small tool to help extract the battery from its holder

5. Insert the new battery with a gentle push. Respect the battery polarity

NOTICE

11

Strato Pi Base User Guide

Summary of Contents for SPBB30X

Page 1: ...Pi Base server with Raspberry Pi 3 Model B SPMB30XP Strato Pi Base server with Raspberry Pi 3 Model B SPMB30X41 Strato Pi Base server with Raspberry Pi 4 Model B 1GB SPMB30X42 Strato Pi Base server wi...

Page 2: ...pins 15 Software installation and configuration 16 Installing the Strato Pi utility on Raspbian 16 Installing the Strato Pi kernel module 16 Installing the Real Time Clock software 17 Testing the Real...

Page 3: ...1 Standards and regulations 31 Safety instructions 31 Set up 31 Conformity Information 32 EU 32 USA 32 CANADA 33 RCM AUSTRALIA NEW ZEALAND 33 Compliance information for Raspberry Pi 33 EU 33 USA 33 CA...

Page 4: ...ato is neither designed nor intended for use in critical military or aerospace applications or environments and for automotive applications or environment Customer acknowledges and agrees that any suc...

Page 5: ...oduct Hazard levels This manual contains information you must observe to ensure your personal safety and prevent damage to property Safety information in this manual are highlighted by the safety symb...

Page 6: ...led and operated properly Follow all applicable electrical safety standards guidelines specifications and regulations for installation wiring and operations of this product The Raspberry Pi board coul...

Page 7: ...battery must be replaced only with an identical battery See the Replacing the RTC backup battery section for instructions Do not throw lithium batteries into fire do not solder on the cell body do no...

Page 8: ...available as a bare board or fully assembled unit including a Raspberry Pi 3 Model B or B or Raspberry Pi 4 Model B in a standard DIN rail case The information contained in this manual covers all ver...

Page 9: ...ato Pi board fully independent from the Raspberry Pi controlled via the GPIO pins of the Raspberry Pi board integrated boot loader for the Strato Pi micro controller allowing in field firmware upgrade...

Page 10: ...ION DIAGRAM Device identification The device can be identified with the information provided in the rating and identification plate permanently attached to the side of the case EXAMPLE RATING AND IDEN...

Page 11: ...ith a Raspberry Pi 3 Model B or B or Raspberry Pi 4 Model B board in a plastic standard DIN rail case There is no need to open the case unless a change in the RS 485 termination resistors is required...

Page 12: ...devices including USB cables Use a non conductive pin or small tool to help extract the battery from its holder Insert the new battery with a gentle push You don t need tools to insert the battery Th...

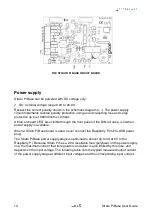
Page 13: ...OF RASPBERRY PI 4 MODEL B MODELS Terminal block Strato Pi Base has a 9 positions terminal block for power and serial connections The maximum conductor cross section is 1 5 mm2 16 AWG or 0 5 mm2 when u...

Page 14: ...rail case is lit when power supply is available When a Strato Pi Base board is used never connect the Raspberry Pi micro USB power plug The Strato Pi Base power supply stage is optimised to deliver up...

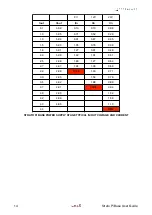
Page 15: ...0 5 05 0 71 0 52 0 28 1 3 5 04 0 91 0 67 0 35 1 5 5 03 1 05 0 76 0 39 1 8 5 01 1 27 0 91 0 46 2 0 5 00 1 42 1 01 0 51 2 5 4 98 1 80 1 27 0 64 2 7 4 97 1 94 1 38 0 68 2 8 4 96 FUSE 1 43 0 71 3 0 4 95...

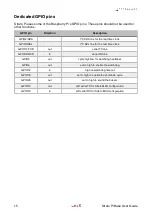
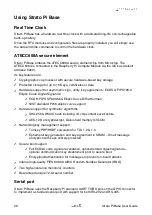
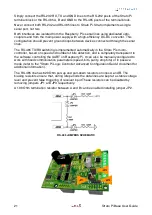
Page 16: ...al time clock GPIO14 TXD out serial TX line GPIO15 RXD in serial RX line GPIO5 out cycle high low for watchdog heartbeat GPIO6 out set to high to enable the watchdog GPIO12 in high on watchdog timeout...

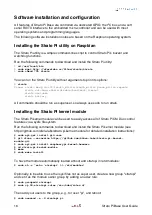
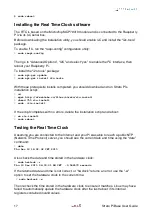
Page 17: ...trato battery All commands should be run as superuser so always use sudo to run strato Installing the Strato Pi kernel module The Strato Pi kernel module can be used to easily access all of Strato Pi...

Page 18: ...rtc install sudo rtc install If the script completes with no errors delete the installation script and reboot rm rtc install sudo reboot Testing the Real Time Clock Assuming you are connected to the...

Page 19: ...he Raspberry Pi If you have another Pi or Strato board try swapping them to isolate the faulty board Configuring the serial port On Raspberry Pi 3 and 4 the main UART ttyAMA0 is used by default for Bl...

Page 20: ...Linux serial console otherwise it will send console data to the serial port Disable the ttyAMA0 console service sudo systemctl disable serial getty ttyAMA0 service Edit the boot cmdline txt file and...

Page 21: ...Curve Diffie Hellman NIST standard P256 elliptic curve support Hardware support for symmetric algorithms SHA 256 HMAC hash including off chip context save restore AES 128 encrypt decrypt Galois field...

Page 22: ...controller based on speed and number of bits detection and is completely transparent to the software controlling the UART on Raspberry Pi It can also be manually configured to work with fixed communi...

Page 23: ...meters and control logic can be modified as described in the Strato Pi Logic Controller Advanced Configuration Guide document The watchdog is normally disabled To enable it set GPIO6 pin to high While...

Page 24: ...power cycle also affects the VSOUT auxiliary power supply output To initiate a delayed power off cycle sudo strato shutdown Advanced configuration The Strato Pi Base logic controller can be configured...

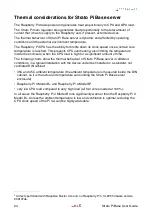
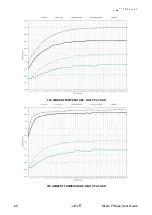
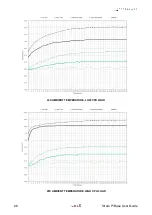
Page 25: ...ount of time The following charts show the thermal behaviour of Strato Pi Base server in different conditions in a typical installation with the device under test installed in a standard not ventilate...

Page 26: ...35C AMBIENT TEMPERATURE LOW CPU LOAD 35C AMBIENT TEMPERATURE HIGH CPU LOAD 25 Strato Pi Base User Guide...

Page 27: ...45C AMBIENT TEMPERATURE LOW CPU LOAD 45C AMBIENT TEMPERATURE HIGH CPU LOAD 26 Strato Pi Base User Guide...

Page 28: ...Block diagram STRATO PI BASE BLOCK DIAGRAM 27 Strato Pi Base User Guide...

Page 29: ...e Serial communication ports RS 485 Half Duplex with automatic data direction management RS 232 Full Duplex Baud Rates on COMM ports 1200 to 115200 ESD Protection Voltage on RS 232 TX RX 15kV human bo...

Page 30: ...ousing standard 4M for DIN rail Operating temperature 0 50 C Storage temperature 20 70 C Protection degree IP20 Weight 30 g Strato Pi Base board 150 g Strato Pi Base server 29 Strato Pi Base User Guid...

Page 31: ...Dimensions DIMENSIONS mm 30 Strato Pi Base User Guide...

Page 32: ...body to gain access to the Strato Pi Base circuit board Always remove the battery before disposing of this product Installation and use restrictions Standards and regulations The design and the setti...

Page 33: ...ate radio frequency energy and if not installed and used in accordance with the instructions may cause harmful interference to radio communications However there is no guarantee that interference will...

Page 34: ...4 53 EU USA Raspberry Pi 3 Model B FCC IDENTIFIER 2ABCB RPI32 Raspberry Pi 3 Model B FCC IDENTIFIER 2ABCB RPI3BP Raspberry Pi 4 Model B FCC IDENTIFIER 2ABCB RPI4B The antenna s used for this transmitt...

Page 35: ...it pas produire de brouillage et 2 l utilisateur de l appareil doit accepter tout brouillage radio lectrique subi m me si le brouillage est susceptible d en compromettre le fonctionnement 34 Strato Pi...

Page 36: ...Mouser Electronics Authorized Distributor Click to View Pricing Inventory Delivery Lifecycle Information Sfera Labs SPMB21X SPBB21X SPMB21XP SPBB30X SPMB30X42 SPMB30XP SPMB30X44 SPMB30X48...

Reviews: