background image

8

9

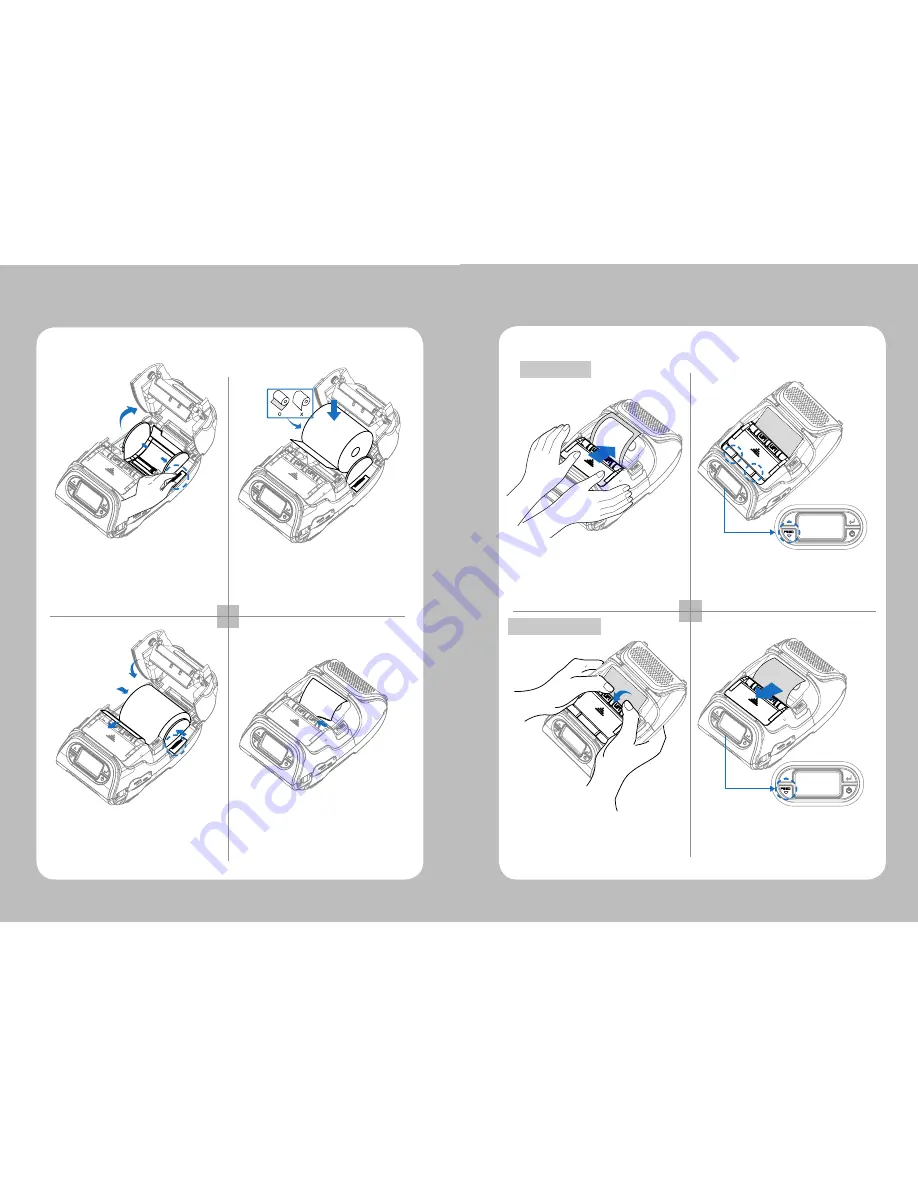
3-5. Stock Installation

1 2

3 4

Put the stock in so it unrolls from the 

bottom. Remove the stock core when 

it is empty. Pull a short length of stock 

out of the printer.

Press the Feed Key once to arrange 

the paper.

Open the Paper cover by pressing the 

Open button and set the width of paper 

guide by turning the knob with finger. 

Close the cover.

3-6. Peel Mode 

1 2

1 2

With a roll of stock installed, slide the 

peeler body towards the back of the 

printer.

Lift the peeler wing and slide the peeler 

body towards the front of the printer.

Press the feed button.

Press the feed button.

Peel Mode 

Non-Peel Mode 

Summary of Contents for LK-P12W

Page 1: ...cations are subject to change without notice USER S MANUAL MODEL LK P12W SEWOO TECH CO LTD 374 2 Gajang dong Osan si Gyeonggi do 447 210 Korea TEL 82 31 459 8200 FAX 82 31 459 8880 www miniprinter com Rev 01 07 12 ...

Page 2: ... Peel Mode 9 3 7 Diagnostic Test 11 4 Peripherals Connection 13 4 1 Wifi 802 11b g Connection 13 4 2 Interface Cable Connection 14 5 Printer Cleaning 15 5 1 PrintHead Cleaning 15 5 2 Platen Roller Cleaning 16 6 Pritner Specification 17 6 1 Specification 17 7 CPCL Command Compatibility 19 RISK OF EXPLOSION IF BATTERY IS REPLACED BY AN INCORRECT TYPE DISPOSE OF USED BATTERIES ACCORDING TO THE INSTRU...

Page 3: ... Printer Battery Recharger Optional Standard 2 Product overview CHARGER CONNECTOR COVER OPEN BUTTON Front Bottom CD USB Cable Quick Reference PEELER BODY PEELER WING BATTERY DOOR SERIAL USB DISPLAY Paper Serial cable ...

Page 4: ...y NOTE NOTE 3 1 Display 3 Setting Up the Product Remove the battery door Insert the battery as shown 1 2 Replace the battery door You must fully charge the battery when you receive the printer Batteries can be charged in the printer or in an optional external cradle 1 The battery status LEDs indicate amount of power remaining Actual run time remaining depends on factors such as the contents of out...

Page 5: ...he charge indicator LED located on the AC charger as shown shows red or green according to the status 3 3 Removing the Battery 3 4 1 The status of lamp in charging Status charging charging complete Charging Lamp Red Green Remove the battery door Lift out the battery LED If there is trouble while charging the battery the charge indicator LED blinks green Try unplugging and reconnecting charger char...

Page 6: ...range the paper Open the Paper cover by pressing the Open button and set the width of paper guide by turning the knob with finger Close the cover 3 6 Peel Mode 1 2 1 2 With a roll of stock installed slide the peeler body towards the back of the printer Lift the peeler wing and slide the peeler body towards the front of the printer Press the feed button Press the feed button Peel Mode Non Peel Mode...

Page 7: ...rmal paper 3 7 Diagnostic Test 1 2 3 NOTE Turn off the printer The information label prints Press and hold the feed button and power button 1 For Hex Dump mode do steps 1 2 then press the feed button 2 After printing ASCII pattern the diagnostic test is complete 3 If the feed button is not pressed to go to Hex Dump mode the printer exits diagnostics after three seconds ...

Page 8: ...not overheat the motor To prevent the motor from overheating stop the printer for at least 30 seconds after continuously printing 1 5 meters 4 Peripherals Connection NOTE Refer to the wifi 802 11b g Manual for more details on connection This printeThis product can communicate with other devices via Wifi 802 11b g communication and cable 4 1 Wifi 802 11b g Connection 1 The Printer can be connected ...

Page 9: ...ow the instructions below to clean the printer NOTE 1 Make sure to turn the printer power off prior to cleaning 2 The printhead can become very hot during printing allow the printer approximately 10 minutes to cool before cleaning 3 Do not touch the printhead it can be damaged by static electricity 4 Take care not to allow the print head to become scratched and or damaged in any way 1 Use an appli...

Page 10: ...W7 Code 128 Code 93 PostNet Two Dimensional Barcodes PDF417 MaxiCode Aztec QR Code Quick Response Datamatrix Stacked One Dimensional Barcodes GS1 Databar RSS or Composite Code Emulation CPCL MPCL Driver Window CE 4 2 5 0 Window Mobile 5 0 Sensor Black Mark Upper Lower Gap Cover open Peeler Detect Peeler S W Media Width Detect Paper paper type Thermal Paper width 56mm thickness 0 06 0 16 mm Externa...

Page 11: ...eration 35 80 storage 10 90 Printer Commands Compatibility PRINT FORM JOURNAL UNITS Comments TEXT Compatibility TEXT FONT GROUP FG TEXT CONCATENATION MULTILINE ML COUNT SETMAG SCALABLE TEXT X Linear Bar Codes Compatibility BARCODE BARCODE TEXT Two Dimensional Bar Codes Compatibility PDF417 PORTABLE DATA FILE MAXICODE QRCODE DATAMATRIX GS1 RSS NOTE Compatible Partially Compatible Not Compatible x C...

Page 12: ...TION PAGE WIDTH PACE NO PACE WAIT REWIND X TENSION X SPEED SETSP ON OUT OF PAPER X ON FEED PREFEED POSTFEED PRESENT AT X COUNTRY CODE PAGE FORMAT FILES BEEP CUT X PATIAL CUT X MCR Line Print Mode Compatibility SETLP SETLF Moving With X and Y Coordinates LMARGIN SETBOLD SETSP Special ASCII Characters SETFF SET TOF SETLP TIMEOUT ...

Page 13: ......

Reviews: