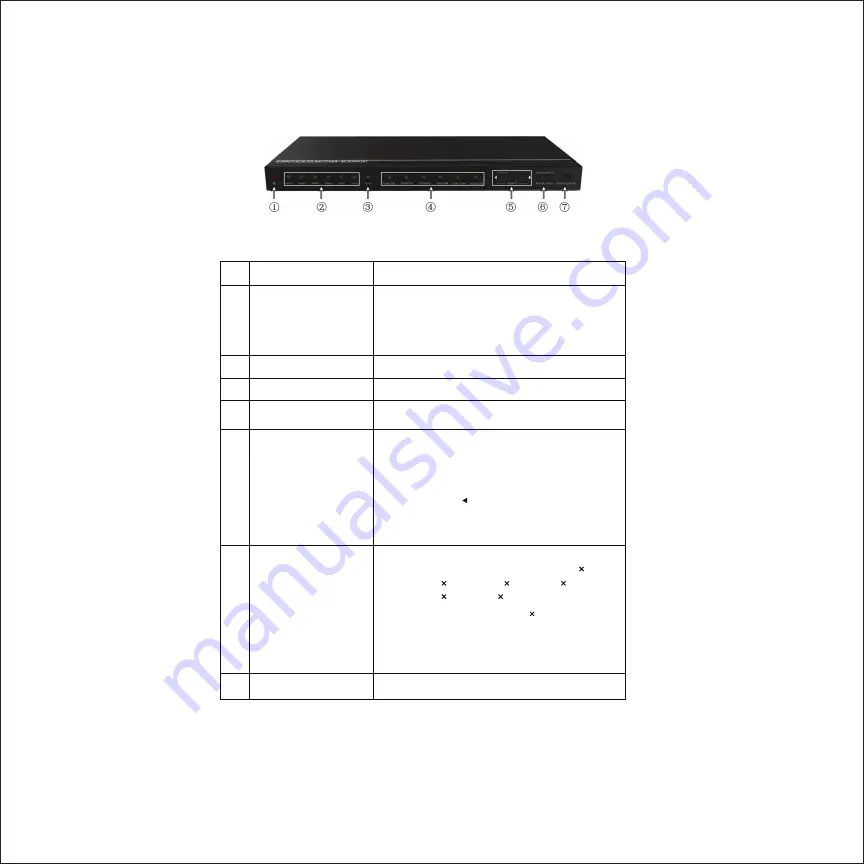
Sewell Rivule 6x1 Manual Download Page 5

Front Panel Layout

No.


Name


Description


1


Power


LED 

Indicates Power status


Green when system is working


Red when on standby


Input Indicators


Green indicates current output selection


Auto-switching LED


Remains green when in auto switching mode.


Output Resolution


LED


Green indicates current output resolution


Source/Auto 

Switching Mode


Source selection button: switches


between inputs.


Switching mode selection button: Press 
and hold 


for 3 seconds to switch 

between manual and auto switching 

mode.


Resolution/Firmware 

Update


Manual resolution switching button for 
VGA input: Select between


1920 1200, 

1920 1080, 1360 768, 1280 800, 

1024 768, 1280 720. 


(Default resolution:  1920  1080) 


Press and hold for 7  seconds to enter 


Firmware update mode. All LEDs will 

blink when the system is loading the 

Firmware.


OUTPUT BLACK


Press to Blackout Audio and Video output. All 

LEDs will turn off except for the power LED.


Summary of Contents for Rivule 6x1

Page 1: ...nter the Rivule 6x1 Scaler Switcher brings any one of up to six devices to your display The 6x1 switch boasts scaling features that allow you to also change between multiple resolutions as well as con...

Page 2: ...upport sewelldirect com sewelldirect com support Live support available Monday through Friday 9AM 8PM EST If you have anything less than a 5 star experience please let us be the first to know and we l...

Page 3: ...nnection 1 3 5mm stereo audio 1 optical audio It switches between HDMI and VGA signals and outputs a single HDMI signal The unit also allows upscaling downscaling and supports resolution adjustment se...

Page 4: ...ns RS232 commands and IR Remote Switch 4 HDMI and 2 VGA input to 1 HDMI output Scale VGA to HDMI output Output resolutions 1920x1200 1920x1080 1360x768 1280x800 1024x768 1280x720 Supports HDMI 1 4 4K...

Page 5: ...election button switches between inputs Switching mode selection button Press and hold for 3 seconds to switch between manual and auto switching mode 6 Resolution Firmware Update Manual resolutionswit...

Page 6: ...GA 2 VGA inputs Audio 2 3 5mm stereo audio inputs 2 Outputs 1 HDMI output 3 5mm Audio Stereo audio output 1 Optical Audio output 3 Control Type A USB port for updating firmware RS232 Input IR IN 3 5 m...

Page 7: ...ower input For IR Remote Control Use Plug in the IR receiver to the IR in port on the rear panel Auto switching In this mode selecting an input source via the front panel buttons will not work however...

Page 8: ...he Rivule to a computer with RS232 control software Set the parameters for the COM number buad rate data bit stop bit and the parity bit correctly Monitoring area indicates whether the command sent wo...

Page 9: ...itching 50619 Change the resolution to 1360 X 768 Resolution 136 50626 Change the resolution to 1024 X 768 XGA Resolution 1024 X 768 50627 Change the resolution to 1280 X 720 720P Resolution 1280 X 72...

Page 10: ...spect Ratio xx xx 16 9 4 3 auto 50614 Set the picture mode for VGA input 50615 Set SM audio mode to VGA input Sound Mode xx xx standard music movie sports user Picture Mode xx xx dynamic standard mild...

Page 11: ...M 2ch EDID 1080P PCM 2ch 50774 Set the EDID of all input ports 1080P 5 1ch EDID 1080P 5 1ch 50775 Set the EDID of all input ports 1080P 3D 5 1ch EDID 1080P3d 5 1ch 50769 Read the EDID file the file mu...

Page 12: ...Check the contrast Contrast xx 50638 Check the saturation Saturation xx 50639 Check sharpness Sharpness xx 50640 Check the color temperature Color Temperature xx 50652 Check Digital audio output statu...

Page 13: ...e increase image width Output Width Adjust xx 50675 Pull right from left side decrese image width Output Width Adjust xx 50678 Enable screen output adjusting Enter Output Position Adjust 50679 Disable...

Page 14: ...S232 Port Cannot control the device Bad Batteries Broken IR Remote Replace batteries Send the remote in for replacement Beyond the effective range of the IR signal or not pointing at the IR receiver A...

Page 15: ...vicing to qualified service peronnel at Sewell Direct To prevent fire or shock hazard do not expose the unit to rain moisture or install this product near water Do not use liquid or aerosol cleaners t...

Reviews: