9
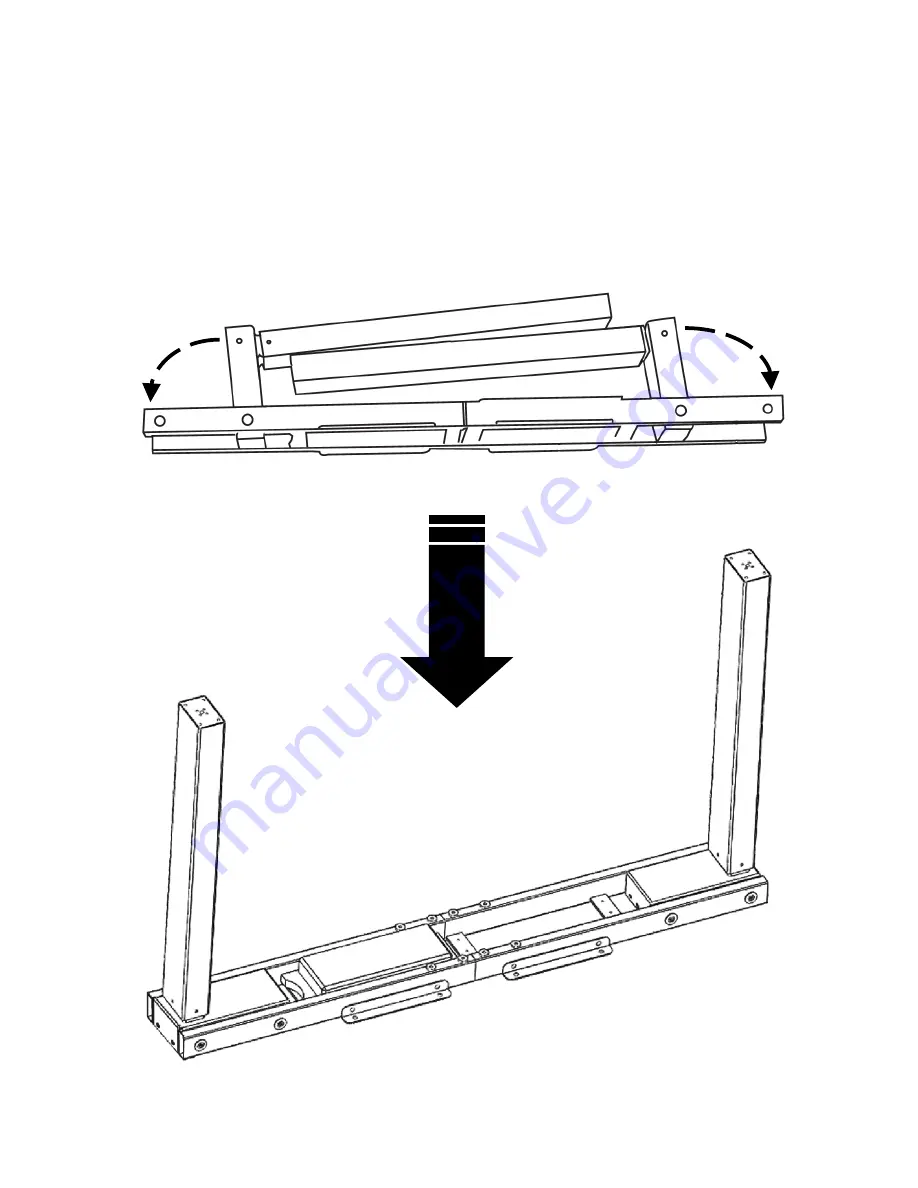
STEP 1. Remove SUPPORT BEAM
(B)
from box and set on TOP
(A)
with
legs facing upward.
STEP 2. Unfold legs until the holes on the legs and beam align.
Assembly Instructions: Unpack & Unfold
90°
Page 1: ...p Kits OFFK65818 19 22 23 26 27 75 76 77 84 85 86 OFFK66001 02 03 04 05 06 11 12 13 Please contact Seville Classics for help with assembly and to report any damaged or missing components Phone 1 800 3...
Page 2: ...is not just a convenient upgrade it s a healthy one Too much sedentary behavior can present a real health risk even for people who are already healthy Simply getting up throughout the day and moving i...
Page 3: ...repare Workspace Unpack Unfold Install Support Brackets Unlock Beam Align Frame Mounting Seville Classics Ergo Table Top Mounting Non Seville Classics Top Installing Feet Cable Management Connect Cabl...
Page 4: ...4...
Page 5: ...some of it s components When moving or turning the assembled desk grab the legs not the desk top Make sure to assemble on a soft and non abrasive surface to avoid scratches Check all connections and c...
Page 6: ...6 Component Diagram Top Foot Support Beam Control Box Support Bracket Legs Foot Support Bracket Legs...
Page 7: ...ter assembly If you re missing parts contact us for replacements at 800 323 5565 or send an email to Support SevilleClassics com Please make sure you have all the parts on this list T Screwdriver H Al...
Page 8: ...le Top or your own top with the bottom side facing up on a soft flat even surface beneath the top to protect the surface Layout all components and hardware Examine each and make sure components are wi...
Page 9: ...9 STEP 1 Remove SUPPORT BEAM B from box and set on TOP A with legs facing upward STEP 2 Unfold legs until the holes on the legs and beam align Assembly Instructions Unpack Unfold 90 90...
Page 10: ...h STEP 3 Slide SUPPORT BRACKET D into the SUPPORT BEAM B Support Bracket Tighten w 6mm Allen Wrench Tighten w 6mm Allen Wrench Insert BOLT SLEEVES P through holes on SUPPORT BEAM B and LEG C Insert M8...
Page 11: ...AM B with 3mm ALLEN WRENCH H This unlocks the SUPPORT BEAM B and allows it to be extended or shortened to accommodate different sizes of desk tops Screw the bolts back in to apply tension against the...
Page 12: ...on each support bracket STEP 5 With 2 people pull or push the SUPPORT BEAM B to align the mounting holes on the SUPPORT BRACKETS E with the TOP A Seville Classics Table Top features pre installed moun...
Page 13: ...ORT BRACKET D with 5mm ALLEN WRENCH I Seville Classics Top 5mm Allen Wrench M6x16 Bolt Screw Screwdriver Install CONTROLLER G to either side of the desk top with two SCREWS O Press firmly with screwdr...
Page 14: ...r own top BE SURE screws ARE NOT longer than top depth Screw Screwdriver Install CONTROLLER G to either side of the desk top with two SCREWS O TIP Use an electric screwdriver to install screws more qu...
Page 15: ...Feet STEP 8 Attach FEET E to the bottom of table legs with four M6x40 BOLTS M and 5mm ALLEN WRENCH I M6x40 Bolts Leveling Foot pre installed 5 mm Allen Wrench Take this time to make sure all screws a...
Page 16: ...ions Cable Management STEP 9 Identify the MOTOR CABLES coming from the LEGS C Identify the CONTROLLER CABLE coming from the CONTROLLER G Guide them through the cable guard toward the CONTROL BOX F Cab...
Page 17: ...plug the cables from the motors into the two right side ports on the CONTROL BOX F NOTE Motor cables can connect to either port interchangeably Plug Power Cable into the other side of the control box...
Page 18: ...IS HEAVY LIFT WITH EXTREME CAUTION STEP 11 With the help of at least one other person turn the desk onto it s feet Desk with top weighs approximately 120 lbs TIP Screw the leveling feet in and out as...
Page 19: ...o middle height When the number 38 1 appears on the display the desk is ready It may be necessary to reinitialize the desk from time to time due to power outages or simply due to use over time If nece...
Page 20: ...ontroller Thread the cable through the clip on the FASTENER R to keep the wires close to the table Use ZIP TIES S to affix the cables from the CONTROLLER G and CONTROL BOX F to the SUPPORT BEAM B so t...
Page 21: ...s are noisy It is normal that desk makes noise when the stages move past each other Apply silicon based lubricant if it is unusually noisy Code Action Re initialize the system Control system malfuncti...
Page 22: ...al or consequential costs expenses or damages incurred by the customer or other user This warranty covers only the airLIFT S3 Height Adjustable Standing Desk sold in the United States of America and C...
Page 23: ...w SevilleClassics com for desk accessories as well as home storage and organization goods Live well with features like Beveled Edges Desk edges feature an inward bevel for user comfort allowing users...
Page 24: ...rint 48 W x 23 75 D Lifting Speed 1 5 per second Base Weight 76 lbs Maximum Weight Capacity with Seville Classics Ergo Top 264 lbs Customer Service Information Telephone 800 323 5565 Fax 310 533 3899...