background image


Instruction Manual for Deluxe Series Fixed Frame 

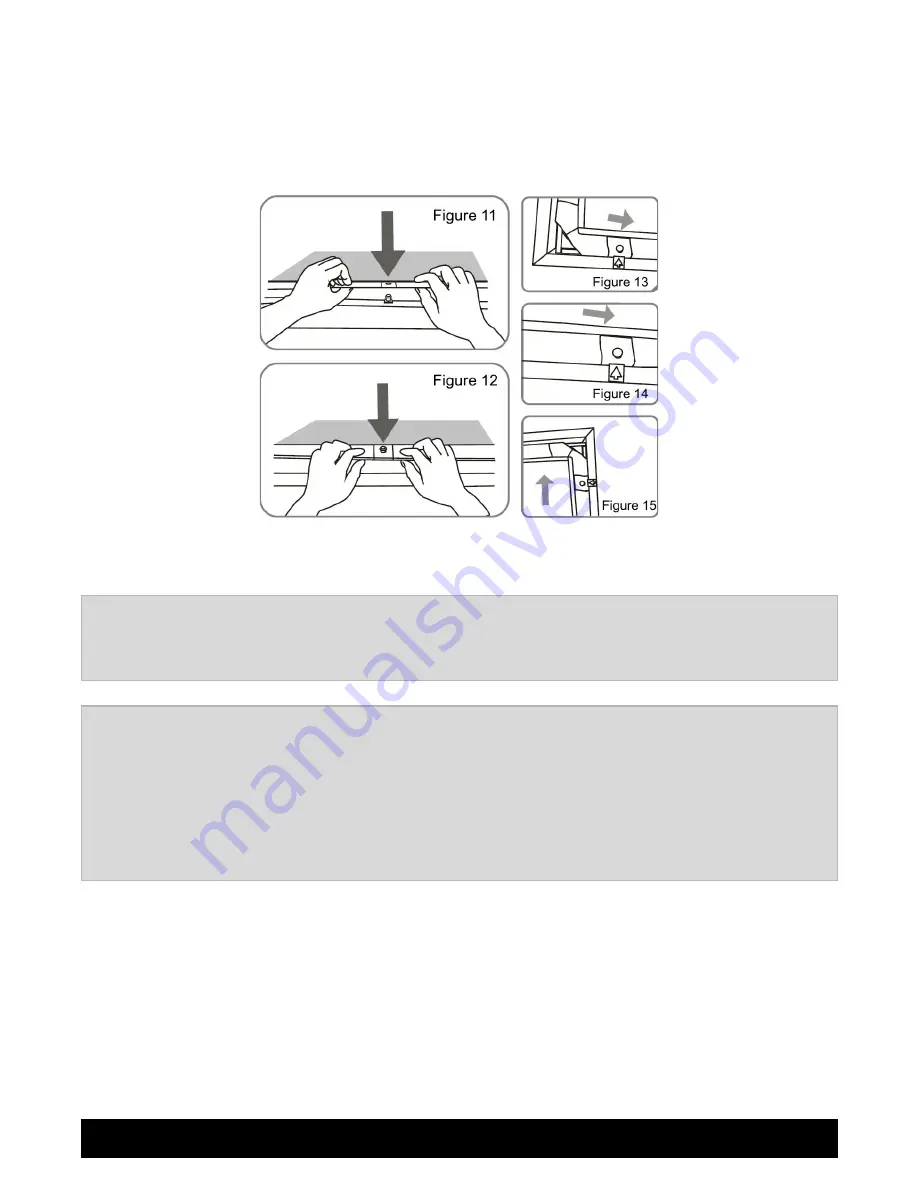
5. Align fixing lugs with the arrows (arrows are approximate). Starting in the middle of a 

short side, pull the tension bar over each of the fixing lugs, allowing the lugs to fit 

through the fabric holes. Repeat for the other short side, then repeat for each of the two 

longer sides. 


6. Adjust screen material to ensure that it is flat and smooth. 


Note 6.1:

For acoustically-transparent screen materials, please see

Appendix A: Black-Backing


Instructions in this guide for steps to attach the black backing fabric before mounting the


screen on the wall. 


Note 7.1:

The mounting brackets should be installed no further apart than the distance the


sliding brackets on the frame can reach. Before securing each bracket to the wall, make sure


they are level horizontally. When installing, make sure that the screws penetrate into the


studs of the framed wall, otherwise the brackets will not be securely fastened. Two brackets


for the top and two for the bottom are provided, but some installations do not require the


bottom brackets installed. If your installation requires the bottom brackets to secure the


screen repeat steps 7-9 for the bottom brackets. 


Summary of Contents for DF1610 Series

Page 1: ...r Deluxe Series Fixed Frame MODELS DF169 DF1610 DF235 Thank you for purchasing a Severtson projection screen Before use please read the instructions carefully After installation store the instructions...

Page 2: ...Instruction Manual for Deluxe Series Fixed Frame Overview Parts Included 1...

Page 3: ...ps below to install the screen Note 1 1 The screen should be installed at the best possible viewing position for the audience Install according to material chosen front projection Figure 1 or rear pro...

Page 4: ...corner bracket screw Repeat for each corner Figure 6 7 4 Unroll screen fabric as shown Insert the four tension bars into the pockets of the screen material using the long bars on the top and bottom a...

Page 5: ...in this guide for steps to attach the black backing fabric before mounting the screen on the wall Note 7 1 The mounting brackets should be installed no further apart than the distance the sliding bra...

Page 6: ...each top wall bracket to the wall Figure 16 17 8 Align the screen frame with wall brackets Figure 18 Move the sliding brackets on the frame to line up with the top wall brackets 9 Secure the screen to...

Page 7: ...ical tension rods The two vertical tension rods on the back of the frame will be the primary support points where the black backing will be mounted The black backing will end up hanging freely from th...

Page 8: ...have the black backing secured at each corner 5 Secure the remainder of the black backing along the top edge The black backing should now be secured at the two upper corners but will be loose along t...

Page 9: ...Instruction Manual for Deluxe Series Fixed Frame the tension rod and plastic pin so that it will be secured in place Your black backing is now properly installed 8...

Page 10: ...to scratch or damage the screen surface while handling it 5 Do not write or draw on screen surface Do not poke fold or tear screen material 6 Do not use detergents or harsh chemicals to clean screen...

Reviews: