


11
Step 3
Verify functionality.
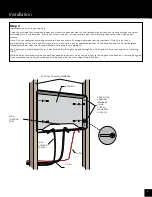
Place TV assembly face down on a clean, dry surface near the installed back box. Make all necessary A/V and electrical connections
and ensure full functionality of the TV, remote and any other A/V connections.
Before applying adhesive, test-fit the TV assembly in back box. Notice that the gravity lock mounts engage. Ensure functionality in
installed position.
Remove TV assembly from back box. Do not disconnect any wires. Clean any residue from glass and remove debris.
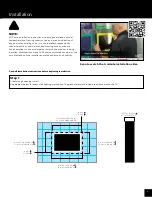
PASS-
THROUGH
PORT
LOW VOLTAGE
POWER CABLE
2) BACK BOX
1/8" BEAD
1) TV ASSEMBLY
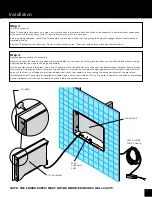
NOTE: THE POWER SUPPLY MUST NOT BE MOUNTED INSIDE A WALL CAVITY.
Installation
Step 4
Apply sealant and install TV assembly.
Generously apply 1/8" bead of supplied waterproof sealant to the outer lip of the glass face that surrounds the black metal housing.
Apply the sealant as close to the edge as possible.
With the sealant around the glass, insert the TV assembly into the back box mounting that has been already installed. Ensure gravity
lock mounts fully engage. Slowly compress the adhesive until the back of the glass is tight against the wall surface. Sealant should
seep out the front on all edges to provide the best seal. Verify that sealant is surrounding the entire perimeter of the glass face.
Immediately after TV assembly is installed and sealed, again verify functionality of TV and remote. If operation has been compromised
by the installation, corrections can easily be made before the sealant has cured.