Seura 10.5 User Manual Download Page 6

6

Display Requirements

Operation and Storage Requirements

The ambient temperature for operating the device is between 41 to 122 degrees Fahrenheit. Do not install the device in the proximity 

of heat sources, such as heating pipes, heaters, furnaces or other devices that radiate heat. Mount the device in such a way that it 

is protected against moisture. Trouble free operation is ensured up to 75% air humidity. To prevent fire or electric shock, never allow 

liquids to enter the unit. The product must be stored in dry and well-ventilated rooms, without extreme temperature fluctuations. Heat 

sources and aggressive active substances may not be stored in the proximity of the device. The required storage temperature is 32° F - 

140° F at an air humidity of 5 - 85% RH non-condensing. The device must be stored in the complete packaging, as delivered.

Installation Environment

Avoid direct light or sun exposure, direct proximity to heat sources, outdoor installation. The product is specifically designed for indoor 

use only. There is the danger of fire and of electric shock and damage to the device if it is operated outdoors. Do not place any heat 

sources such as radiators and heat registers, etc. near the monitor. To reduce eye strain, avoid installing the Séura Television Mirror 

against a bright background such as a window. Position the monitor at the height of your eye level. Position the monitor directly in front 

of you at a comfortable viewing distance. 

Installation

Have this product installed by qualified personnel only. Use the mounting systems which are specified or recommended by Séura. 

Install the product in a way that it is fixed properly and take care that children are not exposed to danger. Please take extra care during 

installation, avoid impacts. Before cabling your monitor, check that the power is off. To avoid any possibility of electric shock, always 

connect your equipment to properly grounded outlets. Use of power cords or adapters other than those provided may cause fire or 

malfunction. Place this product as close to the power socket as possible. Leave enough space to insert and remove the power plug on 

demand. Even if you switch off the product with your remote control, power is not cut off unless the power cord is unplugged.
The device may only be operated with the provided power adapter. The rated voltage is indicated on the product label. The device is 

factory-set to the optimal operating voltage (see Technical Specification). Use only power cords and plugs that are suitable for your 

local electrical outlets. Install the power cords in such a way that it does not obstruct anyone. Ensure furthermore that the cable is 

not clamped and that it cannot be pulled out accidentally from the power adapter. Do not install the power cords in the proximity of 

heating elements and never place heavy items on the cable or power adapter. Do not modify or arbitrarily repair the power cords.

CAUTION

Do not use any power cords or adapters other than those provided with this product! Use of power cords or adapters other than 

those provided with this product may cause fire, electric shock or malfunction. If several kinds of power cords are provided with this 

product, use the one that fits your power socket. Do not let the adapter hang down while using. Do not cover or wrap the adapter. 

Leave space around the adapter to prevent overheating. The individual components can be destroyed, if the polarity is reversed or an 

incorrect connection is used. A goodwill replacement is not possible in such cases, since each device is submitted to meticulous quality 

inspections prior to shipping. The connecting plugs must be attached in such a way that the connector is held firmly. Have trained 

technical personnel install the electrical facilities necessary for mounting. The power adapter must be installed in ventilated areas due 

to heat emission. Connect the power cord to a grounded outlet. Never cut or damage the power cord.
Please disconnect the device from the power adapter in the following cases:
1. The device is out of use for a lengthy period.
2. The device malfunctions or displays other unusual features, necessitating maintenance work.
3. During a thunderstorm.
Please plan the positioning of the power adapter and the source cables before proceeding with the structural measures and positioning 

of the Séura Television Mirror. Observe the protection zones when placing the power adapter! For in-wall applications please bear in 

mind that the power adapter has to be placed beyond the inset due to heat emission. Optional 50’ adapter extension cables may be 

purchased from Séura.

NOTE

The power adapter should be adequately secured to prevent it from becoming unstable and/or falling. Make sure the power source 

circuits are properly grounded. Use the supplied power cord in order to connect it to the power source. If your installation requires 

a different power cord, be sure to use an officially approved power cord displaying the mark of the safety agency that defines the 

regulations for power cords in your country. Please consider that the AC outlet for the power adapter is placed within reach of the Séura 

Television Mirror and should be easily accessible in case it needs to be powered off.
Install the unit in a dry environment where the operating ambient temperature will not exceed 40°C / 104°F. Also, don’t position the 

power adapter on top of the Séura monitor system in order to prevent thermal overload. Ensure that your installation complies with 

your national and local safety rules. Any servicing, adjustment, maintenance or repair must be performed only by service-trained 

personnel.
Ensure the power adapter is installed in an accessible location, to access it easily in case of a defect. If you choose to place the power 

adapter in a separate space, take care that ventilation is present, because the power adapters need convection cooling for stable 

working conditions.
When placing the power adapter in a fully enclosed space, make sure the air flow around the sides and top of the power adapter is not 

restricted. According to a common rule of thumb please calculate the length of the power adapter plus an additional gap of at least 

150mm all around for DC 19V power adapters.

Summary of Contents for 10.5

Page 1: ...USER MANUAL WWW SEURA COM TV SIZES 10 INCH 19 INCH 27 INCH Vanity TV Mirror MODEL NUMBERS 10 5 19 5 27 5 ...

Page 2: ...ment and be easily accessible The TV should be connected to a grounded GFCI protected main socket outlet WARNING If you manipulate against the recommended usage serious injury or death to user may result To protect against electric shock do not immerse the power cord power plug or product in water or other liquid Do not overload AC outlets or extension cords Overloading can cause fire or electric ...

Page 3: ...r cord power plug or product in water or other liquid Do not overload AC outlets or extension cords Overloading can cause fire or electric shock Close adult supervision is necessary when any product is used by or near children Do not operate any product with a damaged cord or plug or operate it after the appliance malfunctions or has been damaged in any manner Do not let the power cord come in con...

Page 4: ...ay Requirements 6 Setup 7 Installation 8 Making Connections 9 MENUS AND SETTINGS On Screen Display Menu OSD 10 INTEGRATION AND CONTROL RS 232 Protocol 14 IR Commands 17 TROUBLESHOOTING AND TECHNICAL DETAILS Troubleshooting 18 Technical Features 18 Ports and Media Support 19 Product Limited Warranty 20 ...

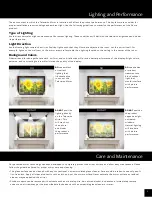
Page 5: ...t illuminates the room not the Television Mirror DO NOT position lighting directly on the Television Mirror This will wash out the picture and hinder the product s performance DO DO DO NOT DO NOT Care and Maintenance Our patented mirror technology has been developed to completely protect the mirror surface and allow easy maintenance Please follow the guidelines listed for proper mirror care and cl...

Page 6: ...f power cords or adapters other than those provided with this product may cause fire electric shock or malfunction If several kinds of power cords are provided with this product use the one that fits your power socket Do not let the adapter hang down while using Do not cover or wrap the adapter Leave space around the adapter to prevent overheating The individual components can be destroyed if the ...

Page 7: ...MAL 015 SHEET 2 www seura com PH 920 857 9069 FAX 920 857 9490 24 36 5 10 21 4 16 4 19 TV SCREEN 1 2 LIFT OFF CLEARANCE REQUIRED 138 TOTAL DEPTH 11 16 OFF WALL DISTANCE Drawing ID Number Item and Description Revised Date Reseller SHEET 1 DATE SIGNATURE NOTE PLEASE SIGN AND DATE THIS PAGE BEFORE RETURNING TO SEURA SIGNIFYING YOU AGREE TO ALL SPECIFICATIONS SHOWN ON ALL DRAWING SHEETS THE BUILD PROC...

Page 8: ...Drawing ID Number S S 2436 19 5 V2 Model Number Revised Date PROPRIETARY AND CONFIDENTIAL THE INFORMATION CONTAINED IN THIS DOCUMENT IS THE SOLE PROPERTY OF THE MANUFACTURER ANY REPRODUCTION IN PART OR AS A WHOLE WITHOUT THE WRITTEN PERMISSION OF MANUFACTURER IS PROHIBITED TOLERANCES UNLESS OTHERWISE NOTED FRACTIONAL 1 8 ANGULAR 1 0 TWO PLACE DECIMAL 03 THREE PLACE DECIMAL 015 SHEET 3 MAGNET MAGNE...

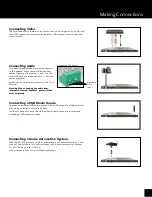
Page 9: ...ing the audio from internal to external speakers power off the unit completely Connecting a USB Media Source Connect an external USB media source to the USB socket to display photos play music or install a software update In order to have access to the USB port after installation we recommend installing a USB extension cable Connecting a Home Automation System With the RS 232 interface 9 pin d sub...

Page 10: ...the characteristics of your display based on personal preferences OSD menus include Video Audio TV Setup and Parental 1 Press on your remote control to open the OSD menu 2 Navigate within the OSD with the left right and up down arrows 3 Change settings with the left right arrows 4 Go back one step with 5 Confirm selection with the OK button 6 Press to exit the OSD menu Input Source Selection In th...

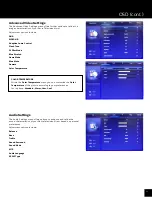
Page 11: ...amma Color Temperature COLOR TEMPERATURE Within the Color Temperature menu you can customize the Color Temperature of the picture according to your preferences Your options Standard Warm User Cool OSD cont Audio Settings The Audio Settings menu offers options to enhance and refine the sound characteristics of your Séura Television Mirror based on personal preferences Adjustment options include Bal...

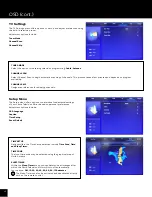
Page 12: ... SLEEP TIMER Within the Sleep Timer menu you can determine a timespan after which the Séura Television Mirror will turn off automatically Your options Off 10 20 30 40 50 60 90 120 minutes The Sleep Timer can also be activated and deactivated directly with on the remote control Setup Menu The Setup Menu offers options to determine fundamental settings of your Séura Television Mirror based on person...

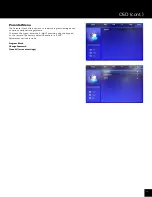
Page 13: ...program viewing based on various national rating systems To access the menu enter the 4 digit Password using the keypad on the remote The factory default password is 0000 Adjustment options include OSD cont Program Block Change Password Clean All or reset settings ...

Page 14: ...sent as hex commands all other data must be sent as ASCII characters Contact Séura Technical Support for instructions on accessing the Service Menu at 800 957 3872 or techsupport seura com Each command is a string of ASCII characters plus a Parameter A colon separates the Command from the Parameter The Parameter is 1 to 5 ASCII characters long After each command is received the TV shall send back ...

Page 15: ...02 KEY 12 0x03 0x02 OK 0x03 MENU TOGGLE 0x02 KEY 21 0x03 0x02 OK 0x03 DISPLAY TOGGLE 0x02 KEY 22 0x03 0x02 OK 0x03 VOL Navigate Right 0x02 KEY 23 0x03 0x02 OK 0x03 VOL Navigate Left 0x02 KEY 24 0x03 0x02 OK 0x03 CH Navigate Up 0x02 KEY 25 0x03 0x02 OK 0x03 CH Navigate Down 0x02 KEY 26 0x03 0x02 OK 0x03 PICTURE MODE STANDARD 0x02 KEY 27 0x03 0z02 OK 0x03 PICTURE MODE DYNAMIC 0x02 KEY 28 0x03 0x02 O...

Page 16: ...x03 0x02 0 0x03 ON 0x02 PWD 1 0x03 0x02 OK 0x03 0x02 PWD 0x03 0x02 1 0x03 TOGGLE 0x02 PWD 3 0x03 0x02 OK 0x03 N A N A MUTE MUT COMMAND RESPONSE QUERY RESPONSE MUTE 0x02 MUT 1 0x03 0x02 OK 0x03 0x02 MUT 0x03 0x02 1 0x03 UN MUTE 0x02 MUT 0 0x03 0x02 OK 0x03 0x02 MUT 0x03 0x02 0 0x03 CHANNEL CHA COMMAND RESPONSE QUERY RESPONSE 0x02 CHA xxx x 0x03 0x02 OK 0x03 0x02 CHA 0x03 0x02 xxx x 0x03 VOLUME VOL ...

Page 17: ...A 001F 000A 001F 000A 001F 000A 001F 000A 0047 000A 001F 000A 0768 000A 0047 000A 001F 000A 001F 000A 001F 000A 001F 000A 0047 000A 001F 000A 0047 000A 0047 000A 0047 000A 0047 000A 0047 000A 0047 000A 001F 000A 0047 000A 0651 3 0000 006B 0000 0020 000A 0047 000A 001F 000A 001F 000A 001F 000A 001F 000A 0047 000A 0047 000A 001F 000A 001F 000A 001F 000A 001F 000A 001F 000A 001F 000A 0047 000A 001F 0...

Page 18: ... with the Television Mirror Error message No Signal Check that the connected media sources are switched on Check that the signal cable connector is properly connected and that the connection pins are not bent or damaged Press Menu on your remote control you should see the OSD menu Check your settings for misconfigurations and adjust accordingly Alternatively perform a factory reset to restore the ...

Page 19: ...SIZE 8 7 8 w x 5 h 16 w x 10 h 23 3 4 w x 13 1 2 h DISPLAY RESOLUTION 1024 x 600 1440 x 900 1920 x 1080 ASPECT RATIO 16 10 16 10 16 9 CONTRAST RATIO Typical 500 1 Typical 1000 1 Typical 1200 1 TUNER ATSC NTSC QAM ATSC NTSC QAM ATSC NTSC QAM RESPONSE TIME 7 ms 3 6 ms 3 5 ms VIEWING ANGLE 45 45 45 20 170 Horizontal 160 Vertical 170 Horizontal 160 Vertical POWER CONSUMPTION DC 19V 10W 083A DC 19V 40W...

Page 20: ...s the purchaser responsibility to take precautions to protect the product from malware viruses data loss and other potentially destructive programs Warranty Disqualifiers This Limited Warranty only extends to and runs for the benefit of the original purchaser of the Product and only covers a Product purchased new All warranty claims must be submitted together with original proof of purchase and an...

Reviews: