LISST-
200X User’s Manual
101
Appendix I: Path Reduction Module
•
While holding the PRM Plate, remove the two PRM Plugs. The PRM
Removal Tool will be helpful for pulling out the PRM plugs. Be sure to hold
the PRM Plate so that it does not fall out or drop unexpectedly.
•
Carefully slide the PRM Plate with quartz cylinder from the optics of the
LISST-200X.
The PRM plate may need to be tipped to separate the PRM from the glass
window.
3
•
After removing the PRM, clean the optics of the LISST-200X and all the
PRM parts before storage.
•
Be sure to protect the quartz cylinder from scratches or impacts that could
damage the optical surfaces.
It is also highly recommended to change the instrument configuration on the
LISST-200X to reflect that the PRM is no longer installed.
5. Maintaining and Storing the PRM
1
Remove the PRM as described above, and clean all the parts
Note: Full disassembly of the PRM is not usually required and not recommended unless
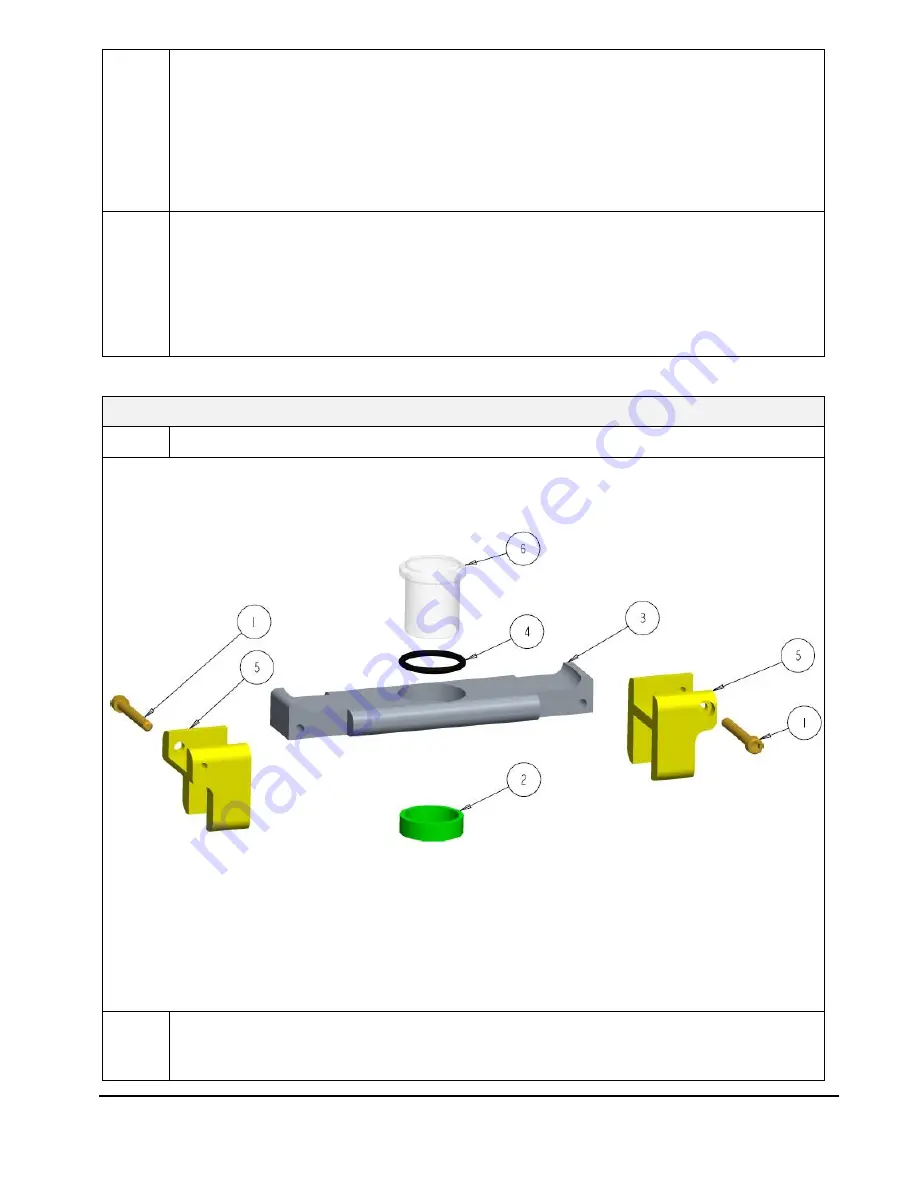
absolutely necessary. For the rare cases when it is needed, see the following diagram
and notes.
Parts:
1. 4-
40 x 7/8” socket head cap screws
2. Retaining ring
3. PRM plate
4. O-ring, size 2-016
5. Positioning plug
6. Quartz PRM cylinder
2
•
The retaining ring, item 2, holds the cylinder loosely in the plate. The ring is
held on the cylinder by friction, and may be difficult to remove. If it is too tight
to remove with your fingers, use only blunt tools that cannot scratch the
Summary of Contents for LISST-200X
Page 2: ...Intentionally blank...
Page 3: ...LISST 200X User s Manual Page iii This document is copyrighted by Sequoia Scientific Inc...
Page 4: ...Intentionally blank...
Page 6: ...Intentionally blank...
Page 8: ...Page viii LISST 200X User s Manual Intentionally blank...
Page 85: ...LISST 200X User s Manual 77 Appendix A Technical Specifications...


