background image

CHAPTER 7. GIS COLLECTION WITH PINPOINT-GIS OR OTHER APPLICATIONS

7.4 Connecting to the internet

To be able to use PinPoint-GIS Web, your browser should be connected to the internet. This
section details how this can be done by enabling the Mobile Hotspot functionality of the Altus
NR3.

Connect to the Internet using the

internal Cellular/GSM on the Altus NR3

Ensure that your Altus NR3 is switched on and
that the WiFi LED in the receiver is on (double click
the front-panel power button to toggle the WiFi)

Connect your mobile device (tablet, phone or PC)
to the Altus NR3 using the WiFi connection

If connected via WiFi you can open the web
browser on your mobile device and open the
web interface of the Altus NR3 (using the URL:

http://192.168.20.1

).

Make sure the GSM of the Altus NR3 is on and
connected to the internet. You can con

gure the

cellular modem on the Communication/ cellular
tab on the web interface.

If you want a high

accuracy position then use the NTRIP settings tab
to con

gure RTK (see Altus NR3 user manual)

When connected via WiFi to the Altus NR3
your mobile device will lose its own Internet
connection. The Altus NR3 allows you to share its
Internet connection by using the Mobile Hotspot
functionality.

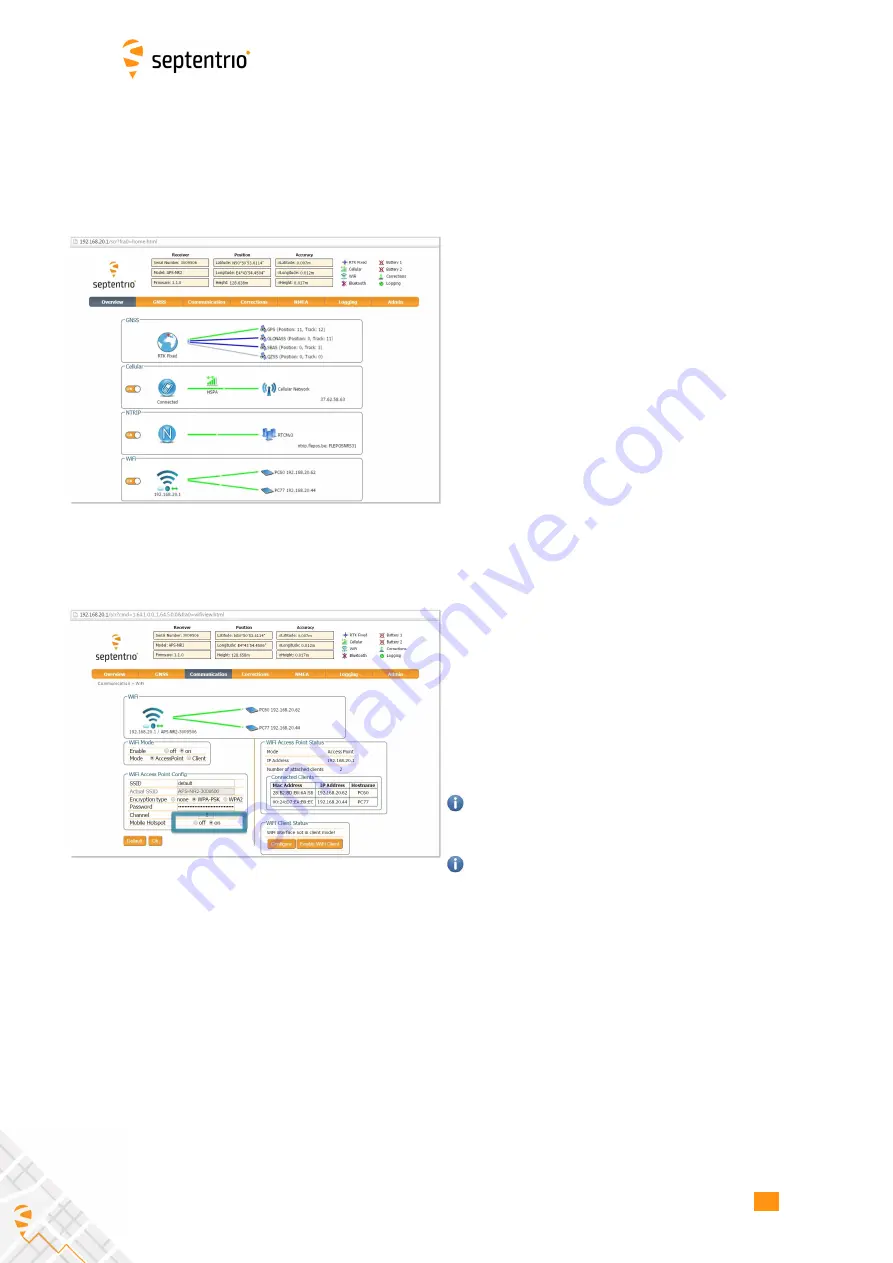
This is enabled on the WiFi tab in the Altus
NR3 web interface. Next to

Mobile Hotspot

:

select

on

then click

OK

.

It is recommended to save the con

guration to

boot (so that the Altus NR3 starts its connection
automatically at boot time)
If you want to use the Internet in your mobile
device then use a Bluetooth connection to the
Altus NR3 and use the NTRIP connection in the
PinPoint-GIS app

86

Summary of Contents for ALTUS NR3

Page 1: ...Altus NR3 User Manual ...

Page 2: ...or notice or obligation The information contained in this manual is subject to change without notice We recommend you to look for new or updated information in our Knowledge Base at https customersupport septentrio com s topiccatalog Copyright 2000 2021 Septentrio NV SA All rights reserved Septentrio NV Greenhill Campus Interleuvenlaan 15i 3001 Leuven Belgium http www septentrio com support septen...

Page 3: ...rting a micro SIM card 22 3 2 2 Inserting the batteries 22 3 2 3 Switching on the Altus NR3 22 3 2 4 Switching WiFi on off 23 3 3 CONNECTING TO THE WEB INTERFACE 24 4 Configuring the Altus NR3 as a rover 25 4 1 STANDARD ROVER RECEIVER SETTINGS 25 4 2 CONFIGURING THE CONNECTION TO A BASE STATION 27 4 2 1 Connecting via Mobile Internet 27 4 2 2 Connection to an NTRIP Caster 29 4 2 3 Connecting via Dat...

Page 4: ...USING THE EXPERT CONSOLE 73 6 9 HOW TO LOG DATA FOR PROBLEM DIAGNOSIS 74 6 9 1 Support SBF file 74 6 9 2 Diagnostic Report 77 7 GIS Collection with PinPoint GIS or other applications 78 7 1 INTRODUCTION 78 7 2 USING THE ALTUS NR3 ON BOARD SIMPLE DATA COLLECTOR 80 7 2 1 Designing a collection project 80 7 2 2 Performing a collection 82 7 2 3 Downloading collected data 83 7 3 CREATING A MAP 84 7 4 CO...

Page 5: ...CONTENTS Appendix E Glossary of ArcGIS and PinPoint GIS terms 104 Appendix F List of Typical GNSS Related Acronyms 105 5 ...

Page 6: ...nough power to see you through the working day and beyond The charger and batteries are non proprietary so it is easy and inexpensive to keep spares Use your existing phone or tablet The Altus NR3 can communicate with any device with a WiFi radio Simply connect to the Altus NR3 open your browser and your Altus NR3 is configured within minutes Esri ready The Altus NR3 has been designed specifically f...

Page 7: ...Swap Li Ion Batteries Onboard 16 GB Memory Onboard GIS collection using PinPoint GIS 1 1 1 GNSS Key Features 448 Channels with support for GPS L1 L2 L5 GLONASS L1 L2 L3 GALILEO E1 E5ab AltBoc BEIDOU B1 B2 IRNSS L5 QZSS L1 L2 L5 and RTK PPP SBAS DGPS and Standalone positioning modes Navigation performance Horizontal Vertical Standalone 1 2 m 1 9 m SBAS WAAS EGNOS MSAS 0 6 m 0 8 m DGPS 0 3 m 0 7 m P...

Page 8: ... free for one year from date of purchase The warranty does not cover Defects due to accidents abuse misuse negligence abnormal use or any other non recommended use Defects due to environmental conditions that do not conform to Altus NR3 specifications Defects due to improper installation or operating procedures Defects due to modifications alterations or changes not made in accordance with the Altus...

Page 9: ...ax 32 16 221 640 Interleuvenlaan 15i sales septentrio com 3001 Leuven Belgium North and South America Septentrio Inc Phone 1 310 541 8139 Suite 200 sales septentrio com 23848 Hawthorne Blvd Torrance CA 90505 USA Asia Pacific Septentrio Phone 86 186 163 10 905 Room 401 Tower B Shanghai Digital Industry Park sales cn septentrio com 1018 Dong Sanliqiao Rd Pudong District Shanghai China Septentrio Phon...

Page 10: ...r business environment This device meets the EU requirements 1999 519 EC and the International Commission on Non Ionizing Radiation Protection ICNIRP on the limitation of exposure of the general public to electromagnetic fields by way of health protection To comply with the RF exposure requirements this equipment must be operated in a minimum of 20 cm separation distance to the user ROHS WEEE Notic...

Page 11: ... used in accordance with the instructions may cause harmful interference to radio communications However there is no guarantee that interference will not occur in a particular installation If this equipment does cause harmful interference to radio or television reception which can be determined by turning the equipment off and on the user is encouraged to try to correct the interference by one or m...

Page 12: ...re de brouillage et 2 l utilisateur de l appareil doit accepter tout brouillage radioélectrique subi même si le brouillage est susceptible d en compromettre le fonctionnement IC RF Exposure Compliance MPE This equipment complies with IC RSS 102 RF exposure limits set forth for an uncontrolled environment This equipment should be installed and operated with minimum distance 20 cm between the radiat...

Page 13: ...ARNING The power supply provided by Septentrio should not be replaced by another Statement 3 WARNING Ultimate disposal of this product should be handled according to all national laws and regulations Statement 4 WARNING The equipment and all the accessories included with the product may only be used according to the specifications in the delivered release note in the manual and in all other documen...

Page 14: ...410222 GNSS network rover for survey and GIS applications USB Cable 214100 Configuration via USB Four Li Ion Batteries 215344 Powering the Altus NR3 Battery Charger EU 215498 UK 215499 AU 215500 US 215501 4 channel external battery charger with cable connections to both wall plug and cigarette lighter Figure 2 1 Standard items included with Altus NR3 delivery 14 ...

Page 15: ...on CBL_Altus_NR3_COM_PWR 214969 DB9 Serial RS232 Female connector and open ended power connector supply range 9 30 VDC NMEA BT NR3 215258 Bluetooth to bluetooth dongle for iOS support with Altus NR3 ideal for usage with Collector for ArcGIS AC wall adapter EU 214870 UK 214871 AU 214872 US 214873 110 230V to 12 V adapter wall charger with power cord for Altus NR3 15 ...

Page 16: ...nt Panel The Altus NR3 has an intuitive front panel with status LEDs and a central power button Figure 2 2 Altus NR3 Front Panel The table below provides an overview of the LED indicators A complete description of their behaviour can be found in Section A 2 16 ...

Page 17: ...Green WiFi is on receiver is in Client mode but is not connected Orange WiFi is on receiver is in Client mode and is connected Green Wifi is off not lit Cellular Modem Status The cellular modem is not in use not lit connecting orange connected green or there is an error in the connection red Position Mode The reported position is RTK Fixed green Stand alone red any other mode orange or no position c...

Page 18: ...IEW Power Button Functions As well as turning the Altus NR3 off and on the front panel power button can also be used to toggle WiFi and internal logging as described in Table 2 3 2 Table 2 3 2 Altus NR3 power button functions 18 ...

Page 19: ...lot is located under the left battery bay and has a watertight cover Only a micro SIM card will fit into the slot Figure 2 3 Underside of the Altus NR3 indicating the location of the SIM card slot Closing the battery door Figure 2 4 Closing the battery door Press firmly at the position indicated by the grey arrow to lock the battery door The battery door is only latched after a firm click is heard 19...

Page 20: ...When connected to the AC Adapter2 this will power the device It is recommended not to leave the batteries inside the unit when powering the device using the AC Adapter Connecting the USB cable allows for communication with the Altus NR3 and transfer of logged data files Figure 2 5 Altus NR3 Port 1 Connection 2 The AC Adapter is an optional item 20 ...

Page 21: ...applicable to the Altus NR3 Base model Charged Batteries Make sure you have two charged batteries Empty batteries may take three to four hours to charge An Altus NR3 Wall Charger As an alternative you can power the Altus NR3 using the wall charger when configuring the Altus NR3 A WiFi or USB connection to a phone tablet or computer A WiFi enabled device can be used to configure the Altus NR3 using t...

Page 22: ... close the SIM card compartment 3 2 2 Inserting the batteries 1 Place the two batteries in their compartments with the positive ends pointing to the front panel of the Altus NR3 2 Close the two battery doors The doors click audibly when latched 3 NOTE when working at temperatures below 20Âř C 4Âř F and above 50Âř C 122Âř F the device needs to be powered via an external power supply such as the AC ...

Page 23: ...ceiver is configured as a WiFi client and you will only be able to connect to the unit using the USB cable Figure 3 1 Press power button twice to toggle WiFi on and off Turn off WiFi to save power The WiFi modem consumes power when it is switched on You can extend the duration of one battery charge by turning the WiFi off when it is not needed Switch the WiFi modem off by pressing the power button twic...

Page 24: ...given in the steps below 1 Wait till Altus NR3 has fully booted after switching on about 20 seconds 2 Make sure that the front panel WiFi LED is lit indicating WiFi is enabled Section 3 2 4 describes how to turn on the WiFi 3 On your device find the wireless network named Altus_NR3 Serial Number where Serial Number is the 7 digit serial number of the Altus NR3 No password is set by default 4 Open a...

Page 25: ... as shown in Figure 4 1 This is the default operating mode of the Altus NR3 Figure 4 1 By default the Altus NR3 is configured as a rover with all positioning modes enabled The format of the differential corrections output by the base station should be compatible with that acceptable by the rover In the Corrections Input window of the Corrections menu you can configure the Altus NR3 to only accept diff...

Page 26: ...CHAPTER 4 CONFIGURING THE ALTUS NR3 AS A ROVER Figure 4 2 With the default auto setting Altus NR3 will accept any format of incoming differential corrections 26 ...

Page 27: ...ications Cellular tab on the Web Interface to show the status of the Cell Modem 2 Enter a Cellular PIN and Access Point Name APN in this window You may also need to enter a Username and Password 3 Make sure the on buttons of both Power and Connect are selected 4 Click Ok Figure 4 3 Connecting the Altus NR3 to the internet using the cellular modem 27 ...

Page 28: ...lly the Status will follow the sequence Initializing Connecting Connected The connection line in the Cellular field will become green and indicate the connection type e g LTE and Status field on the right hand side of the window will be filled with details of the connection as shown in Figure 4 3 28 ...

Page 29: ... NTRIP client as shown in Figure 4 4 Figure 4 4 NTRIP tab of the Web Interface 3 Enter the NTRIP caster details as shown in Figure 4 5 and click Ok The mount point list will only be populated when the caster details have been entered correctly Figure 4 5 NTRIP Settings 4 Click Ok to apply the final setting If the configuration is correct the graphic should show a green line to the NTRIP caster as in...

Page 30: ...o the caster when switched on The Altus NR3 can also be configured as an NTRIP Server In this case the receiver would work as a Base station passing corrections to an NTRIP Caster Note that the NTRIP version is only relevant when the NTRIP has been configured as a Server in Client mode the Altus NR3 automatically detects the version protocol of the NTRIP Caster Step 2 Configure data output Section 4 ...

Page 31: ...he receiver is in Rover mode Section 4 1 shows how you can check that the Altus NR3 is set to work as a rover Step 2 Configure the connection to the base station From the Communication menu select Cellular where you can configure the cellular modem of the rover receiver to make a data call to the base station receiver The essential settings are shown highlighted in Figure 4 7 with other settings bei...

Page 32: ...3 is connected to an external power supply Note that either the base or the rover can make the call As long as one receiver is configured to be calling the other receiver which is accepting calls a data connection using Data Call can be established Step 3 Configure data output Section 4 4 2 details the settings needed to output data Step 4 Configure any additional settings Section 4 5 details some ad...

Page 33: ... the internet as described in Section 4 2 1 Step 2 Configure the IPR connection Setup an IPR Receive connection so the unit can accept the differential corrections via the Cellular internet connection On the Communication IP Settings menu configure and IPR connection with the IP address either from the Reference Station or from the Altus NR3 the IP address assigned by the GSM or Cellular internet con...

Page 34: ... specify explicitly the format using the drop down list Figure 4 10 Configure the rover receiver to listen for differential correction output from the base station Step 4 Monitor the incoming stream In the rover unit the widget in the Corrections Corrections input menu should show the IPR connection accepting corrections Similarly the base station widget will show data output from the receiver If no...

Page 35: ...tion as Client over USB If the base station receiver has been configured as a WiFi Access Point then the rover should be configured as a client In client mode however the rover can make only one WiFi connection which in this case will be with the base station For this reason the rover should be configured using the USB connection The steps below describe how to connect via USB to the Altus NR3 and co...

Page 36: ...nel as shown in Figure 4 13 This will display a list of reachable WiFi networks Figure 4 13 Click on Configure From the list of networks select to connect to the base station receiver by clicking Add as shown in Figure 4 14 Figure 4 14 Select the base station device from the list of reachable networks Close the screen and click the OK button to apply the settings 36 ...

Page 37: ...explicitly selected using the drop down list Figure 4 15 The IPR1 connection will be used for input of differential correction input Configure the IPR connection Setup an IPR Receive connection for reception of differential corrections On the Communication IP Settings menu configure and IPR connection with the same port number configured for the base station and the IP address 192 168 20 1 as shown in ...

Page 38: ...If both the base station and rover receivers have been configured correctly the rover Overview tab should show the WiFi connection to the base station and the top panel positioning mode icon should indicate RTK fixed as shown in Figure 4 17 Figure 4 17 If the configuration is correct the WiFi panel should show a connection to the base station and the top panel icon indicate RTK fixed 38 ...

Page 39: ... onshore correction service as described in the steps below Step 1 Check you have PPP permissions on your Altus NR3 The use of PPP services is permission file controlled on the Altus NR3 You can make sure that you have PPP permissions enabled on the About page selected from the Admin menu Click on Permitted Capabilities and scroll down the list of permissions PPP and Augmented Data Svc should appea...

Page 40: ...your Altus NR3 dealer or from the Septentrio sales department sales septentrio com To activate SECORX you will need to provide the Product Activation Code PAC of the receiver The PAC can be found on the Admin About window as shown in Figure 4 19 Figure 4 19 The Product Activation Code PAC required for SECORX activation Step 3 Select PPP positioning Ensure that PPP is selected as a positioning mode...

Page 41: ...scription the Altus NR3 will still be able to track visible L Band signals Figure 4 22 shows the L Band Tracker Status field when the Altus NR3 is locked onto signals from the 25E satellite which transmits at 1545 825 Mz After purchasing a subscription you will need to track one of the beams for activation over the air To guarantee successful activation the LBand signal should be received with a ca...

Page 42: ...CHAPTER 4 CONFIGURING THE ALTUS NR3 AS A ROVER Figure 4 23 L Band decoder Information field showing that SECORX decoding is enabled 42 ...

Page 43: ...vice name of your Altus NR3 and execute the pairing sequence By default the Bluetooth Device name is Altus_NR3 Serial Number 4 The Bluetooth name of the device you connected to appears on the right hand side of the Bluetooth icon in the Bluetooth tab 5 Using your preferred GIS or Survey application on the device make sure you connect to the Bluetooth port created by the Bluetooth manager of your d...

Page 44: ...t configuration wizard When the configuration is complete click on Ok to apply the settings In the example shown in Figure 4 25 the Altus NR3 has been configured out output the NMEA GGA and ZDA messages every 1 second over the serial COM connection COM1 Data can also be output over USB USB1 or USB2 Ethernet IPS1 IPS2 or IPS3 Bluetooth BT01 or DataCall DCL1 Figure 4 25 example showing output of NMEA G...

Page 45: ...ply when finished In the example shown in Figure 4 26 an offset of 2 0 metres was used Figure 4 26 GNSS Tab setting Antenna Offset The Altus NR3 automatically compensates for the Antenna Phase Centre offset using the approved calibration of the product in order to provide the most accurate position out of the box The slant height measuring point SHMP is located at the line formed by the transition fro...

Page 46: ...et WiFi NTRIP Serial COM1 port e g to an external UHF radio Bluetooth Note that the Data Call feature only works when using batteries and will not work when the Altus NR3 is connected to an external power supply A summary of the pros and cons of the first three connection methods can be found in Appendix C 5 1 Setting the base station position A rover receiver in RTK mode calculates a position rela...

Page 47: ...ration or for relative positioning however for most other purposes a properly surveyed position is advisable Click on to access the position settings In the example shown in Figure 5 2 the position stored under Geodetic1 is used Pre set positions can be entered in either Geodetic or Cartesian coordinates as shown Figure 5 2 Setting the static position to the pre set Geodetic1 position 47 ...

Page 48: ...rover are transferred over a GSM cellular modem call In this example the rover receiver calls the Base station receiver on the number 0474 90 86 52 With the Role set to Accepting any call the receiver will automatically accept any incoming call Figure 5 3 Overview of the Base Rover configuration for differential correction transfer over Data Call Step 1 Setting the Altus NR3 base station position Se...

Page 49: ...ion menu select Cellular where you can configure the cellular modem of the Base station receiver for the reception of a data call The essential settings are highlighted in Figure 5 4 with other settings being optional Figure 5 4 Configuring the Base station receiver to receive a data call from the rover receiver 49 ...

Page 50: ...ctions that you want to send to the rover receiver The particular messages necessary for RTK and DGNSS are selected by default Selecting DCL1 as the Connection Port will as shown in Figure 5 5 the receiver will send out correction data to any rover receiver that connects on a data call Figure 5 5 Output of RTCMv3 differential corrections over the DC1 connection of the base station receiver 50 ...

Page 51: ...on as described in Section 5 1 Step 2 Configure output of differential corrections Configure your cellular connection Make sure that the cell modem of the Altus NR3 is connected Section 4 2 1 details how this can be done When the cellular modem is connected this will be indicated by an active green cellular connection line in the Communication Cellular window as shown in Figure 5 7 Take note of the I...

Page 52: ...Altus NR3 which will allow the Rover receiver to use a fixed and unique URL for connecting to the Base receiver e g nr3 123 dyndns org In this case the Dynamic DNS configuration should be done on the Base station receiver Please see Section 6 4 for configuring a Dynamic DNS service Configure the IPS connection Setup an IPS connection over which the differential corrections can be streamed On the IP Por...

Page 53: ...configured in the previous step The messages necessary for RTK and DGNSS are selected by default2 but you can select any combination of correction messages that you want to output Figure 5 9 Output RTCMv3 diff corr on the configured TCP IP server port of the Base station receiver 2 Note that if you do not have permissions for RTK Base corrections you will only be allowed to output RTCM2 DGPS messages...

Page 54: ... Figure 5 10 Base Rover configuration using WiFi Step 1 Setting the Altus NR3 base station position Set the Altus NR3 base station position as described in Section 5 1 Step 2 Configure the Base station output of differential corrections Configure your WiFi connection as an Access point If you can connect to the receiver over WiFi using the web interface then it is already configured in Access Point mod...

Page 55: ...e as indicated in Figure 5 12 Figure 5 12 Select AccessPoint in the WiFi Mode field Configure the IPS connection Setup an IPS connection over which the differential corrections can be streamed On the IP Ports page click on New IP Server as shown in Figure 5 13 then insert the port number and mode of the connection It is recommended to use higher range ports e g 28785 to avoid conflicts with other appl...

Page 56: ... window click on New RTCM3 output as shown in Figure 5 9 You can then select the IPS connection configured in the previous step The messages necessary for RTK and DGNSS are selected by default3 but you can select any combination of correction messages that you want to output 3 Note that if you do not have permissions for RTK Base corrections you will only be allowed to output RTCM2 DGPS messages 56...

Page 57: ...CHAPTER 5 CONFIGURING ALTUS NR3 AS A BASE STATION Figure 5 14 Output RTCMv3 diff corr on the configured TCP IP server port of the base station receiver 57 ...

Page 58: ... as shown in Figure 6 1 To set up a logging session you should 1 Select on in the Enable Logging field 2 Select either the NMEA or SBF data format 3 Click the icon to start the logging configuration wizard In the example shown in Figure 6 1 the SBF blocks necessary for Rinex generation have been selected for logging at 1 Hz 4 In the SBF Logging Parameters field you can select the naming convention Th...

Page 59: ...additional logging options For Base station use the Marker and Station Parameters fields can be filled in You can also specify what you want to happen when the internal disk becomes full The default option is StopLogging with DeleteOldest as alternative Figure 6 2 Web Interface Logging Advanced Settings 59 ...

Page 60: ...nternal disk of the receiver The logged data can be downloaded from the receiver over WiFi using the Web Interface or over USB using the data cable 6 2 1 Using the Web Interface 1 In the Logging window click on Disk Contents 2 Click the to download a file 3 Obsolete files can be deleted by clicking the Figure 6 3 Downloading logged files 60 ...

Page 61: ... called Septentrio Drivers will appear in the File Explorer after a few seconds Pop ups may appear indicating that drivers are being installed but these should be ignored In the folder driver you will find an executable driver file Right click on this file and select Run as administrator as shown in Figure 6 4 Figure 6 4 Run the executable driver installation file in the folder driver For the final sta...

Page 62: ...d If the Altus NR3 has not been connected to the computer being used before then first execute the steps described in the Section 6 2 2 If the Altus NR3 has already been connected to the computer and the drivers installed you can follow the steps below to retrieve logged data files 1 Open the Windows File Explorer 2 Connect the Altus NR3 to a USB port of your computer using the USB communication cab...

Page 63: ...nection If the Altus NR3 has not been connected to the computer being used before then first execute the steps described in the Section 6 2 2 If the Altus NR3 has already been connected to the computer used the following steps apply Connect the Altus NR3 to your computer using the USB cable Open your web browser and use the IP address 192 168 3 1 63 ...

Page 64: ...nt No Yes Settings that are actually being used Boot Yes Yes The receiver configuration on start up User1 User 2 Yes Yes Two configurations can be stored for later use With the Web Interface you can perform the following operations on configurations Copy The Copy operation allows the user to copy any of the five configurations into another configuration Download The Download operation allows the user to...

Page 65: ...6 3 2 for more information on managing configurations Figure 6 6 The save to Boot pop up If you have consistently pressed Save when the pop up appears on the screen all settings will be persistent and will be applied again when the device powered on You can also save the current configuration as the boot configuration on the Admin Configurations window as shown in Figure 6 7 Select Current and Boot fr...

Page 66: ...re the Source configuration is to be copied into using the Target drop down box 3 Click OK Download Configuration 1 Click the next to the configuration to be downloaded 2 The download is started immediately 3 The configuration can be found in the browser s download folder Upload Configuration 1 Click the next to the configuration to be uploaded 2 A window pops up for the user to select a file 3 After a fi...

Page 67: ...reate an account with a Dynamic DNS provider to register a hostname for your receiver The Altus NR3 supports the following two services Dyn DNS http dyn com No IP http www noip com Having opened account you can then create a host service for which you will need to specify a URL or hostname for the receiver e g mynr3 dyndns org Step 2 Configure the Dynamic DNS settings of the receiver In the Dynamic...

Page 68: ...as before the command was issued unless the Config option has been ticked Hard This is similar to a power off on sequence After hardware reset the receiver will copy the Boot configuration into the Current configuration Table 6 5 1 Altus NR3 Reset Levels Erase Description Config The RxDefault configuration is copied into the receiver s Boot and Current configurations The User1 and User2 configurations rem...

Page 69: ...s that may affect your use of the receiver On the Admin menu select Upgrade and then click the Choose file button You can then select the upgrade suf file downloaded from the website For major upgrades two or more files may have to be upgraded separately The files to be upgraded and the order for upgrading is documented in release notes After selecting the upgrade suf file click on Start upgrade Figure ...

Page 70: ... as their access level For added security an SSH key can be used This is described in Section 6 7 1 In the example shown in Figure 6 14 Web Interface Anonymous users without password can connect to the receiver via the web interface as Viewers They can browse the various windows but cannot change any of the settings Only George who has User access can change receiver settings via the web interface...

Page 71: ...4 Defining user access After defining the Users Viewers and their access levels they can then login on the web interface by clicking on Log in on the upper right corner as shown in Figure 6 15 Figure 6 15 Logging in to the Altus NR3 web interface 71 ...

Page 72: ... password provided of course that the matching private key is known by the key agent running on the same PC You can generate public and private keys using for example PuTTY Key Generator as shown in Figure 6 16 Figure 6 16 Generating SSH keys using the PuTTY Key Generator The public key is highlighted The generated public key is the highlighted text that can be pasted directly into the SSH Key fiel...

Page 73: ...irect the command The sub systems of the Altus NR3 are the Mainboard Altus NR3 GNSS Receiver and the Cell modem The command responses will be shown the window below the label Expert Console Clicking the up and down arrows of your keyboard will allow you to scroll through previously entered commands Specific messages may be viewed via the Message Inspector The command set of the Altus NR3 is describ...

Page 74: ...w SBF stream button to start defining a new logging session Step 2 Select to log the Support data blocks In the Edit Session click on SBF and New SBF stream In the final Edit SBF Stream field make sure to select the Support option as shown in Figure 6 20 This option automatically selects all the SBF blocks that are useful for the Support Department to help diagnose receiver problems If you suspect in...

Page 75: ...ce Please note that logging the Support data blocks requires a large throughput of data that may not be compatible with other CPU intensive tasks such as data output at higher rates When data logging has been correctly configured the Logging screen will show that data is being logged on the internal disk as indicated in Figure 6 22 Figure 6 22 The Logging screen showing data being logged to the dis...

Page 76: ...download a data file logged on the Altus NR3 click on Disk Contents or on the pie chart in the Disk Usage box and then click the download icon next to the filename on the Disk Contents page as shown in Figure 6 23 Figure 6 23 Click the icon next to the file you want to download 76 ...

Page 77: ...be generated under the Admin About tab on the Web interface as shown in Figure 6 24 and saved to your PC Note that the About menu also contains information on the Altus NR3 s hardware and software components in the Receiver Identification field Figure 6 24 Generate a Diagnostic Report 77 ...

Page 78: ...roid app PinPoint GIS App PinPoint GIS Web PinPoint GIS Web is an extension of Septentrio s web interface with a direct link to ArcGIS Online It offers a unique solution with the power to run GIS collection inside Septentrio GNSS receivers No extra applications are needed simply use your preferred web browser for full GIS workflow from accurate data collection in the field directly to the ArcGIS Onli...

Page 79: ... PinPoint GIS when working in conjunction with Esri s well known ArcGIS Online tools Table 7 1 1 Differences between PinPoint GIS web and PinPoint GIS App when using Esri s ArcGIS Online The following sections provide an introduction to using PinPoint GIS Web and PinPoint GIS App An additional section provides details on the newer version of Collector for ArcGIS with the Altus NR3 A glossary of the...

Page 80: ... simple data collector 7 2 1 Designing a collection project On the PinPoint GIS page of the Web Interface click on PinPoint GIS Rx to select and edit a collection project There are three collection projects that can be configured Select the project you want to edit and click Manage then Designer 80 ...

Page 81: ...efined attribute Fill in the name of the attribute and default value you want it to take Adding a receiver output attribute Again click on New attribute then select Receiver This will generate a drop down list from which you can select the receiver data output that you want to collect When all attributes have been added click on Save and close the project design window 81 ...

Page 82: ... next to the project you want to use You can then click on the Collector button to start a collection At each collection point click on collect and enter the details of the user defined attribute then click Save When the collection is finished you can click on Close to close the collection window Please note that points cannot be collected at more than 1 point per second 82 ...

Page 83: ... GIS Rx and then the Manage button next to the project you want download The project window will pop up where you can click on the CSV Export button In the export pop up window enter a name for the file and select the column separator Click on Export to generate the file and then on Download The file can be opened in Excel or any text editor 83 ...

Page 84: ...pen an ArcGIS account online at www arcgis com home You can create a Public account free for non commercial use If you need to create define your own collection feature layer you will need a payable account from Esri a trial version is available A feature layer is used when data collection and editing is required A feature layer can be customized for your own GIS attributes in a geolocation 2 Creat...

Page 85: ...aving found your preferred layer click on Add You can add as many layers as you want 4 Add a collectable layer You can create your own layers and your own Layers Service however a good example of a collection layer would be Layers_Coastal_Collector Search for this layer in ArcGIS Online This layer contains lines polygons and point collections which can be illustrative for demonstrations You can ch...

Page 86: ...ltus NR3 using the URL http 192 168 20 1 Make sure the GSM of the Altus NR3 is on and connected to the internet You can configure the cellular modem on the Communication cellular tab on the web interface If you want a high accuracy position then use the NTRIP settings tab to configure RTK see Altus NR3 user manual When connected via WiFi to the Altus NR3 your mobile device will lose its own Internet...

Page 87: ...he PinPoint GIS menu of the web interface as shown in Figure 7 8 Within this view you have full access to your ArcGIS Online user maps The system allows you to select your ArcGIS Online user maps change the background of your user map using the multiple Basemaps available from Esri Display or hide the different layers and filters of your map and will allow you to have configurability for Portal for A...

Page 88: ... maps stored in your account Select your map of choice The Altus NR3 position will be shown and you can now start data collection with accurate positioning You can use the ArcGIS Online toolsets to perform analytics administration reports web apps and much more benefiting of the precise and accurate collected data from the Altus NR3 http www arcgis com features features html While position passed t...

Page 89: ...port for sub block information within some SBF blocks only the common flags of the block are auto filled Table 7 5 2 SBF blocks supported by the Auto filling of GNSS data The auto filling is done by simply creating a GIS attribute which corresponds to the SBF block and field name message name _ field name e g DOP_VDOP More information about all the fields of SBF blocks can be found at the Reference guide...

Page 90: ...want to use for the auto filled GNSS data and follow steps below Public accounts do not allow new attributes in the layer to be defined Extra attributes are useful for demonstrating how PinPoint GIS automatically pushes not only position data but also any other metadata which might be important e g accuracy height Positioning Mode etc If you need this functionality you will need a payable Esri accou...

Page 91: ...e SBF naming convention 5 Once you have added the field please make sure you save your map 6 Once saved when you add a collection in ArcGIS Online you will see the form field automatically filled by the Altus NR3 Figure 7 12 Auto filled values in PinPoint GIS Web Note that even if not the whole accuracy is shown in the form auto filled values PinPoint GIS Web will still push the whole accuracy to the G...

Page 92: ...mation from the Altus receivers Basic GNSS control WiFi GSM With the PinPoint GIS App you can choose to use either the internal cellular connection of the Altus NR3 or the connection of your mobile device The diagrams above show schematically the connection options The PinPoint GIS App is an application which can be used along with any other Android applications The application is designed to prov...

Page 93: ...k on the PinPoint GIS App icon The PinPoint GIS App will try to make an automatic connection to the Altus NR3 If you have the WiFi connection enabled then it will automatically connect to the receiver If you want to connect via Bluetooth then you can create a new connection by going to the Connection manager in the app The first time you perform a Bluetooth connection it will require a pairing to t...

Page 94: ...p PinPoint GIS running in the background by clicking the home key in your Android device and open your preferred Android GIS application The current location of the Altus NR3 will be used in your own app if location overriding has been enabled and the GPS position accuracy will be that of the Altus NR3 94 ...

Page 95: ...h accuracy data collection straight into the ArcGIS Online cloud This section describes the general steps needed for using the Altus NR3 with Collector for ArcGIS Please contact Esri for any questions or for getting an ArcGIS Online account www arcgis com A Bluetooth connection is needed when using Collector for ArcGIS In this case it is recommended to connect to the Altus NR3 web interface via Wi...

Page 96: ...ring to the Altus NR3 which can be done from the connection manager Click on the Collector for ArcGIS App icon In the Settings panel from Collector open the Location Provider and select the receiver you want to use If the Altus NR3 receiver is not yet in the list tap on the icon and select it from the list of available devices If you are mounting the receiver or antenna on a pole specify the heigh...

Page 97: ...em If a datum transformation between the coordinate systems of your receiver s correction service and your map is available you will be prompted to specify the data collection area Choose a datum transformation from a list of available transformations The list of transformations is sorted with the most relevant datum transformation listed at the top of the list Give the location profile a name and ...

Page 98: ...ONT PANEL LEDS A Status icons and front panel LEDs A 1 Status Icons on the Web Interface The icons on the right hand side of the top banner quickly show the user the status of the Altus NR3 Table A 1 1 Web Interface Status Icons 98 ...

Page 99: ...APPENDIX A STATUS ICONS AND FRONT PANEL LEDS A 2 Front Panel LEDs Table A 2 1 Front panel LED behaviour 99 ...

Page 100: ...ternal battery charger B 1 1 Using the external battery charger The batteries of the Altus NR3 can best be charged using the external battery charger For a totally drained battery of 3400 mAh a charging time of 3 to 4 hours can be expected Battery chargers from other manufacturers may be used however please note that Low quality battery chargers may not fully charge the batteries Flexible chargers...

Page 101: ...batteries and charging When both batteries are below 5 then the Altus NR3 will make use of both batteries The user may replace either battery without interrupting operation Both the Web Interface and front panel LEDs give information about the battery status See Table A 2 1 for a description of the front panel LED behaviour 101 ...

Page 102: ...ating a data call will cause a peak in the current drawn from the batteries For this reason a data call connection requires both batteries to be present with at least a total charge for both batteries of about 40 Note that the Data Call feature cannot be used when the Altus NR3 is connected to an external power supply without batteries on the unit Mobile internet set by provider Limited to 3G 4G a...

Page 103: ...been configured with personal hotspot a user and a password will be displayed to the user Configure the Altus NR3 in WiFi Client mode so that it can connect to your mobile device using the credentials from the mobile device Access the web interface via your mobile device iOS devices You can easily access the web interface by using http altusnr3 local or http altusnr3 xxxxxxx local in your web browse...

Page 104: ...a geographical data shown visually on top of a basic map Feature class The definition of a feature which specifies all the attributes of your object Creation of new feature classes can only be done using ArcGIS Pro or Desktop Feature data The actual object which can have geographic location and other properties and which are defined in the feature class Using PinPoint GIS Web collection a Feature in ...

Page 105: ...rface HERL Horizontal External Reliability Level HPL Horizontal Protection Level IGS International GNSS Service LAMBDA Least squares AMBiguity Decorrelation Adjustment LED Light Emitting Diode MDB Minimal Detectable Bias MOPS Minimum Operational Performance Standards MSAS Multi functional Satellite Augmentation System MT Message Type NGS National Geodetic Survey NMEA National Marine Electronics As...

Reviews: