background image

DDR-08-1U / DDR-16-1U Quick Setup Guide 

R201302-V07 

- 5 - 

3

ε

Under Backup mode

φ


Single click left button to select item, single click right button to jump back to previous page. 

4

ε

Under PTZ mode

φ


Single click left button to operate PTZ function, single click right button to jump back to previous page. 


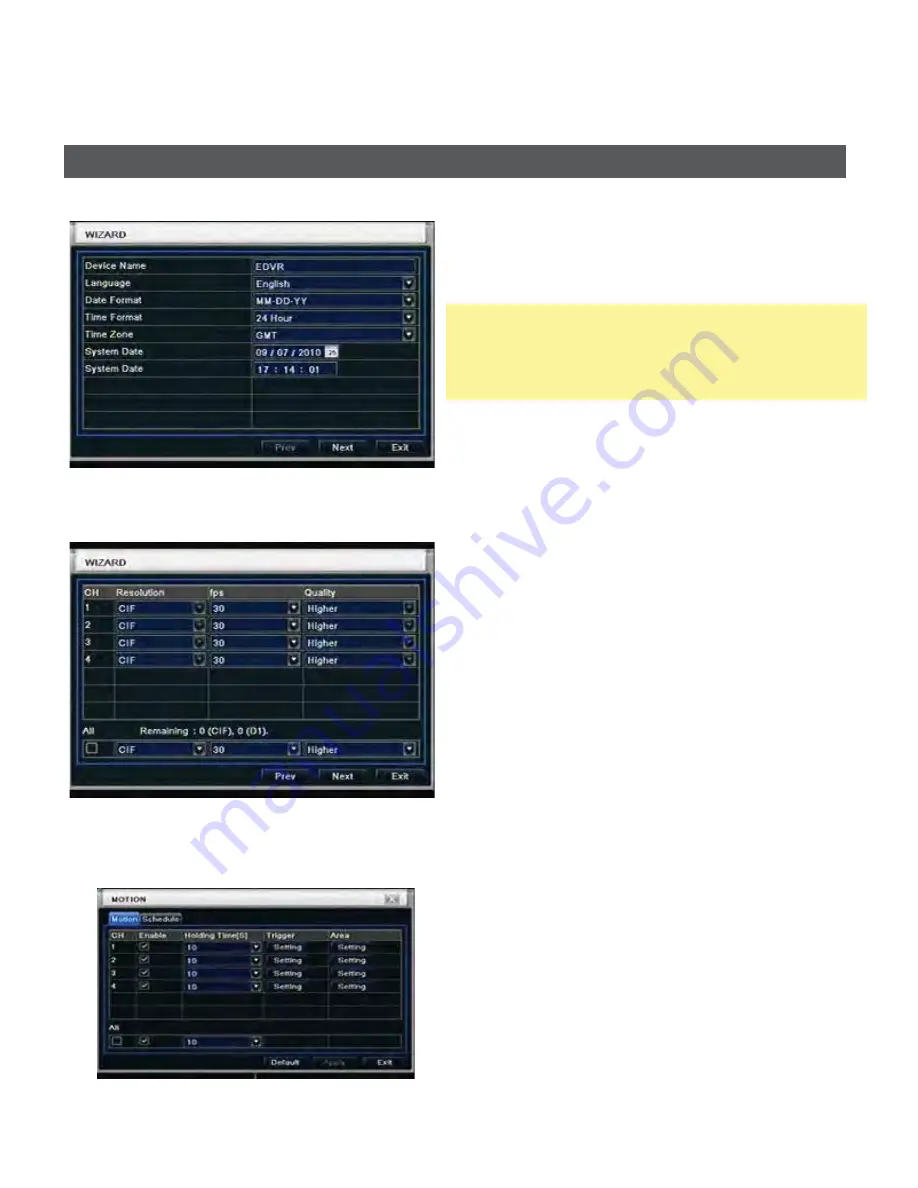
1.  Wizard for language and time setup 


2. Wizard for Record setup 


1.1 

Motion Detection Recording: 

Motion Detection Recording

: Enter Main Menu 

Æ


Setup 

Æ


Alarm 

Æ


Motion 


Enable the Channels to turn on Motion Detect Record.


**Motion Schedule Default

: is set to Full Time motion recording on all channels. 

Wizard setup


Device Name: to set a name of DVR. 
Language: to set a proper language. 
Date Format: to set a proper display format of time. 
Time Format: to set 24 hour or 12 hour format to display. 

Time Zone: to set proper time zone (GMT-8: Los 
Angeles) 

ɀ

Caution: Please make sure to set time zone correctly.  

To prevent getting different time stamps between local 
and remote site.


System Date: to set current system date time.


Please click “next” to next wizard 

process. 


You can setup record frame rate and quality for each 
channel and change record resolution. 
 
Adjustable parameter as following, 
Resolution: CIF, HD1 or D1 
Frame rate: 

Number of channel.resolution@NTSC frame 

rate(PAL frame rate)


CH


4CIF@30(25) 

4HD1@30(25) 

4D1@30(25) 

Quality: Highest/ Higher/ Normal/ Low/ Lower/ Lowest 


If you want to change all channel setup at once, please 

click “All” then setup resolution, frame rate and quality at 

right hand side. 

Please click “next” to next wizard process.


Summary of Contents for DDR-08-1U

Page 1: ...mp w Power Cord H Two 2 Three 3 SATA Cable Inside DDR 08 1U SATA Cable Inside DDR 16 1U I One 1 Quick Set up Guide Book J One 1 CMS Software Manual CD A B C D E F G H Inside the DVR I J Thank you for...

Page 2: ...eiver 9 Split Direction Key Switch split Move selected item 10 Enter Validate action 11 MENU Enter menu page increase value 12 SEARCH Back up video event 2 Back Panel 8 CH Item Label Name Function 1 P...

Page 3: ...high definition display device optional 5 NET Network port 6 VGA port VGA output connect to monitor 7 Video out Connect to monitor 8 Video in Video input channels from 1 16 9 Audio in 4 CH Audio input...

Page 4: ...er 2 Make change on DVR ID Setting Go to SYSTEM MENU DEVICE ID to make change The ID must be the same on DVR For example If ID 1 Please take remote control and point to DVR then press 8 8 1 Enter Then...

Page 5: ...nguage Date Format to set a proper display format of time Time Format to set 24 hour or 12 hour format to display Time Zone to set proper time zone GMT 8 Los Angeles Caution Please make sure to set ti...

Page 6: ...ox will appear on screen to confirm that manual recording is enabled Press Record Button again to stop recording OR Right click on main screen and select Record Note Definition of Holding Time on moti...

Page 7: ...plugged in 5 After Apply the IP Address Netmask Gateway and DNS addresses should automatically be generated For STA TIP Write down HTTP Port Server Port and IP Address on a piece of paper for referenc...

Page 8: ...com because they are free 3 Using your Internet Browser go to that website you selected and REGISTER to obtain User Name Password and Host Domain information to setup DDNS for your DVR TIP Write down...

Page 9: ...case consult the manual for settings for creating a custom service and use the above values For router gateway devices provided by your ISP please contact your ISP technical support Note For further...

Reviews: