UltraWave Product Guide
Page 19
1. Pass the gear clamp through the slots in the post collar.
2. Using an 11 mm (7/16 in.) wrench and the supplied hardware (hex nut, lock washer, flat
washer - X4) attach the mounting bracket assembly to the UltraWave unit (see
).
3. Wrap the gear clamp around the post and measure the mounting height of the UltraWave unit
from the center of the antenna (see
) to the ground’s surface.
4. Aim the UltraWave unit at the second mounting post, and using an 8 mm (5/16 in.) nut driver
or socket, tighten the gear clamp with the UltraWave unit at the specified height.
5. Measure and verify the mounting height.
6. Using an 11 mm wrench, tighten the hardware attaching the post collar to the mounting
bracket.
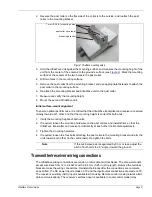
7. For UltraWave units that are separated by 50 m or less, use the alignment holes and adjust
the pitch of both units to a 5º angle toward the ground (see
).
8. Repeat for the second UltraWave unit.
Initial post-mount alignment
For optimal performance, ensure that the UltraWave transmitter and receiver are aimed directly
toward each other, and that the mounting height is correct for both units (see
1. Measure and verify the mounting heights of both units (center of antenna to ground).
2. If required, loosen the transmitter’s gear clamp slightly, and then carefully aim the transmitter
directly at the receiver.
3. Tighten the transmitter’s gear clamp.
4. If required, loosen the receiver’s gear clamp slightly, and then carefully aim the receiver
directly at the transmitter.
5. Tighten the receiver’s gear clamp.
6. If required, loosen the four bolts that attach the post collar to the mounting bracket and tilt the
units (in the vertical axis) toward each other. Re-tighten the bolts.
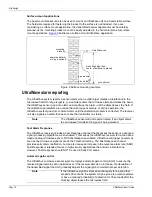
Figure 15 UltraWave mounting with a 5º angle
Note
The UltraWave receiver includes a received signal strength
indicator, which serves as an aid during final alignment.
1. Loosen the 4 vertical adjustment bolts.
2. Line up the 2 alignment holes in the post collar
and mounting bracket (example uses a pen).
3. Tighten the 4 vertical adjustment bolts.
For a 5º mounting angle:

