


Site survey
FiberPatrol Site Planning & Installation Guide
Page 25
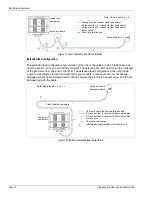
1. Hold the conduit against the fence post and on the conduit, mark the positions of any
hardware on the fence that will require notches in the conduit.
2. Make any required notches in the conduit.
3. Attach the sensor cable to the gate.
4. Hold the notched half of the conduit under the cable and against the fence post.
5. Press-fit the sensor cable into the split loom so the split loom extends 7.5 cm (3 in.) beyond
the top and bottom of the split conduit.
6. Fit the other half of the conduit over the cable and secure the conduit to the fence post with the
supplied gear clamps. Ensure the split loom covers the sensor cable, and protects it from
chafing against the top and bottom edges of the conduit.
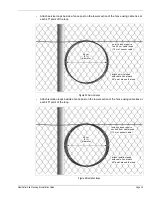
Protecting masonry walls and buildings
If some, or all, of the perimeter is comprised of masonry walls or buildings, FiberPatrol sensor
cable can be installed along the outside edge, and if necessary, the inside edge of the structure to
protect against climb over intrusions. In this case, custom P-brackets are used to fasten the sensor
cable to the structure so it extends slightly outside and above the structure. A P-bracket is installed
every 60 cm (2 ft.) along the structure to hold the sensor cable in place.
For a masonry wall, the recommended sensor cable configuration uses 2 cables. One along the
outside edge and one along the inside edge.
Note
FiberPatrol functions as a contact sensor when it is installed on
masonry walls and buildings.
Figure 27 Protecting a masonry structure along the perimeter
fence-mounted
isolation loop
fence-mounted
isolation loop
P-brackets 60 cm (2 ft.)
spacing along edge of wall
respect min. turn radius
at corners


