17
Toast, Bagel, Frozen
NOTE:
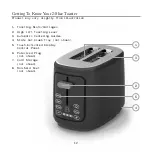
Use either toasting slot when toasting only 1 piece of bread
or toaster food. Always use slices or foods that fit freely into
toasting slots.
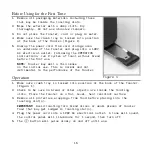
1. Add bread, bagels, English muffins, toaster foods, frozen bread or bagels
to the toasting slots (Figure 2). Press the pulsing
.
2. For the toaster function, just lower the lever to begin toasting.
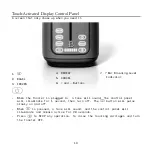
3. Adjust the browning level from 4 (
) MEDIUM by pr or -.
(Figure 3)
4. Press BAGEL or FROZEN (Figure 4). A tone will sound. The
button,
CANCEL button and any FUNCTION button will illuminate when active.
All other buttons vanish when not in use.
5. Lower the toasting lever to begin toasting (Figure 5).
6. For toasting frozen bagels.
• Press BAGEL first. The BAGEL button will stay illuminated and the
FROZEN button will begin to flash.
• Press FROZEN. Both BAGEL and FROZEN will be illuminated.
• Adjust the browning level as needed.
• Lower the lever to begin toasting.
7. While toasting, the chosen browning level lighted bars will pulse
and count down to a single light as the cycle progresses.
NOTE:
The browning level indicator will act as a progressive timer
to show you how much time remains until the toasting cycle will
be completed.
8. At the end of the toasting cycle, 2 audible tones will sound;
and toasting carriages will rise automatically.
9. Remove bread or toaster food from the toasting slot(s). Use care
as the top of the Toaster will still be hot.
CAUTION:
Never use a fork or sharp-edged utensil to remove toast,
because that may damage the heating element or cause injury.
NOTE:
After 20 seconds of inactivity, the control panel will darken,
will pulse slowly on and off and the Toaster will advance to sleep mode.
10. Unplug the Toaster from the wall outlet when not in use and
before cleaning.
Summary of Contents for Beautiful 19019
Page 5: ...Section 1 Safety 1...
Page 13: ...Section 2 Instructions 2...
Page 18: ...16 Figure 2 Figure 4 Figure 3 Figure 5...
Page 25: ...Secci n 1 Seguridad 1...
Page 34: ...Secci n 2 Instrucciones 2...
Page 40: ...38 Figura 2 Figura 4 Figura 3 Figura 4...
Page 47: ......
Page 48: ......


