background image

Using the EK IEM G4

40

Using the EK IEM G4

These sections contain detailed information about using the EK IEM G4.

You can find information on installation and startup of the EK IEM G4 under
“Installing the EK IEM G4”.

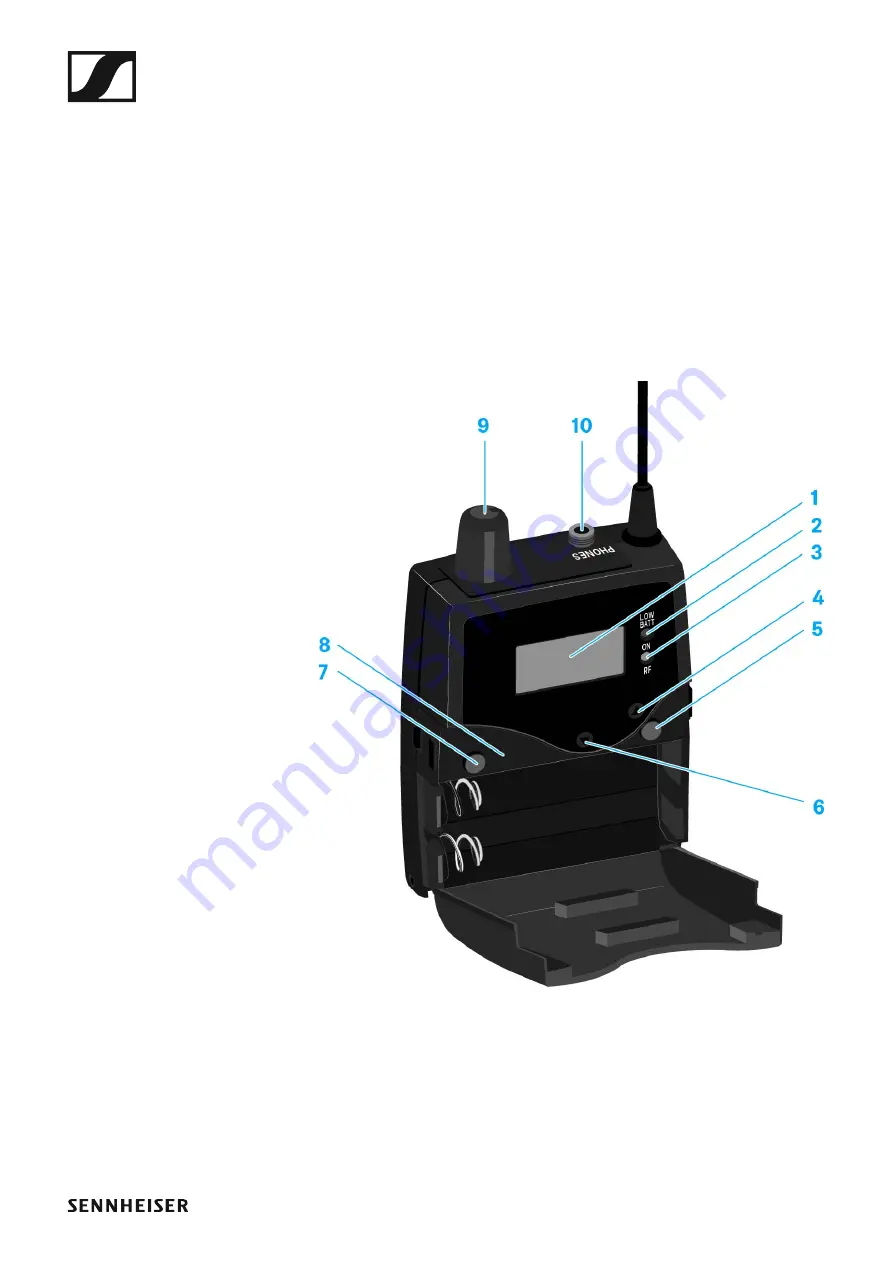
Operating elements of the EK IEM G4 diversity re-
ceiver

EK IEM G4

 product overview

1

Display panel

• See “Displays on the EK IEM G4 display panel”

2

Operation and battery indicator, red LED

• illuminated = ON

See “Switching the EK IEM G4 on and off”

• flashing  =  LOW  BATTERY

See “Inserting and removing the batteries/rechargeable batteries”

Summary of Contents for EK IEM G4

Page 1: ...Sennheiser electronic GmbH Co KG Am Labor 1 30900 Wedemark Germany www sennheiser com ew IEM G4 v1 1 evolution wireless G4 IEM series Instruction Manual ...

Page 2: ...phones to the EK IEM G4 17 Attaching the diversity receiver to your clothing 18 Installing the SR IEM G4 19 Connectors on the rear of the device 19 SR IEM G4 rear side product overview 19 Connecting disconnecting the SR IEM G4 with from the power supply 20 Creating a data network 21 Connecting audio signals 22 Mono 22 Stereo 23 Daisy chaining audio signals 24 Connecting antennas 25 Installing the ...

Page 3: ... item 60 Balance menu item 60 Mode menu item 61 High Boost menu item 62 Auto Lock menu item 63 Advanced menu item 64 Advanced Tune menu item 65 Only adjusting the frequency 65 Setting the channel and frequency 65 Advanced Limiter menu item 66 Advanced Volume Boost menu item 67 Advanced LCD Contrast menu item 67 Advanced Engineer Mode menu item 68 Profiles List 68 Load Profiles 69 Advanced Reset me...

Page 4: ...notes 90 Synchronizing devices 91 Easy Setup Sync function EK IEM G4 SR IEM G4 for a single radio link 91 Easy Setup Sync function EK IEM G4 SR IEM G4 for multi channel frequency setup 92 Sync function SR IEM G4 EK IEM G4 92 Using the AC 41 94 Operating elements on the front of the device 94 Switching the AC 41 on and off 95 Meaning of the LEDs 96 Overview 97 Product variants 98 EK IEM G4 product ...

Page 5: ...stereo jack plug balanced audio in loop out 108 6 3 mm mono jack plug unbalanced 109 6 3 mm stereo jack plug for headphone jack 109 XLR 3 plug balanced 109 Hollow jack plug for power supply 109 Cleaning and maintenance 110 Cleaning the sound inlet basket of the microphone mo dule 110 Contact 112 Instruction manual as a PDF 112 Customer service 112 Feedback 112 ...

Page 6: ...tion about the individual products in the ew IEM G4 series under ew IEM G4 series products For information about the available accessories see Accessories You can find information about the ew IEM G4 series frequency bank sys tem under The frequency bank system ...

Page 7: ... are available from the individual prod ucts You can find more information under Product variants You can find technical specifications about the individual products un der Specifications You can find information about installing the products under Installing and starting up ew IEM G4 series devices You can find information about operating the products under Using ew IEM G4 series devices ...

Page 8: ...tereo diversity receiver You can find more detailed information about the EK IE MG4 in the follow ing sections Installation and Startup Installing the EK IEM G4 Operation Using the EK IEM G4 Technical Data EK IEM G4 ...

Page 9: ...4 stereo transmitter You can find more detailed information about the SR IEM G4 in the follow ing sections Installation and Startup Installing the SR IEM G4 Operation Using the SR IEM G4 Technical Data SR IEM G4 ...

Page 10: ...ries 9 Accessories A variety of accessories are available for the ew IEM G4 series Earphones IE 4 Article no 500432 You can find more information about the earphones on their product page at www sennheiser com ...

Page 11: ... is designed for use with evolution wire less G4 series handheld transmitters bodypack transmitters and bodypack receivers Article no 009950 L 2015 charger The BA 2015 rechargeable battery can be charged in the L 2015 charger on its own or inside of the bodypack transmitter bodypack receiver Article no 009828 ...

Page 12: ...0 G4 EM 300 G4 EM 500 G4 or SR IEM G4 in a 19 rack Article no 503167 AM 2 antenna front mounting kit Antenna front mounting kit for installing antenna connections on the front of the rack when using the EM 100 G4 EM 300 G4 EM 500 G4 or SR IEM G4 together with the GA 3 rack mounting kit Article no 009912 ...

Page 13: ...ional antenna article no 003658 Antenna combiner AC 41 active antenna combiner ASA 41 EU 470 870 MHz article no 508243 AC 41 UK 470 870 MHz article no 508295 AC 41 US 470 608 MHz article no 508244 Antenna cables GZL 1019 BNC BNC coaxial cable antenna cable with 50 character istic wave impedance GZL 1019 A1 variant 1 m 3 ft article no 002324 GZL 1019 A5 variant 5 m 16 ft article no 002325 GZL 1019 ...

Page 14: ...G4 series A1 range 470 516 MHz A range 516 558 MHz AS range 520 558 MHz G range 566 608 MHz GB range 606 648 MHz B range 626 668 MHz C range 734 776 MHz D range 780 822 MHz E range 823 865 MHz Every frequency range has 26 frequency banks with up to 16 channels You can find information about the frequency presets in the frequen cy tables of the respective frequency ranges under Frequency ta bles ...

Page 15: ...formation about installing and connecting ew IEM G4 series devices in the following sections EK IEM G4 diversity receiver Installing the EK IEM G4 SR IEM G4 stereo transmitter Installing the SR IEM G4 ASA 214 antenna combiner Installing the AC 41 You can find information about operating the products under Using ew IEM G4 series devices ...

Page 16: ...and removing the batteries rechargeable batteries You can operate the diversity receiver either with batteries AA 1 5 V or with the rechargeable Sennheiser BA 2015 battery Press the two catches and open the battery compartment cover Insert the batteries or the rechargeable battery as shown below Please observe correct polarity when inserting the batteries Close the battery compartment The cover lo...

Page 17: ...Installing the EK IEM G4 16 Battery status Charge status of the batteries Charge status is critical LOW BATT ...

Page 18: ... Turn down the volume of the headphone output before you put on the headphone To connect the earphones to the receiver Insert the cable s 3 5 mm jack plug into the PHONES socket on the re ceiver as shown in the diagram The ground connection of the earphone cable acts as an antenna for the second diversity branch For details on the pin assignment see Pin assignment ...

Page 19: ...tach the diversity receiver with the antenna pointing downwards To do so withdraw the belt clip from its fixing points and attach it the other way round The belt clip is secured so that it cannot slide out of its fixing points acci dentally To detach the belt clip Lift the belt clip as shown in the diagram Press one side of the clip downward on the fixing hole and pull it out of the housing Do the...

Page 20: ...ket For connecting the power supply unit See Connecting disconnecting the SR IEM G4 with from the power supply 3 LAN connection socket ETHERNET RJ 45 See Creating a data network 4 6 3 mm jack socket LOOP OUT BAL L I Audio output left See Daisy chaining audio signals 5 6 3 mm jack socket LOOP OUT BAL R II Audio output right See Daisy chaining audio signals 6 XLR 3 6 3 mm jack combo socket BAL AF IN...

Page 21: ...wer supply Insert the plug of the power supply unit into the DC IN socket of the re ceiver Pass the cable of the power supply unit through the cable grip Slide the supplied country adapter onto the power supply unit Plug the power supply unit into the wall socket To disconnect the SR IEM G4 transmitter from the power supply Unplug the power supply unit from the wall socket Unplug the power supply ...

Page 22: ...the WSM software See Easy Setup menu item To connect the SR IEM G4 to a network Connect a network cable with an RJ 45 connector to the Ethernet socket on the rear side of the SR IEM G4 Connect the other end of the network cable to a network switch For more information about controlling devices via the Sennheiser Wireless Systems Manager WSM software refer to the instruc tion manual for the softwar...

Page 23: ...In Stereo mode you can receive the two input signals either as a mixed mono signal or as a stereo signal To do so you must select Focus or Stereo mode on the EK IEM G4 receiver See Mode menu item Mono Connect the output of an external device e g a mixing console or an other SR IEM G4 to the audio input socket BAL AF IN L I MONO us ing a suitable cable In Mono mode the corresponding EK IEM G4 recei...

Page 24: ...n external device e g a mixing console or an other SR IEM G4 to the audio input sockets BAL AF IN L I and BAL AF IN R II using suitable cables In Stereo mode the corresponding EK IEM G4 receiver can be oper ated in Focus mode or Stereo mode See Mode menu item ...

Page 25: ...te an AUX path from the mixing console in Focus mode to multiple transmitters and output a separate sig nal on the other channel of the same transmitter e g for the individual mu sician Transmit a signal from the mixing console to the input socket of trans mitter A in this example BAL AF IN R Connect the LOOP OUT BAL R output socket of transmitter A with the BAL AF IN R input socket of transmitter...

Page 26: ... rod antenna Connect the rod antenna to the RF OUT socket on the rear side of the SR IEM G4 If you are using more than one transmitter we recommend using re mote antennas and the AC 41 antenna combiner You can find more information here Installing the AC 41 Using the AC 41 ...

Page 27: ...d the permissible temperature limit specified in the specifications See Specifications Ensure sufficient ventilation if necessary provide additional ventila tion Make sure that the mechanical loading of the rack is even When connecting to the power supply system observe the information indicated on the type plate Avoid circuit overloading If necessary pro vide overcurrent protection When rack moun...

Page 28: ...y To fasten the mounting angle of the GA 3 rack mounting kit Unscrew and remove the two recessed head screws M4x8 on each side of the transmitter Secure the left and right mounting angles to the sides of the transmitter using the previously removed recessed head screws Secure the blanking plate to one of the mounting angles using two re cessed head screws M6x10 ...

Page 29: ...od antenna on the blanking plate right diagram Use a remote antenna possibly in combination with the AC 41 anten na combiner If you are using more than one transmitter we recommend using re mote antennas and as needed Sennheiser antenna accessories For more information visit the ew G4 product page at www sennheis er com Slide the transmitter with the mounted blanking plate into the 19 rack Secure ...

Page 30: ... the AM 2 front mounting kit and an additional GA 3 rack mounting kit For more information visit the ew G4 product pages at www sennheiser com To mount the transmitter using the GA 3 rack mounting kit optional acces sory Place both transmitters upside down and side by side on an even sur face Secure the jointing plate to the transmitters using the six recessed head screws M3x6 Secure the mounting ...

Page 31: ...r of the device 1 RF OUT BNC socket Antenna output See Connecting antennas 2 RF IN 1 to RF IN 4 BNC sockets Antenna input with DC OUT See Connecting the AC 41 with transmitters 3 DC INsocket To connect the NT 3 1 power supply unit See Connecting disconnecting the AC 41 to from the power supply system 4 Strain relief for the cable of the power supply unit See Connecting disconnecting the AC 41 to f...

Page 32: ...onnect the AC 41 antenna combiner to the power supply system Connect the hollow jack plug of the power supply unit to the DC IN socket of the antenna combiner Pass the cable of the power supply unit through the cable grip Plug the supplied mains cable into the power supply unit Plug the mains cable into the wall socket To completely disconnect the AC 41 antenna combiner from the power supply syste...

Page 33: ...mitters are compatible evolution wireless G4 SR IEM G4 evolution wireless G3 EK 300 IEM G3 2000 IEM series SR 2000 IEM with its own power supply SR 2050 IEM with its own power supply Due to legal reasons the transmission power of the connected transmitter must be set to a maximum of 30 mW standard when op erating the AC 41 See Advanced RF Power menu item ...

Page 34: ...Repeat the previous step until all four transmitters are connected to the antenna combiner Connect the AC 41 to the power supply system see Connecting dis connecting the AC 41 to from the power supply system The LEDs light up see Meaning of the LEDs The SR IEM G4 and SR 300 IEM G3 transmitters are supplied with voltage via the RF IN input sockets of the AC 41 ...

Page 35: ...e recommend using remote antennas To connect a remote antenna Connect the antenna and transmitter with a low attenuation 50 Ω ca ble Use the shortest antenna cable possible with few intermediary connec tions The cable and transmitter will attenuate the wanted signal Place the antenna in the room where the transmission is taking place Maintain a distance of at least 1 m 3 ft between the antenna and...

Page 36: ...e permissible temperature limit specified in the specifications See Specifications Ensure sufficient ventilation if necessary provide additional ventila tion Make sure that the mechanical loading of the rack is even When connecting to the power supply system observe the information indicated on the type plate Avoid circuit overloading If necessary pro vide overcurrent protection When rack mounting...

Page 37: ... recessed head screws M4x8 on each side of the antenna combiner Secure the mounting angles to the sides of the antenna combiner using the previously removed recessed head screws Secure the blanking plate to one of the mounting angles using two re cessed head screws M6x10 Cover the antenna holes with the two covers Slide the antenna combiner with the mounted blanking plate into the 19 rack Secure t...

Page 38: ... 3 rack mounting kit option al accessory Place both antenna combiners upside down and side by side on an even surface Secure the jointing plate to the transmitters using the six recessed head screws M3x6 Secure the mounting angle Slide the connected antenna combiners into a 19 rack Secure the mounting angle to the 19 rack ...

Page 39: ... EK IEM G4 SR IEM G4 stereo transmitter Using the SR IEM G4 ASA 214 antenna combiner Using the AC 41 You can find information about installation and start up of the prod ucts under Installing and starting up ew IEM G4 series devices In the sections below you can find important information about specific use cases Establishing a radio link between the transmitter and receiver Es tablishing a radio ...

Page 40: ...es 39 Synchronizing the receiver settings to the transmitter Synchroniz ing devices Using the menu of the receiver Displays on the EK IEM G4 display panel Using the menu of the transmitter Displays on the SR IEM G4 dis play panel ...

Page 41: ... the EK IEM G4 under Installing the EK IEM G4 Operating elements of the EK IEM G4 diversity re ceiver EK IEM G4 product overview 1 Display panel See Displays on the EK IEM G4 display panel 2 Operation and battery indicator red LED illuminated ON See Switching the EK IEM G4 on and off flashing LOW BATTERY See Inserting and removing the batteries rechargeable batteries ...

Page 42: ... DOWN button See Buttons for navigating through the menu 7 ESC button See Buttons for navigating through the menu 8 Infra red interface See Synchronizing devices 9 Volume control with on off switch See Connecting earphones to the EK IEM G4 Switch the receiver on off See Switching the EK IEM G4 on and off 103 5 mm PHONES jack socket lockable Jack for connecting an earphone See Connecting earphones ...

Page 43: ...switch the receiver on Turn the volume control clockwise until it clicks The red ON LED is illuminated and the Frequency Name standard dis play appears To switch the receiver off Turn the volume control counterclockwise until it clicks The red ON LED will go out ...

Page 44: ...on Press the SET button Locked appears in the display panel Press the UP or DOWN button Unlock appears in the display panel Press the SET button Lock off function is now temporarily deactivated When you are in the operating menu Lock off function is deactivated long enough for you to work in the op erating menu When one of the standard displays is shown Lock off function is automatically activated...

Page 45: ...ee Home screen The display panel also displays the operating menu which you can use to configure all of the settings See Setting options in the menu Buttons for navigating through the menu To navigate through the EK IEM G4 operating menu you need the following buttons Press the ESC button Cancels the entry and returns to the current standard display Selects a standard display see Home screen ...

Page 46: ...ing menu Calls up a menu item Changes to a submenu Stores the settings and returns to the operating menu Press the UP or DOWN button Changes to the previous or next menu item Changes the setting of a menu item In Focus mode Adjusts the balance In Stereo mode Selects a standard display see Home screen ...

Page 47: ... displays Frequency Name standard display 1 RF RF level radio frequency RF signal level display including the display of the squelch threshold see Squelch menu item 2 AF audio level audio frequency Displays the audio level of the received transmitter separated by channel in Stereo mode When the display shows full deflection the audio input level is exces sively high See Balance menu item 3 Frequen...

Page 48: ... pilot tone P Activated pilot tone evaluation No symbol Evaluation is deactivated P is black pilot tone is being received on the current frequency See Advanced Limiter menu item Bank Frequency Limiter standard display The Bank Frequency Limiter standard display also shows the audio channel Stereo Focus and the limiter 1 Frequency bank and channel See Frequency Preset menu item 2 Limiter See Advanc...

Page 49: ...ency High Boost standard display The Frequency High Boost standard display also shows the audio chan nel Stereo Focus and the treble boost 1 Treble boost EQ See High Boost menu item 2 Audio channel stereo Focus See Mode menu item ...

Page 50: ...quency Preset menu item Entering a freely selectable name See Name menu item Adjusting the balance See Balance menu item Adjusting Stereo or Focus mode See Mode menu item Activating deactivating the treble boost See High Boost menu item Activating deactivating automatic lock off function See Auto Lock menu item Configuring enhanced settings in the Advanced Menu Setting the receiving frequencies fo...

Page 51: ...Using the EK IEM G4 50 Adjusting the menu item and loading profiles Resetting the settings made in the operating menu Displaying the current software revision See Advanced menu item ...

Page 52: ...Using the EK IEM G4 51 Menu structure The figure shows the complete EK IEM G4 menu structure in an overview ...

Page 53: ...signal lev el area CAUTION Risk of hearing and material damage If you set the squelch threshold to a very low value a very loud hissing noise can occur in the receiver This hissing noise can be loud enough to cause hearing damage or overload your system s loudspeakers Before adjusting the squelch threshold set the volume of the audio out put to the minimum Never change the squelch threshold during...

Page 54: ...rating menu Press the UP or DOWN button until the Squelch menu item appears in the selection frame Press the SET button to open the menu item Adjust the settings as desired Press the SET button to save the changes you made to the settings or Press the ESC button to cancel the entry without saving the settings ...

Page 55: ...ating menu Press the UP or DOWN button until the Easy Setup menu item appears in the selection frame Press the SET button to open the menu item Adjust the settings as desired Scan New List Select Scan New List to scan for unused frequencies Press the SET button to start the scan The frequency range of the receiver is scanned As a result the number of unused frequencies is displayed for every frequ...

Page 56: ...uency setup for multiple radio links simulta neously Connect all of the SR IEM G4 transmitters to one network using a net work switch See Creating a data network The automatic frequency setup function only works for transmitters in the same frequency range Transmitters in a different frequency range are not included Please note that all transmitters must be in the same IP address range The IP addr...

Page 57: ... the transmitters The Mute RF For Connected Devices message appears Press the jog dial to confirm the message and deactivate the radio sig nal for all connected transmitters All connected transmitters in the same frequency range will switch to Easy Setup Sync mode ...

Page 58: ... scribed above From the scan results on the receiver select a frequency bank with enough free channels Hold the infrared interface of the EK IEM G4 receiver in front of the in frared interface of an SR IEM G4 transmitter to transfer the scan re sults from the receiver to this transmitter ...

Page 59: ...ster transmitter will also be shown on the display panel of the connected transmitters Press the jog dial SET on the particular transmitter to save your se lected frequency and synchronize it with the corresponding receiver at a later point see Synchronizing devices or Press the SYNC button to synchronize the selected frequency with the receiver immediately Use this procedure to assign an unused f...

Page 60: ...creen press the SET button to open the operating menu Press the UP or DOWN button until the Frequency Preset menu item appears in the selection frame Press the SET button to open the menu item Adjust the settings as desired Press the SET button to save the changes you made to the settings or Press the ESC button to cancel the entry without saving the settings You can set the frequencies of the fre...

Page 61: ...ngs or Press the ESC button to cancel the entry without saving the settings Balance menu item In the Balance menu item you can adjust the balance of the audio chan nels Setting range 31 steps L R L1 to L15 and R1 to R15 To open the Balance menu item On the home screen press the SET button to open the operating menu Press the UP or DOWN button until the Balance menu item appears in the selection fr...

Page 62: ...mono signal in both headphone channels The balance setting serves to adjust the relative levels of the two sepa rate channels in the mixed mono signal See Balance menu item The corresponding SR IEM G4 transmitter operates in Mono mode Only the left audio input of the SR IEM G4 is received as a mono signal To open the Mode menu item On the home screen press the SET button to open the operating menu...

Page 63: ...menu item On the home screen press the SET button to open the operating menu Press the UP or DOWN button until the High Boost menu item appears in the selection frame Press the SET button to open the menu item Adjust the settings as desired Press the SET button to save the changes you made to the settings or Press the ESC button to cancel the entry without saving the settings ...

Page 64: ...er Lock off function To open the Auto Lock menu item On the home screen press the SET button to open the operating menu Press the UP or DOWN button until the Auto Lock menu item appears in the selection frame Press the SET button to open the menu item Adjust the settings as desired Press the SET button to save the changes you made to the settings or Press the ESC button to cancel the entry without...

Page 65: ... following sub items are available Adjusting the receiving frequency for the frequency bank U See Advanced Tune menu item Adjusting the limiter See Advanced Limiter menu item Adjusting the volume boost See Advanced Volume Boost menu item Adjusting the contrast of the display panel See Advanced LCD Contrast menu item Adjusting the menu item and loading profiles See Advanced Engineer Mode menu item ...

Page 66: ...item in the Advanced menu Adjust the settings Press the SET button to save the changes you made to the settings or Press the ESC button to cancel the entry without saving the settings Setting the channel and frequency Select the Tune menu item and call it up by holding down the SET but ton until the channel selection appears Adjust the settings Press the SET button to save the changes you made to ...

Page 67: ... dB CAUTION Risk of hearing damage The limiter limits the volume of the headphone output PHONES and thus protects your hearing When the limiter is switched off you may expose yourself to high volumes over a prolonged period which can cause perma nent hearing damage Set the limiter to the lowest level before putting the earphones on Do not continuously expose yourself to high volume levels ...

Page 68: ...anced submenu you can adjust the volume boost Setting range 0 dB 3 dB or 6 dB When configuring the settings ensure that the audio signal is not dis torted Advanced LCD Contrast menu item In the LCD Contrast menu item of the Advanced submenu you can adjust the display contrast of the display panel ...

Page 69: ...gs of the different EK re ceivers Load Profiles menu item Activate deactivate profile loading Clear List menu item Delete all profiles Profiles List To read out settings and save them as a profile Call up the Engineer Mode menu item in the Advanced menu Call up the Profiles List menu item Select an unused profile a profile without a frequency entry Press the SET button Sync appears on the display ...

Page 70: ...e standard display Press the ESC button to exit the menu item Select a profile by pressing the UP DOWN button on the standard dis play The selected profile is loaded you hear the audio signal of the corre sponding receiver If there is no profile saved Inactive appears in the Load Profiles menu item Engineer Mode remains activated even if you replace the batteries or switch the EK off and on again ...

Page 71: ...t menu item of the Advanced submenu you can reset the set tings of the receiver to the factory settings Advanced Software Revision menu item In the Software Revision menu item of the Advanced submenu you can display the current software version of the receiver ...

Page 72: ...put 2 Volume control for the headphone socket See Using the headphone output 3 Infrared interface with a blue LED See Synchronizing devices 4 Red LED for warnings See Advanced Fullscreen Warnings menu item 5 Display panel See Displays on the SR IEM G4 display panel 6 Jog dial for navigating through the menu See Buttons for navigating the SR IEM G4 menu 7 SYNC button See Synchronizing devices 8 ESC...

Page 73: ...pears To switch the transmitter to standby mode If necessary deactivate the lock off function see Lock off function Press and hold the STANDBY button until OFF appears on the display panel The display panel switches off To completely switch the transmitter off Disconnect the transmitter from the power supply system by unplug ging the power supply unit from the wall socket ...

Page 74: ... listen to the audio signal ATTENTION Danger due to high volume levels Volume levels that are too high may damage your hearing Turn down the volume of the headphone output before you put on the headphone Connect the headphone to the headphone socket Control the volume by turning the volume control next to the head phone socket ...

Page 75: ...ion to adjust the volume dis tribution on his or her receiver as needed In Stereo mode you can receive the two input signals either as a mixed mono signal or as a stereo signal To do so you must select Fo cus or Stereo mode on the EK IEM G4 receiver See Mode menu item Select Mono when you only want to transmit one channel The signal of the left audio input BAL AF IN L is used In Mono mode you have...

Page 76: ... is displayed however the transmitter is not transmitting an RF signal The RF Mute warning appears see Dis plays on the SR IEM G4 display panel and the LED warnings are illu minated see Operating elements of the SR IEM G4 transmitter To activate the RF signal Press the STANDBY button RF Mute Off appears in the display panel Turn the jog dial RF Mute ON appears in the display panel Press the jog di...

Page 77: ... off function Press the jog dial Locked appears in the display panel Turn the jog dial Unlock appears in the display panel Press the jog dial Lock off function is now temporarily deactivated When you are in the operating menu Lock off function is deactivated long enough for you to work in the op erating menu You are in the standard display Lock off function is automatically activated after 10 seco...

Page 78: ...hannels mono stereo 2 Frequency bank and channel Current frequency bank and channel number See Frequency Preset menu item 3 Frequency Configured transmission frequency See Frequency Preset menu item 4 Name Freely selectable name of the receiver See Name menu item 5 Warnings Activated warning messages are displayed See Advanced Fullscreen Warnings menu item 6 Transmission icon and transmission powe...

Page 79: ...ck menu item Buttons for navigating the SR IEM G4 menu Setting options in the menu The display is dimmed automatically after 2 minutes of inactivity If there is no radio link to a transmitter the display switches off after 20 minutes The display can be reactivated by pressing any button ...

Page 80: ...u items Press the jog dial to open the selected menu item Operating elements of the SR IEM G4 transmitter Making changes in a menu item After you open a menu item you can make changes as follows Turn the jog dial to set the displayed value Press the jog dial to save your setting Press the ESC button to leave the menu item without saving the set ting Operating elements of the SR IEM G4 transmitter ...

Page 81: ...uency Preset menu item Entering a freely selectable name See Name menu item Activating deactivating the automatic lock off function See Auto Lock menu item Configuring enhanced settings in the Advanced Menu Adjusting the transmission frequencies for the U frequency bank Adjusting the parameters for transmission to the receivers Configuring the transmission power Adjusting the warnings Adjusting th...

Page 82: ...e 0 dB to 42 dB in 3 dB steps Mode menu item Configuring the audio transmission Setting range Stereo and Mono In stereo mode you can receive the two input signals either as a mixed mono signal or as a stereo signal To do so you must select Fo cus or Stereo mode on the EK IEM G4 receiver See Mode menu item ...

Page 83: ...y Setup Sync function is needed to perform a frequency scan us ing the receiver and for automatic multi channel frequency setup See Easy Setup menu item for the EK IEM G4 receiver See Synchronizing devices Frequency Preset menu item Manually selecting a frequency bank and channel ...

Page 84: ...he names of the musicians The names are a maximum of 8 characters All letters except umlauts Numbers from 0 to 9 Special characters and spaces Enter the names as follows Turn the jog dial to select a character Press the jog dial to switch to the next position Once you have entered the last character press the jog dial to save the name ...

Page 85: ...the transmitter from being unintentionally switched off and also prevents any unintentional changes to the transmitter s configu ration In the standard display the lock icon shows whether the lock off function is currently switched on You can find information about using the lock off function under Lock off function ...

Page 86: ...ission to the receivers See Advanced Sync Settings menu item Configuring the transmission power See Advanced RF Power menu item Adjusting the warnings See Advanced Fullscreen Warnings menu item Adjusting the contrast of the display panel See Advanced Brightness menu item Resetting the transmitter See Advanced Reset menu item Configuring the IP address See Advanced IP Address menu item Displaying t...

Page 87: ... can save a total of 16 channels in the frequency banks U1 to U6 Only adjusting the frequency Open the Tune menu item in the Advanced menu Adjust the settings Setting the channel and frequency Select the Tune menu item and call it up by holding down the jog dial until the channel selection appears Adjust the settings ...

Page 88: ...rs Balance Squelch Mode High Boost Auto Lock Limiter See Synchronizing devices Advanced RF Power menu item Configuring the transmission power You can configure the transmission power in three steps in the RF Power menu item Please note the information at the following address General conditions and restrictions for the use of frequencies Setting range Low 10 mW Standard 30 mW High 50 mW If you are...

Page 89: ...tivate or deactivate the following warnings AF Peak The audio level is too high RF Mute The RF signal from the transmitter to the receiver is deactivated Advanced Brightness menu item Adjusting the contrast of the display panel You can configure the contrast of the display in 16 steps Setting range 0 to 15 ...

Page 90: ...tter only the selected settings of the pilot tone and the U1 to U6 frequency banks are retained Advanced IP Address menu item Adjusting the network configuration Setting range Automatic or manual Advanced Software Revision menu item Show software revision You can display the current software revision ...

Page 91: ...eceiver and the transmitter manually EK IEM G4 Frequency Preset menu item SR IEM G4 Frequency Preset menu item Setting notes Please note the following when synchronizing a transmitter with a receiv ers Only use transmitters and receivers from the same frequency range see the type plate on the transmitter and receiver Make sure that your chosen frequencies are listed in the frequency ta ble for the...

Page 92: ...ettings for your EK IEM G4 portable receiver directly on your stationary SR IEM G4 trans mitter and transfer them to the receivers via the infrared interface Easy Setup Sync function EK IEM G4 SR IEM G4 for a single radio link Switch your stationary transmitter and your mobile receivers on Call up the Easy Setup menu item on the transmitter Choose the Mute RF For Only This Device option The SYNC d...

Page 93: ...e mobile receiver in front of the infrared interfaces of the remaining transmitters one at a time Easy Setup Sync function EK IEM G4 SR IEM G4 for multi channel frequency setup Perform the multi channel frequency setup as described under Per forming multi channel frequency setup Sync function SR IEM G4 EK IEM G4 You can adjust the Parameters to be transferred to the receivers here Advanced Sync Se...

Page 94: ...When the transfer is complete a tick appears in the transmitter s dis play as a confirmation Then the transmitter will return to the standard display To cancel synchronization Press the ESC button on the transmitter An X appears in the display This icon also appears when no receiver is found or the receiver is not compatible no receiver is found and the synchronization process automatically ends a...

Page 95: ...You can find information on installation and startup of the AC 41 under In stalling the AC 41 Operating elements on the front of the device 1 ON OFF button See Switching the AC 41 on and off 2 Power LED See Switching the AC 41 on and off 3 Status LEDs Power supply of the transmitter See Meaning of the LEDs ...

Page 96: ... turns green The transmitters receive the RF signal The status LEDs light up see Meaning of the LEDs To switch the antenna combiner to standby mode Hold down the ON OFF button until the power LED turns off To fully switch off the antenna combiner Disconnect the antenna combiner from the power supply system by un plugging the power supply unit from the wall socket ...

Page 97: ...nsmitters Sockets RF IN 1 to RF IN 4 have supply voltage for the transmitters LEDs 1 to 4 are not lit The transmitters are not compatible with the AC 41 antenna combiner Make sure that the transmitter has its own power supply or There is a short circuit at the sockets RF IN 1 to RF IN 4 Check the antenna connections Replace the connecting cable if needed ...

Page 98: ...n dividual products Product variants and frequency variants Product variants Frequency tables with overviews of all banks and channels Fre quency tables Product specific technical data Specifications Information on pin assignment jack and XLR Pin assignment You can also find information about safely cleaning and maintaining evolution wireless G4 series products Cleaning and maintenance ...

Page 99: ...EK IEM G4 G 566 608 MHz Art no 507852 EK IEM G4 B 626 668 MHz Art no 507853 EK IEM G4 C 734 776 MHz Art no 507854 EK IEM G4 E 823 865 MHz Art no 507855 EK IEM G4 A1 470 516 MHz Art no 508188 EK IEM G4 A 516 558 MHz Art no 508189 EK IEM G4 AS 520 558 MHz Art no 508190 EK IEM G4 G 566 608 MHz Art no 508191 EK IEM G4 B 626 668 MHz Art no 508192 EK IEM G4 C 734 776 MHz Art no 508193 EK IEM G4 D 780 82...

Page 100: ... B 626 668 MHz Art no 507846 SR IEM G4 C 734 776 MHz Art no 507847 SR IEM G4 E 823 865 MHz Art no 507848 SR IEM G4 A1 470 516 MHz Art no 508181 SR IEM G4 A 516 558 MHz Art no 508182 SR IEM G4 AS 520 558 MHz Art no 508183 SR IEM G4 G 566 608 MHz Art no 508184 SR IEM G4 B 626 668 MHz Art no 508185 SR IEM G4 C 734 776 MHz Art no 508186 SR IEM G4 D 780 822 MHz Art no 508187 AC 41 EU Art no 576761 NT 3...

Page 101: ...an find frequency tables for all available frequency ranges in the download section of the Sennheiser website uneer www sennheiser com download Download area of the Sennheiser website Enter ew G4 into the search bar to show the frequency tables ...

Page 102: ...Specifications 101 Specifications You can find the product specific technical data in the sections below ...

Page 103: ...quency banks each with up to 16 factory preset channels no intermodulation 6 frequency banks with up to 16 programmable channels Switching bandwidth up to 42 MHz Nominal peak deviation 24 kHz 48 kHz Receiver principle Adaptive diversity Sensitivity with HDX peak deviation 4 μV typically 1 6 μV for 52 dBA rms S N Adjacent channel selection Typically 65 dB Intermodulation attenuation Typically 70 dB...

Page 104: ...at 80 kHz Limiter 18 dB to 6 dB in 6 dB steps can be switched off Temperature range 10 C to 55 C 14 F to 131 F Power supply 2 AA batteries 1 5 V or BA 2015 accupack Nominal voltage 3 V battery 2 4 V rechargeable battery Power consumption at nominal voltage with transmitter switched off typically 140 mA 25 μA Operating time approx 4 to 6 hours depending on the volume level Dimensions approx 82 x 64...

Page 105: ...Max 1680 receiving frequencies adjustable in 25 kHz steps 20 frequency banks each with up to 16 factory preset channels no intermodulation 6 frequency banks with up to 16 programmable channels Switching bandwidth up to 42 MHz Nominal peak deviation 24 kHz 48 kHz MPX pilot tone frequency devia tion 19 kHz 5 kHz Frequency stability 10 ppm Antenna output BNC socket 50 Ω RF output power at 50 Switchab...

Page 106: ...nical ly balanced Max input level 22 dBu Total harmonic distortion at 1 kHz and nominal deviation 0 9 Signal to noise ratio at rated in put and peak deviation 90 dB AF output LOOP OUT BAL L I LOOP OUT BAL R II 6 3mm stereo jack socket 1 4 balanced Temperature range 10 C to 55 C 14 F to 131 F Power supply 12 V DC Power consumption max 350 mA Dimensions approx 202 x 212 x 43 mm Weight approx 980 g ...

Page 107: ...z 470 608 MHz Transmission loss 0 dB 1 dB RF input power max 30 mW per input Impedance 50 Ω Power supply 13 8 V DC with tabletop power supply unit NT 3 1 Total power consumption max 3 4 A with connected trans mitters Transmitter power supply on RF IN 1 to RF IN 4 11 4 V DC protected against re verse supply 350 mA Relative air humidity 5 to 95 Temperature range Operation Storage 10 C to 55 C 14 F t...

Page 108: ...107 Block diagram AC 41 ...

Page 109: ...4 3 5 mm mic jack plug Plug for lavalier and headset microphone e g ME 2 Connect to SK 100 G4 SK 300 G4 SK 500 G4 3 5 mm line jack plug Plug for line and instrument cables e g Ci 1 N Connect to SK 100 G4 SK 300 G4 SK 500 G4 6 3 mm stereo jack plug balanced audio in loop out Connect to SR IEM G4 Audio In SR IEM G4 Loop Out R L Mic Line ...

Page 110: ...Connect to EM 100 G4 Audio Out EM 300 500 G4 Audio Out 6 3 mm stereo jack plug for headphone jack Connect to EM 100 G4 headphone input EM 300 500 G4 headphone input SR IEM G4 headphone input XLR 3 plug balanced Hollow jack plug for power supply L R 1 3 2 ...

Page 111: ...s and batteries before you begin cleaning Clean all products only with a soft dry cloth Note the special cleaning instructions below for the following products Cleaning the sound inlet basket of the microphone module Unscrew the top sound inlet basket from the microphone module by turning it counterclockwise Remove the foam insert You can clean the sound inlet basket in two ways Use a slightly dam...

Page 112: ... maintenance 111 Screw the sound inlet basket back onto the microphone module From time to time you should also clean the microphone module contacts Wipe the contacts of the microphone module with a soft dry cloth ...

Page 113: ...o show the instruction manuals for products in the ew G4 series Customer service If you have technical questions or experience problems with the product you can access Sennheiser customer service at www sennheiser com service support Sennheiser customer service online area Feedback Do you have any questions or suggestions about this instruction manual Write to us at techcomm sennheiser com Sennhei...

Reviews: