Sena Parani A20 User Manual Download Page 8

8

2

2

Note: If the helmet has deep ear pockets, you can 

use the speaker pads to bring the speakers closer 

to your ears.

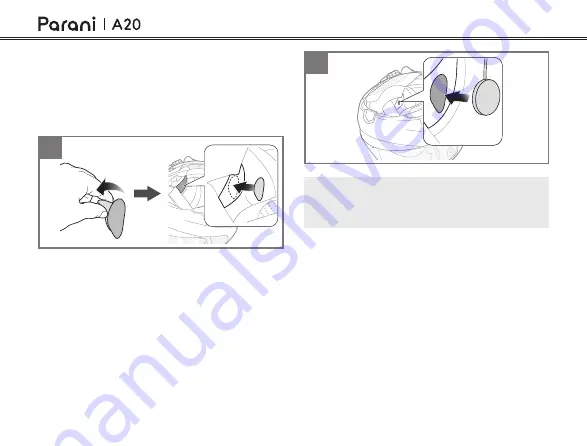
2.3  Installing the Speakers

1.  Attach the hook and loop fasteners for 

speakers to the ear pockets inside the helmet.

2.  Attach the speakers to the hook and loop 

fasteners for speakers inside the helmet.

1

Summary of Contents for Parani A20

Page 1: ...1 2 0 USER S GUIDE ENGLISH Motorcycle Intercom...

Page 2: ...t PRODUCT FEATURES Blast your favorite tunes talk over the intercom with your buddies hear directions from your GPS and more all through your A20 Bluetooth headset With built in Bluetooth capabilities...

Page 3: ...the A20 is Turned Off 15 4 1 3 Pairing When the A20 is Turned On 16 4 2 Second Mobile Phone Pairing 16 5 MOBILE PHONE USAGE 17 5 1 Using Phone Functions 17 1 BEFORE STARTING 5 1 1 Product Details 5 1...

Page 4: ...TING 28 9 1 Fault Reset 28 9 2 Factory reset 29 5 2 Speed Dialing 18 5 2 1 Assigning Speed Dial Presets 18 5 2 2 Using Speed Dial Presets 18 6 STEREO MUSIC 19 7 BLUETOOTH INTERCOM 20 7 1 Intercom Pair...

Page 5: ...i function Button DC Power Charging Firmware Upgrade Port Speakers and Microphone Port LCD Display 1 2 Package Contents Headset Main Unit Clamp Glued Surface Mounting Adapter Speakers and Microphone C...

Page 6: ...nsert the main module into the clamp using the two connecting slots on the back 2 Insert the headset into the helmet using the clamp Wired Boom Microphone Wired Boom Microphone Microphone sponge 2 Hoo...

Page 7: ...headset on the left side of the helmet 4 Insert the speaker and microphone plug into the headset 3 Insert the speaker and microphone plug into the headset 2 2 Using the Glued Surface Mounting Adapter...

Page 8: ...he speaker pads to bring the speakers closer to your ears 2 3 Installing the Speakers 1 Attach the hook and loop fasteners for speakers to the ear pockets inside the helmet 2 Attach the speakers to th...

Page 9: ...side surface of the left external shell 2 Attach the wired boom microphone s mounting plate to the hook and loop fastener 3 Adjust the head of the microphone so that the tab is facing away from your m...

Page 10: ...elmet s chin guard 2 Attach the wired microphone to the hook and loop fastener for wired microphone Note You can use the boom microphone holder after attaching the hook and loop fastener for boom micr...

Page 11: ...3 GETTING STARTED 3 1 Button Multi function Button Button Button Tap Press and Hold 3 Align the arrows on the main unit and microphone cables and insert the microphone cable into the microphone connec...

Page 12: ...C or other locally approved agencies that Sena accepts The headset is compatible with 5 V input USB charged devices only 3 2 LCD Display Battery Indicator Volume Bar Pairing Status Active Function 3 3...

Page 13: ...eadset is rebooted 3 6 Downloadable Parani Software 3 6 1 Parani Device Manager The Parani Device Manager allows you to upgrade firmware and configure settings directly from your PC For more informati...

Page 14: ...er executing the Delete All Pairings feature 4 PAIRING YOUR HEADSET WITH OTHER BLUETOOTH DEVICES Before using the headset with other Bluetooth devices for the first time they will need to be paired Th...

Page 15: ...search for Parani A20 3 Enter 0000 for the PIN Some smartphones may not ask for PIN 1 Press and hold the Button and Button for 1 second You will hear a voice prompt Phone pairing 2 On your smartphone...

Page 16: ...prompt Second mobile phone pairing 3 On your smartphone search for Parani A20 4 Enter 0000 for the PIN Some smartphones may not ask for the PIN 4 1 3 Pairing When the A20 is Turned On 1 While the hea...

Page 17: ...s Answering a call Tap the Multi function Button Ending a call Tap the Multi function Button Rejecting a call Press and hold the Multi function Button for 2 seconds Make a Call with Voice dialer Press...

Page 18: ...gs LAST NUMBER Last Number Redial Speed Dial 2 Cancel Speed Dial 1 Speed Dial 3 5 2 Speed Dialing 5 2 1 Assigning Speed Dial Presets You need to assign speed dial numbers before using the speed dial S...

Page 19: ...To redial the last number called tap the Multi function Button when you hear a voice prompt Last number redial 5 To call one of the speed dials tap the Multi function Button when you hear a voice prom...

Page 20: ...m conversations the last paired headset is set as first intercom friend The previous intercom friend becomes second intercom friend and third intercom friend 7 BLUETOOTH INTERCOM 7 1 Intercom Pairing...

Page 21: ...i function Button Intercom Friend 1 Tap the Multi function Button Intercom Friend 2 Double tap the Multi function Button Intercom Friend 3 Triple tap the Multi function Button Last Come First Served Y...

Page 22: ...e reestablished 7 3 1 Start a Three Way Intercom Conference You A can have a three way conference intercom with two other intercom friends B C by establishing two intercom connections at the same time...

Page 23: ...com Friend B Intercom Friend C YOU 1 You A need to be paired with two other friends B C for three way conference intercom Intercom Friend B Intercom Friend C YOU 2 Start an intercom conversation with...

Page 24: ...dwiththethirdparticipant D as well This is because the third participant D is connected with you via the second friend C Disconnect B Tap the Multi function Button Disconnect C D Double tap the Multi...

Page 25: ...ton or the Button to navigate between the menus You will hear voice prompts for each menu item 3 You can enable disable the feature or execute the command by tapping the Multi function Button 8 GENERA...

Page 26: ...ble Disable or Execute Delete All Pairings Execute Factory Reset Execute Exit Configuration Execute Configuration Setting Enable Disable or Execute Second Mobile Phone Pairing None Speed Dial Execute...

Page 27: ...il you hear a voice prompt Cancel and tap the Multi function Button to confirm You will then hear a voice prompt Cancel 8 2 1 Assigning Speed Dial 1 To assign a phone number as a speed dial tap the Bu...

Page 28: ...set to factory default settings 8 2 2 Voice Prompt Default Enable You can disable voice prompts by configuration setting but the following voice prompts are always on Voice prompts for configuration s...

Page 29: ...9 9 2 Factory reset If you want to restore the headset to factory default settings use the Factory Reset in the configuration menu The headset automatically restores the default settings and turns off...

Page 30: ...ght 2021 Sena Technologies Inc All rights reserved 1998 2021 Sena Technologies Inc All rights reserved Sena Technologies Inc reserves the right to make any changes and improvements to its product with...

Reviews: