background image

ENGLISH - 14

Model

Input Frequency

Polarization

Antenna Gain

Size (W x D x H) 

Weight

Min EIRP

Angle Range (EL / AZ )

Satellite Switching System

Satellite Searching Time

LNB

Input Voltage

Power Consumption

Output

Output Frequency

L.O. Frequency

SNIPE DOME 2 

10.7 ~ 12.75 GHz

Vertical & Horizontal

33.7 dBi @ 12.7 GHz 

(ANT) 660 x 660 x 315 mm

(ANT) 9.6 kg / (RCU) 23 g

50 dBW

15° ~ 75° / 390°

DiSEqC

180 seconds (average)

1 / 2 output (optional)

950 ~ 2,150 MHz 

9.75 / 10.6 GHz

DC 12 V

30 W (in searching)

Model

Frequency

Support Bluetooth version

BLE Gain

Size (W x D x H) 

Screen size (L X H)

Battery

TX power 

RX sensitivity 

SNIPE DOME 2 Remote control

2.4 GHz

Ver 4.2 / 5.0 (the latest)

up to +3 dBm

down to -92 dBm

140 X 50 X 18 mm

128 X 64 Pixels

AAA X 2

6-2. Specifications

Summary of Contents for SNIPE DOME 2

Page 1: ...Stationary Automatic Camping Satellite Antenna www selfsat com ver 1 0 User s manual Bedienungsanleitung Manuel utilisateur ...

Page 2: ...Motorhome Installation 7 1 Precaution before installation 7 2 Required space for SNIPE DOME 2 7 3 Equipment for installation 7 4 Instruction for installation 15 16 17 17 3 Operating Instruction 3 1 Connection diagram 3 2 Functional description 3 3 Quick reference 6 7 11 6 1 Dimension 6 2 Specifications 13 14 4 Software Upgrade 5 Troubleshooting 6 Specifications 11 12 ...
Page 3: ...as long as the system is located within the footprint of this satellite For general operation please ensure that the system always has a clear view to the sky If the satellite s signal beam is interrupted by obstacles such as mountains buildings or trees the unit will not function and no TV signal will be received The first few pages of these instructions contain information about using the general...

Page 4: ...and ensure the cables are not modified in any way As the user of this equipment be responsible for ensuring compliance with the relevant laws and regulations The manufacturer does not take liability for direct or indirect consequential damage of the system motor vehicles or other equipment by reason of unsuitable battery usage or erroneous installation or wrong wire connection It is not possible to...

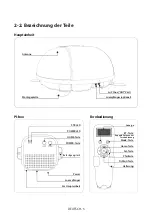
Page 5: ...r and peel off to take copper cables out Only power adaptor produced by SNIPE series manufacturer is guaranteed and has be used Power adaptor has to be purchased separate Please ask to local dealer shop for more information Main unit PI box Cable gland Remote control Cable holder Remote control Bracket M4 20 15 User manual Power adaptor Optional Cigarette lighter adaptor Signal cable 10m x2 for twi...

Page 6: ... plate PI box Remote control STB LED POWER LED HOME button POWER button Fixed hole Power to STB to unit Display window BT button Mode button HOME button SET button Arrow button DiSEqC button Bracket Pairing antenna with remote control Antenna to Receiver optional ...

Page 7: ...onnection diagram Turn on the PI power after all cables connections are complete When not using the antenna turn off the PI power MAIN UNIT PI box Signal cable 10 m PI cable 1 5 m STB TV Power input cable Cigar jack Remote control Mobile App ...

Page 8: ...return from sleep mode press any button except DiSEqC button i ii When the power of the set top box connected to the PI box is turned on the STB LED turns ON a 1 PI box 2 Remote control i POWER Button A Button and Display A Button and LEDs B Basic Features When the Home button is pressed the antenna moves to the home position a ii HOME Button iii STB LED When receiving a broadcast signal or when t...

Page 9: ...CT MAC O 09 39 E4 PRESS SET When the remote control and the antenna are connected a Connected message appears O 39 E4 Connected The MAC Address of the connected antenna the satellite name set for the antenna and the current status are displayed Press the left or right arrow button to select the desired satellite and press the SET button to search for the satellite HOME When the antenna is in the h...

Page 10: ...satellites for DiSEqC 1 1 when user setup at STB For DiSEqC operating user needs to assign DiSEqC satellites list at STB is in same order as above SNIPE DOME 2 s pre set list i DiSEqC setting NO 1 2 3 4 5 6 7 8 9 10 11 12 LNB LNB 1 LNB 2 LNB 3 LNB 4 LNB 5 LNB 6 LNB 7 LNB 8 LNB 9 LNB 10 LNB 11 LNB 12 Satellite ASTRA1 ASTRA2 ASTRA3 ASTRA1 Hot Bird Eutelsat 9 ASTRA 4 Thor Eutelsat 5W ASTRA1 USER1 USE...

Page 11: ...ark in the first line BT SET REFIND ON PRESS SET R Used to update the remote control firmware Press the SET button to restart the remote control in update mode BT SET R C Update PRESS SET O 39 E4 D ASTRA 1 Error 6F Press BT button to change to BT setting screen Press the arrow to move to the desired function and set with the SET button a Press and hold BT button for more than 5 seconds to reset the ...

Page 12: ...properly stored in safe Please also note that different legal requirements are applied to the operation of electrical and electronic equipment in different countries As the user of this equipment you are responsible for yourself ensuring compliance with the relevant laws and regulations The manufacturer does not take liability for direct or indirect consequential damage of the system motor vehicles ...

Page 13: ...hen power on the antenna Check again all the cable connections have been made correctly D Mechanical problems i Try to power OFF ON again If the antenna does not move into desired position ii Try to power OFF ON again If problem persists please contact local dealer shop for assistance If the antenna makes a noise whilst remaining static i C Fail to search the selected satellite Satellite signals c...

Page 14: ...ENGLISH 13 66 0cm 66 0cm 31 5cm 6 Specifications 6 1 Dimension SNIPE DOME 2 PI box Remote control 105 mm 129 mm 102 mm 35 mm 34 mm 28 mm 102 mm 85mm 69 mm 25 mm 15 mm 50 mm 155 mm 155 mm ...

Page 15: ...z Vertical Horizontal 33 7 dBi 12 7 GHz ANT 660 x 660 x 315 mm ANT 9 6 kg RCU 23 g 50 dBW 15 75 390 DiSEqC 180 seconds average 1 2 output optional 950 2 150 MHz 9 75 10 6 GHz DC 12 V 30 W in searching Model Frequency Support Bluetooth version BLE Gain Size W x D x H Screen size L X H Battery TX power RX sensitivity SNIPE DOME 2 Remote control 2 4 GHz Ver 4 2 5 0 the latest up to 3 dBm down to 92 d...

Page 16: ...ndicated with Remove allow mark sticker please refer to the below image Do not open the antenna cover to remove bolt 7 1 Precaution before installation 7 Installation Be aware that using antenna before removal the internal lock bolt will damage the antenna so make sure to read this manual and precautions thoroughly before installation to prevent damage to the product Warning 7 Caravan Motorhome In...

Page 17: ...GLISH 16 Take care that there is enough space for the SNIPE DOME 2 just as for the operation range 7 2 Required space for SNIPE DOME 2 Driving direction Driving direction Vehicle rear 31 5cm 66 0cm 66 0cm ...

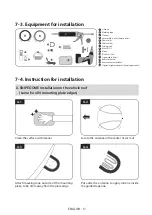
Page 18: ...nt for installation 7 4 Instruction for installation A SNIPE DOME Installation on the vehicle roof same for all 4 mounting plate edges 1 2 10 11 4 13 3 1 2 3 4 5 6 7 8 9 10 11 12 13 14 8 5 6 14 5 7 12 9 A 2 FRONT A 1 Put aside the antenna to apply silicone inside the guided tape line Attach masking tape outside of the mounting plate to be 4mm away from the plate edge A 4 Clean the surface with cle...

Page 19: ...face Repeat the same for the remaining mounting plates B Assemble 2pcs of M4x20 bolt to fix the four 4 mounting plates each B 4 B 2 Place main unit on the top of fixed plate Put back the mounting plate on the silicone applied and make two 2 holes 2mm with power drill 7 Apply silicone on the holes Assemble mounting plate using two 2 M4x20 screws Re apply silicone to cover tightened screws 8 ...

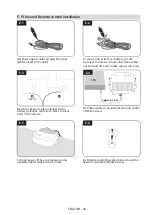
Page 20: ...the antenna remove masking tape and tidy silicone before dry D 8 D 7 Set up the signal cable cable holder and cable gland as above picture D 1 D 2 Apply masking tape 5mm from away the outside of holder and drill a 20mm hole in the center to allow the cable can pass through D Cable holder installation approx 30cm Insert the signal cable through the hole D 4 Arrange cable holder in front of 30cm apa...

Page 21: ... connector to take inner three cables out and peel off each to take copper cable out E 2 Fix Remote control bracket where it should be fixed using two 2 of M4x20 screw E 6 Fix PI Box where it should be fixed using two 2 of M4x20 screw E 4 E 1 E PI box and Remote control installation E 3 Match the power cables polarities to the battery polarities red to red black to black ports of the vehicle 12V DC a...

Page 22: ......

Page 23: ...ile 4 5 7 Installation von Wohnmobil Reisemobil 7 1 Vorsichtsmaßnahme vor der Installation 7 2 Erforderlicher Platz für Installation 7 3 Ausrüstung für die Installation 7 4 Installation 15 16 17 17 3 Bedienungsanleitung 3 1 Anschlussplan 3 2 Funktionsbeschreibung 3 3 Kurzanleitung 6 7 11 6 1 Abmessungen 6 2 Technische Daten 13 14 4 Software Upgrade 5 Fehlerbehebung 6 Technische Daten 11 12 ...

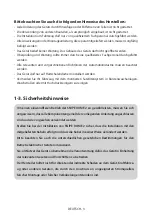
Page 24: ...urch Hindernisse wie Berge Gebäude oder Bäume unterbrochen wird kann das Gerät nicht funktionieren und kein TV Signal kann empfangen werden Die ersten Seiten der Bedienungsanleitung enthalten Informationen über die allgemeinen Funktionen Ihrer SNIPE DOME 2 gefolgt von der Erläuterung der möglichen Einstellungen Die letzten Seiten der Anleitung behandeln die technischen Aspekte der SNIPE DOME 2 1 2...

Page 25: ...dem Gerät Kraftfahrze ug oder anderen Geräten die durch den Anschluss an ungeeigneten Stromquellen falscher Montage oder falscher Verkabelung entstanden sind Jede Änderung des Geräts durch Hinzufügen oder Entfernen von Teilen ist nicht gestattet Die Verwendung von anderen Bauteilen als ursprünglich eingebaut ist nicht gestattet Die Installation am Fahrzeug darf nur von qualifiziertem Fachpersonal d...

Page 26: ...e Isolierung der Kupferkabel Nur ein Netzteil des Herstellers der SNIPE Serie stellt die korrekte Funktion sicher und sollte verwendet werden Netzteil muss separat erworben werden Bitte fragen Sie lokalen Händler Laden für weitere Informationen Haupteinheit PI box Kabelverschraubung Fernbedienung Kabelhalter Fernbedienungshalterung M4 20 15 Bedienungsanleitung Netzteil Optional Stromversorgungskab...

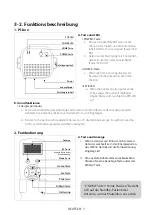
Page 27: ...tageplatte PI box Fernbedienung STB LED POWER LED HOME Taste POWER Taste Befestigungsloch Power zu empfänger Zur Haupteinheit Anzeige BT Taste Mode Taste Koppeln Antenne mit Fernbedienung Antenne zu empfänger optional Home Taste Set Taste Pfeiltaste DiSEqC Taste Halterung ...

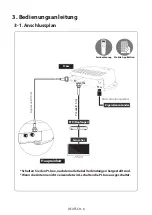
Page 28: ...ox nachdem alle Kabel Verbindungen hergestellt sind Wenn die Antenne nicht verwendet wird schalten die PI box ausgeschaltet Haupteinheit PI box Signal kabel 10m PI kabel 1 5 m STB Empfänger Fernseher Stromversorgungskabel Zigarettenanzünder Fernbedienung Mobile Applikation ...

Page 29: ... außer der DiSEqC Taste i ii Wenn die Stromversorgung der an die PI box angeschlossenen Empfänger eingeschaltet wird leuchtet die STB LED auf a 1 PI box 2 Fernbedienung i POWER Taste A Taste und Anzeige A Taste und LEDs B Grundfunktionen Wenn die Home Taste gedrückt wird bewegt sich die Antenne in die Home Position a ii HOME Taste iii STB LED Wenn Sie ein Sendesignal empfangen oder wenn sich die A...

Page 30: ...ESS SET Wenn die Fernbedienung und die Antenne verbunden sind wird die Meldung Connected angezeigt O 39 E4 Connected Der MAC Address der angeschlossenen Antenne der für die Antenne festgelegte Satellitenname und der aktuelle Status werden angezeigt Drücken Sie die linke oder rechte Pfeiltaste um den gewünschten Satelliten auszuwählen und drücken Sie die SET Taste um nach dem Satelliten zu suchen H...

Page 31: ...C 1 1 bei der Benutzereinstellung von STB Fur den Einsatz von DiSEqC muss der Benutzer die DiSEqC Satellitenliste bei STB zuordnen sie ist in der gleichen Reihenfolge wie die oben voreingestellte Liste von SNIPE DOME 2 i DiSEqC Einstellung NO 1 2 3 4 5 6 7 8 9 10 11 12 LNB LNB 1 LNB 2 LNB 3 LNB 4 LNB 5 LNB 6 LNB 7 LNB 8 LNB 9 LNB 10 LNB 11 LNB 12 Satellite ASTRA1 ASTRA2 ASTRA3 ASTRA1 Hot Bird Eute...

Page 32: ...T SET REFIND ON PRESS SET R Dient zum Aktualisieren der Firmware der Fernbedienung Drücken Sie die SET Taste um die Fernbedienung im Update Modus neu zu starten BT SET R C Update PRESS SET O 39 E4 D ASTRA 1 Error 6F Drücken Sie die BT Taste um zum BT Einstellungsbildschirm zu wechseln Drücken Sie den Pfeil um zur gewünschten Funktion zu gelangen und stellen Sie sie mit der SET Taste ein a Halten S...

Page 33: ...ahrt wird Bitte beachten Sie auch dass für den Betrieb von elektrischen und elektronischen Geräten in verschiedenen Ländern unterschiedliche gesetzliche Anforderungen gelten Als Benutzer dieses Geräts sind Sie selbst dafür verantwortlich die Einhaltung der einschlägigen Gesetze und Vorschriften sicherzustellen Der Hersteller übernimmt keine Haftung für direkte oder indirekte Folgeschäden des Syste...

Page 34: ...tzschalter aus und wieder ein Bei weiter bestehenden Problemen wenden Sie sich an lokalen Händler Laden Die Antenne macht während der Bewegung knackende Geräusche und hängt in einer Stellung fest i ii iii C Der ausgewählte Satellit kann nicht durchsucht werden Satellitensignale können durch Gebäude oder Bäume blockiert oder beeinträchtigt werden Stellen Sie sicher dass sich in südlicher Richtung k...

Page 35: ...DEUTSCH 13 66 0cm 66 0cm 31 5cm 6 Technische Daten 6 1 Abmessungen SNIPE DOME 2 PI box Fernbedienung 105 mm 129 mm 102 mm 35 mm 34 mm 28 mm 102 mm 85mm 69 mm 25 mm 15 mm 50 mm 155 mm 155 mm ...

Page 36: ... mm ANT 9 6 kg RCU 23 g 50 dBW 15 75 390 DiSEqC 180 Sekunden AVG 1 Optional 2 Ausgäng 950 2 150 MHz 9 75 10 6 GHz DC 12 V 30 W wahrend des Suchlaufs Modell Frequenz Unterstützt Bluetooth Version BLE gewinn Abmessungen W x D x H Flüssigkristall Abmessungen L X H Batterie Sendeleistung Empfangsempfindlichkeit SNIPE DOME 2 Fernbedienung 2 4 GHz Ver 4 2 5 0 das Neueste bis zu 3 dBm bis auf 92 dBm 140 ...

Page 37: ...e des Gerätes entfernen siehe nachfolgendes Bild Die Antennenabdeckung nicht öffnen um die Schraube zu entfernen 7 1 Vorsichtsmaßnahme vor der Installation 7 Installation Es ist darauf zu achten dass die Verwendung der Antenne vor dem Entfernen des internen Schloßbolzens die Antenne beschädigen wird also ist diese Anleitung vor der Installation sorgfältig zu lesen um etwaige Schäden am Gerät zu ver...

Page 38: ... ist darauf zu achten dass es für SNIPE DOME 2 genügend Platz gibt genauso wie für den Betriebsbereich 7 2 Erforderlicher Platz für Installation Fahrtrichtung Fahrtrichtung Rücken des Fahrzeugs 31 5cm 66 0cm 66 0cm ...

Page 39: ...nstallation A SNIPE DOME 2 Installation auf dem Dach Gleiches gilt für alle vier 4 Montageplatten 1 2 10 11 4 13 3 1 2 3 4 5 6 7 8 9 10 11 12 13 14 8 5 6 14 5 7 12 9 A 2 FRONT A 1 Die Antenne ablegen um Silikon innerhalb des geführten Rollmessbands aufzubringen Das Abdeckband außerhalb der Montageplatte befestigen so dass es 4 mm vom Plattenrand entfernt ist A 4 Die Oberfläche mit einem Reinigungsm...

Page 40: ...nigen Aufräumen wie auf den Bildern B Montieren Sie 2 Stück M4x20 Schraube der Montageplatte 4 zu befestigen B 4 B 2 Das Hauptgerät auf die Oberseite der festen Platte stellen Die Montageplatte auf das aufgetragene Silikon zurückstellen und 2 Löcher 2 mm mit Bohrmaschine machen 7 Silikon auf die Löcher auftragen Die Montageplatte mit 2 Schrauben M4x20 zusammenbauen wieder auftragen Silikon auf die...

Page 41: ...dem Trocknen entfernen D 8 D 7 Richten Sie das Signalkabel den Kabelhalter und die Kabelverschraubung wie oben abgebildet ein D 1 D 2 Bringen Sie 5 mm von der Außenseite des Halters entfernt Klebeband an und bohren Sie ein 20 mm Loch in die Mitte damit das Kabel hindurchführen kann D Kabelhalter Installation approx 30cm Stellen Sie sicher dass die Lochgröße so minimal ist sodass ein Kabel durchgez...

Page 42: ...erauszunehmen und loskoppeln um Kupferkabel herauszunehmen E 2 Befestigen Sie die Fernbedienungshalterung dort wo sie mit zwei 2 M4x20 Schrauben befestigt werden soll F 6 Befestigen Sie die PI Box dort wo sie mit zwei 2 M4x20 Schrauben befestigt werden soll E 4 E 1 E PI box Fernbedienung und Fernbedienunghalterung Installation E 3 Stimmen Sie die Polaritäten von Netzkabel den der Batterie aufeinan...

Page 43: ......

Page 44: ...n Motorhome Installation 7 1 Précaution avant l installation 7 2 Espace requis pour l installation 7 3 Equipement pour l installation 7 4 Instruction pour l installation 15 16 17 17 3 Instructions de fonctionnement 3 1 Diagramme de connexion 3 2 Description fonctionnelle 3 3 Référence rapide 6 7 11 6 1 Dimension 6 2 Spécification 13 14 4 Mise à jour logicielle 5 Dépannage 6 Caractéristiques 11 12 ...

Page 45: ... l espace nécessaire alors qu il effectue les ajustements nécessaires avec le corps fin et agile de l antenne Pour un fonctionnement général assurez vous s il vous plaît que le système a toujours une vue dégagée sur le ciel Si le faisceau de signal du satellite est interrompu par des obstacles tels que les montagnes les bâtiments ou arbres l appareil ne fonctionnera pas et aucun signal TV sera reçu ...

Page 46: ...ementations en vigueur Le fabricant décline toute responsabilité pour les dommages consécutifs directs ou indirects au système aux véhicules à moteur ou à tout autre équipement en raison d une utilisation inadéquate de la batterie ou d une installation erronée ou d une mauvaise connexion des câbles Il n est pas autorisé de changer l ensemble du dispositif en supprimant ou en ajoutant des composant...

Page 47: ...re Seul un adaptateur d alimentation produit par le fabricant de séries SNIPE est garanti et doit être utilisé L adaptateur d alimentation doit être acheté séparément Veuillez s il vous plait contacter un revendeur un magasin local pour plus d informations Unité principale Boîtier PI Presse étoupe Télécommande Support de câble Support de télécommande M4 20 15 Manuel d utilisation Manuel d utilisat...

Page 48: ...ton HOME Bouton POWER Port d alimentation Câble de PI vers récepteur Câble de signal vers l unite principale Antenne au Boîtier PI port ANT au récepteur optionnel Troudesupport deBoîtierPI Écran à distance Bouton BT Couplage d antenne avec télécommande Bouton Mode Bouton HOME Bouton SET Boutons de flèches Bouton DiSEqC Support de télécommande ...

Page 49: ...PI après toutes les connexions des câbles sont complets Lorsque vous n utilisez pas l antenne coupez l alimentation Boitier PI Unité principale Boîtier PI Câble de signal 10m Câble de PI 1 5m Récepteur satellite Télé Câble d entrée d alimentation Adaptateur allume cigare Télécommande Application mobile ...

Page 50: ...Fonctions de base Lorsque le Bouton HOME est enfoncé l antenne se déplace vers la position HOME a ii Bouton HOME iii Voyant LED de récepteur Lors de la réception d un signal diffusé ou lorsque l antenne est en position d HOME l antenne ne fonctionne qu avec le courant provenant du récepteur Lors de la recherche d un satellite ou lorsque l antenne se déplace il passe automatiquement à la puissance c...

Page 51: ...ELECT MAC O 09 39 E4 PRESS SET Lorsque la télécommande et l antenne sont connectées un message connected apparaît O 39 E4 Connected Le code produit de l antenne connectée le nom du satellite défini pour l antenne et l état actuel s affichent Appuyez sur le bouton de fléché de gauche ou de droite pour sélectionner le satellite souhaité et appuyez sur le Bouton SET pour rechercher le satellite HOME Lors...

Page 52: ... lors de la configuration de l utilisateur à STB Pour l exploitation de DiSEqC l utilisateur doit attribuer la liste des satellites DiSEqC a STB est dans le meme ordre que ci dessus la liste preetablie de SNIPE O i Reglage de DiSEqC NO 1 2 3 4 5 6 7 8 9 10 11 12 LNB LNB 1 LNB 2 LNB 3 LNB 4 LNB 5 LNB 6 LNB 7 LNB 8 LNB 9 LNB 10 LNB 11 LNB 12 Satellite ASTRA1 ASTRA2 ASTRA3 ASTRA1 Hot Bird Eutelsat 9 A...

Page 53: ...ESS SET R Utilisé pour mettre à jour le firmware de la télécommande Appuyez sur le Bouton SET pour redémarrer la télécommande en mode mise à jour BT SET R C Update PRESS SET O 39 E4 D ASTRA 1 Error 6F Appuyez sur le bouton BT pour passer à l écran de réglage BT Appuyez sur la flèche pour accéder à la fonction souhaitée et réglez avec la bouton SET a Appuyez et maintenez enfoncé le Bouton BT pendant ...

Page 54: ...e fort Veuillez également noter que différentes exigences légales sont appliquées au fonctionnement des équipements électriques et électroniques dans différents pays En tant qu utilisateur de cet équipement vous êtes responsable de vous assurer du respect des lois et réglementations en vigueur Le fabricant décline toute responsabilité pour les dommages consécutifs directs ou indirects au système aux...

Page 55: ...onnexions des câbles ont été effectuées correctement D Problème méchanique i Éteignez et rallumez le produit puis effectuez une nouvelle recherche Dans le cas où l antenne ne tourne pas sur certines positions ii Éteignez et rallumez le produit puis effectuez une nouvelle recherche s il ne fonctionne pas contacter régional vendeur ou magasin pour assistance Dans le cas où l antenne fait un bruit lors ...

Page 56: ...FRANÇAIS 13 66 0cm 66 0cm 31 5cm 6 Spécifications 6 1 Dimension SNIPE DOME 2 Boîtier PI Télécommande 105 mm 129 mm 102 mm 35 mm 34 mm 28 mm 102 mm 85mm 69 mm 25 mm 15 mm 50 mm 155 mm 155 mm ...
Page 57: ...2 10 7 12 75 GHz Horizontale Vericale 33 7 dBi 12 7 GHz ANT 660 x 660 x 315 mm ANT 9 6 kg RCU 23 g 50 dBW 15 75 390 DiSEqC 180 secondes moyenne 1 2 sortie Optionel 950 2 150 MHz 9 75 10 6 GHz DC 12 V 30 W en mouvement Modèle Fréquence Prise en charge de la version BT BLE Gain Taille L x P x H Taille de l écran L X H Batterie Puissance TX Sensibilité RX SNIPE DOME 2 Télécommande 2 4 GHz Ver 4 2 5 0...

Page 58: ...ve Retirez ceci voir l image ci dessous N ouvrez pas le couvercle de l antenne pour retirer la vis 7 1 Précaution avant l installation 7 Installation Soyez conscient que l utilisation de l antenne avant le retrait du boulon de verrouillage interne endommagera l antenne Assurez vous donc de lire attentivement ce manuel et les précautions à suivre avant l installation pour éviter d endommager le pro...

Page 59: ...illez à ce qu il y ait suffisamment d espace pour tout comme pour la plage de fonctionne ment 7 2 Espace requis pour l installation Direction de conduite Direction de conduite l arrière du véhicule 31 5cm 66 0cm 66 0cm ...

Page 60: ... pour l installation A Installation Plaque de fixation sur le toit du véhicule même pour tous les quatre 4 bords de la plaque de montage 1 2 10 11 4 13 3 1 2 3 4 5 6 7 8 9 10 11 12 13 14 8 5 6 14 5 7 12 9 A 2 FRONT A 1 Mettez de côté l antenne pour appliquer du silicone à l intérieur de la ligne de ruban guidée Attacher du ruban de masquage à l extérieur de la plaque de montage de 5 mm à partir des...

Page 61: ... Plaque de fixation C 3 C 1 Surface de silicone bien rangé Nettoyer comme les images B 2pcs à vis de boulon M4x20 pour fixer la Plaque de fixation B 4 B 2 PPlacer la plaque de montage sur la silicone et faire 2 trous 2 mm avec une perceuse électrique 7 Appliquer de la silicone sur les trous Visser les 2 trous vis M4x20 Réappliquer de la silicone pour couvrir les boulons vissés 8 ...

Page 62: ...alors bien rangé silicone avant sec D 8 D 7 Installez le câble de signal le support de câble et le presse étoupe comme sur l image ci dessus D 1 D 2 Appliquez du ruban de masquage à 5 mm de l extérieur du support et percez un trou de 20 mm au centre pour permettre au câble de passer D Installation du Support de câble approx 30cm Assurez vous que la taille du trou est minimale afin que le câble pass...

Page 63: ... les trois câbles intérieurs et retirer chacun pour retirer le câble en cuivre E 2 FIxer le Support de télécommande à l aide des deux vis M4x16 au endroit voulu E 6 FIxer Boîtier PI à l aide des deux vis M4x16 au endroit voulu E 4 E 1 E L installation du Boîtier PI et de télécommand E 3 Raccordez les polarités des câbles d alimenta tion aux polarités de la batterie du rouge au rouge arrière au câb...

Page 64: ... IT CO LTD 637 Smart Hub Industry University Convergence Center 237 Sangidaehak ro Siheung si Gyeonggi do Korea 15073 TEL 82 0 31 8041 1500 FAX 82 0 31 8041 1550 E MAIL sales selfsat com WEB www selfsat com ...

Reviews: