Seiki SE65UO01UK User Manual Download Page 11

      10

En


-   

CUSTOMIZING TV SETTINGS

 Initial Setup

• 

Connect the power cord to the power socket after you have completed all the physical connections. At this stage, the TV will enter 

Standby Mode and the red LED indicator will illuminate. 

• 

In Standby Mode, press the   button on the main unit or on the remote control to turn the TV on. The red LED indicator will turn 

blue.

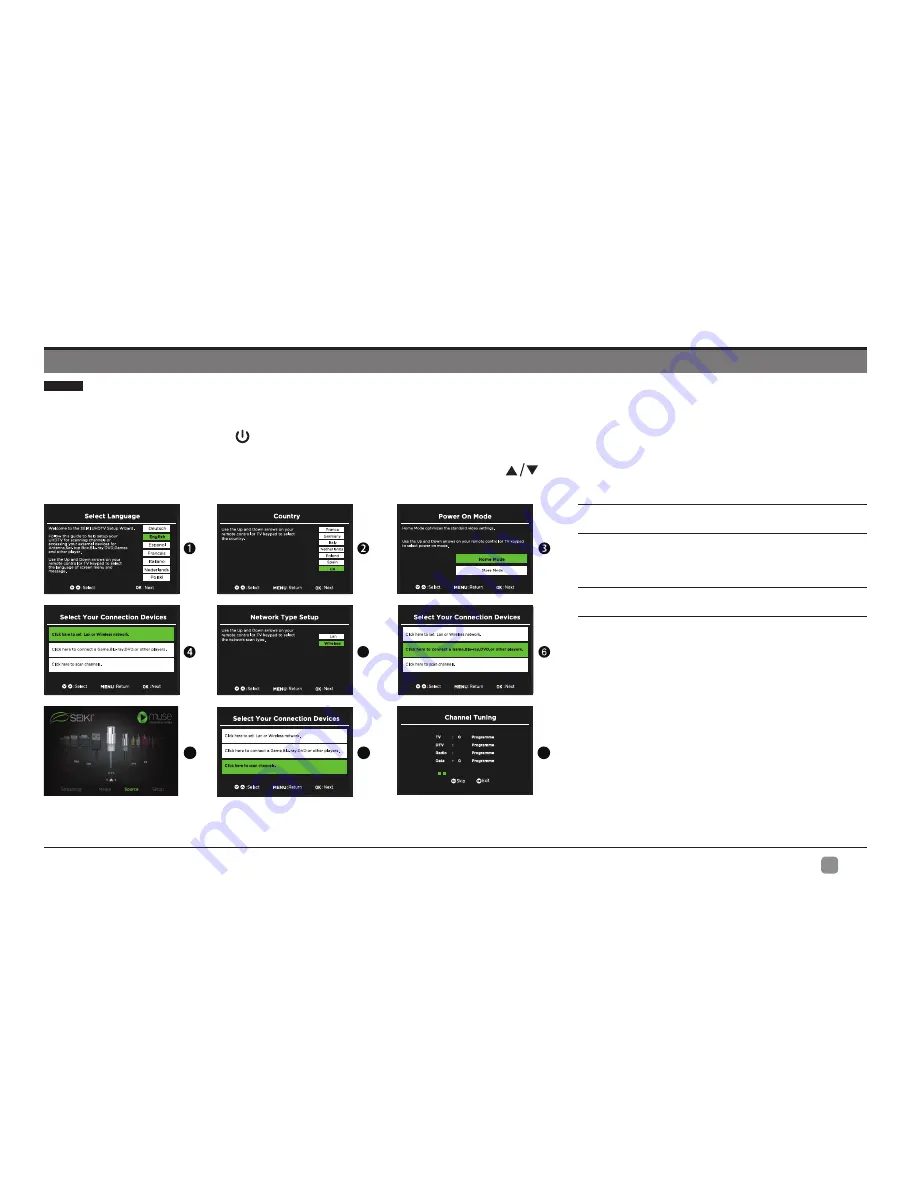
•  The first time you turn the TV on, it will go into the Setup Wizard. Press 


buttons to select your desired options and press 

OK


to confirm.   

Home Mode :

 The picture mode will be Standard if 

you select this mode.

Retail Mode :

 Select Dynamic Mode if you would 

like your picture to be brighter. At times this mode 

may use more energy to operate the Volume/Sound 

Mode and Picture Mode.
• 

The SLEEP-MODE Power should be less than 

0.5 W.

5

7

8

9

10 %

10

13

UHF

CH26D

TV

Summary of Contents for SE65UO01UK

Page 1: ...SE65UO01UK Read the User Manual carefully before using the TV and keep it for further reference USER MANUAL...

Page 2: ...ngs Initial Setup Navigating the Setup Settings Streaming Media Listening to Music Viewing Photos Watching Movies MyText Source Setup System Channel Support Lock Picture Network Audio Parental Control...

Page 3: ...d not be exposed to dripping or splashing Objects filled with liquids such as vases should not be placed on apparatus WARNING The batteries shall not be exposed to excessive heat such as sunshine fire...

Page 4: ...ries Install only new batteries of the same type in your product Failure to insert batteries in the correct polarity as indicated in the battery compartment may shorten the life of the batteries or ca...

Page 5: ...4 En PREPARATION What s Included TV Set MINI AV Cable MINI YPBPR Cable Quick Start Guide Quick Start Guide Remote Control with Batteries TV Stand Six Screws...

Page 6: ...nt input signal sources 3 MENU Display the main menu 4 CH Press to select a channel 5 VOL Press to adjust the volume 6 POWER Indicator Illuminate blue when the TV is turned on Illuminate red when the...

Page 7: ...onnect to the antenna 75 VHF UHF socket with the RF coaxial cable 8 USB Port Connect to a USB storage device to play compatible video audio photo and text files USB mode 9 OPTICAL Connect a digital so...

Page 8: ...Lay the TV face down on a flat cushioned surface to avoid damaging or scratching 2 Untighten the 6 pcs screws holding the stand assembly and remove them 3 Attach the wall mount bracket to the TV using...

Page 9: ...i page passage on screen in teletext ATV DTV mode 20 Reverse playback rapidly CANCEL To exit the teletext mode ATV DTV mode 21 Advance playback rapidly REVEAL Reveals hidden information such as the an...

Page 10: ...9 En CONNECTING EXTERNAL DEVICES Remarks Component AV is sharing with Audio in L R...

Page 11: ...to turn the TV on The red LED indicator will turn blue The first time you turn the TV on it will go into the Setup Wizard Press buttons to select your desired options and press OK to confirm Home Mode...

Page 12: ...ing the Setup Settings Press the MENU button to display the main menu Use buttons to select Setup menu and press or OK button to enter and then use to navigate and select the available menu CUSTOMIZIN...

Page 13: ...n to select the desired APP and press OK button to view Or press the hotkey on the remote control to enter the APP directly Netflix Enjoys TV shows movies streamed instantly over the Internet Toon Gog...

Page 14: ...up press button to display the selected music Listening to Music Note File format supported MP3 CUSTOMIZING TV SETTINGS Viewing Photos After entering Media use buttons to select Photos and press OK to...

Page 15: ...s OK to enter Then use buttons to navigate in the text folder to select the desired text press button to display the selected text CUSTOMIZING TV SETTINGS Watching Movies My Text TXT 123 txt abc txt t...

Page 16: ...n use to select the desired option among System Channel Support Lock Picture Network Audio Source Press the MENU button to display the main menu then use buttons to select the Source menu and press OK...

Page 17: ...iewing at home Store Mode For store demo the brightness is higher than home mode TTX Language Allows you to select your desired teletext language Transparency Select to turn On Off transparency functi...

Page 18: ...Allows you to select your preferences in the PVR File System First Time Setup Allows you to select the OSD language and the country where you will operate the TV the first time Then it will search au...

Page 19: ...t menu and then press OK button to view the built in user manual Support Read the User Manual carefully before using the TV and keep it for further reference USER MANUAL SE65UO01UK Signal Information...

Page 20: ...ct to lock the desired channels Parental Guide Allows you to set up blocking schemes to block specific channels and ratings Off 4 5 18 Hotel Setting Set the different options of hotel settings Backlig...

Page 21: ...Deactivate Netflix and clear the account information Deactivate VUDU Deactivate Vudu and clear the account information Netflix ESN Electronic Serial Number Tint Adjust the balance between red and gre...

Page 22: ...load completed it can upgrade automatically after users press the standby button Note This procedure is fully automatic and remember not to cut off the power Manual Upgrade After the TV connects to ne...

Page 23: ...ounds For User mode Balance Adjust the relative volume of the speaker in a multiple speaker system SPDIF Mode Select the digital audio output mode between PCM RAW Surround Sound Turn On Off to provide...

Page 24: ...u and submenus examples below Things to Consider before Setting up Parental Control Determine which rating you consider acceptable to the viewer For example if you choose TV PG more restrictive rating...

Page 25: ...en Considered suitable for children over 7 may contain fantasy violence scenes TV G General Audience Considered suitable for all audience children may watch unattended TV PG Parental Guidance Suggeste...

Page 26: ...that the batteries are installed with the correct polarity to to Install new batteries Power is suddenly turned off Check the power of the TV The power supply maybe interrupted Check if the sleep tim...

Page 27: ...elect the SET Password setting in the Lock menu then enter the following master password 8899 The master password clears your previous password and allows you to enter a new password There is a proble...

Page 28: ...o not place your TV in direct sunlight or near a heat source SPECIFICATION Panel Size 64 5 inch diagonally Display Type LED Panel Technology TFT Panel 60 Hz Vs 120 Hz 120 Hz Display Resolution 3840 x...

Page 29: ...ese symbols indicate that equipment with these symbols should not be disposed of as general household waste If you want to dispose of the product or battery please consider the collection systems or f...

Page 30: ...s MUST be presented to SEIKI or an authorized customer service provider in order to obtain the requested service Exclusions and Limitations This Warranty covers manufacturing defects in materials and...

Page 31: ...ng customer service please refer to https contactus netflix com help for alternative contact information YouTube You can browse the following website for more help https productforums google com forum...

Page 32: ...w seiki uk com 2016 Tongfang Global UK Co Ltd All rights reserved Service Hotline 0 345 658 8290 IMPORTER ADDRESS UNIT 1 KENFIG INDUSTRIAL ESTATE PORT TALBOT SA13 2PE UNITED KINGDOM COMPANY NO 0723077...

Reviews: