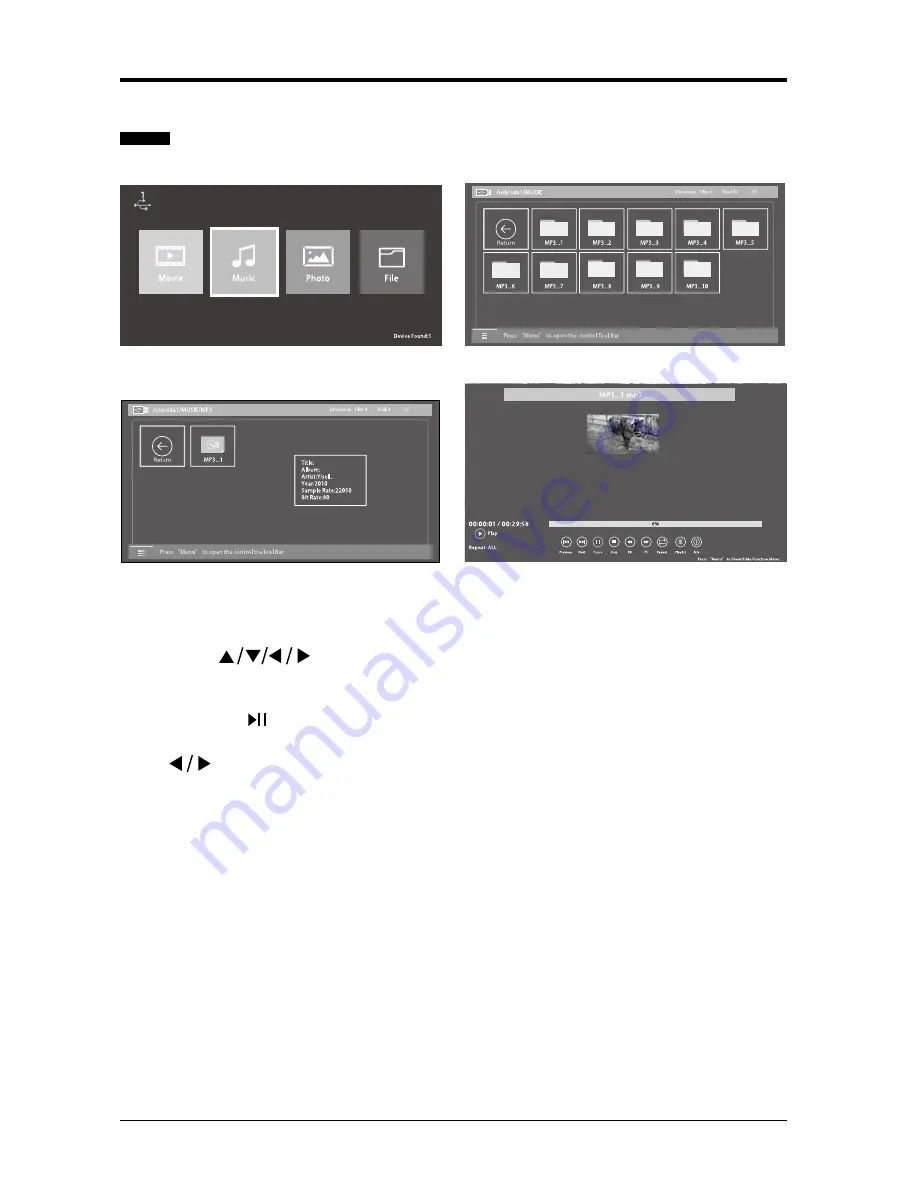
Seiki SE40FO04UK Instruction Manual Download Page 30

30

  Listening to Music

1. After entering 

MultiMedia

, press tubuttons to select 

Music

 and then use 

OK  


button to enter. 

2. Then use 

 buttons to navigate in the music folder and then select the  

    audio file to enter. 

    Note: when navigating in audio file, a thumbnail screen will appear. 

3. Press 

OK

 or     to enjoy the music in full screen. 

4. Press the 

OK

 button or the 

DISPLAY

 button to display the function bar. Press  

    the 

 buttons to select the function: PreviousNext / Pause / Stop / FB /  

    FF / Repeat / Playlist / Info.

ENTERTAINMENT

Summary of Contents for SE40FO04UK

Page 1: ...corded Programme 14 Picture 16 Sound 17 Channel 18 Lock 24 Time 25 Network 26 Setting 27 Entertainment 28 MultiMedia 28 Viewing Movies 29 Listening to Music 30 Viewing Photos 31 Files 32 Using the Fea...

Page 2: ...r or sold with the apparatus When a cart is used use caution when moving the cart apparatus combination to avoid injury from tip over Unplug this apparatus during lightning storms or when unused for l...

Page 3: ...not work normally Do not remove the safety covers There are no user serviceable parts inside Trying to service the unit yourself is dangerous and may invalidate the product s warranty Qualified perso...

Page 4: ...4 Remote Control with Batteries TV Set PREPARATION What is Included User Manual User Manual Quick Start Guide Quick Start Guide MINI YPBPR cable MINI AV cable Base Stand Stand Support Eleven Screws...

Page 5: ...ER Indicator Illuminate blue when the TV is turned on Illuminate red when the TV is in standby mode 3 VOL Press to adjust the volume 4 CH Press to select a channel 5 MENU Display the OSD on screen dis...

Page 6: ...xial cable 8 MINI YPBPR Connect to AV devices with component Y Pb Pr video and audio output sockets COMPONENT VIDEO share with AUDIO IN L R subscribe to 9 CI Slot Used to insert a CI card A CI card al...

Page 7: ...provided screws 3 Fix the stand assembly to the TV using the 5 provided screws 1 Lay the TV face down on a flat cushioned surface to avoid damaging or scratching 2 Untighten the 6 pcs screws holding t...

Page 8: ...esent scree n information such as the current channel and the input source 12 VOL Adjust the volume 13 CH Select a channel 14 SLEEP Set the TV sleep timer 15 NICAM Switch between different audio chann...

Page 9: ...9 Remote Control...

Page 10: ...cluded Headphones OR Video Camera Game Console Blu ray Player Recorder VCR Satellite Receiver Satellite Antenna Cable not included Cable not included not included SCART Cable not included MINI YPBPR C...

Page 11: ...ructions Connect the TV s mains cable into a wall socket and turn the power on if required In standby mode press the button on the main unit or on the remote control to turn the TV on The red LED indi...

Page 12: ...een Home Mode or Store Mode If you select to change to store mode a warning screen will appear asking if you want to leave home mode If you do press the button to continue Note Store Mode should only...

Page 13: ...he main unit or on the remote control to display the Input Source list Use the buttons to select the desired input source and press OK button to confirm Note Not all sources will be displayed when the...

Page 14: ...message will pop up Use the buttons to select either Yes or No and press the OK button to confirm To open the MultiMedia menu whilst using the TV press the MENU button on the main unit or on the remot...

Page 15: ...through the functions then press the OK when you have highlighted the one you require See over the page for a full list of the function bars list of functions Play Press to play the programme Previous...

Page 16: ...aylist Display a full list of recorded videos you can watch Info Shows information about the current programme you are watching Press the EXIT button to return to the previous menus Picture Press the...

Page 17: ...reas of the picture Colour Temp Choose between Standard Warm Cold The colour temp changes the amount of blue and red in your picture Aspect Ratio Choose to view the TV picture in various formats Choos...

Page 18: ...TV Select between PCM Auto Off AD Switch Audio Description is an auxiliary audio function that provides an additional audio track for visually impaired people This function handles the Audio Stream f...

Page 19: ...lect the Auto Tuning submenu and press the OK button to enter Select the tuning type using the buttons you can choose between DTV ATV DTV Analogue TV Country is preset as UK and can be changed CUSTOMI...

Page 20: ...ast Press the button to select Analogue Manual Tuning and press OK to enter Then use to select and adjust the desired option NOTE If the number about to save is the same as a channel that is already b...

Page 21: ...yed on the screen The menu will close and the tuned channel will be shown on your TV screen Channel Edit Press MENU button to enter CHANNEL and then press OK to enter Use buttons to select Channel Edi...

Page 22: ...e information Use the button to select CI Information from the menu then press the OK button to enter Press the buttons to select the items and press the OK button to confirm Press the EXIT button to...

Page 23: ...the mains Recorded List Use the button to select Recorded List from the menu and press the OK button to enter You can now see a full list of all of the programmes recorded on your USB drive You can in...

Page 24: ...wing a DTV channel Lock Press MENU button to display the main menu and select LOCK Press OK button to enter Use the 0 9 buttons to input 4 digit password to enter the LOCK menu NOTE the default passwo...

Page 25: ...ock menu and adjust settings Year Month Day Clock Off Time Automatically turn the TV off at a specified time and on specified days Use the buttons to choose between Off Once Everyday Mon Fri Mon Sat S...

Page 26: ...ant to operate the TV for a long period of time turn off the auto standby function Time zone This feature can only be used if Auto Sync is set to On Use to select the desired time zone the TV is being...

Page 27: ...ge is set as English Hearing Impaired Allows you to set hearing impaired function On Off Blue Screen Allows the blue background to turn On Off during weak or no signal conditions PVR File System Allow...

Page 28: ...to 15 CEC enabled devices that are connected through HDMI directly from one remote control Note CEC also allows for individual CEC enabled devices to command and control each other without your inter...

Page 29: ...press tubuttons to select Movies and then use OK button to enter 2 Then use buttons to navigate in the movie folder and then select the video file to enter Note when navigating in video file a thumbn...

Page 30: ...the music folder and then select the audio file to enter Note when navigating in audio file a thumbnail screen will appear 3 Press OK or to enjoy the music in full screen 4 Press the OK button or the...

Page 31: ...select the picture file to enter Note when navigating in picture file a thumbnail screen will appear 3 Press OK or to view the picture in full screen 4 Press the OK button or the DISPLAY button to di...

Page 32: ...navigate in the files folder When you find the music or photo file you want to view and press the OK button to enter You will now be taken automatically to the photo or music browser 3 See the instru...

Page 33: ...ok through all of the programmes available over the next 7 days by pressing the button to enter the programmes listings Use the buttons to scroll through the programmes a brief description will be sho...

Page 34: ...tion on the Teletext page and use buttons to select the programme you want to view in Home page How to use Fast Text At the bottom of the Teletext page there is a row of subject headings coloured in R...

Page 35: ...rogramme you are watching The Time Shift symbol will be displayed on screen showing that Time Shift is working When you wish to resume watching the programme press the button on the remote control to...

Page 36: ...m using the 0 to 9 buttons on the remote control Backward Select to move the recording backwards in 10 sections of the recording Forward Select to move the recording forwards in 10 sections of the rec...

Page 37: ...f you want to view the recording progress bar again press the button on the remote control When the programme has finished and you want to stop the recording simply press the button Note The recording...

Page 38: ...the remote control to open the Electronic Programme Guide menu Use the buttons to select the programme you want to record then press the RED button to open the Record menu Use the buttons to change t...

Page 39: ...wing all of your scheduled recordings You can use the colour buttons on the the remote control to change organise and delete items in the schedule list Press the EXIT button to close the menus Note Wh...

Page 40: ...UK models 170 862 MHz for EU models Transmission standard DVB T MPEG 2 Demodulation COFDM with 2K 8K FFT mode FEC all DVB modes Video MP ML PAL 4 3 16 9 Audio MPEG Layer I II 32 44 148kHz We apologise...

Page 41: ...power supply maybe interrupted Check if the sleep timer is set Check whether the Auto Standby is activated The video function does not work No picture No Sound Check whether the TV is switched on Try...

Page 42: ...just clock phase or H V position Screen colour is unstable or show a single colour Check the signal cable Reinstall the PC video card Maintenance Early malfunction can be prevented Careful and regular...

Page 43: ...se follow the local laws or regulations for disposal This symbol on the product or on its packaging means that your electrical and electronic device should be disposed of at the end of its service lif...

Page 44: ...rvice provider in order to obtain the requested service Exclusions and Limitations This Warranty covers manufacturing defects in materials and workmanship encountered in the normal non commercial use...

Reviews: